Setting up backup of information in the cloud Microsoft Azure Backup
This article contains instructions for setting up a backup of information to the Microsoft Azure Backup cloud encrypted using CryptoPro EFS, and access to this information on USB tokens and smart cards, for example, JaCarta produced by Aladdin RD .
Software "CryptoPro EFS" is designed to ensure the protection of confidential information when it is stored on a PC. Also, the CryptoPro EFS software is intended to be used in conjunction with the CryptoPro CSP SKPI version 3.0 (ZTYAI.00015-01 30 01) and CryptoPro Pro CSP version 3.6 (ZTYAI.00050-01 30 01) in Microsoft Windows XP / 2003 / Vista / 2008 / W7 / 2008 R2.
JaCarta USB tokens and smart cards are designed for strong authentication, electronic signatures and secure key storage and digital certificates.
In general, the essence of the implementation of two-factor authentication in the Microsoft Cloud is to increase confidence in the Microsoft cloud provider and the general level of security by providing single sign-on and implementing enhanced two-factor authentication on ALL cloud services and local resources using external devices - smart cards (or USB tokens) .
')
The EFS organization has three servers based on Windows Server 2012 R2:
Organization employees connect to RDS.EFS.LOCAL to access applications and store their working documents on it.
It is necessary to ensure the security of the data by encrypting them and making backups to the Microsoft Azure geo-distributed cloud storage. Access to data is provided by a private key that is securely stored on a USB token or smart card.

The CryptoPRO CSP software in this example should be set to:
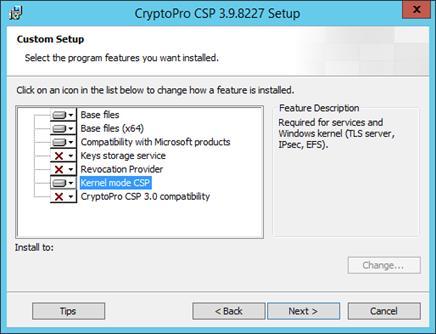
During installation, select the Custom type and select the Kernel mode CSP component for installation.
Install the JaCarta Unified Client software on all PCs and servers where smart cards are planned to be used.
Install with default parameters.
Install the CryptoPro EFS software (version no less than 1.0.1318) on the users PC and the remote desktop server.
Install with default parameters.
Installation should be done only after installing CryptoPro CSP .
In this example, 3 accounts and 2 groups are used. For the demonstration will need the following accounts.
Accounts:
Groups:
The EFSComputers group should include computers that will use EFS encryption using the GOST algorithm. In the present example, this will be RDS.EFS.LOCAL .
In this example, a simplified installation of a Certification Authority (hereinafter CA) is used using only the root CA.
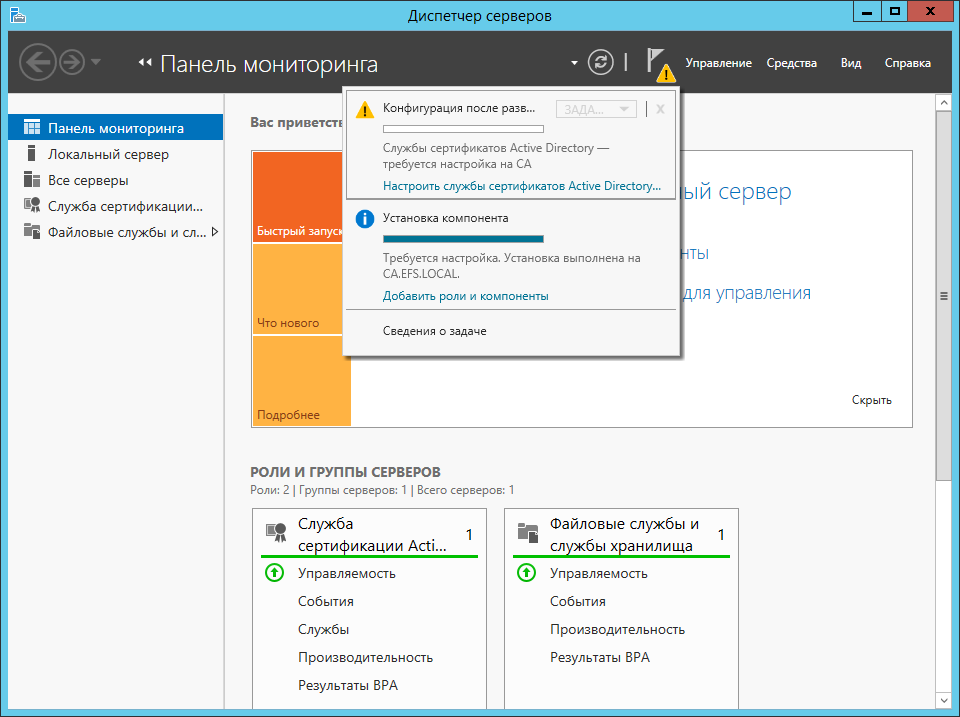
On the CA.EFS.LOCAL server , add the CA: Server Manager -> Manage -> Add Roles and Components role .
Using the Add Roles and Features Wizard, select the Active Directory Certificate Services role to install.
When choosing a role service, you must select a Certificate Authority .
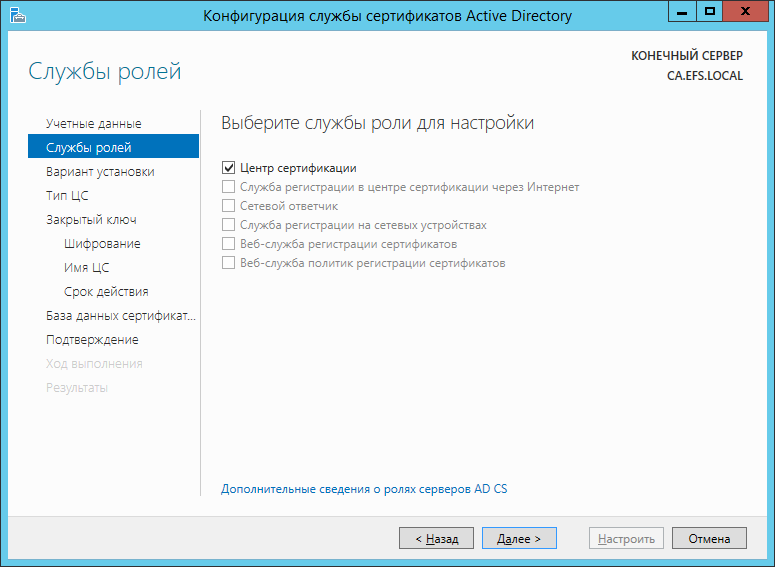
After the installation of the certificate service is complete, you need to configure it.
From the Server Manager, invoke the service configuration dialog.
After entering an arbitrary sequence to generate a key, the PIN code input dialog appears. Set a PIN for the ZK container.
Export the CA certificate to a file accessible to the domain controller. To do this, use the Certificates snap-in (local computer) .
Specify an arbitrary certificate name, for example, efs_root_ca.cer .
It is necessary to initialize three keys for users: DCAdmin, efsRA, K.Sobchak .
As a registration agent, in this example, the DCADmin account is used.
Log in by the user DCAdmin on CA.EFS.LOCAL and from the Certificates snap-in -> current user request the certificate GOST Registration Agent .
Use a smart card as a container (for DCADmin ).
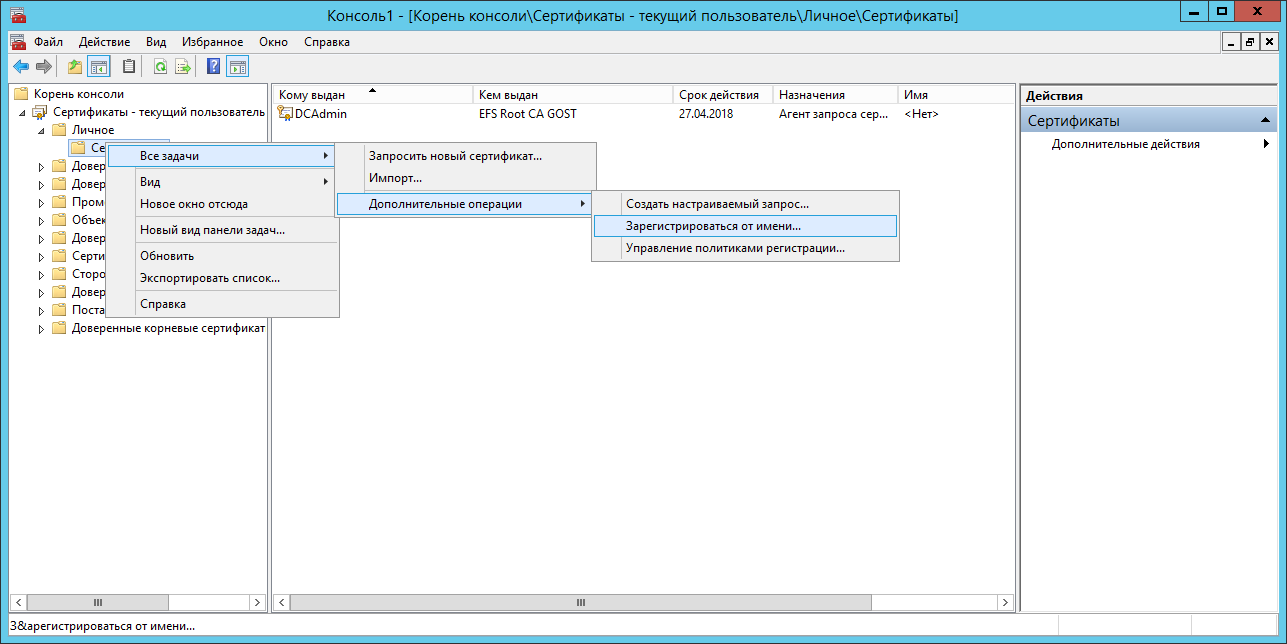
After the registration agent certificate is issued, it is possible to issue certificates for other users on behalf of DCADmin .
From under DCAdmin using the Certificates snap-in → current user, perform the certificate request GOST EFS Recovery Agent for the efsRA user.

Issue the certificate on a smart card designed for efsRA .
Export this certificate to a file.
Similarly, issue a certificate GOST Log with a smart card .
It is performed similarly to the previous one, it is only necessary to use GOST templates. Basic encryption and GOST. Logging on with a smart card .
And on the Certificates tab, uncheck Allow EFS to create self-signed certificates if the Certificate Authority is unavailable .
You must add a CA certificate to the list of trusted Certificate Authorities.
To do this, create a Trusted Certificates policy in the Computer Configuration → Policies → Windows Configuration → Security Settings → Public Key Policy → Trusted Root Certificate Authorities → Import section. Select certificate efr_root_ca.cer .
Issue the service self-signed certificate using the CryptoPRO EFS Management Console utility.
My certificates → All tasks → Create a self-signed certificate.
Next, export the certificate from the Certificates snap-in - the current user in two formats: with the export of the private key (.pfx) and without the export of the private key (.cer).
Import the certificate with the .pfx private key into the Personal Computer vault, and the certificate without the .cer private key into the Vault Trustees of the computer.
PIN code when importing leave blank.
You can now check file encryption on RDS.EFS.LOCAL . To do this, connect with a smart card to the RDS server.
In the Documents directory, create a file and encrypt it by setting Other → Encrypt content to protect data in the file properties.
Click the Details button. If everything went smoothly, the following window will appear.
To start a backup, you need to register a new repository with Azure.
To do this, go to http://manage.windowszure.com . Next, log in with your Microsoft account to the menu item Recovery Services . Go to NEW → Recovery Services → Backup Vault → Quick Create .

Specify the repository name, for example, efs-gost . And select a storage region, for example, North Europe .
After creating the store, download the credentials file and the Azure Backup client from the links provided.
Install the downloaded Azure Backup Agent with default settings. During the installation, if necessary, the missing components will be installed (.Net Framework, Powershell).
When installation is complete, click the Go to Registration button.
The following window will appear, select the credentials file you downloaded earlier.
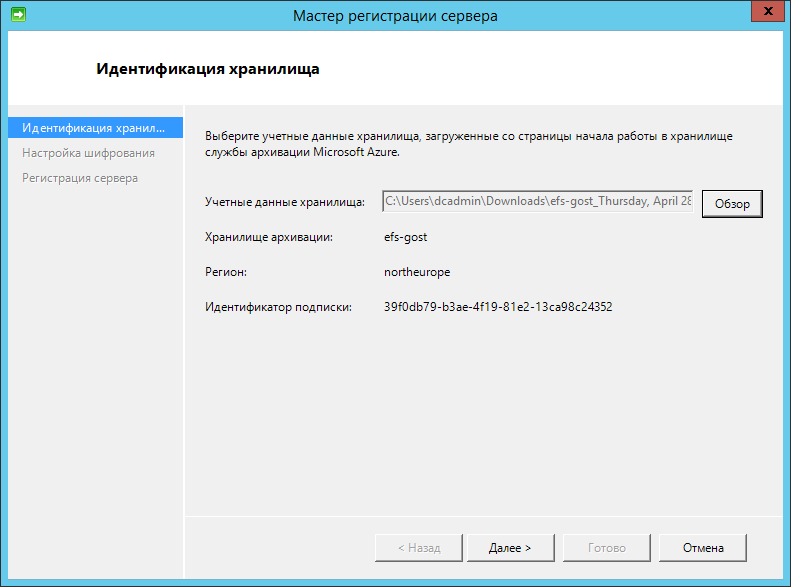
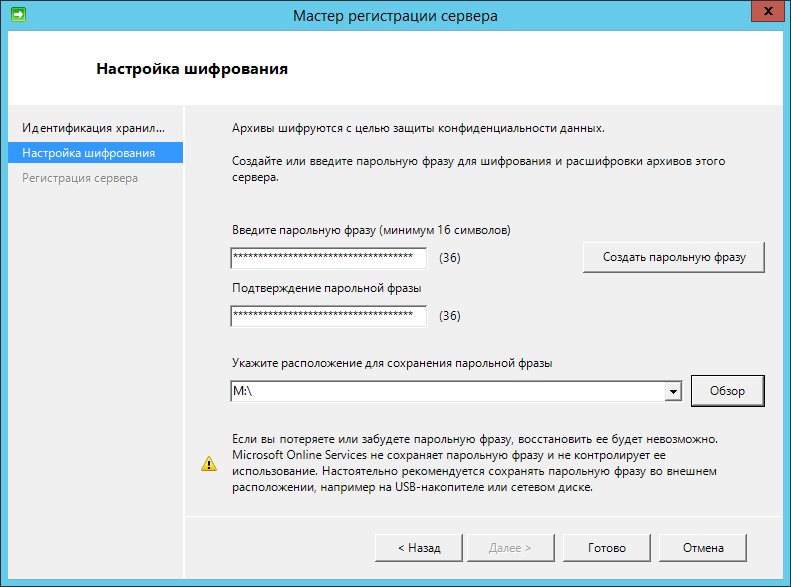
Create a password phrase and specify the path to its recovery file.
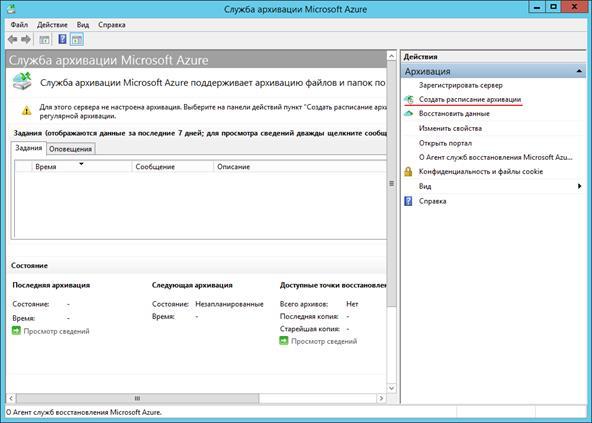
When registration is complete, the Microsoft Azure Backup Service window opens. Create an archiving schedule in it.
In the selection of items to archive, specify the folder with user profiles.

Leave the rest of the default settings.
To check the settings, click Run Instant Backup .
Restoration from a backup copy is similar.
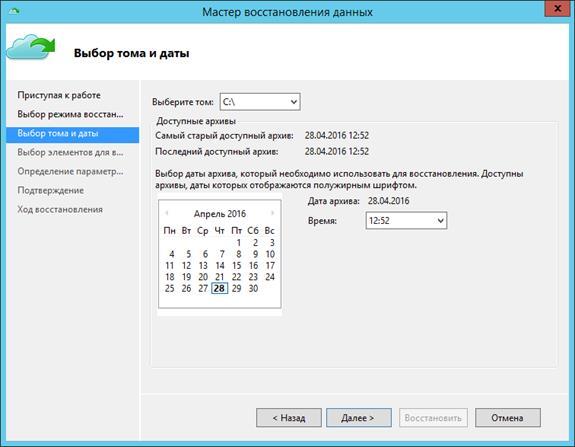
Call the data recovery dialog by clicking the Restore data button.
Select This server → Browse files → Select volume and image date and time .
Next, select the files to restore.
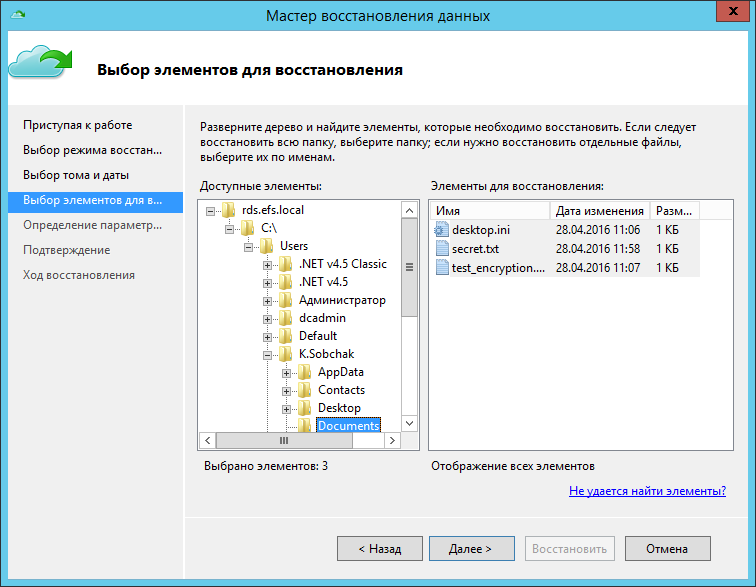
Select a location for the files to be restored.

The files can be scanned by the user who has encrypted them or using the efsRA recovery agent .
Software "CryptoPro EFS" is designed to ensure the protection of confidential information when it is stored on a PC. Also, the CryptoPro EFS software is intended to be used in conjunction with the CryptoPro CSP SKPI version 3.0 (ZTYAI.00015-01 30 01) and CryptoPro Pro CSP version 3.6 (ZTYAI.00050-01 30 01) in Microsoft Windows XP / 2003 / Vista / 2008 / W7 / 2008 R2.
JaCarta USB tokens and smart cards are designed for strong authentication, electronic signatures and secure key storage and digital certificates.
In general, the essence of the implementation of two-factor authentication in the Microsoft Cloud is to increase confidence in the Microsoft cloud provider and the general level of security by providing single sign-on and implementing enhanced two-factor authentication on ALL cloud services and local resources using external devices - smart cards (or USB tokens) .
')
Description of the demo infrastructure
The EFS organization has three servers based on Windows Server 2012 R2:
- DC.EFS.LOCAL - Active Directory Domain Controller;
- RDS.EFS.LOCAL - Remote Desktop Server;
- CA.EFS.LOCAL - Future Certification Authority and Certificate Authority.
Organization employees connect to RDS.EFS.LOCAL to access applications and store their working documents on it.
It is necessary to ensure the security of the data by encrypting them and making backups to the Microsoft Azure geo-distributed cloud storage. Access to data is provided by a private key that is securely stored on a USB token or smart card.
Install the necessary software
Installing CryptoPro CSP
The CryptoPRO CSP software in this example should be set to:
- domain controller DC.EFS.LOCAL;
- desktop server RDS.EFS.LOCAL;
- CA.EFS.LOCAL Certification Center server;
- PC.EFS.LOCAL client machines.
During installation, select the Custom type and select the Kernel mode CSP component for installation.
Installing JaCarta Single Client
Install the JaCarta Unified Client software on all PCs and servers where smart cards are planned to be used.
Install with default parameters.
Installing CryptoPro EFS
Install the CryptoPro EFS software (version no less than 1.0.1318) on the users PC and the remote desktop server.
Install with default parameters.
Installation should be done only after installing CryptoPro CSP .
Preparing accounts and groups
In this example, 3 accounts and 2 groups are used. For the demonstration will need the following accounts.
Accounts:
- DCAdmin - Enterprise Administrator Account;
- efsRA - EFS recovery agent account;
- K.Sobchak is an ordinary user account.
Groups:
- EFSUsers - users who will use EFS encryption;
- EFS Computers are computers on which EFS encryption will be enabled.
The EFSComputers group should include computers that will use EFS encryption using the GOST algorithm. In the present example, this will be RDS.EFS.LOCAL .
Configuring Certificate Authority
Installing the Certificate Authority Role
In this example, a simplified installation of a Certification Authority (hereinafter CA) is used using only the root CA.
On the CA.EFS.LOCAL server , add the CA: Server Manager -> Manage -> Add Roles and Components role .
Using the Add Roles and Features Wizard, select the Active Directory Certificate Services role to install.
When choosing a role service, you must select a Certificate Authority .
Configuring the CA service
After the installation of the certificate service is complete, you need to configure it.
From the Server Manager, invoke the service configuration dialog.
- Enter the credentials of a user who is a member of the Enterprise Admins group.
- As a service to configure, select a Certificate Authority .
- Specify the option to install the Certificate Authority - Enterprise CA.
- Specify the type of Certificate Authority - Root CA.
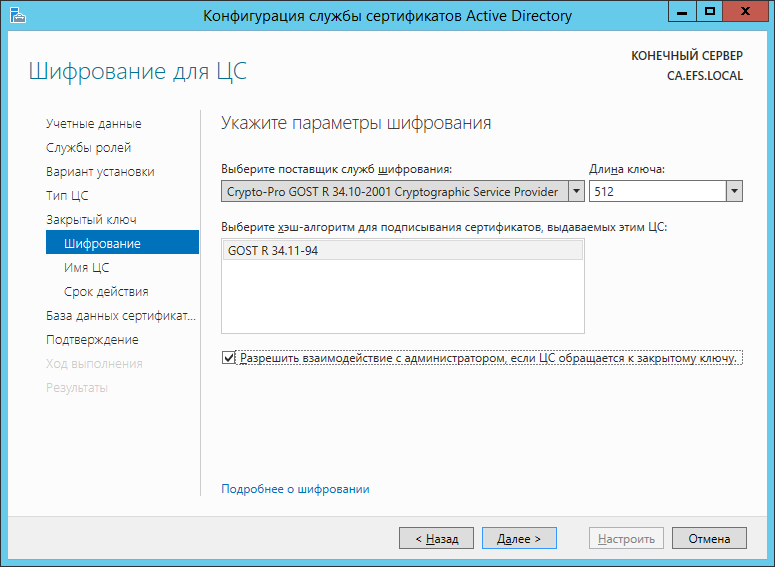
- Specify the type of the private key - Create a new private key .
- Set the encryption parameters as shown in the figure.
- The name of the CA can be left at the default.
- Set the expiration date - 5 years.
- The location of the databases can be left at the default.
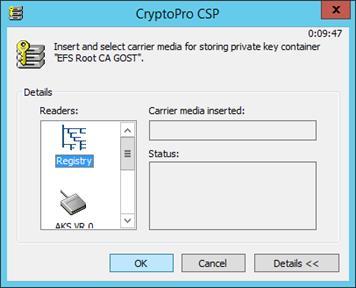
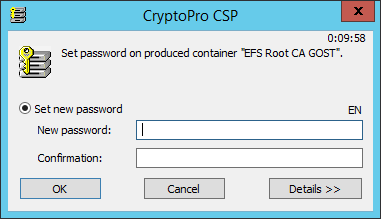
- Click the Customize button . Next, you will be asked to select the location of the private key container (hereinafter referred to as LC).
- Select Registry .
After entering an arbitrary sequence to generate a key, the PIN code input dialog appears. Set a PIN for the ZK container.
- The initial configuration of the CA is over.
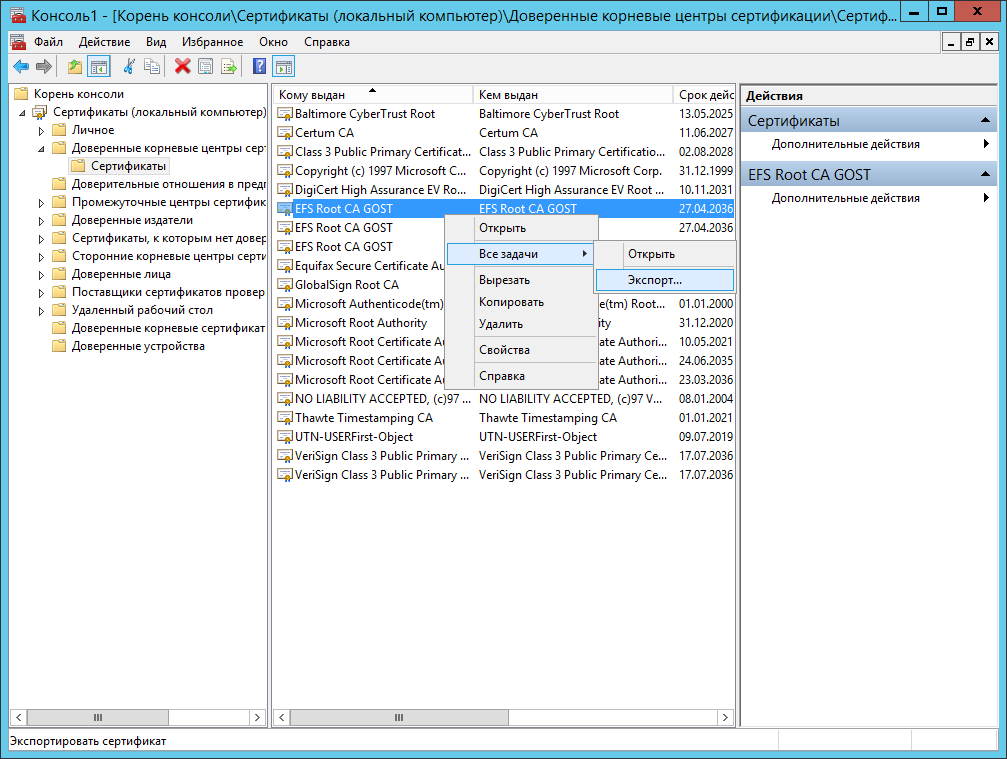
CA Certificate Export
Export the CA certificate to a file accessible to the domain controller. To do this, use the Certificates snap-in (local computer) .
Specify an arbitrary certificate name, for example, efs_root_ca.cer .
Configuring Certificate Templates
- Open the Certificate Authority snap-in from Server Manager -> Tools .
- Next Certificate Templates → Action → Manage .
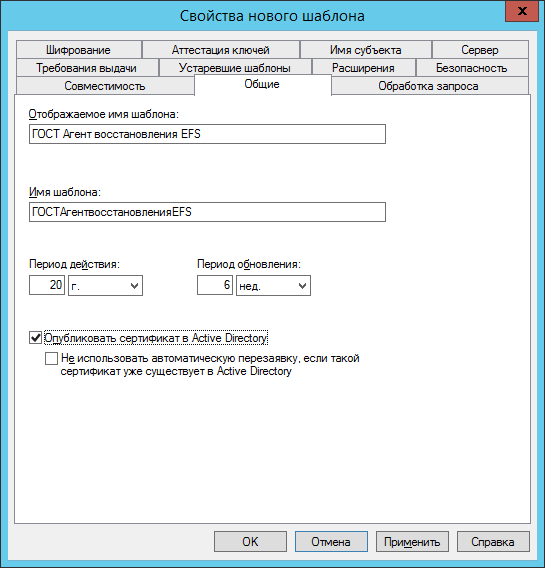
- Copy the EFS Recovery Agent template, in the appeared window rename the Template display name field.
- Check the Publish certificate in Active Directory checkbox.
- On the Request Processing tab, uncheck Allow to export the private key .
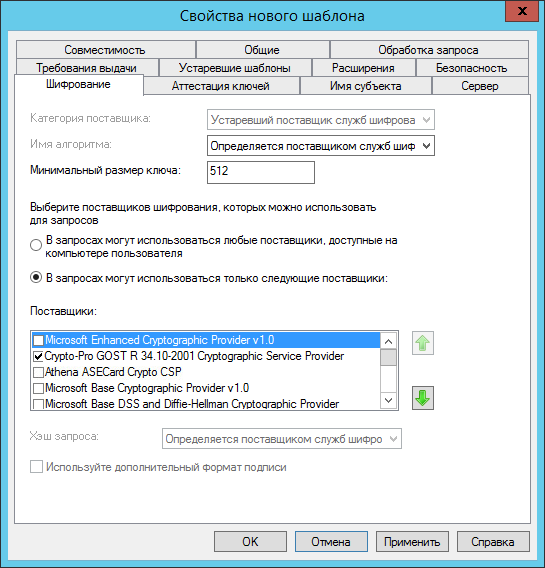
- On the Encryption tab, set the parameters as shown in the figure.
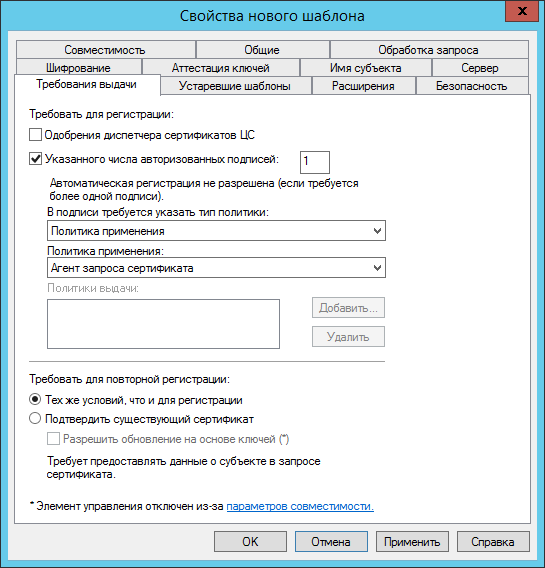
- On the Issue Requirements tab, set the following settings.
- On the Security tab , add a user who will give the keys to other users.
- Allow this user to Read, Write and Apply .
- Similarly, the configuration of the Basic Encryption EFS, Login with Smart Card and Registration Agent is performed.
Template Publishing
- In the list of certificate templates, delete the EFS Recovery Agent templates and Basic EFS Encryption.
- Instead, add the templates you just created: Certificate templates -> Action → Create → Issued certificate template.
Initialization and release of keys
Key Initialization Procedure
It is necessary to initialize three keys for users: DCAdmin, efsRA, K.Sobchak .
Certificate Registration Agent Issue
As a registration agent, in this example, the DCADmin account is used.
Log in by the user DCAdmin on CA.EFS.LOCAL and from the Certificates snap-in -> current user request the certificate GOST Registration Agent .
Use a smart card as a container (for DCADmin ).
After the registration agent certificate is issued, it is possible to issue certificates for other users on behalf of DCADmin .
EFS Recovery Agent Certificate Issue
From under DCAdmin using the Certificates snap-in → current user, perform the certificate request GOST EFS Recovery Agent for the efsRA user.
Issue the certificate on a smart card designed for efsRA .
Export this certificate to a file.
Similarly, issue a certificate GOST Log with a smart card .
Issue of a User Certificate
It is performed similarly to the previous one, it is only necessary to use GOST templates. Basic encryption and GOST. Logging on with a smart card .
Group Policy Settings
Configuring a Recovery Agent
- Create an EFS Encryption Policy group policy applied to the EFSComputers group.
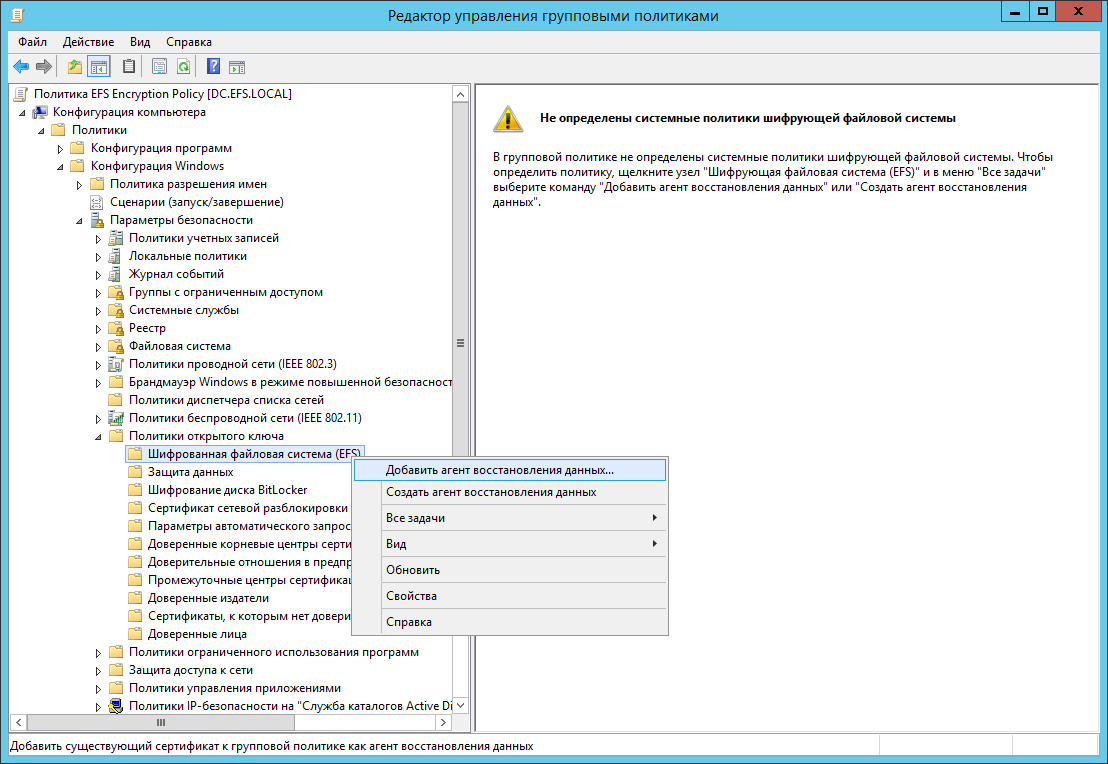
- In computer policy, Windows Configuration → Security Settings → Public Key Policies → Encrypted File System EFS → Add Data Recovery Agent .
- Add certificate efsra.cer .
- In the Encrypted File System (EFS) properties, on the General tab , check Enable File Encryption Using Encrypting File System (EFS).
And on the Certificates tab, uncheck Allow EFS to create self-signed certificates if the Certificate Authority is unavailable .
Adding a CA certificate to the trust store
You must add a CA certificate to the list of trusted Certificate Authorities.
To do this, create a Trusted Certificates policy in the Computer Configuration → Policies → Windows Configuration → Security Settings → Public Key Policy → Trusted Root Certificate Authorities → Import section. Select certificate efr_root_ca.cer .
RDS server setup
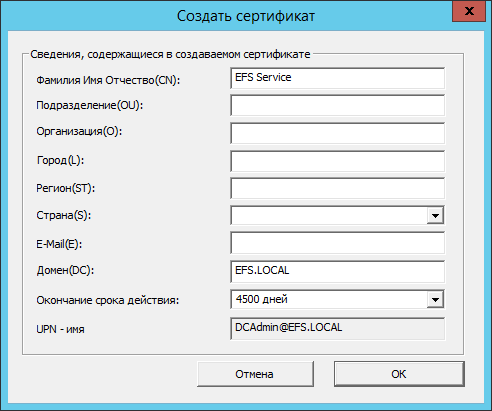
Issue the service self-signed certificate using the CryptoPRO EFS Management Console utility.
My certificates → All tasks → Create a self-signed certificate.
Next, export the certificate from the Certificates snap-in - the current user in two formats: with the export of the private key (.pfx) and without the export of the private key (.cer).
Import the certificate with the .pfx private key into the Personal Computer vault, and the certificate without the .cer private key into the Vault Trustees of the computer.
PIN code when importing leave blank.
File Encryption
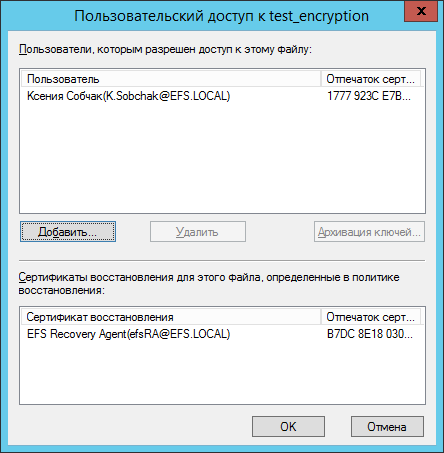
You can now check file encryption on RDS.EFS.LOCAL . To do this, connect with a smart card to the RDS server.
In the Documents directory, create a file and encrypt it by setting Other → Encrypt content to protect data in the file properties.
Click the Details button. If everything went smoothly, the following window will appear.
Configure Azure Cloud Backup
Register Azure Storage
To start a backup, you need to register a new repository with Azure.
To do this, go to http://manage.windowszure.com . Next, log in with your Microsoft account to the menu item Recovery Services . Go to NEW → Recovery Services → Backup Vault → Quick Create .
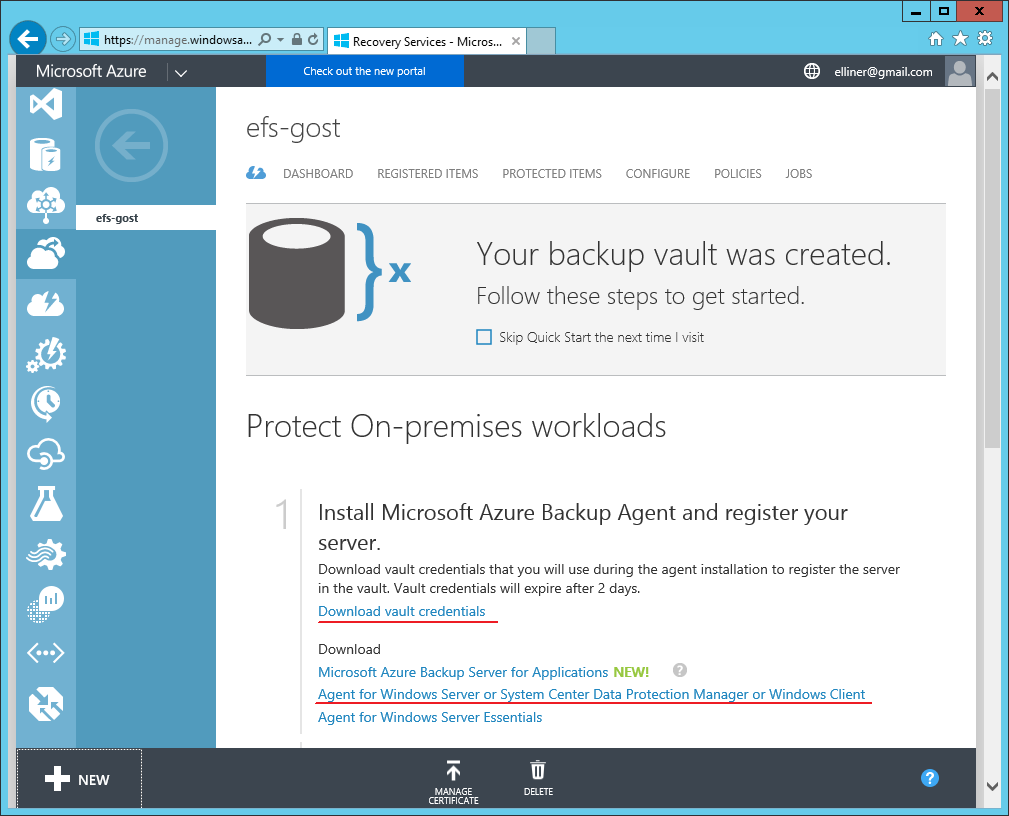
Specify the repository name, for example, efs-gost . And select a storage region, for example, North Europe .
After creating the store, download the credentials file and the Azure Backup client from the links provided.
Install Azure Backup Agent
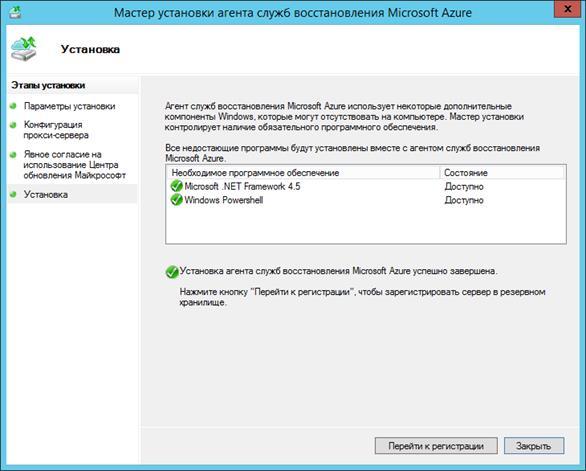
Install the downloaded Azure Backup Agent with default settings. During the installation, if necessary, the missing components will be installed (.Net Framework, Powershell).
When installation is complete, click the Go to Registration button.
The following window will appear, select the credentials file you downloaded earlier.
Create a password phrase and specify the path to its recovery file.
Backup Schedule Setup
When registration is complete, the Microsoft Azure Backup Service window opens. Create an archiving schedule in it.
In the selection of items to archive, specify the folder with user profiles.
Leave the rest of the default settings.
To check the settings, click Run Instant Backup .
Data recovery
Restoration from a backup copy is similar.
Call the data recovery dialog by clicking the Restore data button.
Select This server → Browse files → Select volume and image date and time .
Next, select the files to restore.
Select a location for the files to be restored.
The files can be scanned by the user who has encrypted them or using the efsRA recovery agent .
Source: https://habr.com/ru/post/325734/
All Articles