Huawei USG 6300. Basic firewall configuration out of the box
The idea to write this article arose after I tried to find at least some information on setting up Huawei firewalls on the Internet. In the Russian-speaking segment, I did not find anything, in the English-speaking, mostly outdated data on previous models and references to documentation (which, by the way, is on the manufacturer’s website in the public domain and quite detailed).
If you have experience working with firewalls from other vendors, the documentation should be enough to run and work with Huawei USG, but I know from experience that manuals are being used when all options have been tried. Therefore, one of the goals of this article is to save time during the initial commissioning of this relatively new equipment. Of course, in one article it will not be possible to cover all the functionality, however, the main initial cases for setting up here will be considered. Engineers can use the article as a cheat sheet for installing network equipment, since the basic settings that will be described here will usually have to be done in all installations.

A source
The article will not compare with competitors and generally a minimum of marketing, it will be a story about administration. I will only mention that the main competitors of Huawei USG are Cisco ASA, CheckPoint, FortiNet and others. Possibly, the recent interest in Chinese equipment, in particular, in information security equipment, is probably related to the topic of "import substitution" of the above American vendors.
')
Huawei USG - a new generation of information protection devices, or the so-called NGFW (Next Generation FireWall). Unlike previous generation protection tools, NGFW is able to perform deep packet analysis (up to L7), inspect traffic at the application level, has integrated IPS, and can also interact with other similar devices, receiving information from them about potential attacks directed in its direction. . It also has a simple DLP mechanism (detection of information leaks).
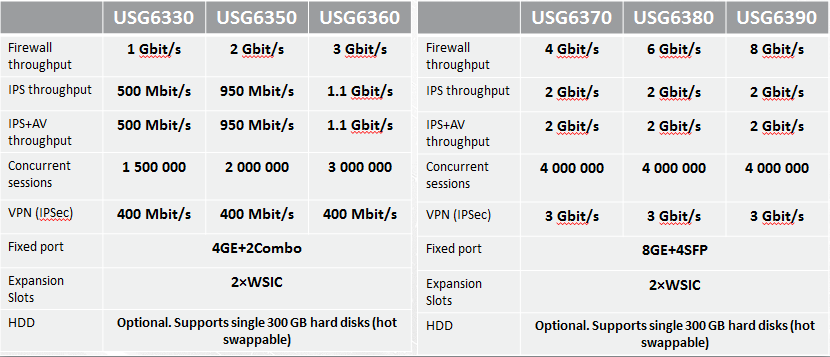
The USG 6300 series is the youngest series of devices targeted at small and medium businesses. Brief specifications are shown in the table below.
The 6300 Series devices listed in the table are designed for 19-inch rack mounting. When writing this article, the device used Huawei USG 6320, made in the desktop version:

The main difference between the Huawei USG6320 and the rack-mount versions of this series is that you cannot put a hard disk into it, which is mainly used to keep logs and generate reports based on the device from the WEB interface. Otherwise, all devices in the series (and even the older 6600 series) run under the same VRP operating system. That is, at least at the time of writing this article, the “firmware” file for the 6300 and 6600 series is the same.
Connect to the console port with standard parameters (9600 baud, no parity), turn on the power and start the download:
At the very beginning of the download, just in case, I will reset the device to the factory settings. Also, this step will be useful to you if you are dealing with a non-new device that has already been configured, and the password to the console is not known.
In order to enter the BootRom menu, you need to press Ctrl + B at the initial stage of loading. The default password for logging into BootRom on most Huawei network devices: O & m15213 (the first letter is O, not zero). This is what the main menu of BootRom looks like:
Select menu item 6 to reset to factory settings and then menu item 0 to reboot.
After the download is complete, the device will prompt you to enter a login and password to control through the console port. Since we returned to the factory settings, the default login and password to the console will be:
The Huawei USG command line is very similar to the Cisco command line with the exception of small nuances. Cisco has three CLI command modes:
Unlike Cisco, the command line of Huawei network equipment (not only USG, but also switches and routers) consists of two modes:
System view mode combines privileged mode and global configuration mode.
A few more differences:
Thus, a review of the current working configuration (for Cisco this show runn) in Huawei will be:
Just as in the CLI, Cisco does not have to enter the entire command. If part of the command is sufficient for recognition, the command will be accepted, or you can use TAB to add.
The first step is to determine which version of the VRP OS currently controls the device, and if this is not the latest version, then you should install the latest one. Check the version of the OS VRP can command
Cisco has a similar team
Checking:
In this case, the version of OS VRP: V100R001C30SPC600PWE. That is, version 100, release 001, podrelyz 30, service pack 600. Also pay attention to the PWE suffix - this stands for Payload without encryption, i.e. Our version of the software, besides being very old, besides, will not yet support strong encryption.
The current software version (as of March 2017) is v500-1001c30spc100.
There is no point in starting to configure this device with the old software version. First, the current V500 has even changed part of the CLI, the syntax of some commands has changed, including commands related to security policy.
Secondly, the lack of strong encryption (namely, with this version of the software, the device will be shipped to Russia to simplify the import), I think, not many will do.
Therefore, the first step is to upgrade the VRP Huawei USG software to the latest version at the moment. You can download it from the manufacturer’s website, if your login has the corresponding rights (as a rule, they are given to Huawei partners). If the latest software version is not available to you (you will see it on the site in any case, but you will not be able to download it), you should contact the company through which your equipment is delivered or to the Russian-speaking support of Huawei.
I downloaded the file USG6000V500R001C30SPC100.bin VRP software from the site and put it in the folder of my TFTP server with the address 172.31.31.250.
I connected the lowest port of Huawei USG to my local network 172.31.31.0 / 24 in order to download the new file with the software via the TFTP protocol to it. But for this you need to register an IP address from the network. We do this as follows:
The address is registered. But at the same time, it turns out that our tftp server is not pinged with USG. All this is because the default security policy on the USG is enabled and the default action is deny, i.e. to ban. To speed up the initial settings, I suggest that you make the default rule, permit, and until the device is released to the Internet, this will not pose a threat to it. At the same time, it will greatly simplify the initial setup:
Check the reachability of the TFTP server:
After that, we will load the new version of the software from the TFTP server into flash memory using the command:
Next, you need to tell the loader that after rebooting, you need to download the software from this image, and not from what we have loaded, for this we give the command:
Let us check that with the next boot the device will boot with the version of software we need:
After that we save the configuration and reboot the device:
After reboot, check the current software version:
As you can see, our version is now the freshest. From this point on, you can begin to tune the hardware.
Next, configure SSH for remote control, since HTTPS control is enabled by default.
We will enable the ability to control using ssh service on all interfaces that will participate in our work. Let GigabitEthernet0 / 0/7 be the WAN interface with public IP, and GigabitEthernet0 / 0/1 will be the LAN interface with the 192.168.200.0 / 24 network:
By default, four firewall zones with targeted priorities (in parentheses) are created in Huawei USG: local (100), dmz (50), trust (85), untrust (5). Everything is very similar to how it is done in Cisco ASA - users in the same zone have the same security attributes. Below is described in more detail the mechanism of the work of security zones, but for now just define the newly configured interfaces into the corresponding zones:
Next, configure the default gateway:
Configure the VTY interface to support AAA:
Create a userssh user who can manage the device via SSH:
We generate a local rsa key pair:
Enable Secure Telnet (SSH) service:
Configure userssh as an SSH administrator.
At this point, it is possible to consider the initial configuration completed and connect the cables of the external Internet and local network to the corresponding configured interfaces.
I prefer to make basic settings and upgrade of the operating system from the command line, like most other configurations. Nevertheless, much (not everything) could be done through the Web interface, which, in my opinion, is very well implemented, does not require Java or a client program (such as ASDM for Cisco ASA). Yes, and security policies, it seems to me, are much clearer and easier to create through a Web interface.
By default, a web interface is enabled on the device and enabled on the Management port — on port devices, this port is separate, and in our case, by default, this port in USG6320 is the youngest on board, the one we used to update the software. By default, the Management port is assigned IP 192.168.0.1 / 24, all types of services are enabled, and DHCP is enabled, so for opponents of the command line, you can use the WEB interface from the very beginning, knowing these default settings. They look like this:
The port for management via https is 8443, and since we changed the address on the port a little earlier to 172.31.31.86, we’ll access the device from any browser as follows:
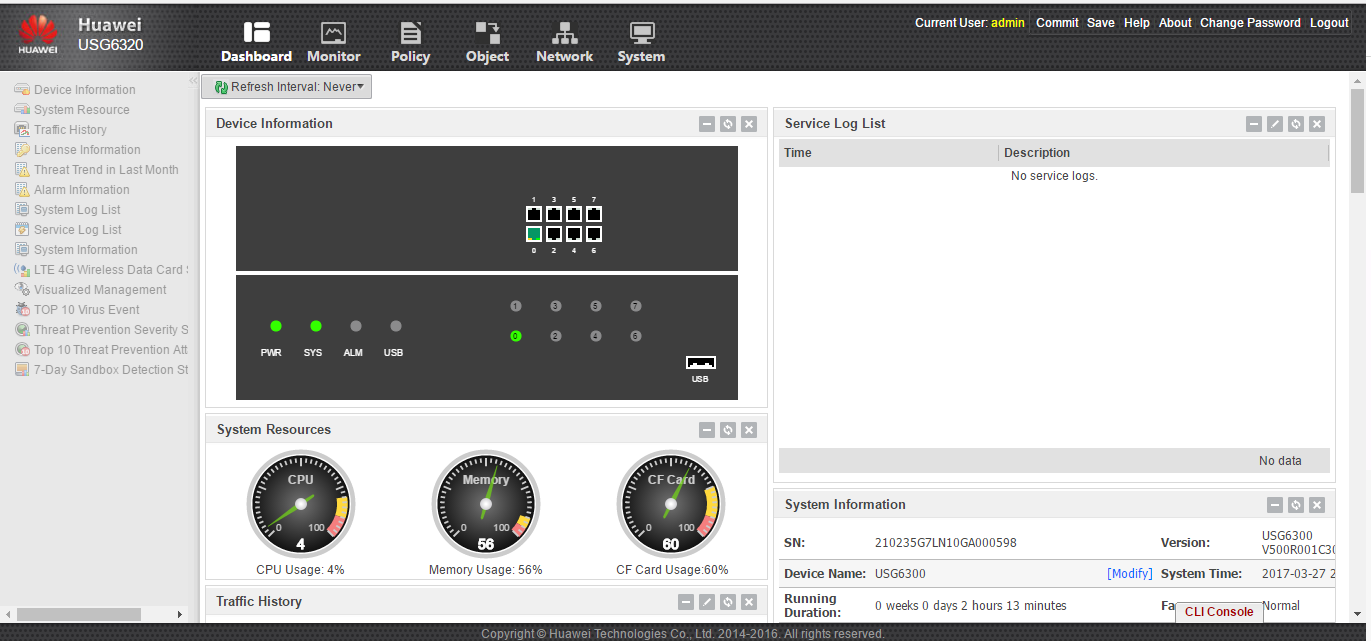
Huawei USG web interface Dashboard tab
First of all, you need to download purchased licenses in the System -> License Management section:

You can also use trial licenses by selecting the appropriate item with the following restrictions:
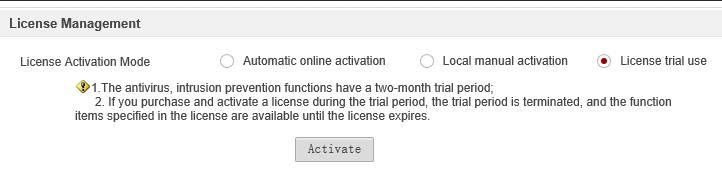
Trial anti-virus and IPS subscriptions have a period of 2 months:
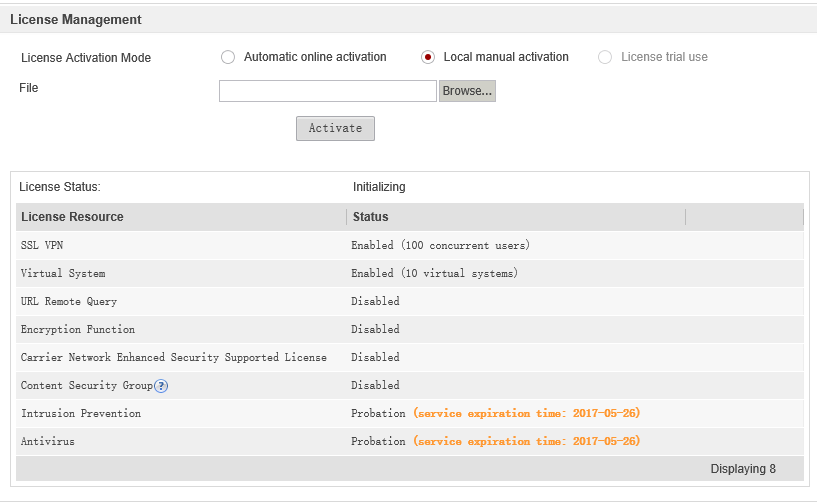
Or, if you select Local manual activation, we substitute the generated file with the dat extension with the license, and our purchased licenses are activated:
Next, I propose to configure the device to access the Internet and update signatures via the Internet. Before proceeding with the settings, we briefly explain the mechanism of the security zones in the Huawei USG.
As stated above, four security zones are configured by default:
You can change the priorities of zones, as well as add new zones, if necessary. This applies to all zones except local — its priority cannot be changed, and no interface can be added to it.
Data flows within the same security zone are trusted and do not require security policy settings. If we need to configure the flow of data from one zone to another, then we will need to configure the security policy, taking into account the direction of traffic according to the following rules.
The direction of traffic is determined by the direction of the first packet.
Let me remind you that we have already configured the interfaces and connected to GigabitEhternet0 / 0/7 cable from the provider, and to GigabitEthernet0 / 0/1 cable from our local network. If you try to ping something outside (untrust zone) directly from our device (local zone), then we will see the following picture:
All packets are lost, although the default route is configured and the device is connected to the provider. In a situation like this, a regular router would get the ICMP response back and the picture would be different. But in our case, the security zones mechanism described above works, and there is an initiation of data flow from a zone with a priority of 100 (local) to a zone with a priority of 5 (untrust), so we need to configure the outbound security policy to allow walking in both directions. If the outgoing policy is applied to traffic in the direction of LOCAL → UNTRUST, our device will create a new entry in the session table after each initiation of a new session in this direction. The entry will contain the outgoing and destination IP addresses, the corresponding port numbers and the protocol type.
If the packets exchanged by the client from the LOCAL zone and the server in the Untrust zone correspond to the entries in the session table, the firewall processes the packets based on the outgoing security policy without re-checking the direction of packet transmission. That is, in our case, we should receive ICMP ECHO from the address 8.8.8.8.
Configure the policy in the Policy section by clicking the Add button with the name policy_to_Inet:
After applying the policy, we will check its performance by running a ping to the address 8.8.8.8 of our device:
In the System → Update Center section, we will try to update the IPS and antivirus signatures by clicking Update immediately opposite, for example, Antivirus Signature Database:

After some time in the Status column, we can see that the database download failed because the domain name of the update server (sec.huawei.com) could not be resolved. Indeed, in order for the names to be resolved, you need to register the DNS server in the Network -> DNS section by clicking the Add button:

After registering the DNS server, everything turned out:
After that, all signatures will be updated according to their time in the Scheduled Update Time section, in this case every day at 6:38 in the morning.
Configure the Internet access for the local network 192.168.200.0 / 24 (our trust zone) using PAT. Since in this case the direction of traffic will be from a zone with a higher priority (trust) towards the zone, a lower priority (untrust), you need to configure outbound policy security. Here is exactly the same rule as we already did for the local zone. You can configure a new rule, or you can, if all the other parameters are the same, add another Source Zone to the already created policy_to_Inet, in our case trust:
In the Content Security section, add the default preset profile to the Antivirus subsection and the strict profile to the Intrusion Preventions subsection.
Then we will create a NAT policy for the trust zone to access the Internet, “masquerading” with the external IP address:
After that, users from the network 192.168.200.0 / 24 will be able to access the Internet.
The basic setting of Huawei USG can be considered complete. The software of the VRP device has been upgraded to the latest version, SSH has been configured for remote management via the command line, setting up update of signatures over the Internet, and access to the Internet for users from the trusted zone.
Once again, it is worth noting a very good configuration guide (the HUAWEI USG6000 & USG9500 V500R001C30SPC200 & NGFW Module V500R002C00SPC200 Product Documentation was used in this article. In addition to the described functions, I configured IPsec site-to-site tunnels, SSL VPN for connecting remote users, integration with Microsoft Active Directory for authorizing remote SSL-VPN users and Single Sign On for domain users (accessing the Internet for domain users without additional authorization) and other.
I hope this article will be useful for those who consider as a UTM / NGFW / Firewall device to replace similar devices known American vendors.
If you have experience working with firewalls from other vendors, the documentation should be enough to run and work with Huawei USG, but I know from experience that manuals are being used when all options have been tried. Therefore, one of the goals of this article is to save time during the initial commissioning of this relatively new equipment. Of course, in one article it will not be possible to cover all the functionality, however, the main initial cases for setting up here will be considered. Engineers can use the article as a cheat sheet for installing network equipment, since the basic settings that will be described here will usually have to be done in all installations.
A source
The article will not compare with competitors and generally a minimum of marketing, it will be a story about administration. I will only mention that the main competitors of Huawei USG are Cisco ASA, CheckPoint, FortiNet and others. Possibly, the recent interest in Chinese equipment, in particular, in information security equipment, is probably related to the topic of "import substitution" of the above American vendors.
')
Huawei USG rulers and brief specifications
Huawei USG - a new generation of information protection devices, or the so-called NGFW (Next Generation FireWall). Unlike previous generation protection tools, NGFW is able to perform deep packet analysis (up to L7), inspect traffic at the application level, has integrated IPS, and can also interact with other similar devices, receiving information from them about potential attacks directed in its direction. . It also has a simple DLP mechanism (detection of information leaks).
The USG 6300 series is the youngest series of devices targeted at small and medium businesses. Brief specifications are shown in the table below.
The 6300 Series devices listed in the table are designed for 19-inch rack mounting. When writing this article, the device used Huawei USG 6320, made in the desktop version:
Its brief characteristics are as follows:
Interfaces: 8GE
Power: AC Adapter
Firewall throughput: 2 Gbit / s
IPS throughput: 700 Mbit / s
IPS + AV throughput: 700 Mbit / s
Concurrent sessions: 500,000
VPN Throughput (IPSec): 400Mbit / s
The main difference between the Huawei USG6320 and the rack-mount versions of this series is that you cannot put a hard disk into it, which is mainly used to keep logs and generate reports based on the device from the WEB interface. Otherwise, all devices in the series (and even the older 6600 series) run under the same VRP operating system. That is, at least at the time of writing this article, the “firmware” file for the 6300 and 6600 series is the same.
First turn on the device
Connect to the console port with standard parameters (9600 baud, no parity), turn on the power and start the download:
*********************************************************** * * * NGFW * * * *********************************************************** Base Bootrom Ver : 060 Dec 4 2015 06:55:42 Extended Bootrom Ver : 060 Dec 4 2015 07:00:34 CPLD BigVer : 02 CPLD SmlVer : 00 2015-03-19 PCB Ver : SUE1MPUB REV A BOM Ver : 000 CPU L2 Cache : 2048 KB CPU Core Frequency : 1000 MHz BUS Frequency : 600 MHz Mem Size : 2048 MB Press Ctrl+B to enter main menu... At the very beginning of the download, just in case, I will reset the device to the factory settings. Also, this step will be useful to you if you are dealing with a non-new device that has already been configured, and the password to the console is not known.
In order to enter the BootRom menu, you need to press Ctrl + B at the initial stage of loading. The default password for logging into BootRom on most Huawei network devices: O & m15213 (the first letter is O, not zero). This is what the main menu of BootRom looks like:
====================< Extend Main Menu >==================== | <1> Boot System | | <2> Set Startup Application Software and Configuration | | <3> File Management Menu... | | <4> Load and Upgrade Menu... | | <5> Modify Bootrom Password | | <6> Reset Factory Configuration | | <0> Reboot | | ---------------------------------------------------------| | Press Ctrl+T to Enter Manufacture Test Menu... | | Press Ctrl+Z to Enter Diagnose Menu... | ============================================================ Enter your choice(0-6): Select menu item 6 to reset to factory settings and then menu item 0 to reboot.
After the download is complete, the device will prompt you to enter a login and password to control through the console port. Since we returned to the factory settings, the default login and password to the console will be:
Login: admin Password: Admin@123 Command Line Huawei USG
The Huawei USG command line is very similar to the Cisco command line with the exception of small nuances. Cisco has three CLI command modes:
- user mode (> icon);
- privileged mode (# sign, enable input by command);
- global configuration mode (input by configure terminal command from privileged mode).
Unlike Cisco, the command line of Huawei network equipment (not only USG, but also switches and routers) consists of two modes:
- user mode (also the> icon);
- System view (icon #, system-view input from user mode).
System view mode combines privileged mode and global configuration mode.
A few more differences:
- Cisco's show command is similar to the display command in Huawei's VRP OS;
- Cisco's no command is similar to Huawei's undo.
Thus, a review of the current working configuration (for Cisco this show runn) in Huawei will be:
display current-configuration Just as in the CLI, Cisco does not have to enter the entire command. If part of the command is sufficient for recognition, the command will be accepted, or you can use TAB to add.
The first step is to determine which version of the VRP OS currently controls the device, and if this is not the latest version, then you should install the latest one. Check the version of the OS VRP can command
display version Cisco has a similar team
show version Checking:
<USG6300>display version 17:02:50 2017/03/27 Huawei Versatile Security Platform Software Software Version: USG6300 V100R001C30SPC600PWE (VRP (R) Software, Version 5.30) Copyright (C) 2014-2016 Huawei Technologies Co., Ltd.. USG6320 uptime is 0 week, 0 day, 0 hour, 2 minutes Engine Version : V200R001C10 AV Signature Database Version : IPS Signature Database Version : IPS Engine Version : V200R001C10SPC352 SA Signature Database Version : 2015121601 Location Signature Database Version : 2015020515 RPU's Version Information: 2048M bytes SDRAM 16M bytes FLASH 1024M bytes CFCARD 1024K bytes SRAM PCB Version : VER.A CPLD Version : 200 Base Bootrom Version : 060 Dec 4 2015 06:55:42 Extended Bootrom Version : 060 Dec 4 2015 07:00:34 In this case, the version of OS VRP: V100R001C30SPC600PWE. That is, version 100, release 001, podrelyz 30, service pack 600. Also pay attention to the PWE suffix - this stands for Payload without encryption, i.e. Our version of the software, besides being very old, besides, will not yet support strong encryption.
Device software update
The current software version (as of March 2017) is v500-1001c30spc100.
There is no point in starting to configure this device with the old software version. First, the current V500 has even changed part of the CLI, the syntax of some commands has changed, including commands related to security policy.
Secondly, the lack of strong encryption (namely, with this version of the software, the device will be shipped to Russia to simplify the import), I think, not many will do.
Therefore, the first step is to upgrade the VRP Huawei USG software to the latest version at the moment. You can download it from the manufacturer’s website, if your login has the corresponding rights (as a rule, they are given to Huawei partners). If the latest software version is not available to you (you will see it on the site in any case, but you will not be able to download it), you should contact the company through which your equipment is delivered or to the Russian-speaking support of Huawei.
I downloaded the file USG6000V500R001C30SPC100.bin VRP software from the site and put it in the folder of my TFTP server with the address 172.31.31.250.
I connected the lowest port of Huawei USG to my local network 172.31.31.0 / 24 in order to download the new file with the software via the TFTP protocol to it. But for this you need to register an IP address from the network. We do this as follows:
<USG6300>system-view [USG6300]interface GigabitEthernet0/0/0 [USG6300-GigabitEthernet0/0/0] ip address 172.31.31.86 255.255.255.0 [USG6300-GigabitEthernet0/0/0]quit [USG6300] The address is registered. But at the same time, it turns out that our tftp server is not pinged with USG. All this is because the default security policy on the USG is enabled and the default action is deny, i.e. to ban. To speed up the initial settings, I suggest that you make the default rule, permit, and until the device is released to the Internet, this will not pose a threat to it. At the same time, it will greatly simplify the initial setup:
[USG6300] security-policy [USG6300-policy-security] default action permit Warning:Setting the default packet filtering to permit poses security risks. You are advised to configure the security policy based on the actual data flows. Are you sure you want to continue?[Y/N]Y [USG6300-policy-security] quit [USG6300]Ctrl+Z Check the reachability of the TFTP server:
<USG6300>ping 172.31.31.250 17:46:58 2017/03/27 PING 172.31.31.250: 56 data bytes, press CTRL_C to break Reply from 172.31.31.250: bytes=56 Sequence=1 ttl=128 time=1 ms Reply from 172.31.31.250: bytes=56 Sequence=2 ttl=128 time=1 ms After that, we will load the new version of the software from the TFTP server into flash memory using the command:
<USG6300>tftp 172.31.31.250 get USG6000V500R001C30SPC100.bin Next, you need to tell the loader that after rebooting, you need to download the software from this image, and not from what we have loaded, for this we give the command:
<USG6300>startup system-software USG6000V500R001C30SPC100.bin Info:System software for the next startup:hda1:/usg6000v500r001c30spc100.bin, start read file.... Succeeded in setting the software for booting system. <USG6300> Let us check that with the next boot the device will boot with the version of software we need:
<USG6300>display startup 17:50:53 2017/03/27 MainBoard: Configed startup system software: hda1:/suempua15v1r1c30spc600pwe.bin Startup system software: hda1:/suempua15v1r1c30spc600pwe.bin Next startup system software: hda1:/usg6000v500r001c30spc100.bin Startup saved-configuration file: NULL Next startup saved-configuration file: NULL After that we save the configuration and reboot the device:
<USG6300>save all <USG6300>reboot 17:52:31 2017/03/27 System will reboot! Do you want to save the running configuration? [Y/N]:Y 2017-03-27 17:52:33 USG6300 %%01CFM/4/SAVE(l): When deciding whether to save configuration to the device, the user admin chose Y. Next config file name is NULL,set to Default... Next config file is hda1:/vrpcfg.zip Now saving the current configuration to the device.... Info:The current configuration was saved to the device successfully.. System will reboot! Continue? [Y/N]:Y After reboot, check the current software version:
<USG6300>display version 2017-03-27 18:37:42.590 Huawei Versatile Routing Platform Software VRP (R) Software, Version 5.160 (USG6300 V500R001C30SPC100) Copyright (C) 2014-2016 Huawei Technologies Co., Ltd USG6320 uptime is 0 week, 0 day, 0 hour, 37 minutes As you can see, our version is now the freshest. From this point on, you can begin to tune the hardware.
Configuring interfaces and SSH for remote management
Next, configure SSH for remote control, since HTTPS control is enabled by default.
We will enable the ability to control using ssh service on all interfaces that will participate in our work. Let GigabitEthernet0 / 0/7 be the WAN interface with public IP, and GigabitEthernet0 / 0/1 will be the LAN interface with the 192.168.200.0 / 24 network:
<USG6300> system-view [USG6300] interface GigabitEthernet 0/0/7 [USG6300-GigabitEthernet0/0/7] service-manage enable [USG6300-GigabitEthernet0/0/7] service-manage ssh permit [USG6300-GigabitEthernet0/0/7] ip address 195.26.xxx.xxx 255.255.255.224 [USG6300-GigabitEthernet0/0/7] service-manage http permit [USG6300-GigabitEthernet0/0/7] service-manage https permit [USG6300-GigabitEthernet0/0/7] service-manage ping permit [USG6300-GigabitEthernet0/0/7] quit [USG6300] interface GigabitEthernet0/0/1 [USG6300-GigabitEthernet0/0/1] undo shutdown [USG6300-GigabitEthernet0/0/1] ip address 192.168.200.100 255.255.255.0 [USG6300-GigabitEthernet0/0/1] service-manage http permit [USG6300-GigabitEthernet0/0/1] service-manage https permit [USG6300-GigabitEthernet0/0/1] service-manage ping permit [USG6300-GigabitEthernet0/0/1] service-manage ssh permit By default, four firewall zones with targeted priorities (in parentheses) are created in Huawei USG: local (100), dmz (50), trust (85), untrust (5). Everything is very similar to how it is done in Cisco ASA - users in the same zone have the same security attributes. Below is described in more detail the mechanism of the work of security zones, but for now just define the newly configured interfaces into the corresponding zones:
[USG6300] firewall zone trust [USG6300-zone-trust] add interface GigabitEthernet0/0/1 [USG6300-zone-trust] quit [USG6300] firewall zone untrust [USG6300-zone-untrust] add interface GigabitEthernet0/0/7 [USG6300-zone-untrust] quit Next, configure the default gateway:
[USG6300] ip route-static 0.0.0.0 0.0.0.0 195.26.xxx.1 Configure the VTY interface to support AAA:
[USG6300] user-interface vty 0 4 [USG6300-vty0-4] authentication-mode aaa [USG6300-vty0-4] protocol inbound ssh [USG6300-vty0-4] user privilege level 15 [USG6300-vty0-4] quit Create a userssh user who can manage the device via SSH:
[USG6300] aaa [USG6300-aaa] manager-user userssh [USG6300-aaa-manager-user-userssh] password Enter Password: Confirm Password: [USG6300-aaa-manager-user-userssh] service-type ssh [USG6300-aaa-manager-user-userssh] quit [USG6300-aaa] bind manager-user userssh role system-admin [USG6300-aaa] quit We generate a local rsa key pair:
[USG6300] rsa local-key-pair create Enable Secure Telnet (SSH) service:
[USG6300] stelnet server enable Configure userssh as an SSH administrator.
[USG6300] ssh user userssh [USG6300] ssh user userssh authentication-type password [USG6300] ssh user userssh service-type stelnet At this point, it is possible to consider the initial configuration completed and connect the cables of the external Internet and local network to the corresponding configured interfaces.
Setting using a web interface
I prefer to make basic settings and upgrade of the operating system from the command line, like most other configurations. Nevertheless, much (not everything) could be done through the Web interface, which, in my opinion, is very well implemented, does not require Java or a client program (such as ASDM for Cisco ASA). Yes, and security policies, it seems to me, are much clearer and easier to create through a Web interface.
By default, a web interface is enabled on the device and enabled on the Management port — on port devices, this port is separate, and in our case, by default, this port in USG6320 is the youngest on board, the one we used to update the software. By default, the Management port is assigned IP 192.168.0.1 / 24, all types of services are enabled, and DHCP is enabled, so for opponents of the command line, you can use the WEB interface from the very beginning, knowing these default settings. They look like this:
interface GigabitEthernet0/0/0 undo shutdown ip address 192.168.0.1 255.255.255.0 anti-ddos flow-statistic enable anti-ddos syn-flood source-detect alert-rate 100 service-manage http permit service-manage https permit service-manage ping permit service-manage ssh permit service-manage snmp permit service-manage telnet permit dhcp select interface dhcp server ip-range 192.168.0.1 192.168.0.254 The port for management via https is 8443, and since we changed the address on the port a little earlier to 172.31.31.86, we’ll access the device from any browser as follows:
https://172.31.31.86:8443 Huawei USG web interface Dashboard tab
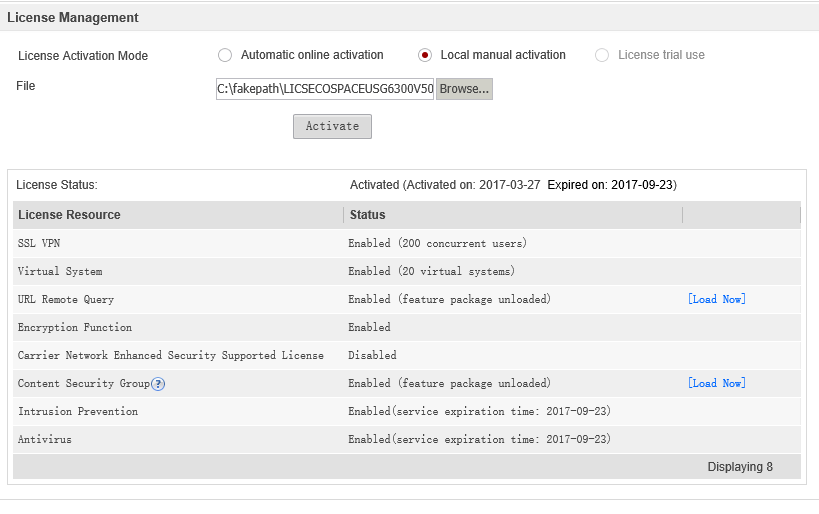
First of all, you need to download purchased licenses in the System -> License Management section:
You can also use trial licenses by selecting the appropriate item with the following restrictions:
Trial anti-virus and IPS subscriptions have a period of 2 months:
Or, if you select Local manual activation, we substitute the generated file with the dat extension with the license, and our purchased licenses are activated:
Configuring Security Policies and Signature Updates
Next, I propose to configure the device to access the Internet and update signatures via the Internet. Before proceeding with the settings, we briefly explain the mechanism of the security zones in the Huawei USG.
As stated above, four security zones are configured by default:
- Untrust (5). Identifies an insecure network segment, such as the Internet, has the lowest level of security 5.
- DMZ (50). Defines a segment in which, as a rule, servers are located, to which it is necessary to provide access from outside. But at the same time, access to more secure network segments is prohibited from this zone.
- Trust (85). Defines a secure network segment where, as a rule, user workstations are located.
- Local (100). The area of the USG device itself, including its interfaces.
You can change the priorities of zones, as well as add new zones, if necessary. This applies to all zones except local — its priority cannot be changed, and no interface can be added to it.
Data flows within the same security zone are trusted and do not require security policy settings. If we need to configure the flow of data from one zone to another, then we will need to configure the security policy, taking into account the direction of traffic according to the following rules.
- Inbound traffic: traffic is forwarded from a zone of lower priority to a zone with a higher priority.
- Outbound traffic: forwards traffic from a higher priority zone to a lower priority zone.
The direction of traffic is determined by the direction of the first packet.
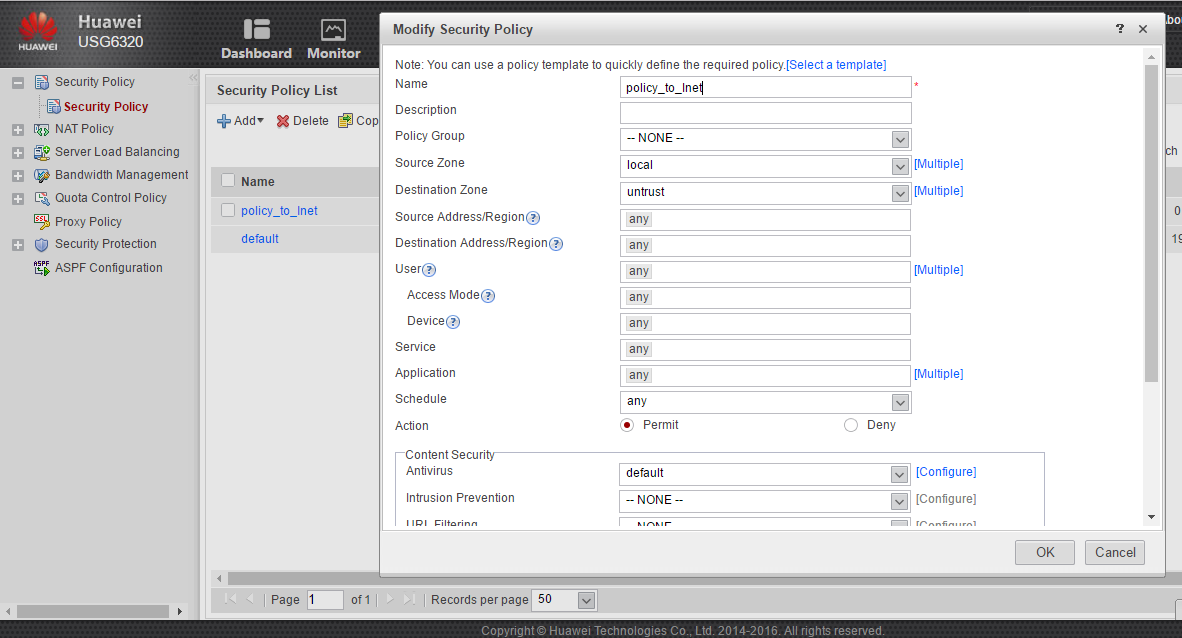
Let me remind you that we have already configured the interfaces and connected to GigabitEhternet0 / 0/7 cable from the provider, and to GigabitEthernet0 / 0/1 cable from our local network. If you try to ping something outside (untrust zone) directly from our device (local zone), then we will see the following picture:
[USG6300]ping 8.8.8.8 PING 8.8.8.8: 56 data bytes, press CTRL_C to break Request time out Request time out Request time out Request time out Request time out --- 8.8.8.8 ping statistics --- 5 packet(s) transmitted 0 packet(s) received 100.00% packet loss All packets are lost, although the default route is configured and the device is connected to the provider. In a situation like this, a regular router would get the ICMP response back and the picture would be different. But in our case, the security zones mechanism described above works, and there is an initiation of data flow from a zone with a priority of 100 (local) to a zone with a priority of 5 (untrust), so we need to configure the outbound security policy to allow walking in both directions. If the outgoing policy is applied to traffic in the direction of LOCAL → UNTRUST, our device will create a new entry in the session table after each initiation of a new session in this direction. The entry will contain the outgoing and destination IP addresses, the corresponding port numbers and the protocol type.
If the packets exchanged by the client from the LOCAL zone and the server in the Untrust zone correspond to the entries in the session table, the firewall processes the packets based on the outgoing security policy without re-checking the direction of packet transmission. That is, in our case, we should receive ICMP ECHO from the address 8.8.8.8.
Configure the policy in the Policy section by clicking the Add button with the name policy_to_Inet:
After applying the policy, we will check its performance by running a ping to the address 8.8.8.8 of our device:
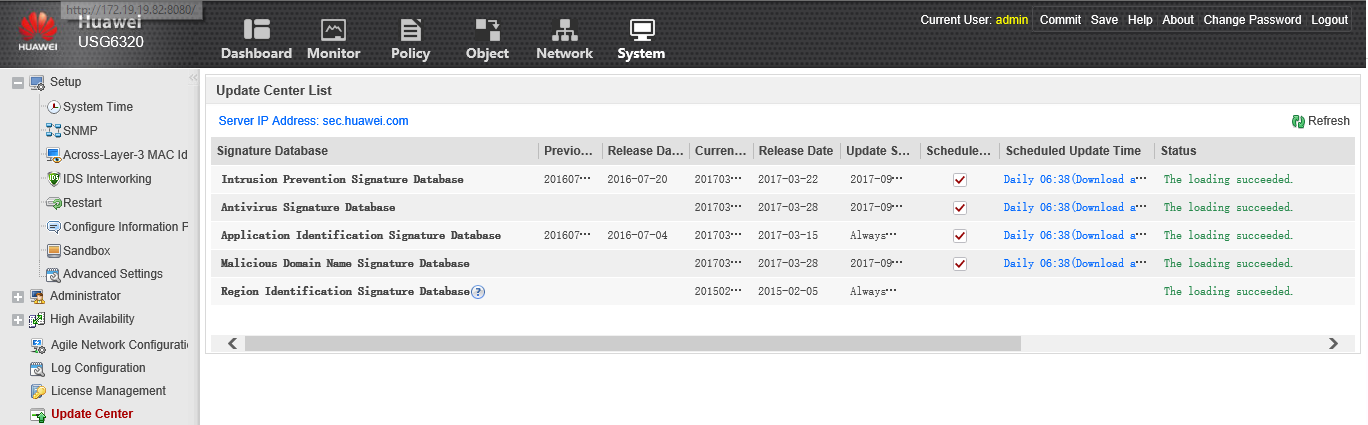
[USG6300]ping 8.8.8.8 PING 8.8.8.8: 56 data bytes, press CTRL_C to break Reply from 8.8.8.8: bytes=56 Sequence=1 ttl=47 time=19 ms Reply from 8.8.8.8: bytes=56 Sequence=2 ttl=47 time=21 ms Reply from 8.8.8.8: bytes=56 Sequence=3 ttl=47 time=19 ms Reply from 8.8.8.8: bytes=56 Sequence=4 ttl=47 time=20 ms Reply from 8.8.8.8: bytes=56 Sequence=5 ttl=47 time=20 ms --- 8.8.8.8 ping statistics --- 5 packet(s) transmitted 5 packet(s) received 0.00% packet loss round-trip min/avg/max = 19/19/21 ms In the System → Update Center section, we will try to update the IPS and antivirus signatures by clicking Update immediately opposite, for example, Antivirus Signature Database:
After some time in the Status column, we can see that the database download failed because the domain name of the update server (sec.huawei.com) could not be resolved. Indeed, in order for the names to be resolved, you need to register the DNS server in the Network -> DNS section by clicking the Add button:
After registering the DNS server, everything turned out:
After that, all signatures will be updated according to their time in the Scheduled Update Time section, in this case every day at 6:38 in the morning.
Configure NAT / PAT for LAN access to the Internet
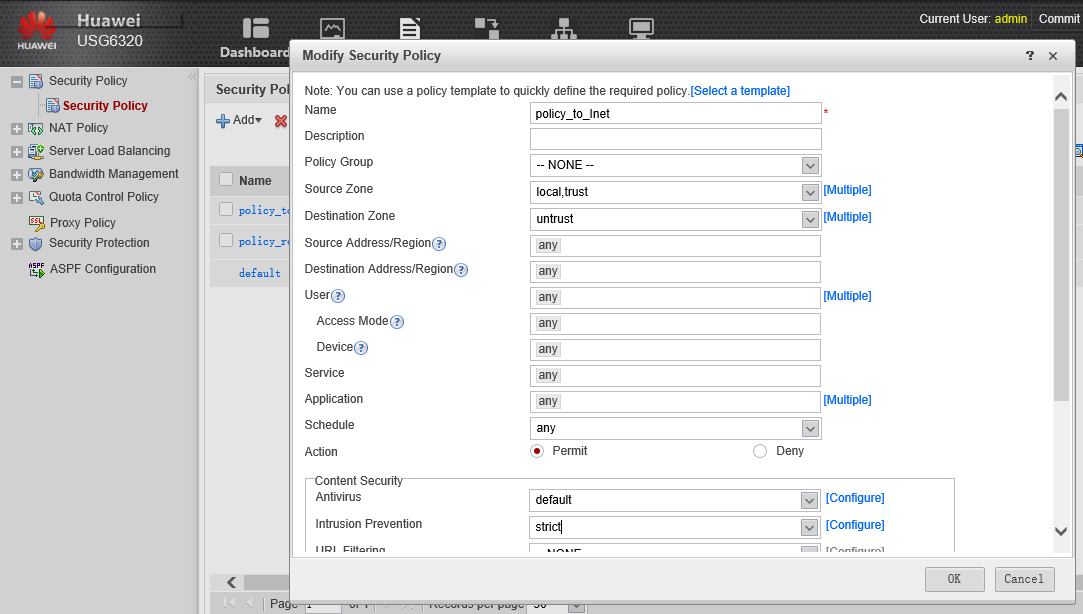
Configure the Internet access for the local network 192.168.200.0 / 24 (our trust zone) using PAT. Since in this case the direction of traffic will be from a zone with a higher priority (trust) towards the zone, a lower priority (untrust), you need to configure outbound policy security. Here is exactly the same rule as we already did for the local zone. You can configure a new rule, or you can, if all the other parameters are the same, add another Source Zone to the already created policy_to_Inet, in our case trust:
In the Content Security section, add the default preset profile to the Antivirus subsection and the strict profile to the Intrusion Preventions subsection.
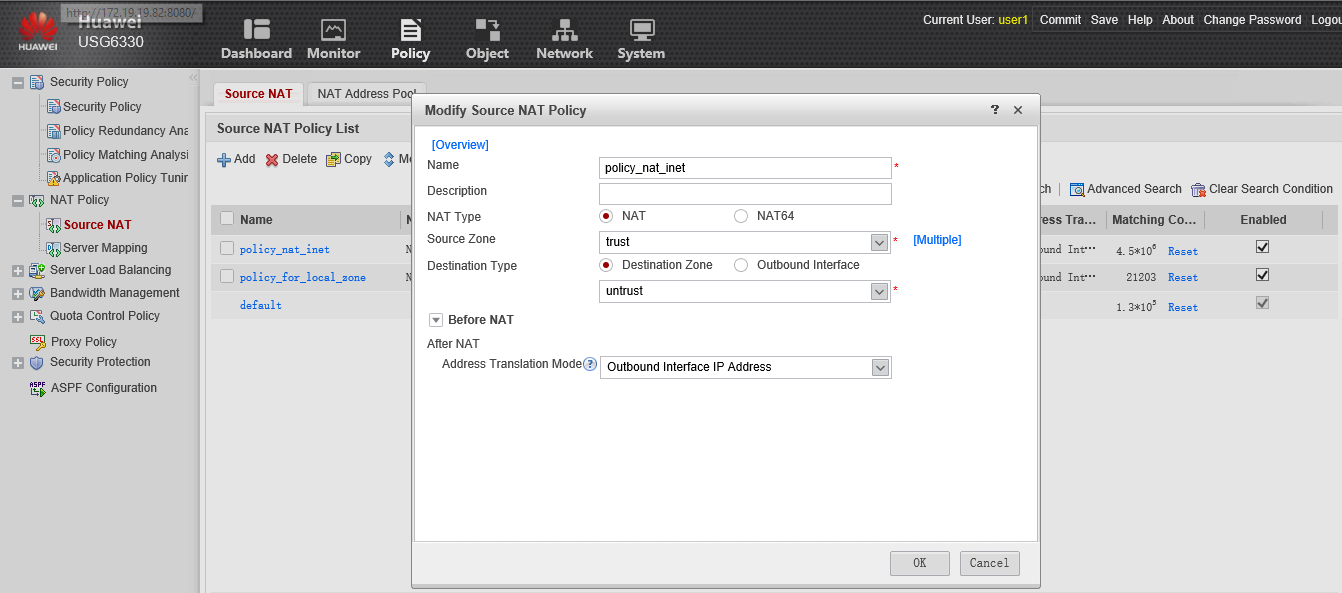
Then we will create a NAT policy for the trust zone to access the Internet, “masquerading” with the external IP address:
After that, users from the network 192.168.200.0 / 24 will be able to access the Internet.
The basic setting of Huawei USG can be considered complete. The software of the VRP device has been upgraded to the latest version, SSH has been configured for remote management via the command line, setting up update of signatures over the Internet, and access to the Internet for users from the trusted zone.
Once again, it is worth noting a very good configuration guide (the HUAWEI USG6000 & USG9500 V500R001C30SPC200 & NGFW Module V500R002C00SPC200 Product Documentation was used in this article. In addition to the described functions, I configured IPsec site-to-site tunnels, SSL VPN for connecting remote users, integration with Microsoft Active Directory for authorizing remote SSL-VPN users and Single Sign On for domain users (accessing the Internet for domain users without additional authorization) and other.
I hope this article will be useful for those who consider as a UTM / NGFW / Firewall device to replace similar devices known American vendors.
Source: https://habr.com/ru/post/325676/
All Articles