Setting up replication in FreeIPA 4.4 with domain level 1

In our company for organizing and managing access for Linux-servers
A service such as FreeIPA is used. FreeIPA is a fully-fledged AD replacement for Linux systems from RHEL. In the new version there are levels of domains and the process of setting up replication has been revised. As it was not possible to find instructions of the imputed type in runet, I decided to write my own.
First we need two servers with CentOS 7. The servers will be as follows:
')
ipamaster.org.lan ip 192.168.10.23 ipareplica0.org.lan ip 192.168.10.123 On each server we add the master and replica addresses to / etc / hosts. In our case it is:
192.168.10.23 ipamaster.org.lan 192.168.10.213 ipareplica0.org.lan Next on the wizard install the necessary packages. In our case, we use the FreeIPA server as a DNS server. Therefore, install and package the DNS server:
yum -y install ipa-server bind bind-dyndb-ldap ipa-server-dns After installing the packages, you must install the FreeIPA server itself. To automate the installation, ipa-server-install supports many keys that allow you to automatically answer all the questions of the installer. We at the moment will go over each field with a description. Also, nothing prevents ipa-server-install -h from running and creating the necessary set of keys.
So install the server:
ipa-server-install --setup-dns --mkhomedir The key --setup-dns says that we will use a DNS server; The --mkhomedir switch is needed to automatically create a home directory on clients for each user.
Next, we answer the questions.
1. The host name must be spelled in the host and resolved. Leave as is.
Server host name [ipamaster.org.lan]: 2. Domain name is also left as is.
Please confirm the domain name [org.lan]: 3. Realm name is also unchanged.
Please provide a realm name [org.lan]: 4. The password for the management of Ldap directories is needed complicated. And do not lose.
Directory Manager password: q1w2e3r4t5y6 Password (confirm): q1w2e3r4t5y6 5. Administrator password of the service itself.
IPA admin password: 1234567890 6. Specify dns forwarders, for example, on Google servers. To finish specifying forwarders, just press ENTER in a blank line.
Do you want to configure DNS forwarders? [yes]: Do you want to configure these servers as DNS forwarders? [yes]: All DNS servers from /etc/resolv.conf were added. You can enter additional addresses now: Enter an IP address for a DNS forwarder, or press Enter to skip: 8.8.8.8 DNS forwarder 8.8.8.8 added. You may add another. Enter an IP address for a DNS forwarder, or press Enter to skip: 8.8.4.4 DNS forwarder 8.8.4.4 added. You may add another. Enter an IP address for a DNS forwarder, or press Enter to skip: Checking DNS forwarders, please wait… 7. Resolve the reverse zone.
Do you want to search for missing reverse zones? [yes]: Do you want to create reverse zone for IP 192.168.10.23 [yes]: Please specify the reverse zone name [10.168.192.in-addr.arpa.]: Using reverse zone(s) 10.168.192.in-addr.arpa. 8. Next, we display the data for verification. Check, continue.
The IPA Master Server will be configured with: Hostname: ipamaster.org.lan IP address(es): 192.168.10.23 Domain name: org.lan Realm name: ORG.LAN BIND DNS server will be configured to serve IPA domain with: Forwarders: 8.8.8.8, 8.8.4.4 Forward policy: only Reverse zone(s): 10.168.192.in-addr.arpa. Continue to configure the system with these values? [no]: yes Begins a rather long installation process. One of the longest parts is the generation of certificates, so you can go and have some tea.
In the final installation we will show which ports are used. We configure the firewall to accept connections on these ports. In our case, the test environment and all trust each other.
1. You must make sure these network ports are open: TCP Ports: * 80, 443: HTTP/HTTPS * 389, 636: LDAP/LDAPS * 88, 464: kerberos * 53: bind UDP Ports: * 88, 464: kerberos * 53: bind * 123: ntp We can go to the web interface, check the work.

Make sure everything works. Now go to raising the domain. We need to go through the tabs IPA SERVERS → Topology. Where we are immediately warned that the CA servers must be more than one.
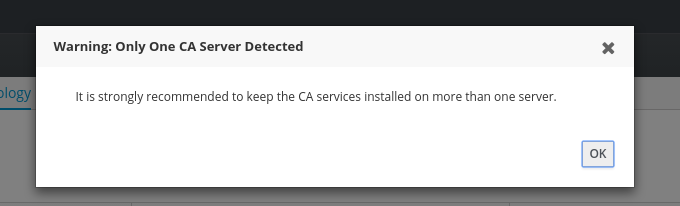
We answer OK. And check the domain level on the Domain Level tab. If this is a fresh install, it will default to 1.
ATTENTION! If you do it on sale, then raising the domain level without preliminary preparation can break everything. Do this only when you understand why and how.
After these operations go to the settings of the replica. And here begins the differences from the old mechanisms. If earlier it was necessary to generate keys, transfer to a replica and make a lot of gestures, now everything is much simpler.
So we check that the replica takes dns from the master.
cat /etc/resolv.conf search org.lan nameserver 192.168.10.23 Now install ipa-client.
yum -y install ipa-client ipa-server-dns After that install and configure the client. There is the same story as with the server - there are a lot of keys for automation, so we are doing it.
/usr/sbin/ipa-client-install -d --mkhomedir --domain=org.lan --server=ipamaster.org.lan --realm=ORG.LAN --principal=admin --password=1234567890 --enable-dns-updates -U After that, the host should appear in the web interface.

Further we pass to replication setup. We carry out.
Ipa-replica-install We will be asked to admin password. Enter, press ENTER.
WARNING: conflicting time&date synchronization service 'chronyd' will be disabled in favor of ntpd Password for admin@ORG.LAN: Next, wait for the installation and configuration of replication. After completion, you can go to ipareplica0.org.lan there in IPA SERVERS → Topology → Topology Graph, we will see that the replica has appeared and only the domain part has been replicated.

But we also remember the annoying mention that the CA server is one and that we need a backup dns. We proceed to configure the dns server on the replica.
Ipa-dns-install And by analogy with the master allow forwarders. If suddenly our replica is in a different region, you can specify other forwarders.
After that go to the installation of the CA server.
Ipa-ca-install Here we will ask our Directory Manager password. You haven't lost it yet?
Directory Manager (existing master) password: q1w2e3r4t5y6 It takes a lot of time, so we wait. After completion, go to any web interface and check the topology. Missing annoying message that the CA in a single copy. And there was a new connection in the graphics topologies.
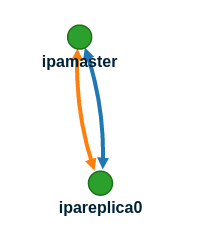
As you can see, now everything is relatively fail-safe. Scaling in the new version has become much simpler and more understandable.
Now a few words about what to remember to monitor. We monitor the running processes, open ports, and most importantly, monitor the validity period of the root CA certificate. Because in case it stitches, there may be a bunch of manual red tape that nobody needs.
Well, links to official documentation:
www.freeipa.org/page/V4_Designs
www.freeipa.org/page/V4_Proposals
Source: https://habr.com/ru/post/325546/
All Articles