Authenticating OAuth2 in-app using Google Sign-In. Continuous access to Google APIs
"From April 20, 2017, the sending of authorization requests from embedded browsers will be blocked."This message from March 1 can be seen in some applications where authorization is required. About this, Google wrote in his blog in August 2016, and this means that soon in many applications will have to rewrite the registration process. Enough is not enough, but there is a way out - use the recommended Google Sign-in authorization method.
This method will be discussed in the lesson, as well as how to get the tokens needed to work with the Google API.
In the lesson will be present a partial translation of official documentation. But first, a little background from my practice and the first work with OAuth2, maybe someone will be in a similar situation.
It took me for the app to get a live chat from YouTube. And then I learned that in order to send requests for broadcasting (and only then chat), OAuth2 user authentication is required. I started looking. Information on this topic is very small, it is scattered, not suitable for my case, and of course everything was in English. Basically, the information was to work with the most popular APIs: Drive, Cloud, Google Plus. In the official YouTube API documentation there is a ready-made code, take it and use it, but it is not suitable for Android. Having spent a considerable amount of time, through trial and error, I came to a working solution. The first thing I wanted to do afterwards was to collect information “in a heap” and put it on the shelves, which encouraged me to write this lesson.
')
Initially, my solution began with the fact that before the user opened the WebView for authorization (enter email, password). Further, permission to use the data was requested, and only after permission in the answer came an authentication code (AuthCode), in more detail what will be done with it further. The url that opened in webview was the following:
https://accounts.google.com/o/oauth2/auth? client_id=60*********5ad3np.apps.googleusercontent.com &redirect_uri=urn:ietf:wg:oauth:2.0:oob &access_type=offline&response_type=code &scope=https://www.googleapis.com/auth/youtube.readonly This is nothing but a post request, in response to which a page containing authCode arrived, with the code in the page header. Everything, as per the recommendation to the API, and the actions for hiding this code from the user were left to the developer.
Everything worked well, the application was published, but one day I saw the following:

Clicking on the link "Read more" we get into the blog, where it is said that in the name of security, WebView authentication will not work from April 20th. Well, I think, I just did and will have to be redone through Sign-In. And initially I tried to make the implementation through this service. However, with the existing knowledge of "what and why," it came out pretty quickly. So, let's begin.
1. Get credentials
In the API Manager, create a new project (or select an existing one):

For authorization, you will need a configuration file, which can be obtained in the wizard :
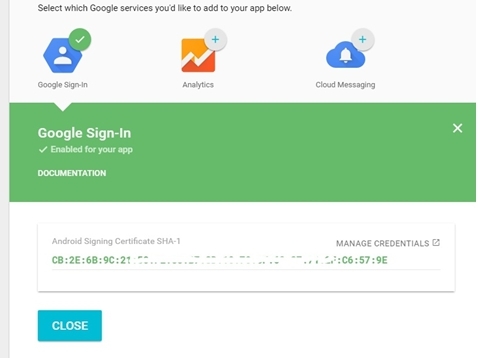
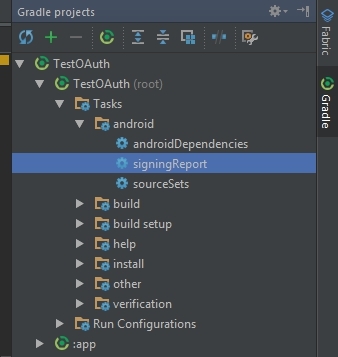
Fill in the application name and package. Next, choose which service we are connecting (Google Sign-In), here you need to enter the SHA1 application key, get it simply: in Android Studio, find the Gradle tab, open the Tasks tabs and android-signingReport. We double-click, and in the logs will appear information about the keys. Find the key SHA1, copy.

Click the button “Generate configuration file”, and after “Download google-services.json”. This json file is saved in the project folder “app”.
Important! If you are going to publish the application on Google Play, the SHA1 debug key will need to be replaced with the release key, and the configuration file will be replaced accordingly.
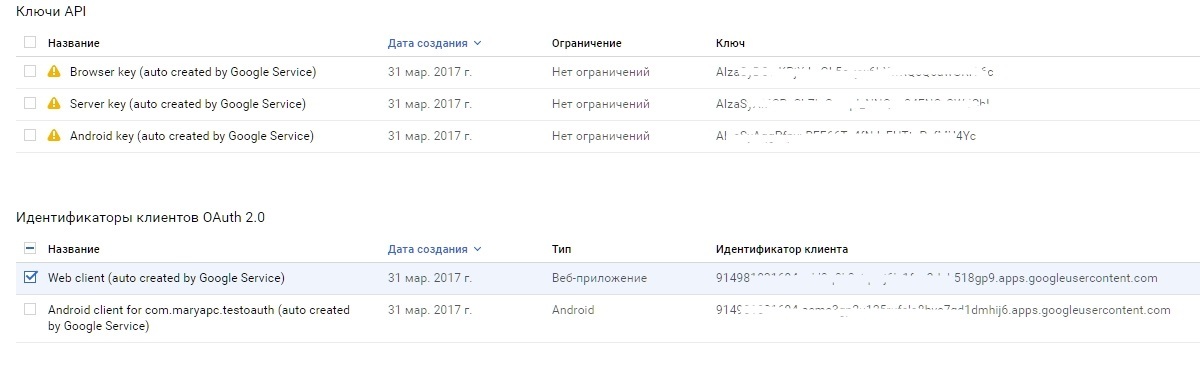
We go into the Manager API, we see that the keys and identifiers of OAuth clients have been generated. We need only the Web client data (client ID and client secret).
In the tab “OAuth Access Request Window”, you can change the email and product name - this is what will be written when permission is requested “Application **** requests: ...”
2. Configure client sign-in
To access the Google Api Client, add the following dependencies to the gradle app file:
compile 'com.google.android.gms:play-services-auth:10.2.0' And the plugin (at the end of the file):
apply plugin: 'com.google.gms.google-services' To the gradle project file depending on:
classpath 'com.google.gms:google-services:3.0.0' Customize options:
GoogleSignInOptions gso = new GoogleSignInOptions.Builder(GoogleSignInOptions.DEFAULT_SIGN_IN) .requestServerAuthCode(getString(R.string.server_client_id)) .requestEmail() .requestScopes(new Scope("https://www.googleapis.com/auth/youtube.readonly")) .build(); Here the most interesting lines are:
requestServerAuthCode(getString(R.string.server_client_id)) - we request authCode, passing the parameter client identifier (all), which was received above.requestScopes(new Scope("***")) - we request the area / area of access required for the API used. There are some already defined areas in Scopes, but if you don’t find one there, you can set your own, as in my case. For the user will be displayed as access to "what" wants to get the application.Customize the client:
GoogleApiClient mApiClient = new GoogleApiClient.Builder(this) .enableAutoManage(this, this) .addApi(Auth.GOOGLE_SIGN_IN_API, gso) .build(); Everything is according to the standard documentation:
enableAutoManage(this, this) - activation and connection listener are passed to the parameters (we implement the GoogleApiClient.OnConnectionFailedListener interface).addApi(Auth.GOOGLE_SIGN_IN_API, gso) - we specify that we use Sign In api and the previously created options object.Now, to start the authorization you need a button (or any other element). You can use the standard Sign In Button. Markup xml:
<com.google.android.gms.common.SignInButton android:id="@+id/activity_button_sign_in" android:layout_width="wrap_content" android:layout_height="wrap_content" /> It looks like this:

In the activation button is defined as all other views, we will hang the listener on it and execute the method on click:
@Override public void onClick(View view) { switch (view.getId()) { case R.id.activity_button_sign_in: signIn(); break; } } The code of the called method is the creation of an intent and the activation call for authorization:
public void signIn() { Intent signInIntent = Auth.GoogleSignInApi.getSignInIntent(mApiClient); startActivityForResult(signInIntent, RC_AUTH_CODE); } We pass the configured mApiClient to the parameter. RC_AUTH_CODE any number, as always, to track the result of the activation.
When you click on the button, you will be prompted to select an account to login, or add a new one. After selecting, the application will ask for permission:
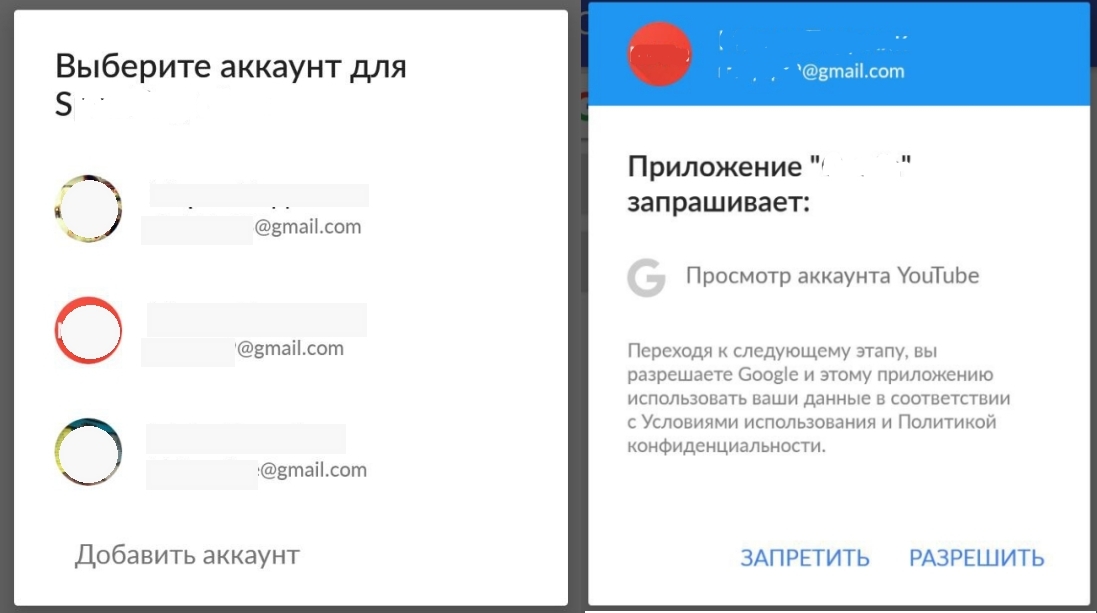
3. Getting Auth code
After the user gives permission, in onActivityResult we get the data of his account:
@Override protected void onActivityResult(int requestCode, int resultCode, Intent data) { if (requestCode == RC_AUTH_CODE) { GoogleSignInResult result = Auth.GoogleSignInApi.getSignInResultFromIntent(data); if (result.isSuccess()) { GoogleSignInAccount acct = result.getSignInAccount(); String authCode = acct.getServerAuthCode(); getAccessToken(authCode); } } } As a result, we get the auth code as a regular line, it looks like this:
4/iHhVmqtxccXh0Qs*********oo5XG8OjaNsWu_kEKyw Also from the account, you can get the user's email, username and avatar:
acct.getEmail ()
acct.getDisplayName ()
acct.getPhotoUrl ()
This data may be needed, for example, to paste it into the header of the NavigationView.
4. Getting Access Token and Refresh Token
Received auth code, now it needs to be changed to the necessary tokens for API requests. To do this, we form a request at
https://www.googleapis.com/oauth2/v4/token. For example, I will do this using OkHttp. public void getAccessToken(String authCode) { OkHttpClient client = new OkHttpClient(); RequestBody requestBody = new FormEncodingBuilder() .add("grant_type", "authorization_code") .add("client_id", getString(R.string.server_client_id)) .add("client_secret", getString(R.string.client_secret)) .add("code", authCode) .build(); final Request request = new Request.Builder() .url("https://www.googleapis.com/oauth2/v4/token") .header("Content-Type", "application/x-www-form-urlencoded") .post(requestBody) .build(); client.newCall(request).enqueue(new Callback() { @Override public void onFailure(Request request, IOException e) {} @Override public void onResponse(Response response) throws IOException { try { JSONObject jsonObject = new JSONObject(response.body().string()); mAccessToken = jsonObject.get("access_token").toString(); mTokenType = jsonObject.get("token_type").toString(); mRefreshToken = jsonObject.get("refresh_token").toString(); } catch (JSONException e) { e.printStackTrace(); } } }); } Consider more options. In Request.Builder () We pass the url by which we get tokens:
url("https://www.googleapis.com/oauth2/v4/token") In the header, specify the Content-Type:
header("Content-Type", "application/x-www-form-urlencoded") Specify that this is the POST method, passing in the body:
post(requestBody) Formed requestBody must contain parameters:
"grant_type", "authorization_code" - indicate that we will transmit auth code"client_id", getString(R.string.server_client_id) - the parameter is the client id obtained in the API Manager"client_secret", getString(R.string.client_secret) - client secret obtained in API Manager"code", authCode - actually received code.The request is asynchronous, in the response we get the usual json with all the necessary data for work:
{ "access_token":"ya29.GlsfBJNMTfGy…", "token_type":"Bearer", "expires_in":3600, "refresh_token":"1\/72OqA7zYuyY__XhGij5oA2nEb7…", "id_token":"eyJhbGciOiJSUzI1NiIsImtpZ…" } "access_token" - the access token for which everything was done"expires_in" is the access token's lifetime, by default the token lives 1 hour, and 25 tokens can be received on request per day, no more."token_type" is a type of token, it must also be remembered, it is also inserted into the request to api in the future."refresh_token" is a token to refresh the access token when an hour has passed. Refresh token unchanged. Often I saw a problem on the forums that I faced myself: this token did not arrive in the request. Errors are incorrect credentials, or incorrect requests. If authorization was done via WebView, and such an important parameter as access_type = offline was not specified in the url, then the refresh token simply did not arrive.5. Update Access Token
An hour has passed, the access token is no longer active, a new one is needed. After that, 401 or 403 errors will sprinkle, the server will say that the user is not authorized or does not have access. It is not good to request a new permit if we need a continuous session, for example, like me, you need to continuously receive messages from the chat during the broadcast, and this is a few hours. What to do? Send a request for a new token.
The request is basically the same as in clause 4, except for some parameters:
private void getNewAccessToken() { OkHttpClient client = new OkHttpClient(); RequestBody requestBody = new FormEncodingBuilder() .add("refresh_token", mRefreshToken) .add("client_id", getString(R.string.server_client_id)) .add("client_secret", getString(R.string.client_secret)) .add("grant_type", "refresh_token") .build(); final Request request = new Request.Builder() .url("https://www.googleapis.com/oauth2/v4/token") .header("Content-Type", "application/x-www-form-urlencoded") .post(requestBody) .build(); client.newCall(request).enqueue(new Callback() { @Override public void onFailure(Request request, IOException e) {} @Override public void onResponse(Response response) throws IOException { try { JSONObject jsonObject = new JSONObject(response.body().string()); mAccessToken = jsonObject.get("access_token").toString(); } catch (JSONException e) { e.printStackTrace(); } } }); } Here are the important parameters:
"grant_type", "refresh_token" - in the type indicate that we are sending a refresh token"refresh_token", mRefreshToken - and the token itselfThe answer will be json, containing the new access token, with which you can again access the API:
{ "access_token":"ya29.GlsfBM7Y...", "token_type":"Bearer", "expires_in":3600, "id_token":"eyJhbGciOiJ..." } This authorization and user authentication is completed.
For example, I’ll show you how the request to the API looks like, and how I am updating the token.
To request an API, I use Retrofit2 + RxAndroid. This is the request for live chat chat:
@GET(GoogleApiUrls.Youtube.CHAT) Observable<ChatResponse> getChat(@Header("Authorization") String token, @Query("liveChatId") String liveChatId, @Query("part") String part); Here it is important to note that in the header, the type of token and the access token itself must be transmitted via the Authorization key. That is so:
Authorization Bearer ya29.GlsfBJNMTfGy… Next, I make a request through RxAndroid, and since all sorts of errors come to the onError callback, the HttpException error with code 401 Unauthorized comes after an hour. Here I process it, check if it is the same error, then I bring it to the appropriate type, check if this is really code 401 and execute the method of getting a new token, then repeat the request.
@Override public void onError(Throwable e) { if (e instanceof HttpException) { HttpException exception = (HttpException) e; if (exception.code() == 401) { getNewAccessToken(); } } } There is also a GET request for checking a token:
https://www.googleapis.com/oauth2/v3/tokeninfo?access_token=ya29.GlsfBJNMTfGy… In response, data will come about the token, if it is still active, or an error, if its lifetime has expired.
Again, the implementation of the update token Google leaves on the developer.
It is much easier to leave the account and revoke the authorization; it is easy to find it in the official documentation, if necessary.
I recommend checking inquiries in a third-party application / extension, for example Postman, to make sure that the parameters are entered correctly and the responses received. I will be very happy if someone lesson will be useful!
Links to the documentation used:
1. Google Sign-In for Android
2. Youtube API. OAuth 2.0 flows
Source: https://habr.com/ru/post/325518/
All Articles