Posting 3CX on Google Compute Engine
Today, we will explain in detail how the integrator, the 3CX partner, should prepare the Google cloud infrastructure for hosting 3CX entities (instances). Placing the 3CX server on the Google cloud eliminates the need for the integrator (or end user) to invest in server hardware and waste resources on maintaining it. Google is one of the largest and most reliable cloud providers, and the Google Compute Engine service is great for hosting PBXs for small (and large) companies.
To place 3CX on Google Compute Engine, you need to follow a few simple steps:
- Create a Google Account (if you don’t have one) and a new Google Platform Project
- Create a temporary virtual machine (VM) that will serve as a template for future 3CX virtual machines
- Create a 3CX VM instance for a customer
- Install the 3CX software on a VM instance and transfer it to the customer
Creating a Google Account and the Google Platform Project
If you do not have a Google account, create one. You can use not only the gmail domain, but also your own email address. Please note that in the future, after the trial period expires, this account will be used for billing for the service provided. After creating an account:
- Go to https://console.cloud.google.com
- Select your country, accept the conditions and click Accept and continue .
- Next, enter the information about you, your organization and enter the details of the bank card from which periodic payments for using the service will be charged.
- You will be taken to the Google Cloud Platform Control Panel . Click the Create Project link.
- Specify the project name, for example, cloud3cx-247supported-demo and in a few seconds the project will be created.
Creating an instance of a template
Create a virtual machine that will serve as a template for new virtual machines, which you then transfer to end users:
- In the left menu, go to the Compute Engine - VM Instances section.
- Create a new instance with the name, for example, instance-3cx-template-vm and select Small machine g1-small .
- Specify a fixed hard disk size of 25 GB and a Debian GNU / Linux 8 image (jessie).
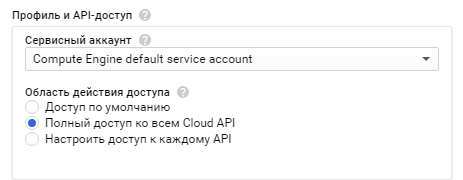
- Select the Compute Engine default service account and Full access to all Cloud APIs.
- Just below, expand the Settings Configure Management, Disk, Network, and SSH keys options and uncheck the Delete boot disk check box when deleting an instance .
- To finish creating an instance, click Create .
Installing 3CX on a template instance
- Connect to the VM instance via SSH. In this case, a connection pop-up window will appear in the browser. Allow pop-up windows for this site.
- Leave yourself root.
sudo su -
- Upgrade your operating system.
apt update - updates the list of available packages
apt upgrade - upgrade packages
- Install the tcpdump package, which may be required to troubleshoot various network problems.
apt-get install tcpdump
- Install the modules required for 3CX operation.
  wget -O- http://downloads.3cx.com/downloads/3cxpbx/public.key |  apt-key add -
 echo “deb http://downloads.3cx.com/downloads/3cxpbx/ /” |  tee /etc/apt/sources.list.d/3cxpbx.list
 apt update
 apt-get install -y $ (apt-cache depends 3cxpbx | grep Depends | sed “s /. ends: \ //” | tr '\ n' ')
- Since the Google VM uses the internal and public IP addresses, you need to create the port publishing rules necessary to access the VM instance from the outside.
- Configure the rules for accessing instance services in accordance with this table .
- Shut down and delete the VM instance in the management console, saving the virtual disk. Please note that during the removal there was no warning about deleting the virtual hard disk.
Creating an instance of VM 3CX for a customer
Now you can create a virtual machine instance to install the 3CX server and transfer it to the customer.
- Go to the Images section, at the top, click the Create image button and create a new image with the name, for example, image-3cx-template . As the disk, select the previously created virtual disk instance-3cx-template-vm
- Your created image should appear in the list of available images.
- Select the created image and click on Create instance at the top.
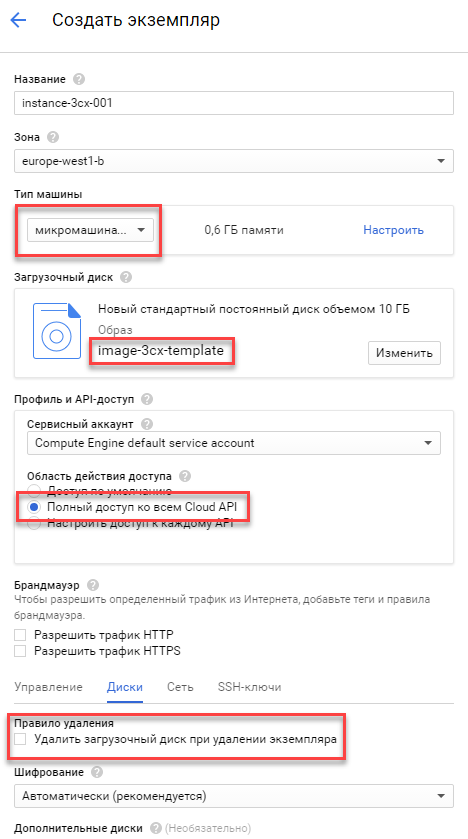
- Specify instance parameters:
- Name, for example instance-3cx-001
- The zone is the closest to the customer to minimize network delays.
- Machine type: for small installations, you can choose a micro machine 0.6 GB of memory
- Service account: Compute Engine default service account
- Access Scope: Full access to all Cloud API
- In the section Configure Management, Disk, Network, and SSH Keys, and uncheck the Delete boot disk check box when deleting an instance . This is recommended in order not to permanently lose data if an administrator or customer accidentally deletes a virtual machine instance.
- Immediately in the Network section, specify (or add a new) external static IP address. The ephemeral address will not be enough.
- Click Create , and a custom VM instance will be created for the 3CX server.
Installing 3CX software on a virtual machine
- Connect to the created entity by pressing the SSH button.
- Install 3CX with the command
sudo apt-get install 3cxpbx
- You can select the option (1) Using a Web Browser and continue configuring 3CX in this guide . At the same time, you need to connect to the public IP address of the created instance. In this case, if the address is 104.199.62.254, the connection string will be
http://104.199.62.254 ro01
At this point, setting up an instance of VM 3CX is complete. It can be transferred to the customer.
')
Source: https://habr.com/ru/post/325508/
All Articles


