Making your first game on the Phaser. Part 3 - Creating the game world
Table of contents
0 Preparation for work
1 . Introduction
2 Resource download
3 Creating the game world [ ]
4 ( wip ) Groups
5 ( wip ) The world of physics
6 ( wip ) Management
7 ( wip ) Add targets
8 ( wip ) Finishing Touches
It's time to create a small world for our platformer, so that the main character has where to live and his existence has at least some meaning.
Do not forget to read the comments in the code, they are important!
All the code, like last time, is in the Github repository with the part-3 tag.
Creation of the game world
We already used the this.game.add.sprite() method in the last lesson to create stars, but in addition to adding a sprite to the game world, this method also creates a Phaser.Sprite object for further manipulations with the created sprite.
The game world in Phaser is a place where all the objects created by us live, it can be compared with the scene in ActionScript 3 . By default, the game world is completely cleared when you change or restart the state of the game.
The game world does not have a fixed size and can expand indefinitely in all directions, and the coordinates0,0are the center of this world. For convenience, Phaser puts the top left point of the game camera in the center of the world, but you can move the camera to the desired location.
You can access the world object through the link: this.game.world . In this object you will find many useful properties and methods (such as the height and width of the world, an array of elements added to the game, etc.) that will help you to place and manage the elements in the game world, as well as to sort them on the screen.
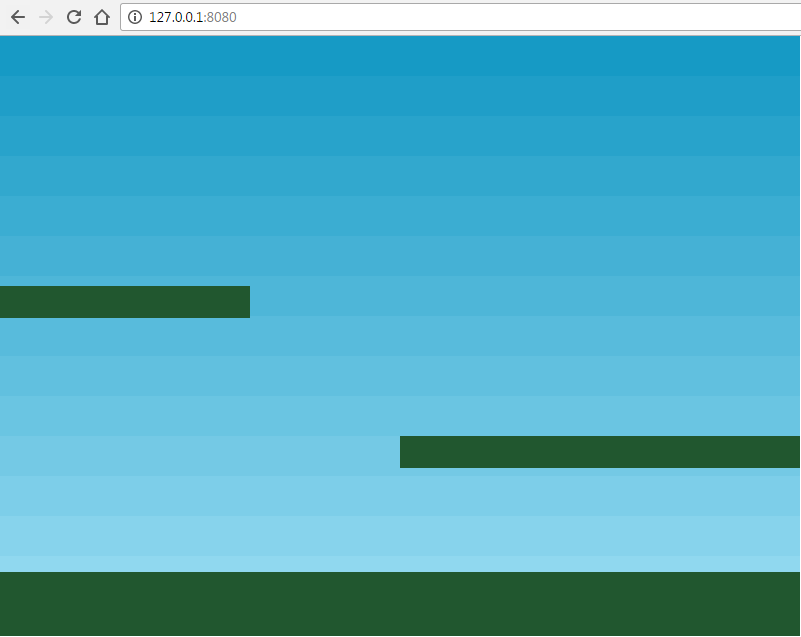
For now, let's go back to the code. Remove all the stars we created previously from MainState ( src/states/main.state.ts ), and add to this state the background and platforms:
'use strict'; /** Imports */ import State from './state'; // export default class MainState extends State { sky: Phaser.Sprite; // platforms: Phaser.Group; // create(): void { // Phaser (p2, box2d, ninja arcate). // , // . this.game.physics.startSystem(Phaser.Physics.ARCADE); // this.sky = this.game.add.sprite(0, 0, 'sky'); // this.platforms = this.game.add.group(); // , this.platforms.enableBody = true; // const ground = this.platforms.create( 0, this.game.world.height - 64, 'platform' ); // 2 , // ( - 400x32, 800) ground.scale.setTo(2, 2); // ( , // ). ground.body.immovable = true; // const ledge1 = this.platforms.create(400, 400, 'platform'); ledge1.body.immovable = true; // , const ledge2 = this.platforms.create(-150, 250, 'platform'); ledge2.body.immovable = true; // . } } Did everything right? Then you will see the following picture in your browser:
Most likely, you noticed that working with groups is different from creating a single sprite. I will tell you about their purpose and functions in the next section.
This concludes this lesson.
Github Repo : https://github.com/SuperPaintman/phaser-typescript-tutorial
')
Source: https://habr.com/ru/post/325384/
All Articles