All protocol PHP bot in 10 minutes, or how Microsoft Bot Framework and Azure Functions make life easier for us
It is absolutely impossible to deny that the development of natural patterns in the interfaces gave a fantastic impetus to the development of the entire IT industry as a whole. And this is not only and not so much about voice interfaces, but about the widespread introduction of gestures, a huge shift in the paradigm of mobile platforms and, of course, significant work in the field of UI and UX as a whole. While the industry is striving to become increasingly friendly for more and more people, the usual and, to a certain extent, routine development turns into endless attempts to embrace the immense. If before we were mostly concerned with the levels of abstraction of languages and frameworks, now we are faced with much more global issues. How to find a balance between a complex and functional interface? Should I start a new project with microservices? I can’t answer these questions, but I can tell you about the tools that already now make it much easier and cheaper to master and apply new technologies and development approaches.
Chatbots have a long and not very successful history, but, like about touch interfaces or neural networks, one can say about them - everything has its time. In the last round of history, bots owe their popularity to Asian messengers and social networks. Having started in Asia, they set off to conquer Western social services. Those, in turn, hastily concocted the API, began to compete in a variety of opportunities and the amount of potential earnings on their platforms. That turned the lives of ordinary developers, who faced the same tasks of mastering bots, but from the side of content and service providers, into a nightmare.
Only one instant messengers that potentially go to the client can be counted with a dozen or so success, and in fact there are still classic SMS, Email and web chats. And all this requires a special approach, because each offers its own API or SDK. And it would be good to manage to cover all with one more or less consistent code, in order not to develop and support ten different implementations of the same. Business requires not so much quality coverage of smaller sales channels, but quantitative coverage of a larger number of channels. Even if some channels make more money than others. Or, if some channels offer more features than others.
')
So how to cover as many channels as possible without turning your work into endless running around between different implementations of the same? One of the available solutions is to use the framework. This, of course, will not solve all the problems, but will save, at a minimum, mental balance and, ideally, the money of the customer or employer.
The Microsoft Bot Framework was first introduced a year ago at the Microsoft Build 2016 conference. However, it is still in the Preview stage, which can create certain difficulties of various kinds using it in large projects in the current form. At least, I definitely cannot recommend using it in production right now.
I will not talk about all the features and benefits of this framework, you can easily find out about it from its documentation or any other article about it. As part of this material, I want to make a slight immersion in the practical implementation of the bot for the Microsoft Bot Framework.
It may seem that the bot is in principle difficult, but with an unfamiliar framework even more so, but it is not. As stated in the title, the implementation of the simplest bot with the Microsoft Bot Framework will take you no more than 10 minutes. About so much it took me to write and debug the code for this article and twice as much was spent searching for a suitable template to launch it in Azure Functions.
I chose PHP for this material for a number of reasons. First, because the main focus of my work is web development, and PHP, at least in Russia, remains the most popular language in this area. I thought about including Python code in the example, but decided not to complicate the already bloated material. If it is interesting, you can put it in a separate article. Secondly, although Microsoft claims that it is possible to work with the Bot Framework in PHP or Python, it effectively ignores them, does not give any documentation or examples, there is not even the SDK. All that is is the REST API and its documentation. The implementation is on the conscience of a developer who is likely to be ignored by a technology that is poorly documented for his language, no matter how wonderful and simple it is. Examples in other languages are not always easy to read, especially if they are overloaded with foreign constructions, like “async / await”.
I chose Azure Functions , because this is the easiest and cheapest way for any reader to try and practice with the code for this example. In fact, all that is required of you to launch a full-fledged bot from this material is to click the “Deploy to Azure” button and enter a couple of parameters for the application. Azure will create and configure the necessary resources, load the sample code from GitHub and set up the billing so that you do not have to pay for the entire time the application is running. You will pay only for the immediate calls of the bot, in fact the messages it processes.
In addition, if you are interested in the subject of microservices with serverless architecture and you are not familiar with Azure Functions, then this will be an excellent opportunity for you to get acquainted. However, microservices and the role of Azure Functions in them is another topic for another article.
Separately, I note that this example is written in the simplest, most linear, well-readable and descriptive way. Of course, it can not be used as a working code. Since there is no SDK for PHP at the moment, complicating this example with classes and individual functions would be completely redundant and only complicated its readability and perception.
So the first thing you need to do is create the bot itself: https://dev.botframework.com/bots/new . Create a bot name (Name), description (Description) and alias for naming URLs (Bot handle). Note that, unlike the name and description, the alias after creating a bot cannot be changed. Leave the “Messaging endpoint” field blank for now, we will fill it in after launching the application.
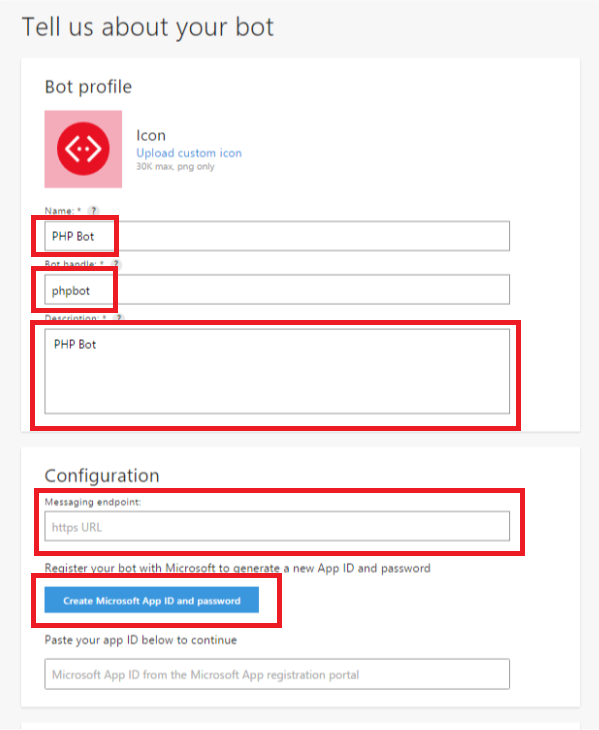
Click the “Microsoft App ID and password” button to create an ID and password for your application. ID and password are needed to authorize the application as a bot when sending messages to the chat, so save them. Click the "Complete the operation and return to the Bot Framework."

At this preparatory part is almost over. Read, confirm your agreement with all the agreements and click "Register". If everything is correct, you will see the message “Bot created” very soon. Nominally, your bot is ready. It remains to teach him to communicate.
First of all, set the application ID and password for bot authentication. You got them at the last step. At the same time we set the URL where we will contact them for the token authorizing the bot's answers.
In this example, I get the parameters from the environment variables, but you can set them directly in the code.
Next, we read the body of the POST request with a message from the user and deserialize it from the JSON format into the $ deserializedRequestActivity array .
In this example, I get the request body from the environment variable req , which is pre-configured in the Azure Functions binding. You can get the request body from the php: // input stream if you are not using Azure Functions.
If $ deserializedRequestActivity contains an id field, consider the incoming request to be correct and begin processing. First of all, you need to get a token to authorize the response to the message. The token can be obtained via a POST request to the Microsoft oAuth service. I use the stream context for a query only because its implementation looks clearer; you can use CURL .
We create the stream context configured above and execute a request to an oAuth service from it.
We read the answer to the request and deserialize it into the $ authData array.
If $ authData contains the access_token field, we consider authentication successful and continue processing. We determine what type of message we received and prepare the text of the response to the message if the type of the incoming message is message. In this example, we will not process all other types of messages, so all other types simply say that we are not familiar with them.
Now that we know what to answer, we create an $ deserializedResponseActivity array with the response data, which we later pass to the Microsoft Bot Framework.
Having formed the answer, we are preparing to send it, for which we form the URL, where we will send it. In fact, the URL is collected from the parameters of the incoming POST request and looks like this:
Where activity is an incoming POST request with a message that was deserialized earlier into the $ deserializedRequestActivity array.
Skip {activity.serviceUrl} through rtrim to exclude the last closing slash, because sometimes it is, and sometimes it is not. Also {activity.id} must be passed through urlencode , because there are special characters in it that break the URL and interfere with the request.
The URL is ready, now we are preparing a POST request to the Microsoft Bot Connector API, in which we will transmit the response to the incoming message. First, configure the stream context. I use the stream context for a query only because its implementation looks clearer; you can use CURL .
And immediately we create it and execute a configured request to the Microsoft Bot Connector API from the stream context.
Done, the user in the chat reads our response, and we write to the stream STDOUT a log about the receipt and processing of the next message.
The above code is on GitHub , there is no need to copy-paste it from here or write again. You can deploy the code in your own environment, or use the predefined template for Azure Functions. If you are going to deploy the code in your own environment, click here to skip the part about Azure Functions.

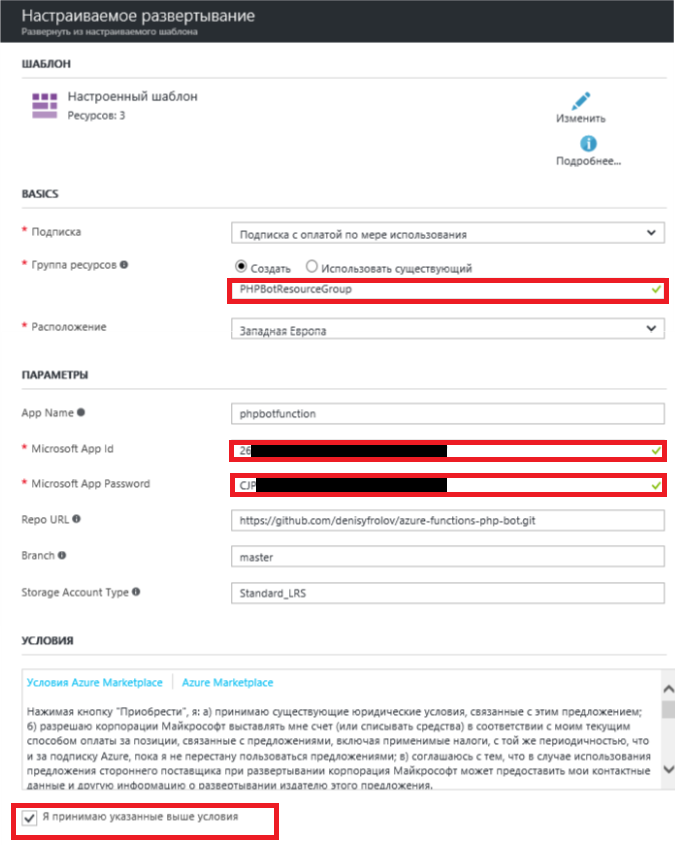
To perform automatic code deployment in Azure, simply click the “Deploy to Azure” button, located just above. The Deployment Wizard will only ask you for “Microsoft App Id” and “Microsoft App Password”, feel free to enter the ones you received during the preparation phase. Be sure to change the value of the “App Name” field, as the name specified in the template is already in use, and the deployment will end in error if left as is. Just add a couple of random numbers there. Additionally, you can select an existing resource group or create a new one, if you wish. Otherwise, the parameters are best left as is. Do not forget to read and agree to the terms, then click "Purchase."
The final touch, you need to take a link to the deployed application and stick it in the "Messaging endpoint" created at the bot preparation stage.
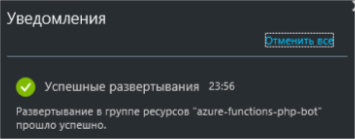
Wait until the application is deployed and go to the resource group into which you deployed it.

Go inside the Application Service instance with the name of the application you just deployed.
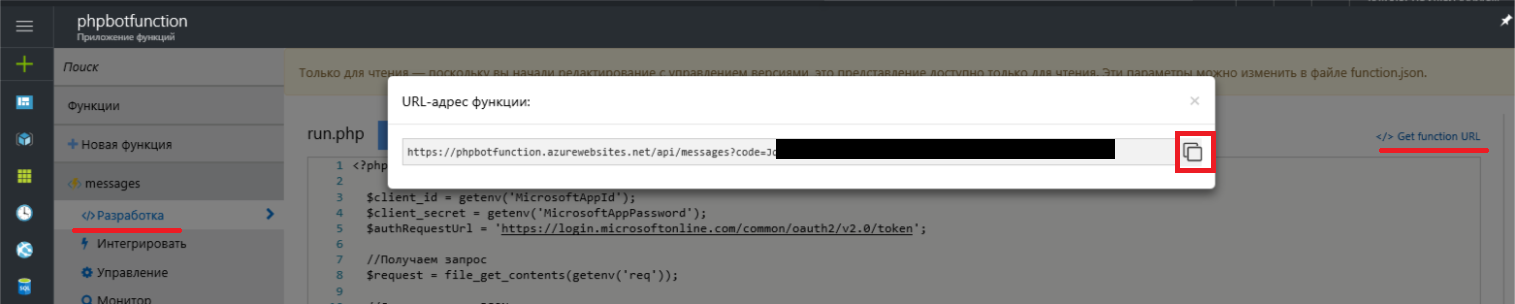
On the left, under the name of the “messages” function, go to the “Development” menu and in the window that opens on the right, click the “Get Function URL” link. In the popup will be a link of the following form.
The code parameter protects your application from accidental and malicious attacks. Without knowing this key, you cannot make the application work, which means you cannot overload it with requests and drive you into debt to Azure. Therefore, try not to show this parameter to anyone.
Copy the link, return to the list of your bots on the framework portal, from there go to bot editing and paste it (or similar to the messages / run.php script from the example, if you did not use Azure Functions) in the “Messaging endpoint” field.
Do not rush to leave the bot control page. On the right, you will find a web chat window where you can already try to write something to your new e-pet.
If you have deployed the code from the Azure Functions template , then do not be alarmed if the answers to your first messages come with some delay. This is due to the mode of the application service instance. To reduce your costs for hosting an example, a so-called “Consumption Plan” is included in the template, in which the service consumes resources as needed. Simply put, it is launched and scaled only when there is a real need for it. If it is even simpler, the service will be able to stand by until its web hook is pulled by someone who has the right to do so. If during the execution it does not have enough available resources, it is scaled automatically. Thus, you will save hours of computing, but note that this is not the only resource you pay for. After processing the call and after some time, the service again "falls asleep."
If you have already sent several messages to the bot and have not received any reply from it, then first of all visit the Application Services instance. There you can find the service call log (including data from the STDOUT stream) and a code testing tool.
By default, the code will be linked to the sample repository on GitHub in continuous deployment mode. Therefore, in the console you will see a warning about the availability of the code read-only. To change the code, you need to either completely disable continuous deployment, or clone the repository and link the service to it. Both can be done if you go from the console menu on the left to the “Application-function parameters” and click the “Configure continuous integration” button.
By default, Skype and web chat will be connected to the bot. Additionally, both instant messengers like Telegram and Slack are connected, as well as Email or SMS channels. There is also a REST API Direct Line interface that allows you to use your own chat applications or instant messengers. The settings of all the additional channels are accompanied by detailed instructions and, as a rule, do not cause any difficulties, so I see no reason to go into the details of these procedures here.
"Addresses and appearances" of the bot from this example:
It is no secret that Microsoft has been working on natural interfaces for a very long time and at the moment has achieved, if not great, then definitely no less success than colleagues in the shop. In my opinion, this framework is a wonderful example. It offers one of the broadest channel covers with relatively minimal labor costs. In addition, its capabilities are not limited to working with common features for all instant messengers and direct chat rooms. Microsoft Bot Framework allows you to work with features that are unique to a particular messenger, as well as work in group chats with their inherent logic. Of course, he is not the only one, and someone may have a different opinion on this matter.
The purpose of this article: to show by example how any web developer, with the right tools at hand, can now create his first bot without the extra cost and effort. And I hope that this will be enough for you to at least try.
But this is definitely not enough to instruct the bot of your customers. When we talk about natural interfaces, we mean not only the format of user interaction, but also how they will feel this interaction, that UX. As practice shows, the user is not very fond of communicating with bots, which are perceived only by dry teams and are not able to answer a single question. And for this problem, Microsoft has a fairly elegant solution to Microsoft Cognitive Services .
Microsoft Cognitive Services and working with natural speech is a very large and important part that could continue the topic of this article. But, first of all, I want to hear how interesting this is in the context of web development? Is it worth doing a cycle of articles? What languages would you like to see in the future?
Introduction
Chatbots have a long and not very successful history, but, like about touch interfaces or neural networks, one can say about them - everything has its time. In the last round of history, bots owe their popularity to Asian messengers and social networks. Having started in Asia, they set off to conquer Western social services. Those, in turn, hastily concocted the API, began to compete in a variety of opportunities and the amount of potential earnings on their platforms. That turned the lives of ordinary developers, who faced the same tasks of mastering bots, but from the side of content and service providers, into a nightmare.
Only one instant messengers that potentially go to the client can be counted with a dozen or so success, and in fact there are still classic SMS, Email and web chats. And all this requires a special approach, because each offers its own API or SDK. And it would be good to manage to cover all with one more or less consistent code, in order not to develop and support ten different implementations of the same. Business requires not so much quality coverage of smaller sales channels, but quantitative coverage of a larger number of channels. Even if some channels make more money than others. Or, if some channels offer more features than others.
')
So how to cover as many channels as possible without turning your work into endless running around between different implementations of the same? One of the available solutions is to use the framework. This, of course, will not solve all the problems, but will save, at a minimum, mental balance and, ideally, the money of the customer or employer.
Microsoft Bot Framework
The Microsoft Bot Framework was first introduced a year ago at the Microsoft Build 2016 conference. However, it is still in the Preview stage, which can create certain difficulties of various kinds using it in large projects in the current form. At least, I definitely cannot recommend using it in production right now.
I will not talk about all the features and benefits of this framework, you can easily find out about it from its documentation or any other article about it. As part of this material, I want to make a slight immersion in the practical implementation of the bot for the Microsoft Bot Framework.
It may seem that the bot is in principle difficult, but with an unfamiliar framework even more so, but it is not. As stated in the title, the implementation of the simplest bot with the Microsoft Bot Framework will take you no more than 10 minutes. About so much it took me to write and debug the code for this article and twice as much was spent searching for a suitable template to launch it in Azure Functions.
Why PHP?
I chose PHP for this material for a number of reasons. First, because the main focus of my work is web development, and PHP, at least in Russia, remains the most popular language in this area. I thought about including Python code in the example, but decided not to complicate the already bloated material. If it is interesting, you can put it in a separate article. Secondly, although Microsoft claims that it is possible to work with the Bot Framework in PHP or Python, it effectively ignores them, does not give any documentation or examples, there is not even the SDK. All that is is the REST API and its documentation. The implementation is on the conscience of a developer who is likely to be ignored by a technology that is poorly documented for his language, no matter how wonderful and simple it is. Examples in other languages are not always easy to read, especially if they are overloaded with foreign constructions, like “async / await”.
Why Azure Functions?
I chose Azure Functions , because this is the easiest and cheapest way for any reader to try and practice with the code for this example. In fact, all that is required of you to launch a full-fledged bot from this material is to click the “Deploy to Azure” button and enter a couple of parameters for the application. Azure will create and configure the necessary resources, load the sample code from GitHub and set up the billing so that you do not have to pay for the entire time the application is running. You will pay only for the immediate calls of the bot, in fact the messages it processes.
In addition, if you are interested in the subject of microservices with serverless architecture and you are not familiar with Azure Functions, then this will be an excellent opportunity for you to get acquainted. However, microservices and the role of Azure Functions in them is another topic for another article.
Implementation
Separately, I note that this example is written in the simplest, most linear, well-readable and descriptive way. Of course, it can not be used as a working code. Since there is no SDK for PHP at the moment, complicating this example with classes and individual functions would be completely redundant and only complicated its readability and perception.
Training
So the first thing you need to do is create the bot itself: https://dev.botframework.com/bots/new . Create a bot name (Name), description (Description) and alias for naming URLs (Bot handle). Note that, unlike the name and description, the alias after creating a bot cannot be changed. Leave the “Messaging endpoint” field blank for now, we will fill it in after launching the application.
Click the “Microsoft App ID and password” button to create an ID and password for your application. ID and password are needed to authorize the application as a bot when sending messages to the chat, so save them. Click the "Complete the operation and return to the Bot Framework."
At this preparatory part is almost over. Read, confirm your agreement with all the agreements and click "Register". If everything is correct, you will see the message “Bot created” very soon. Nominally, your bot is ready. It remains to teach him to communicate.
Code
First of all, set the application ID and password for bot authentication. You got them at the last step. At the same time we set the URL where we will contact them for the token authorizing the bot's answers.
$client_id = getenv('MicrosoftAppId'); $client_secret = getenv('MicrosoftAppPassword'); $authRequestUrl = 'https://login.microsoftonline.com/common/oauth2/v2.0/token'; In this example, I get the parameters from the environment variables, but you can set them directly in the code.
$client_id = '26XXXXXX-XXXX-XXXX-XXXX-XXXXXXXXXXXX'; $client_secret = 'CJPXXXXXXXXXXXXXXXXXXXXXXXXXXXX'; $authRequestUrl = 'https://login.microsoftonline.com/common/oauth2/v2.0/token'; Next, we read the body of the POST request with a message from the user and deserialize it from the JSON format into the $ deserializedRequestActivity array .
$request = file_get_contents(getenv('req')); $deserializedRequestActivity = json_decode($request, true); In this example, I get the request body from the environment variable req , which is pre-configured in the Azure Functions binding. You can get the request body from the php: // input stream if you are not using Azure Functions.
$request = file_get_contents('php://input'); $deserializedRequestActivity = json_decode($request, true); If $ deserializedRequestActivity contains an id field, consider the incoming request to be correct and begin processing. First of all, you need to get a token to authorize the response to the message. The token can be obtained via a POST request to the Microsoft oAuth service. I use the stream context for a query only because its implementation looks clearer; you can use CURL .
$authRequestOptions = array( 'http' => array( 'header' => "Content-type: application/x-www-form-urlencoded\r\n", 'method' => 'POST', 'content' => http_build_query( array( 'grant_type' => 'client_credentials', 'client_id' => $client_id, //ID 'client_secret' => $client_secret, // 'scope' => 'https://graph.microsoft.com/.default' ) ) ) ); We create the stream context configured above and execute a request to an oAuth service from it.
$authRequestContext = stream_context_create($authRequestOptions); $authResult = file_get_contents($authRequestUrl, false, $authRequestContext); We read the answer to the request and deserialize it into the $ authData array.
$authData = json_decode($authResult, true); If $ authData contains the access_token field, we consider authentication successful and continue processing. We determine what type of message we received and prepare the text of the response to the message if the type of the incoming message is message. In this example, we will not process all other types of messages, so all other types simply say that we are not familiar with them.
switch ((string)$deserializedRequestActivity['type']) { case 'message': $message = 'New message is received: ' . (string)$deserializedRequestActivity['text']; break; default: $message = 'Unknown type'; break; } Now that we know what to answer, we create an $ deserializedResponseActivity array with the response data, which we later pass to the Microsoft Bot Framework.
$deserializedResponseActivity = array( // 'type' => 'message', // 'text' => $message, //, - 'textFormat' => 'plain', // 'locale' => 'ru-RU', // ID , ( id POST- ) 'replyToId' => (string)$deserializedRequestActivity['id'], // id ( recipient->id recipient->name POST- , id name, ) 'from' => array( 'id' => (string)$deserializedRequestActivity['recipient']['id'], 'name' => (string)$deserializedRequestActivity['recipient']['name'] ), // id , , ( from->id from->name POST- ) 'recipient' => array( 'id' => (string)$deserializedRequestActivity['from']['id'], 'name' => (string)$deserializedRequestActivity['from']['name'] ), // id , ( conversation->id POST- ) 'conversation' => array( 'id' => (string)$deserializedRequestActivity['conversation']['id'] ) ); Having formed the answer, we are preparing to send it, for which we form the URL, where we will send it. In fact, the URL is collected from the parameters of the incoming POST request and looks like this:
https:// {activity.serviceUrl} /v3/conversations/ {activity.conversation.id} /activities/ {activity.id}Where activity is an incoming POST request with a message that was deserialized earlier into the $ deserializedRequestActivity array.
Skip {activity.serviceUrl} through rtrim to exclude the last closing slash, because sometimes it is, and sometimes it is not. Also {activity.id} must be passed through urlencode , because there are special characters in it that break the URL and interfere with the request.
$responseActivityRequestUrl = rtrim($deserializedRequestActivity['serviceUrl'], '/') . '/v3/conversations/' . $deserializedResponseActivity['conversation']['id'] . '/activities/' . urlencode($deserializedResponseActivity['replyToId']); The URL is ready, now we are preparing a POST request to the Microsoft Bot Connector API, in which we will transmit the response to the incoming message. First, configure the stream context. I use the stream context for a query only because its implementation looks clearer; you can use CURL .
$responseActivityRequestOptions = array( 'http' => array( // POST- , (token_type) (access_token) 'header' => 'Authorization: ' . $authData['token_type'] . ' ' . $authData['access_token'] . "\r\nContent-type: application/json\r\n", 'method' => 'POST', // JSON- $deserializedResponseActivity 'content' => json_encode($deserializedResponseActivity) ) ); And immediately we create it and execute a configured request to the Microsoft Bot Connector API from the stream context.
$responseActivityRequestContext = stream_context_create($responseActivityRequestOptions); $responseActivityResult = file_get_contents($responseActivityRequestUrl, false, $responseActivityRequestContext); Done, the user in the chat reads our response, and we write to the stream STDOUT a log about the receipt and processing of the next message.
fwrite(STDOUT, 'New message is received: "' . (string)$deserializedRequestActivity['text'] . '"'); Launch
The above code is on GitHub , there is no need to copy-paste it from here or write again. You can deploy the code in your own environment, or use the predefined template for Azure Functions. If you are going to deploy the code in your own environment, click here to skip the part about Azure Functions.
To perform automatic code deployment in Azure, simply click the “Deploy to Azure” button, located just above. The Deployment Wizard will only ask you for “Microsoft App Id” and “Microsoft App Password”, feel free to enter the ones you received during the preparation phase. Be sure to change the value of the “App Name” field, as the name specified in the template is already in use, and the deployment will end in error if left as is. Just add a couple of random numbers there. Additionally, you can select an existing resource group or create a new one, if you wish. Otherwise, the parameters are best left as is. Do not forget to read and agree to the terms, then click "Purchase."
The final touch, you need to take a link to the deployed application and stick it in the "Messaging endpoint" created at the bot preparation stage.
Wait until the application is deployed and go to the resource group into which you deployed it.
Go inside the Application Service instance with the name of the application you just deployed.
On the left, under the name of the “messages” function, go to the “Development” menu and in the window that opens on the right, click the “Get Function URL” link. In the popup will be a link of the following form.
https:// {__} .azurewebsites.net/api/messages?code= JqXXXXXXXXXXXXXXX...The code parameter protects your application from accidental and malicious attacks. Without knowing this key, you cannot make the application work, which means you cannot overload it with requests and drive you into debt to Azure. Therefore, try not to show this parameter to anyone.
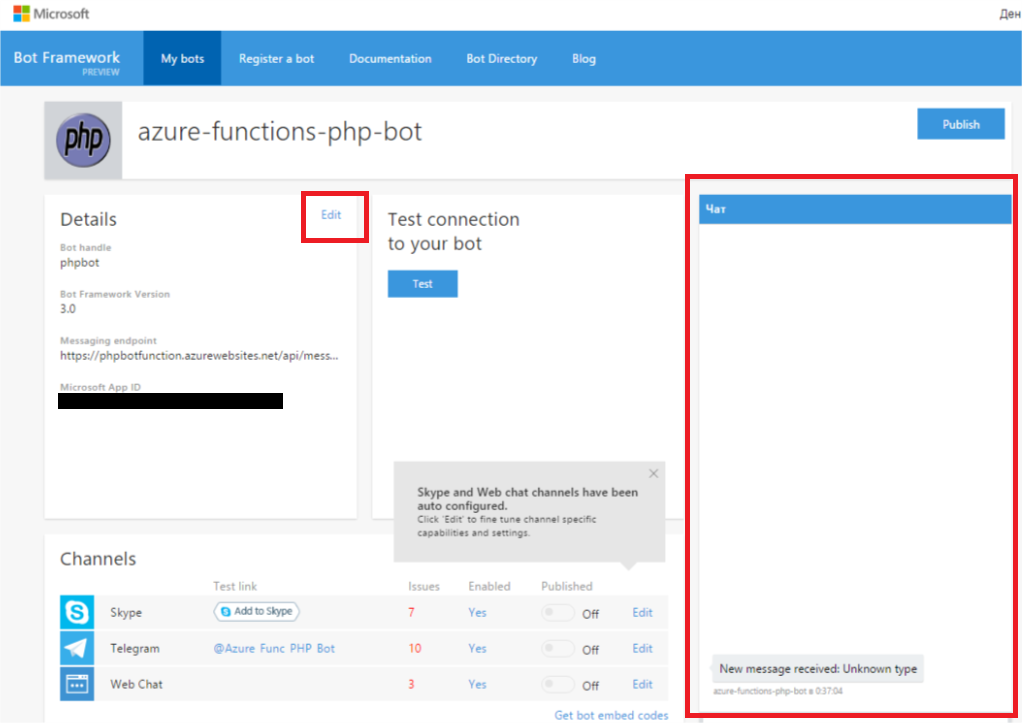
Copy the link, return to the list of your bots on the framework portal, from there go to bot editing and paste it (or similar to the messages / run.php script from the example, if you did not use Azure Functions) in the “Messaging endpoint” field.
Check and debug
Do not rush to leave the bot control page. On the right, you will find a web chat window where you can already try to write something to your new e-pet.
If you have deployed the code from the Azure Functions template , then do not be alarmed if the answers to your first messages come with some delay. This is due to the mode of the application service instance. To reduce your costs for hosting an example, a so-called “Consumption Plan” is included in the template, in which the service consumes resources as needed. Simply put, it is launched and scaled only when there is a real need for it. If it is even simpler, the service will be able to stand by until its web hook is pulled by someone who has the right to do so. If during the execution it does not have enough available resources, it is scaled automatically. Thus, you will save hours of computing, but note that this is not the only resource you pay for. After processing the call and after some time, the service again "falls asleep."
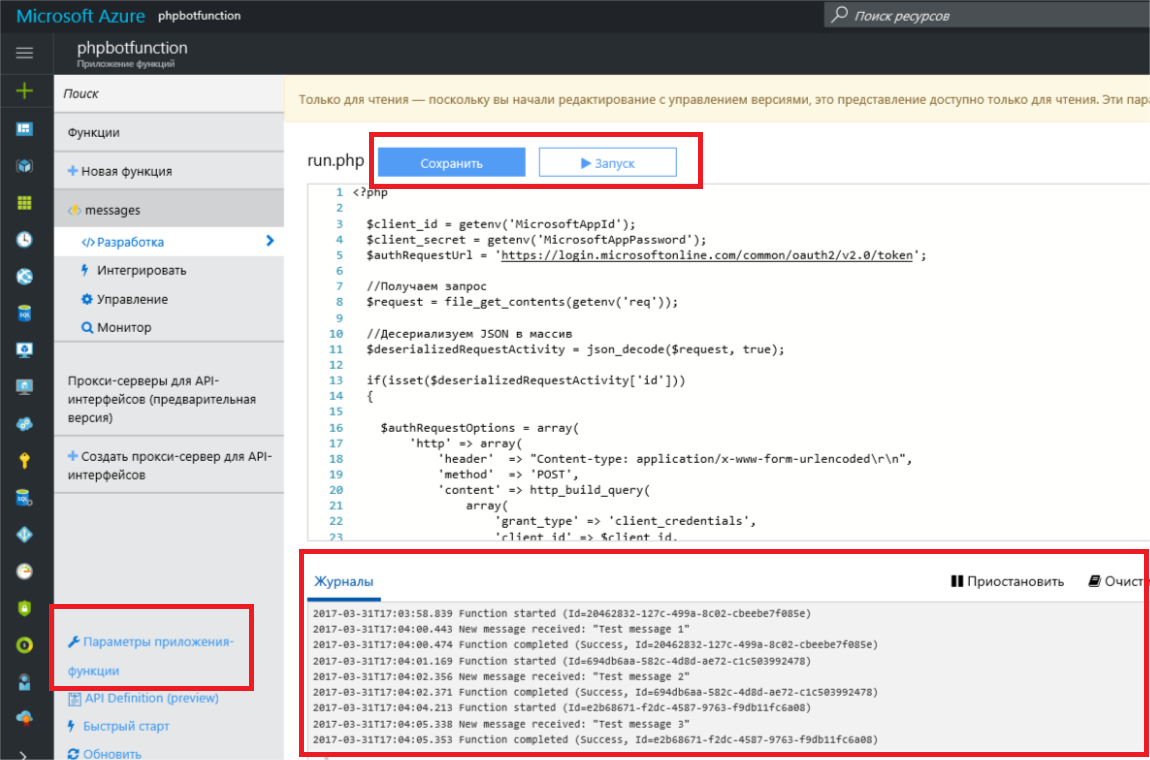
If you have already sent several messages to the bot and have not received any reply from it, then first of all visit the Application Services instance. There you can find the service call log (including data from the STDOUT stream) and a code testing tool.
By default, the code will be linked to the sample repository on GitHub in continuous deployment mode. Therefore, in the console you will see a warning about the availability of the code read-only. To change the code, you need to either completely disable continuous deployment, or clone the repository and link the service to it. Both can be done if you go from the console menu on the left to the “Application-function parameters” and click the “Configure continuous integration” button.
Connecting channels
By default, Skype and web chat will be connected to the bot. Additionally, both instant messengers like Telegram and Slack are connected, as well as Email or SMS channels. There is also a REST API Direct Line interface that allows you to use your own chat applications or instant messengers. The settings of all the additional channels are accompanied by detailed instructions and, as a rule, do not cause any difficulties, so I see no reason to go into the details of these procedures here.
"Addresses and appearances" of the bot from this example:

- Telegram @Azure_Func_PHP_Bot
- web chat
Conclusion
It is no secret that Microsoft has been working on natural interfaces for a very long time and at the moment has achieved, if not great, then definitely no less success than colleagues in the shop. In my opinion, this framework is a wonderful example. It offers one of the broadest channel covers with relatively minimal labor costs. In addition, its capabilities are not limited to working with common features for all instant messengers and direct chat rooms. Microsoft Bot Framework allows you to work with features that are unique to a particular messenger, as well as work in group chats with their inherent logic. Of course, he is not the only one, and someone may have a different opinion on this matter.
The purpose of this article: to show by example how any web developer, with the right tools at hand, can now create his first bot without the extra cost and effort. And I hope that this will be enough for you to at least try.
But this is definitely not enough to instruct the bot of your customers. When we talk about natural interfaces, we mean not only the format of user interaction, but also how they will feel this interaction, that UX. As practice shows, the user is not very fond of communicating with bots, which are perceived only by dry teams and are not able to answer a single question. And for this problem, Microsoft has a fairly elegant solution to Microsoft Cognitive Services .
Microsoft Cognitive Services and working with natural speech is a very large and important part that could continue the topic of this article. But, first of all, I want to hear how interesting this is in the context of web development? Is it worth doing a cycle of articles? What languages would you like to see in the future?
Related Links
- Sample code on GitHub
- Microsoft Bot Framework Documentation
- Azure Functions Documentation
- Get 30 days of free using Azure
Source: https://habr.com/ru/post/325130/
All Articles