Making your first game on the Phaser. Part 1 - Introduction
Table of contents
0 Preparation for work
1 . Introduction [ ]
2 Resource download
3 Creation of the game world
4 ( wip ) Groups
5 ( wip ) The world of physics
6 ( wip ) Management
7 ( wip ) Add targets
8 ( wip ) Finishing Touches
Welcome to our first lesson on creating Phaser games. Here I will tell you how to create a small game - a platformer that will introduce you to the main functions of this framework and work with it in current realities ( ES6 / TypeScript + WebPack ).
What is a Phaser?
Phaser is an HTML5 ( JavaScript / TypeScript ) gaming framework that is designed to help developers create cool, cross-browser HTML5 games in a short time and, unlike other frameworks, phaser was originally sharpened for mobile devices. The only requirement put forward by this framework is support for the <canvas /> . He also inherited a lot from Flixel .
Demand
The source code of this lesson and the resources of the game lie in this Github repository with the tag part-1 (each tag corresponds to the number of the lesson). If you have already cloned this repository yourself, start learning from src/index.ts .
You will need basic knowledge of TypeScript 'a (or ES6 ), as well as the installed Node.js for building the project (I recommend, at the time of publication of this article, put the 6 version).
When you clone your repository, don't forget to install the NPM packages:
npm i # Yarn npm i -g yarn yarn npm rebuild # Yarn C++ , After installation, start the Webpack Dev Server (the server will listen at http://127.0.0.1:8080 ):
npm start Open src/index.ts in your favorite editor, and let's take a look at the code.
The application framework looks like this:
'use strict'; /** Imports */ // . (, webpack' ). require('pixi'); // - Phaser', PIXI p2 require('p2'); require('phaser'); // -, , TypeScript , `import 'phaser';` import 'styles/style.styl'; // ; // ("") export class MainState extends Phaser.State { preload(): void { } create(): void { } update(): void { } } // export default class App extends Phaser.Game { constructor(config: Phaser.IGameConfig) { super(config); this.state.add('main', MainState); // "" this.state.start('main'); // } } // python' `__name__ == "__main__"`, // . if (!module.parent) { window.onload = () => { const config: Phaser.IGameConfig = { width: 800, // canvas' height: 600, // canvas' renderer: Phaser.AUTO, // , AUTO parent: '', resolution: 1, forceSetTimeOut: false // setTimeout }; new App(config); // . Canvas }; } On lines 4-6 we register global dependencies for our application. As mentioned above, due to the Phaser architecture ( at the time of writing the article v2.6.2 ), these 3 libraries should be global (we make them global at the assembly stage, in the Webpack). Also, TypeScript ( v2.2.1 ) for some reason breaks down if you connect them via import , and not through require , well, to hell with it.
On line 22 , we inherit the Phaser.Game class, and register in its constructor the main state of our game.
We create the main constructor of the state on the 12 line, and inherit it from Phaser.State . This class has 3 main public methods ( in fact, much more , but these are the most frequently used):
preload(): void- needed to load game resources: sprites, sounds, json-data, etc.create(): void- the starting (and immutable) parameters of the game are initialized in it: setting the background, generating a map, creating objects, etc.update(): void- the method called during each tick of the game (i.e., in fact, for each frame change).
In the future, it is in them that we will create the main logic of our game.
And finally, the 36 'th line, on it we create a configuration object for our application, and on the 45 ' th line we start it.
Basic properties:
width- the height of the game world.height- the width of the game world.renderer- rendering engine. The choice of image rendering method (CanvasorWebGL), we chosePhaser.AUTO, so that the framework itself would choose an available browser engine. In case the browser does not supportWebGL, a fallback to theCanvaswill occur.parent- HTML element or element selector where<canvas />will be inserted. By default (with''), the canvas is inserted into<body />.resolution- the resolution of the game.forceSetTimeOut- will force Phaser to usesetTimeoutinstead ofrequestAnimationFrame. In our case, this is not necessary.
The rest of the properties you will find here .
If you did everything right, you will see the following:
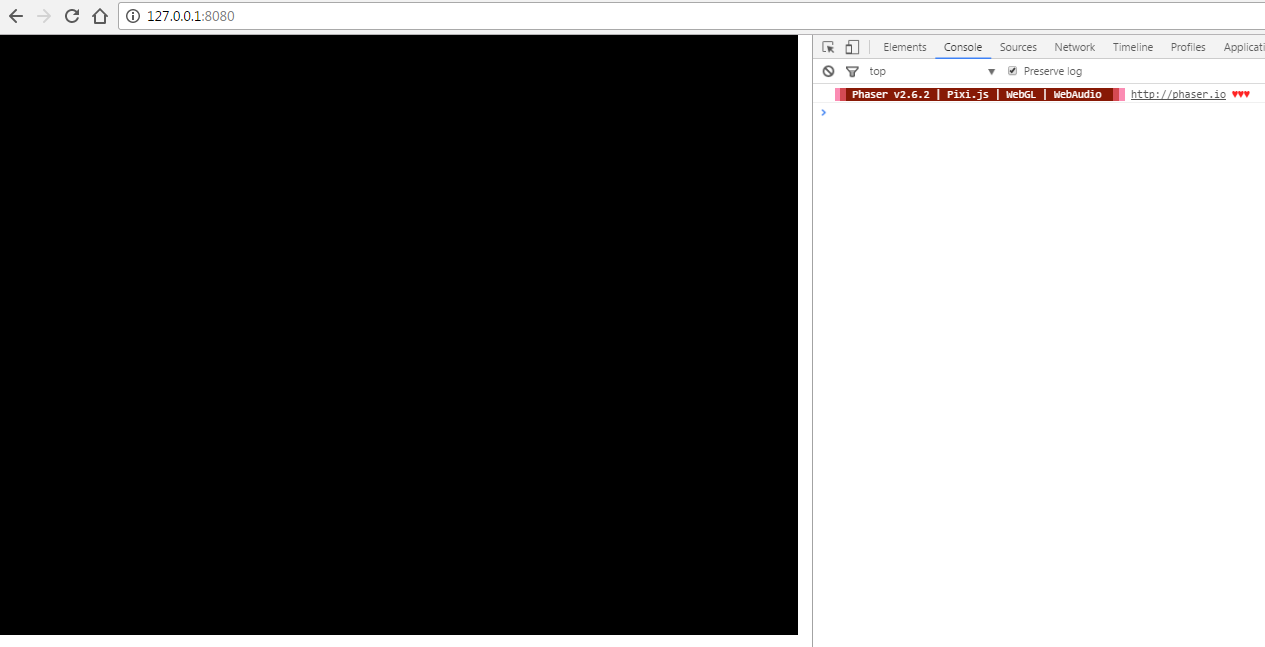
And judging by this line, the browser supports WebGL and WebAudio :

Github Repo : https://github.com/SuperPaintman/phaser-typescript-tutorial
')
Source: https://habr.com/ru/post/324896/
All Articles