Creating a button for a LISP application in nanoCAD

The release of the eighth version of the nanoCAD Plus platform was, in my opinion, the largest and most extensive update in the history of its existence. Many new features have appeared , the already implemented functions have been refined and rethought, the wishes and comments of active users have been taken into account. One of the important changes of the eighth version is the revised user interface settings (NPI). This article will be discussed in this article, namely, how to create a button in nanoCAD and attach a LISP application to it. We will create our button in nanoCAD Plus 8.1, but the method works in other applications based on the eighth version.
I recommend storing all LISP files in a separate directory (in this example, they are located along the path D: \ Lisp \ ). First you need to make sure the command is registered inside the LISP file. Open LISP using any text editor (Fig. 1). In our function file is assigned the name C: summline . The operation of the command can be checked by uploading a LISP file to nanoCAD ( Tools → Applications → Application Download ). When you enter the summline command on the command line, the LISP function will be executed. This is the name of the command that we will use when creating the button.

Fig. 1. Team Registration in LISP
')
First of all, let's teach nanoCAD to automatically load our LISP every time you start the program. To do this, we go to Tools → Applications → Application Download ... In the Application Upload / Download window, click the Applications button, and in the Startup window, click the Add button and specify our D: \ Lisp \ summline.lsp file (Figure 2).

Fig. 2. Autoloading a LISP Application
Great, we added our application to autoload! Start creating a button on the toolbar. Go to Tools → Interface → Customize User Interface> Toolbars tab . The right side of the window that opens contains a list of nanoCAD commands. From the context menu, select the Create command option (Fig. 3).

Fig. 3. User Interface Settings (NPI)
In the window that appears, register a new command. The internal command name must match the command name from the LISP. In the Name field, we indicate the name of the command in Cyrillic: Sum . We also fill in the Display Name, Tooltip Text and Explanatory Text fields.
As a resource DLL, specify newbtns.dll from the product folder (it contains interface icons). In fig. 4 shows how our command and button to it will look on the command line and on the toolbar.
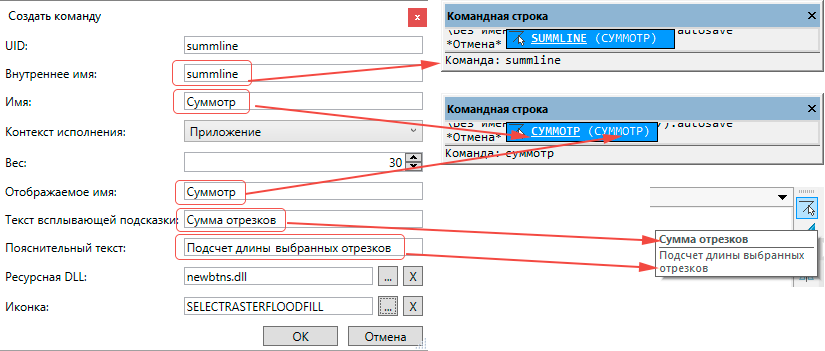
Fig. 4. Creating a button for a LISP application
After filling in the fields, click OK . Our team appeared in the general list of nanoCAD teams. With the left mouse button, drag the command to the left side of the NPI window and place it in the required toolbar (Fig. 5). In our example, this is the Edit toolbar.

Fig. 5. Adding a button to the toolbar
Press the OK button and restart nanoCAD. After restarting, our new button will appear on the toolbar (Fig. 6).
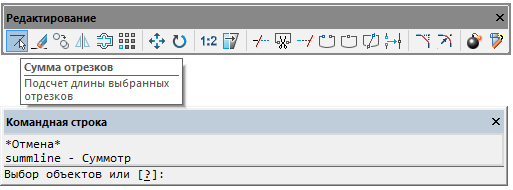
Fig. 6. Editing panel
In this way, new commands can be added to nanoCAD. You can store commands in one LISP file or in several - the main thing is not to forget to add them to the autoload.
Have a good design!
Sergey Spirin, mahbak
ZAO Nanosoft
Source: https://habr.com/ru/post/324784/
All Articles