Rust, Eclipse and STM32
In order to make friends with each other, the technologies specified in the title will be needed:
The idea is to compile a program written in Rust into a library that can be linked using the toolchain for ARM.
As a result, we can even quite comfortably debug the mixed code on Rust and C.
We will use the STM32CubeMX utility for this. For the demo project we need:
')
Check the clocking settings. Here, if desired, we can specify the clocking from the outer quartz and its frequency.
Generate the project. Let's call it “HwApi”, because This layer of code we will have an abstraction over iron, which we will use when writing code on Rust. For IDE, select SW4STM32.
If the Workbench is installed, then we can open the generated project and check that it compiles successfully.
Although System Workbench is based on Eclipse, we will have to create a new project in the new major version of Eclipse (Neon), since RustDT is incompatible with that version of Eclipse.
We also need a project template that is installed with the GNU ARM Eclipse Plugin.

In order to successfully link the lib generated by the rust compiler, we need a pre-installed fresh version of the GNU ARM Embedded Toolchain.
Begin the process of moving a project from System Workbench to Eclipse CDT. On the Internet, you can find scripts that automate this process, but I will do it manually, because I am going to reuse HwApiLib in other projects, changing only the part of the code written in Rust.
Copy the following folders / files into the new project:
If the Workbench is installed, then expand the two project settings windows (from the old and new Eclipse) so that it is convenient to copy the values from one window to another. The windows are slightly different, so when copying we focus on the flags, which are indicated in brackets.
If the Workbench is not installed, you can simply copy the settings from the screenshots attached below.
Copy Defined Symbols:

Folder paths containing * .h files:
On the “Optimization” tab, you can enable Optimize size (-Os).
Further we specify that we need all warnings of the compiler:

Specify the path to the linker script + check the checkbox to remove unused sections from the linking result:
On the next tab, it is important to check the “Use newlib-nano” checkbox and manually specify the

Specify the paths to the folders with files to compile:

Click OK. Then we change the startup file extension to the capital .S so that the file is successfully picked up by the compiler. Check that the project is compiled.
Now you need to configure the debugger (Run - Debug Configurations - GDB OpenOCD Debugging). Create a file for OpenOCD with a description of the hardware in which the program will run (in my case, the file is called STM32F103C8x_SWD.cfg):
If you use another microcontroller or another way to connect to it, then the correct file for OpenOCD can be generated in Workbench (using Debugging options - Ac6).
In the Config options, specify the -f flag and the path to the file created in the previous step.

Click Debug. We check that the debugger successfully filled the code into the microcontroller and started debugging.
It's time to create a Rust project. Since we will need compiler instructions that are not supported in the stable version, we will need to switch us to the nightly version of the compiler by running the following commands in cmd:
Next, you need to get the current version of the compiler:
Then clone the sources of rust and switch to the commit that was used to build this compiler (specified in commit-hash).
The next step is to compile the libraries we need under ARM.
In the future, with each update of the compiler (rustup update), you will need to switch to the current version of the source code and recompile the libraries for ARM, otherwise you will lose the opportunity to debug the code on rust.
Finally you can start creating a Rust project in eclipse.


Eclipse asks to specify the path to the compiler, source code and utilities for working with rust-code.
Usually these components can be found in C: \ Users \% username% \. Cargo. Rust src - the path to the src folder in the source code that we downloaded earlier.
Now the main code:
lib.rs
api.rs - interlayer for integration between Rust and C code
runtime_support.rs - to support low-level Rust features
Also in the project root you need to create a target platform configuration file
thumbv7m-none-eabi.json grossws suggested that now this file is included in the compiler and you can not create it.
Copy into the Rust folder of the project the libs-arm folder containing the components compiled to work under ARM from the standard Rust library.
We change the Debug target so that it runs the compilation with the parameters we need

Compile the Rust project. As a result, the file lib.o will appear in the project folder.
Now in the C-project we create files api.h / api.c, in which we declare and implement the functions that are used in api.rs.
api.h
api.c
Add the demo_main_loop () call inside the main function.
main.c
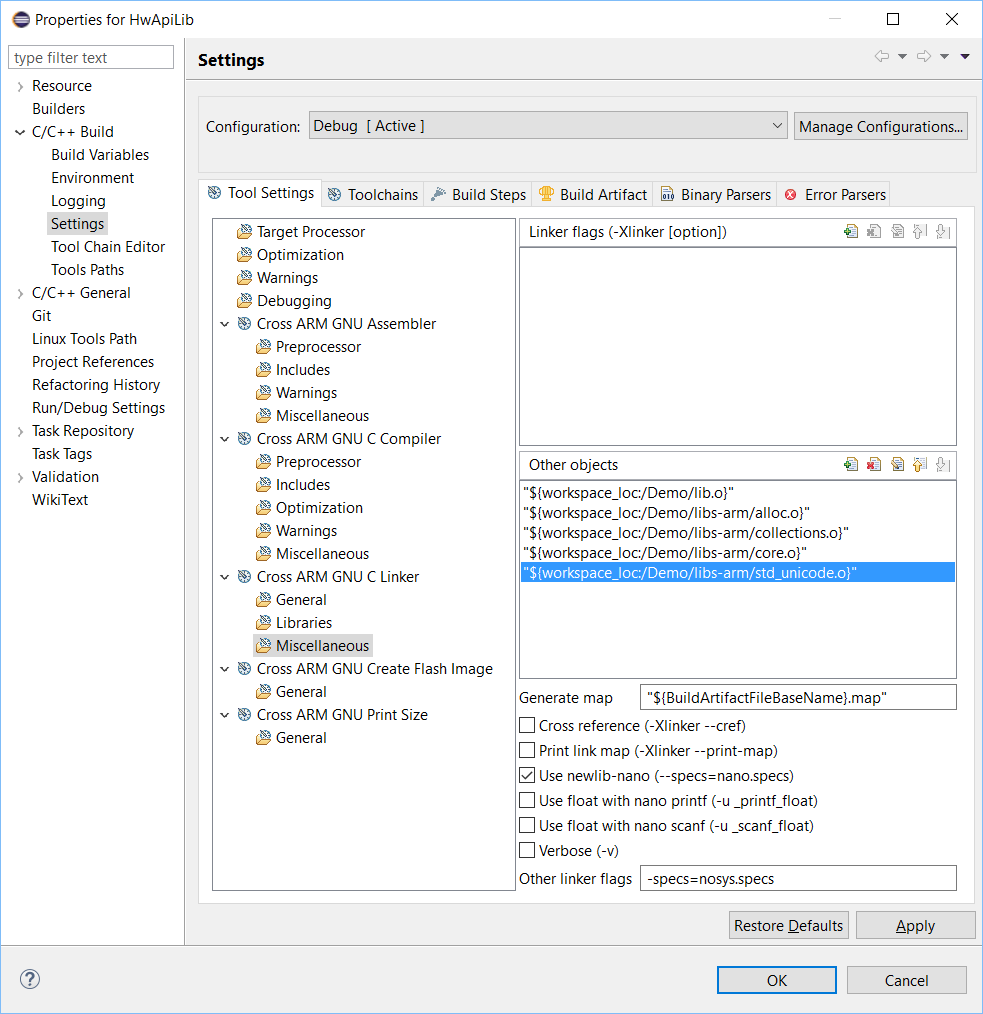
It remains to link everything. To do this, open the project properties in C and tell the linker where to get the missing obj files.
Compile. The binary has gained a lot of weight, but still fits in the STM32F103C8.

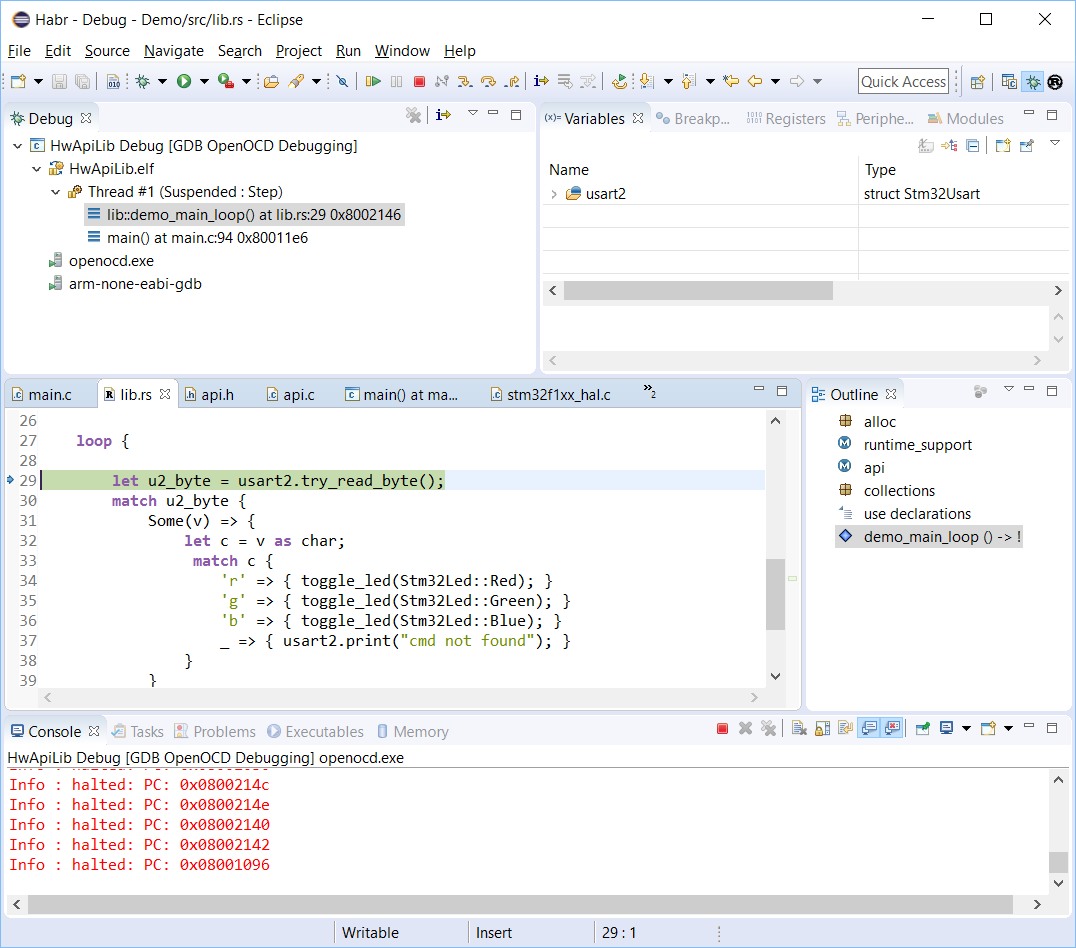
We launch Debug and we see that Eclipse without problems passes from the C-code to Rust.
At the end of the article I want to thank the authors of the following posts, without them I would not have mastered this process:
www.hashmismatch.net/pragmatic-bare-metal-rust
spin.atomicobject.com/2015/02/20/rust-language-c-embedded
github.com/japaric/rust-cross
The article was written with the hope that this would serve as an additional step in the emergence of a community of developers using Rust for programming under microcontrollers, since it is really a convenient and modern language, despite the fact that it has a rather high threshold of entry.
- Fresh GNU ARM Embedded Toolchain
- System Workbench for STM32 (optional)
- Fresh Eclipse CDT
- GNU ARM Eclipse Plugin
- Rusty
- RustDT . For comfortable development it is also recommended to install Racer, Rainicorn and rustfmt .
The idea is to compile a program written in Rust into a library that can be linked using the toolchain for ARM.
As a result, we can even quite comfortably debug the mixed code on Rust and C.
1. Project generation in C
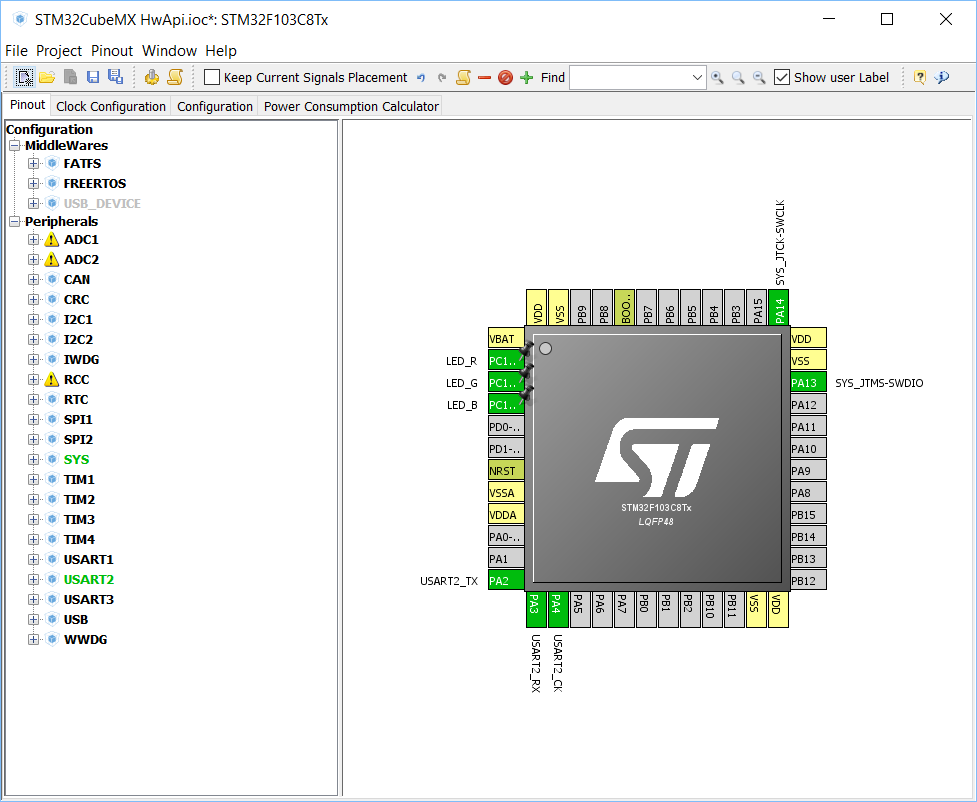
We will use the STM32CubeMX utility for this. For the demo project we need:
- SYS = Serial Wire (if the device is connected via SWD) or JTAG
- USART2 in Asynchronous configuration
- Several pins on one port in GPIO_Output mode (let's call them LED_R, LED_G, LED_B)
')
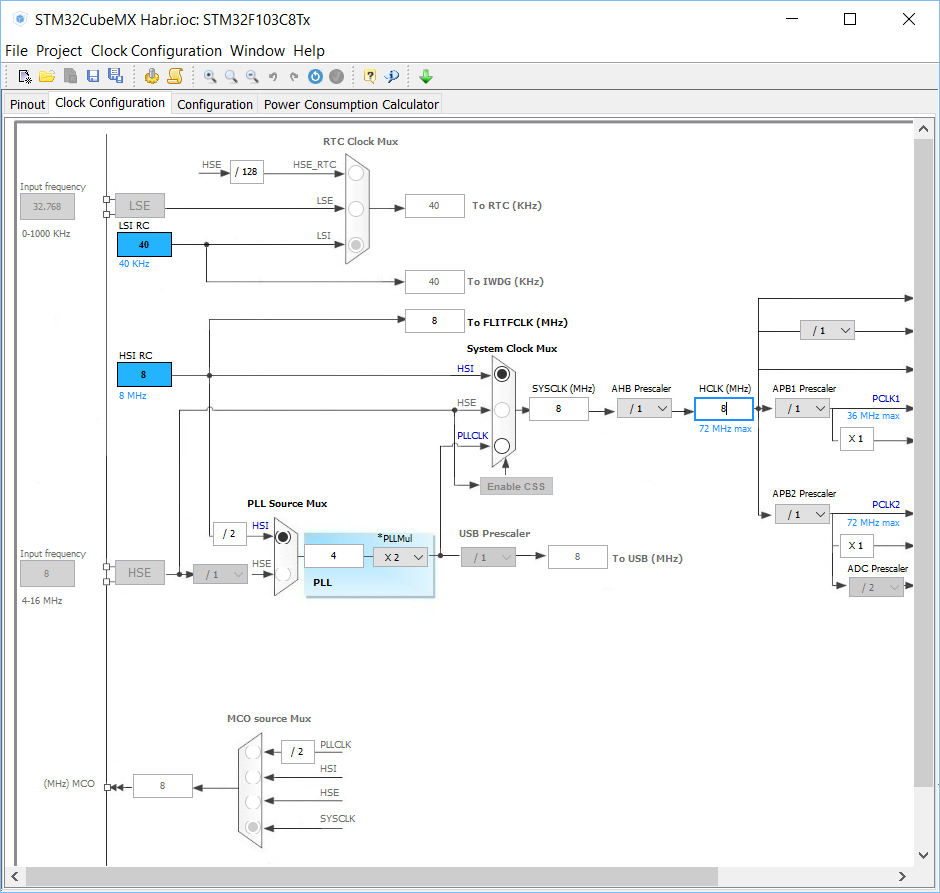
Check the clocking settings. Here, if desired, we can specify the clocking from the outer quartz and its frequency.
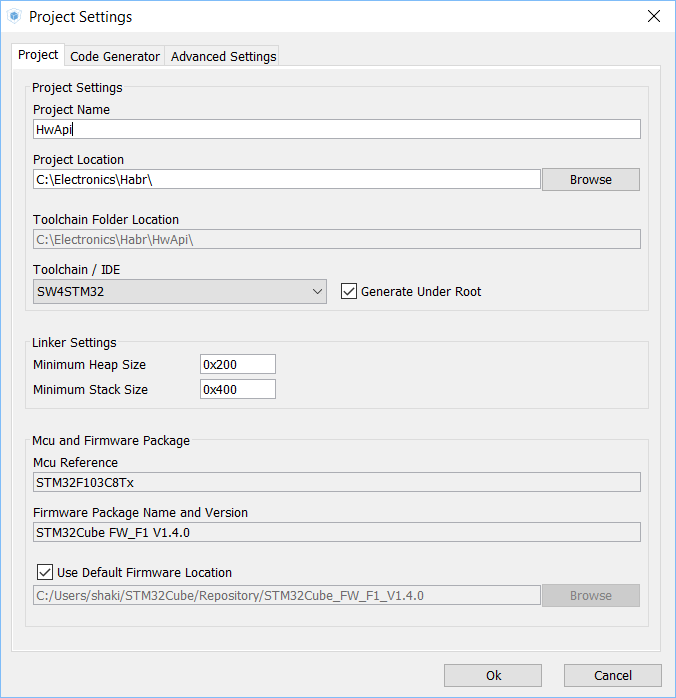
Generate the project. Let's call it “HwApi”, because This layer of code we will have an abstraction over iron, which we will use when writing code on Rust. For IDE, select SW4STM32.
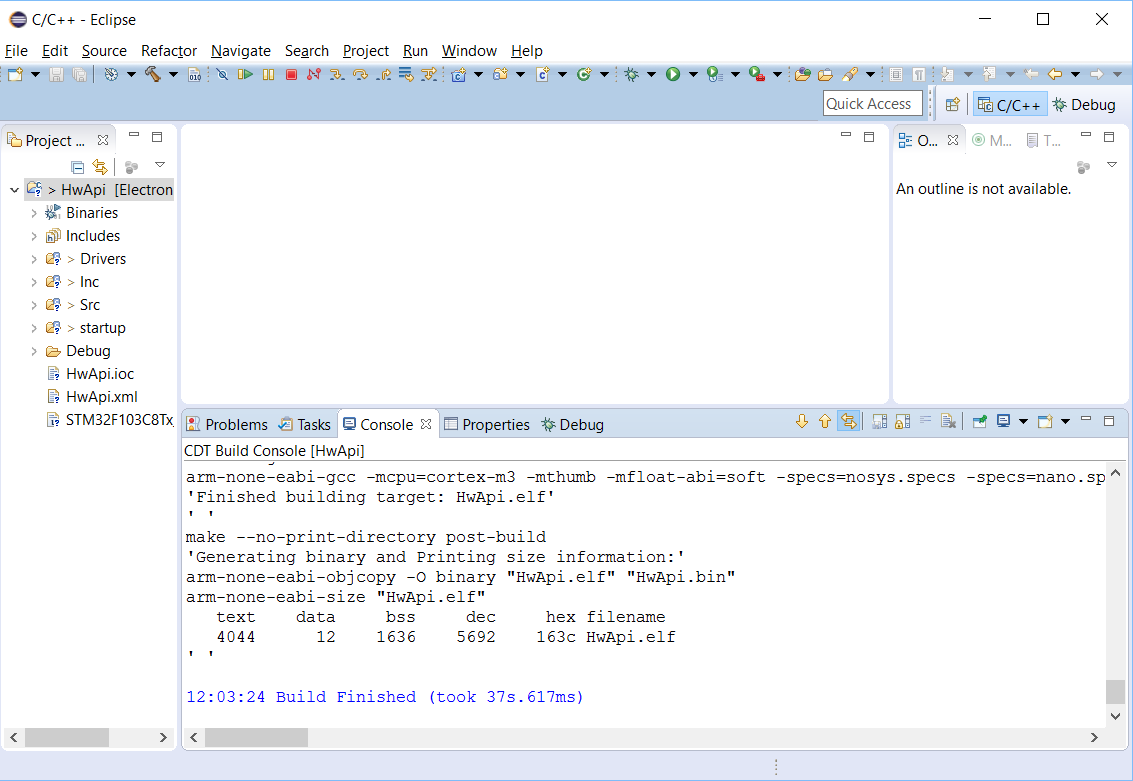
If the Workbench is installed, then we can open the generated project and check that it compiles successfully.
2. Create a project for the latest version of Eclipse
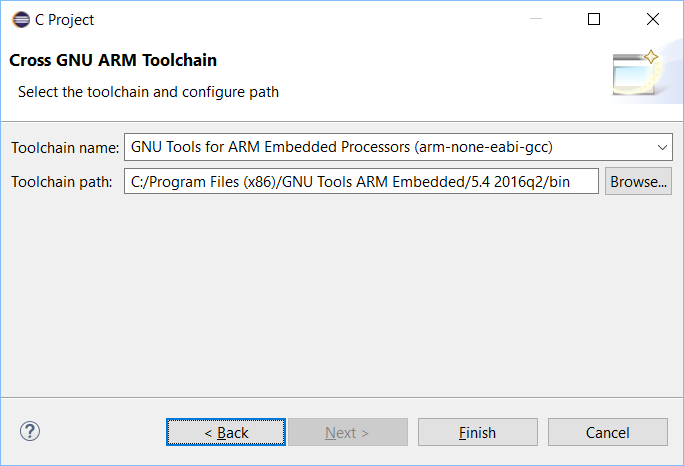
Although System Workbench is based on Eclipse, we will have to create a new project in the new major version of Eclipse (Neon), since RustDT is incompatible with that version of Eclipse.
We also need a project template that is installed with the GNU ARM Eclipse Plugin.
In order to successfully link the lib generated by the rust compiler, we need a pre-installed fresh version of the GNU ARM Embedded Toolchain.
Begin the process of moving a project from System Workbench to Eclipse CDT. On the Internet, you can find scripts that automate this process, but I will do it manually, because I am going to reuse HwApiLib in other projects, changing only the part of the code written in Rust.
Copy the following folders / files into the new project:
- Drivers
- Inc
- Src
- startup
- STM32F103C8Tx_FLASH.ld
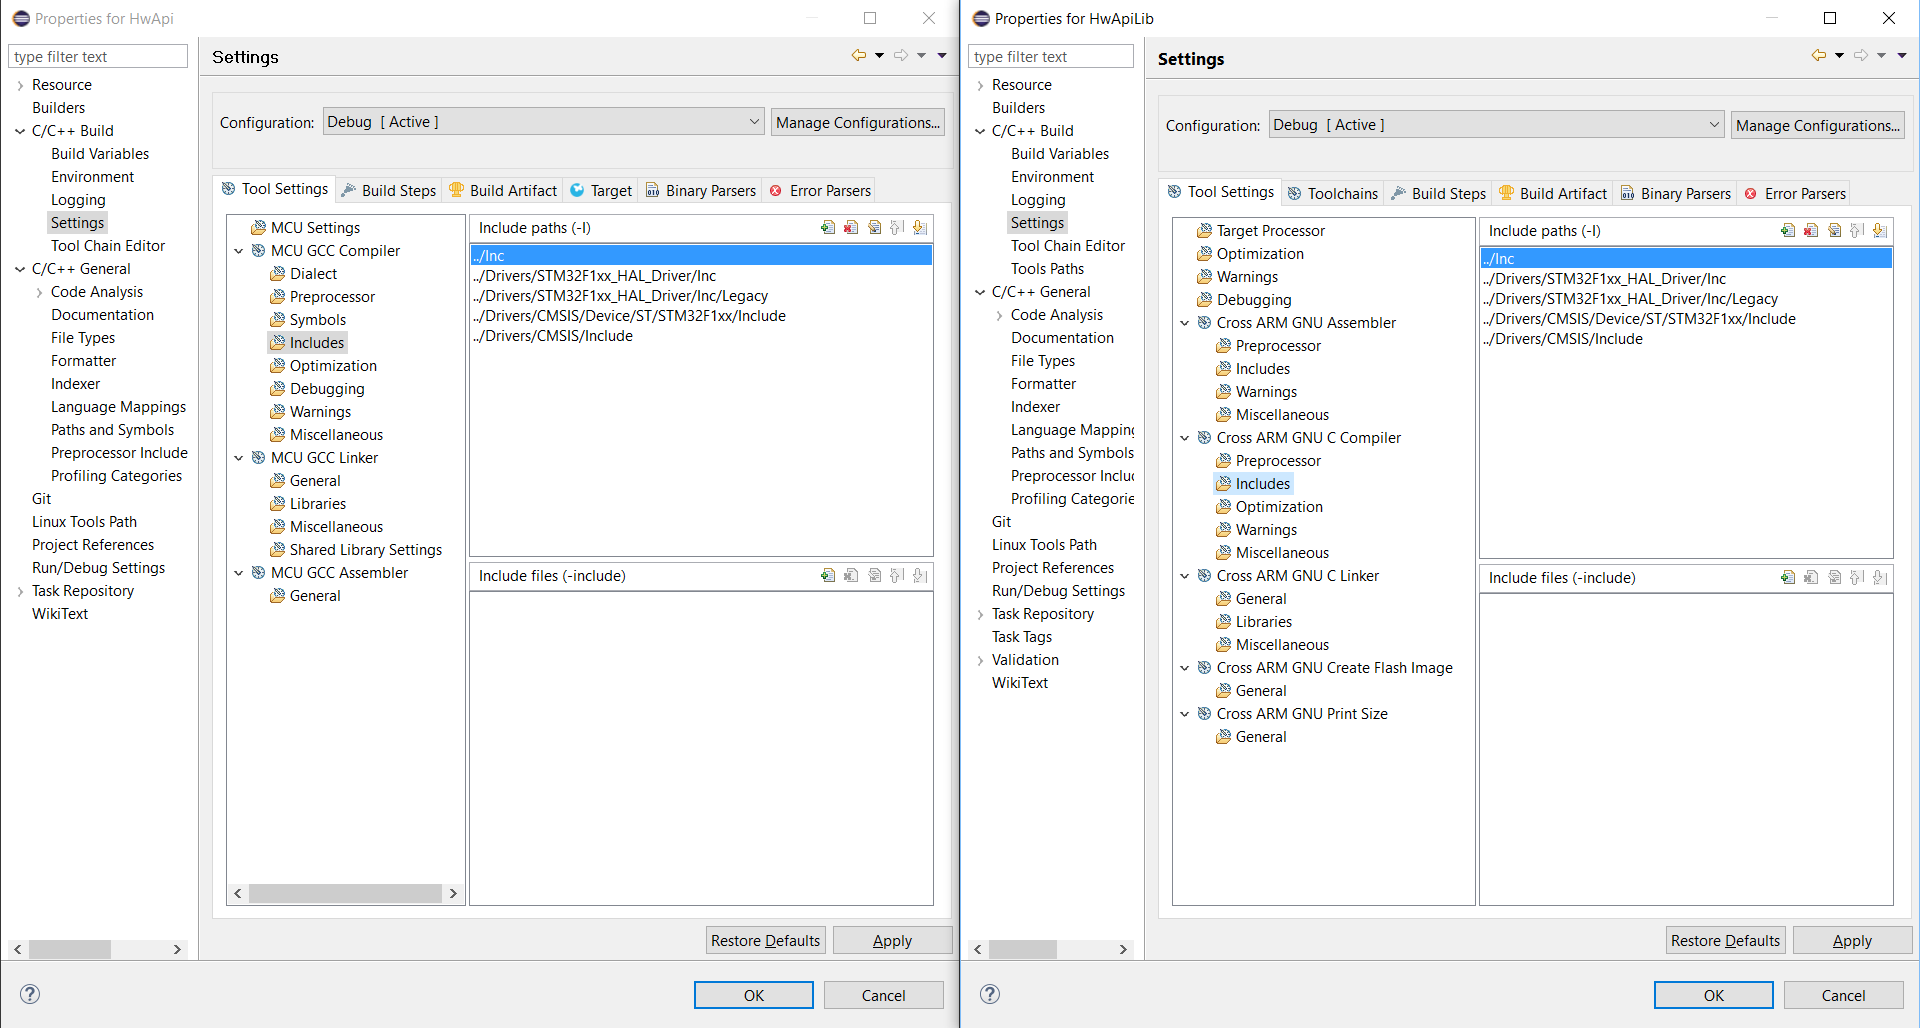
If the Workbench is installed, then expand the two project settings windows (from the old and new Eclipse) so that it is convenient to copy the values from one window to another. The windows are slightly different, so when copying we focus on the flags, which are indicated in brackets.
If the Workbench is not installed, you can simply copy the settings from the screenshots attached below.
Copy Defined Symbols:
Folder paths containing * .h files:
On the “Optimization” tab, you can enable Optimize size (-Os).
Further we specify that we need all warnings of the compiler:
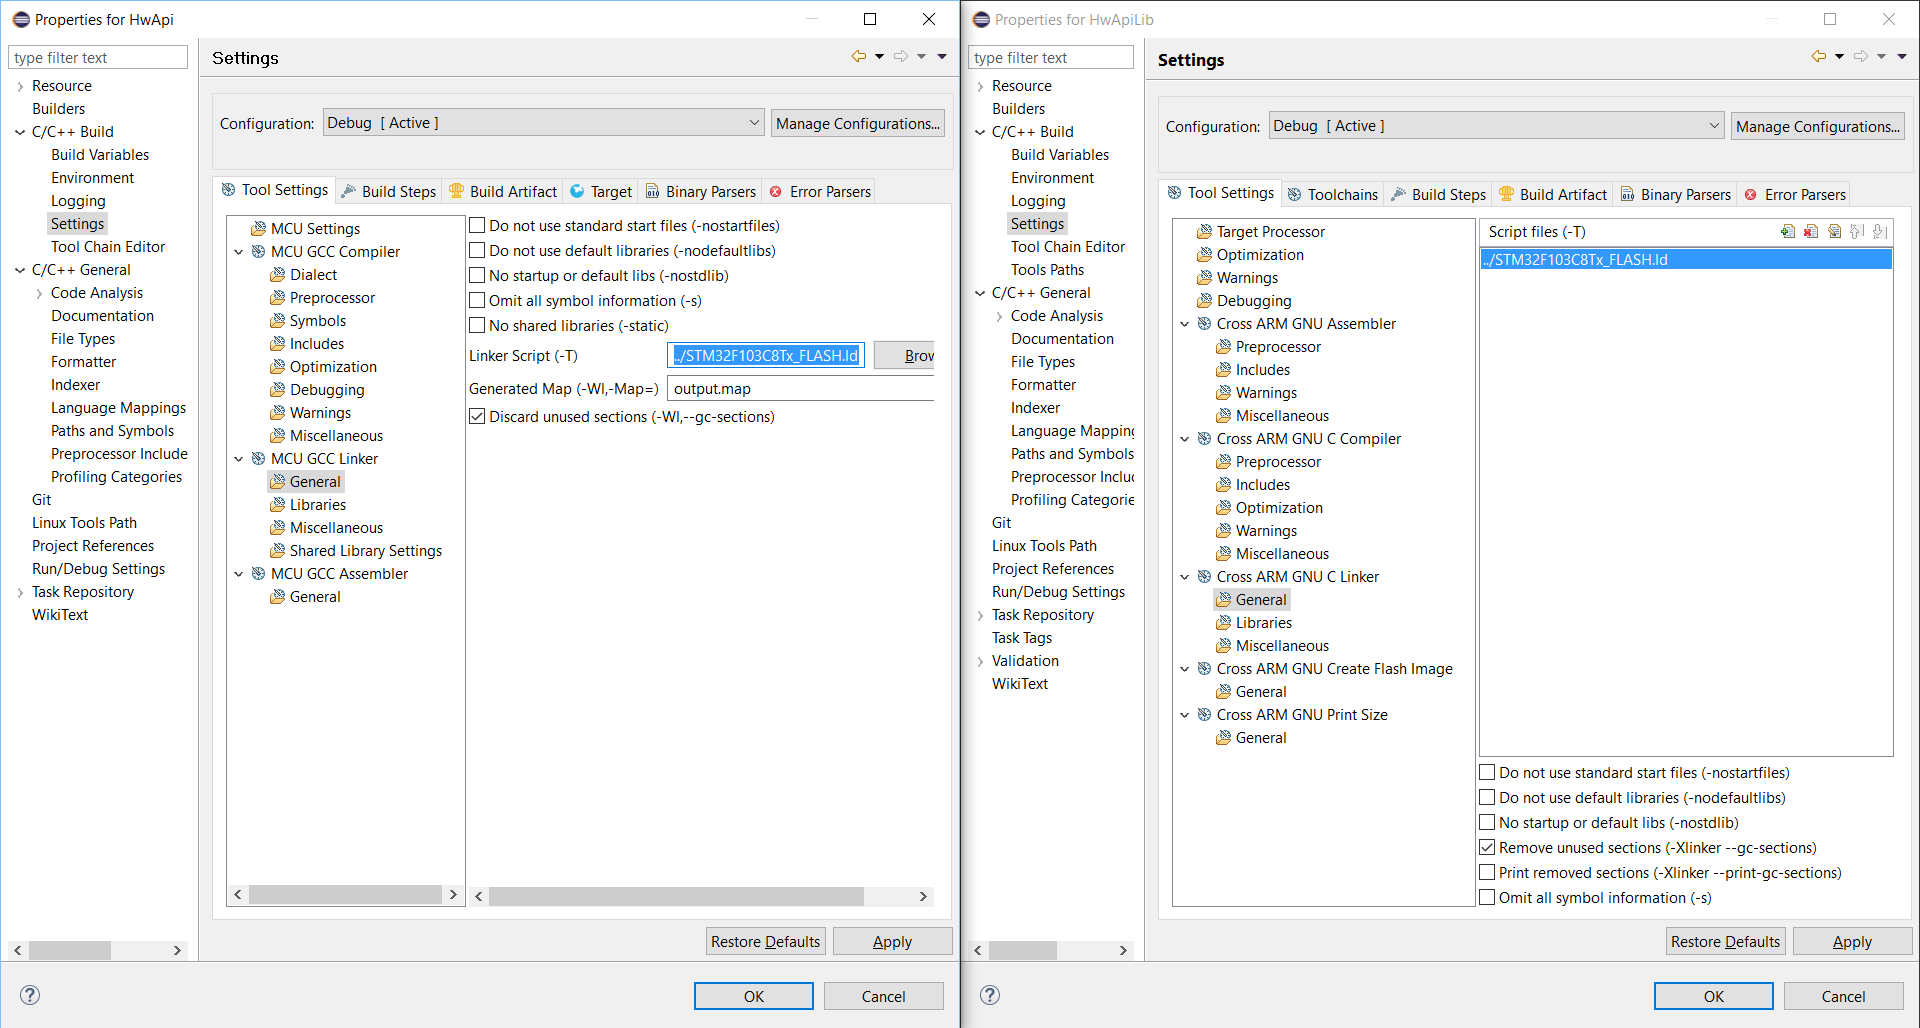
Specify the path to the linker script + check the checkbox to remove unused sections from the linking result:
On the next tab, it is important to check the “Use newlib-nano” checkbox and manually specify the
-specs=nosys.specs :Specify the paths to the folders with files to compile:
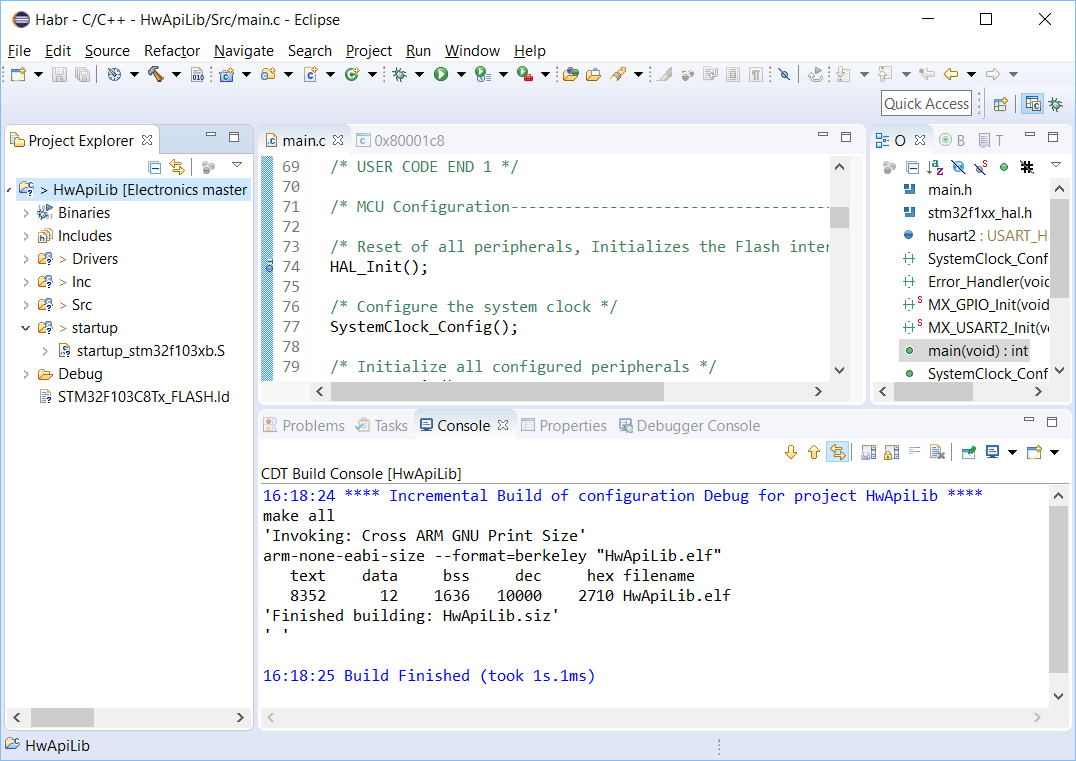
Click OK. Then we change the startup file extension to the capital .S so that the file is successfully picked up by the compiler. Check that the project is compiled.
Now you need to configure the debugger (Run - Debug Configurations - GDB OpenOCD Debugging). Create a file for OpenOCD with a description of the hardware in which the program will run (in my case, the file is called STM32F103C8x_SWD.cfg):
source [find interface/stlink-v2.cfg] set WORKAREASIZE 0x5000 transport select "hla_swd" set CHIPNAME STM32F103C8Tx source [find target/stm32f1x.cfg] # use hardware reset, connect under reset reset_config none If you use another microcontroller or another way to connect to it, then the correct file for OpenOCD can be generated in Workbench (using Debugging options - Ac6).
In the Config options, specify the -f flag and the path to the file created in the previous step.
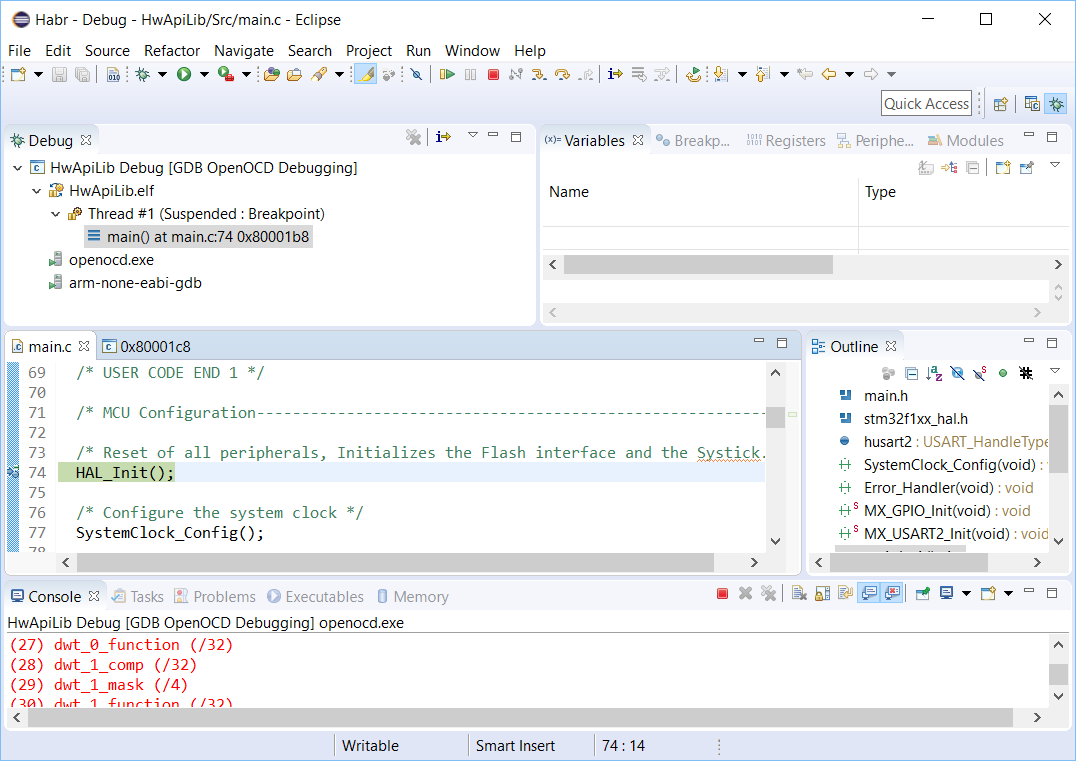
Click Debug. We check that the debugger successfully filled the code into the microcontroller and started debugging.
It's time to create a Rust project. Since we will need compiler instructions that are not supported in the stable version, we will need to switch us to the nightly version of the compiler by running the following commands in cmd:
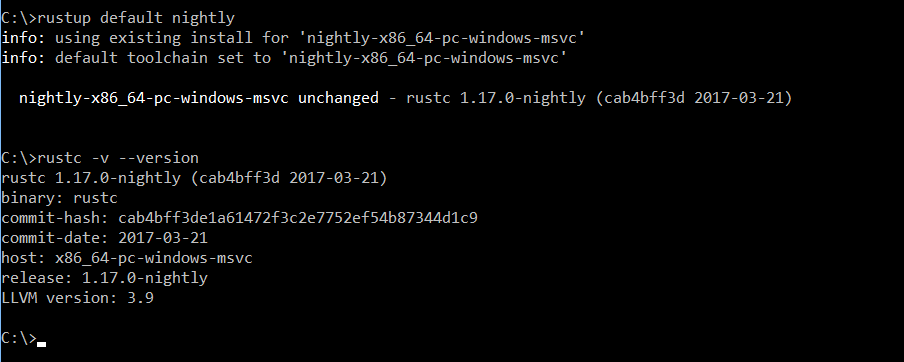
rustup update rustup default nightly Next, you need to get the current version of the compiler:
rustc -v --version Then clone the sources of rust and switch to the commit that was used to build this compiler (specified in commit-hash).
git clone git@github.com:rust-lang/rust.git cd rust git checkout cab4bff3de1a61472f3c2e7752ef54b87344d1c9 The next step is to compile the libraries we need under ARM.
mkdir libs-arm rustc -C opt-level=2 -Z no-landing-pads --target thumbv7m-none-eabi -g src/libcore/lib.rs --out-dir libs-arm --emit obj,link rustc -C opt-level=2 -Z no-landing-pads --target thumbv7m-none-eabi -g src/liballoc/lib.rs --out-dir libs-arm -L libs-arm --emit obj,link rustc -C opt-level=2 -Z no-landing-pads --target thumbv7m-none-eabi -g src/libstd_unicode/lib.rs --out-dir libs-arm -L libs-arm --emit obj,link rustc -C opt-level=2 -Z no-landing-pads --target thumbv7m-none-eabi -g src/libcollections/lib.rs --out-dir libs-arm -L libs-arm --emit obj,link In the future, with each update of the compiler (rustup update), you will need to switch to the current version of the source code and recompile the libraries for ARM, otherwise you will lose the opportunity to debug the code on rust.
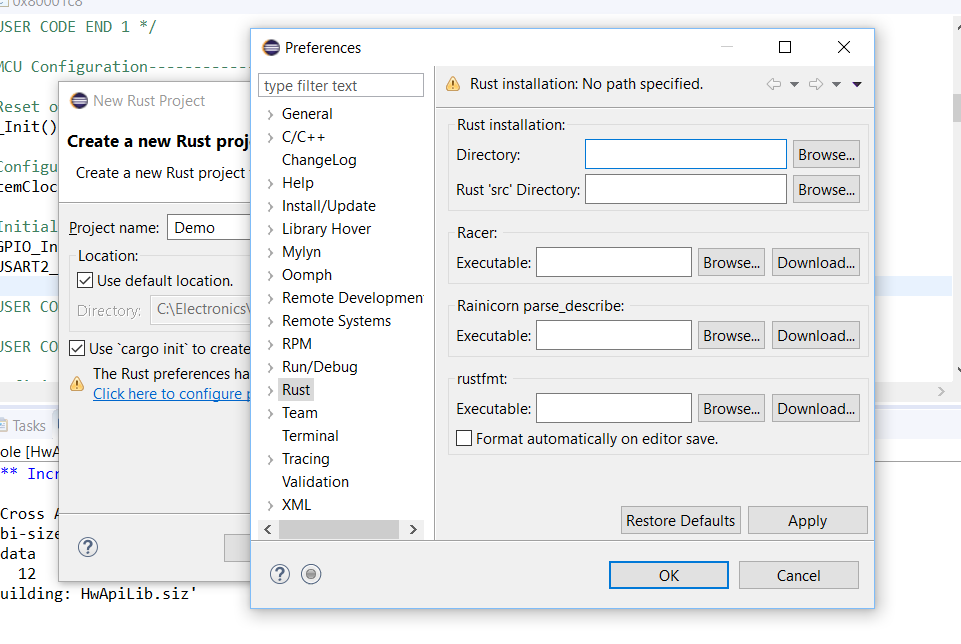
Finally you can start creating a Rust project in eclipse.
Eclipse asks to specify the path to the compiler, source code and utilities for working with rust-code.
Usually these components can be found in C: \ Users \% username% \. Cargo. Rust src - the path to the src folder in the source code that we downloaded earlier.
Now the main code:
lib.rs
#![feature(macro_reexport)] #![feature(unboxed_closures)] #![feature(lang_items, asm)] #![no_std] #![feature(alloc, collections)] #![allow(dead_code)] #![allow(non_snake_case)] extern crate alloc; pub mod runtime_support; pub mod api; #[macro_reexport(vec, format)] pub extern crate collections; use api::*; #[no_mangle] pub extern fn demo_main_loop() -> ! { let usart2 = Stm32Usart::new(Stm32UsartDevice::Usart2); loop { let u2_byte = usart2.try_read_byte(); match u2_byte { Some(v) => { let c = v as char; match c { 'r' => { toggle_led(Stm32Led::Red); } 'g' => { toggle_led(Stm32Led::Green); } 'b' => { toggle_led(Stm32Led::Blue); } _ => { usart2.print("cmd not found"); } } } _ => {} } delay(1); } } api.rs - interlayer for integration between Rust and C code
use collections::Vec; extern { fn stm32_delay(millis: u32); fn usart2_send_string(str: *const u8, len: u16); fn usart2_send_byte(byte: u8); fn usart2_try_get_byte() -> i16; fn stm32_toggle_led(led: u8); fn stm32_enable_led(led: u8); fn stm32_disable_led(led: u8); } pub fn delay(millis: u32) { unsafe { stm32_delay(millis); } } #[derive(Copy, Clone)] pub enum Stm32UsartDevice { Usart2 } #[derive(Copy, Clone)] pub struct Stm32Usart { device: Stm32UsartDevice } impl Stm32Usart { pub fn new(device: Stm32UsartDevice) -> Stm32Usart { Stm32Usart { device: device } } pub fn print(&self, str: &str) { let bytes = str.bytes().collect::<Vec<u8>>(); self.print_bytes(bytes.as_slice()); } pub fn print_bytes(&self, bytes: &[u8]) { unsafe { match self.device { Stm32UsartDevice::Usart2 => usart2_send_string(bytes.as_ptr(), bytes.len() as u16) } } } pub fn println(&self, str: &str) { self.print(str); self.print("\r\n"); } pub fn send_byte(&self, byte: u8) { unsafe { match self.device { Stm32UsartDevice::Usart2 => usart2_send_byte(byte) } } } pub fn try_read_byte(&self) -> Option<u8> { unsafe { let r = usart2_try_get_byte(); if r == -1 { return None; } return Some(r as u8); } } } pub enum Stm32Led { Red, Green, Blue, Orange } impl Stm32Led { fn to_api(&self) -> u8 { match *self { Stm32Led::Green => 2, Stm32Led::Blue => 3, Stm32Led::Red => 1, Stm32Led::Orange => 0 } } } pub fn toggle_led(led: Stm32Led) { unsafe { stm32_toggle_led(led.to_api()); } } pub fn enable_led(led: Stm32Led) { unsafe { stm32_enable_led(led.to_api()); } } pub fn disable_led(led: Stm32Led) { unsafe { stm32_disable_led(led.to_api()); } } runtime_support.rs - to support low-level Rust features
extern crate core; /// Call the debugger and halts execution. #[no_mangle] pub extern "C" fn abort() -> ! { loop {} } #[cfg(not(test))] #[inline(always)] /// NOP instruction pub fn nop() { unsafe { asm!("nop" :::: "volatile"); } } #[cfg(test)] /// NOP instruction (mock) pub fn nop() {} #[cfg(not(test))] #[inline(always)] /// WFI instruction pub fn wfi() { unsafe { asm!("wfi" :::: "volatile"); } } #[cfg(test)] /// WFI instruction (mock) pub fn wfi() {} #[lang = "panic_fmt"] fn panic_fmt(_: core::fmt::Arguments, _: &(&'static str, usize)) -> ! { loop {} } #[lang = "eh_personality"] extern "C" fn eh_personality() {} // Memory allocator support, via C's stdlib #[repr(u8)] #[allow(non_camel_case_types)] pub enum c_void { __variant1, __variant2, } extern "C" { pub fn malloc(size: u32) -> *mut c_void; pub fn realloc(p: *mut c_void, size: u32) -> *mut c_void; pub fn free(p: *mut c_void); } #[no_mangle] #[allow(unused_variables)] pub unsafe extern "C" fn __rust_allocate(size: usize, align: usize) -> *mut u8 { malloc(size as u32) as *mut u8 } #[no_mangle] #[allow(unused_variables)] pub unsafe extern "C" fn __rust_deallocate(ptr: *mut u8, old_size: usize, align: usize) { free(ptr as *mut c_void); } #[no_mangle] #[allow(unused_variables)] pub unsafe extern "C" fn __rust_reallocate(ptr: *mut u8, old_size: usize, size: usize, align: usize) -> *mut u8 { realloc(ptr as *mut c_void, size as u32) as *mut u8 } { "arch": "arm", "cpu": "cortex-m3", "data-layout": "em:ep:32:32-i1:8:32-i8:8:32-i16:16:32-i64:64-v128:64:128-a:0:32-n32-S64", "disable-redzone": true, "executables": true, "llvm-target": "thumbv7m-none-eabi", "morestack": false, "os": "none", "relocation-model": "static", "target-endian": "little", "target-pointer-width": "32" } Copy into the Rust folder of the project the libs-arm folder containing the components compiled to work under ARM from the standard Rust library.
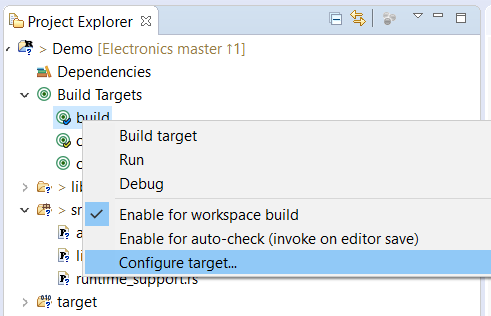
We change the Debug target so that it runs the compilation with the parameters we need
rustc -C opt-level=2 -Z no-landing-pads --target thumbv7m-none-eabi -g --crate-type lib -L libs-arm src/lib.rs --emit obj,link Compile the Rust project. As a result, the file lib.o will appear in the project folder.
Now in the C-project we create files api.h / api.c, in which we declare and implement the functions that are used in api.rs.
api.h
#ifndef SERIAL_DEMO_API_H_ #define SERIAL_DEMO_API_H_ #include "stm32f1xx_hal.h" void stm32_delay(uint32_t milli); void usart2_send_string(uint8_t* str, uint16_t len); void usart2_send_byte(uint8_t byte); int16_t usart2_try_get_byte(void); void stm32_toggle_led(uint8_t led); void stm32_enable_led(uint8_t led); void stm32_disable_led(uint8_t led); #endif api.c
#include "api.h" #include "stm32f1xx_hal.h" #include "stm32f1xx_hal_uart.h" #include "main.h" void stm32_delay(uint32_t milli) { HAL_Delay(milli); } extern UART_HandleTypeDef huart2; void usart2_send_string(uint8_t* str, uint16_t len) { HAL_UART_Transmit(&huart2, str, len, 1000); } void usart2_send_byte(uint8_t byte) { while (!(USART2->SR & UART_FLAG_TXE)); USART2->DR = (byte & 0xFF); } int16_t usart2_try_get_byte(void) { volatile unsigned int vsr; vsr = USART2->SR; if (vsr & UART_FLAG_RXNE) { USART2->SR &= ~(UART_FLAG_RXNE); return (USART2->DR & 0x1FF); } return -1; } uint16_t stm32_led_to_pin(uint8_t led); void stm32_toggle_led(uint8_t led) { HAL_GPIO_TogglePin(LED_R_GPIO_Port, stm32_led_to_pin(led)); } void stm32_enable_led(uint8_t led) { HAL_GPIO_WritePin(LED_R_GPIO_Port, stm32_led_to_pin(led), GPIO_PIN_SET); } void stm32_disable_led(uint8_t led) { HAL_GPIO_WritePin(LED_R_GPIO_Port, stm32_led_to_pin(led), GPIO_PIN_RESET); } uint16_t stm32_led_to_pin(uint8_t led) { switch (led) { case 1: return LED_R_Pin; case 2: return LED_G_Pin; case 3: return LED_B_Pin; default: return LED_B_Pin; } } Add the demo_main_loop () call inside the main function.
main.c
... /* Infinite loop */ /* USER CODE BEGIN WHILE */ while (1) { /* USER CODE END WHILE */ /* USER CODE BEGIN 3 */ demo_main_loop(); } /* USER CODE END 3 */ ... It remains to link everything. To do this, open the project properties in C and tell the linker where to get the missing obj files.
Compile. The binary has gained a lot of weight, but still fits in the STM32F103C8.
We launch Debug and we see that Eclipse without problems passes from the C-code to Rust.
At the end of the article I want to thank the authors of the following posts, without them I would not have mastered this process:
www.hashmismatch.net/pragmatic-bare-metal-rust
spin.atomicobject.com/2015/02/20/rust-language-c-embedded
github.com/japaric/rust-cross
The article was written with the hope that this would serve as an additional step in the emergence of a community of developers using Rust for programming under microcontrollers, since it is really a convenient and modern language, despite the fact that it has a rather high threshold of entry.
Source: https://habr.com/ru/post/324646/
All Articles