Continuous integration with Drone CI, Docker and Ansible

Can you imagine that you will never again have to install dependencies and configure configurations manually on your continuous integration server? Do you believe that every step of your build can be truly isolated and work exclusively in Docker containers? After all, would you like to try a tool that is in the top 20 of all open source projects written in Golang and has 9k + asterisks on Github?
In this article, we would like to talk about the magnificent Drone CI, which has already helped us simplify and improve our continuous integration. We will share the details of the installation of the Drone CI and show with the example of a small project all the details of the use. If you don’t like to read a lot and want to try it right away, there are links to Github repositories at the end of the article that will help you get started quickly.
Before turning to the main topic, I would like to thank our readers for the large number of good reviews about the article on docker-compose and, of course, Brad Rydzewski , the author of Drone CI, without whom this article would not exist. This is a huge motivation for us to write on!
A bit of history
If you are already familiar with the term "Continuous Integration" (CI) and would like to know more, start with a great article from Martin Fowler . Continuous integration has long been familiar to us, helping us to identify problems and fully automate the process of deploying the application, while saving a lot of time for the entire team.
I have been using CI servers for the past 7 years and, like many of us, started with Jenkins , later TeamCity , and then fell in love with Travis CI . Each of these products has done a lot to develop the practice of continuous integration. One of the ideas that makes me change tools from time to time is the possibility of fully automating any processes. Jenkins and TeamCity have a very advanced user interface that allows you to configure continuous integration for any project, but it is rather difficult to automate. Travis is a very good tool and still remains option number 1 for all my open-source initiatives, since "Testing your open source project is 10000% free" . Travis was the first tool to configure continuous integration with a single .travis.yml file.
Pipeline as a code
"Pipeline as a code" is a relatively new approach that allows you to configure the 'deployment pipeline' using code instead of manually setting up a running CI service. Today, this concept is very popular, and I know at least five players in this segment: LambdaCD , Concourse , Drone , GoCD and Travis CI . This approach not only makes it easier to automate continuous integration and continuous deployment, but also allows you to test the infrastructure for deployment. This concept made the world look different, but the most important thing is that it really allows you to use CI more efficiently and elegantly.
How do we continuously integrate
Today, we have 6 people in our team, and our approach to continuous integration and deployment is quite simple. We actively use Github, Pull Requests , Code Review . If you want to learn more about "Continuous Delivery" - pay attention to the book " Continuous Delivery: Reliable Software Releases through Build, Test, and Deployment Automation " by Jez Humble and David Farley.
The main steps of our continuous integration and continuous deployment:
- Each team member works in a separate branch and creates a pull request as soon as the task is done.
- Each commit in Pull Request is checked by our CI server. Run unit, integration, UI tests and lint. The launch status is displayed in Github:
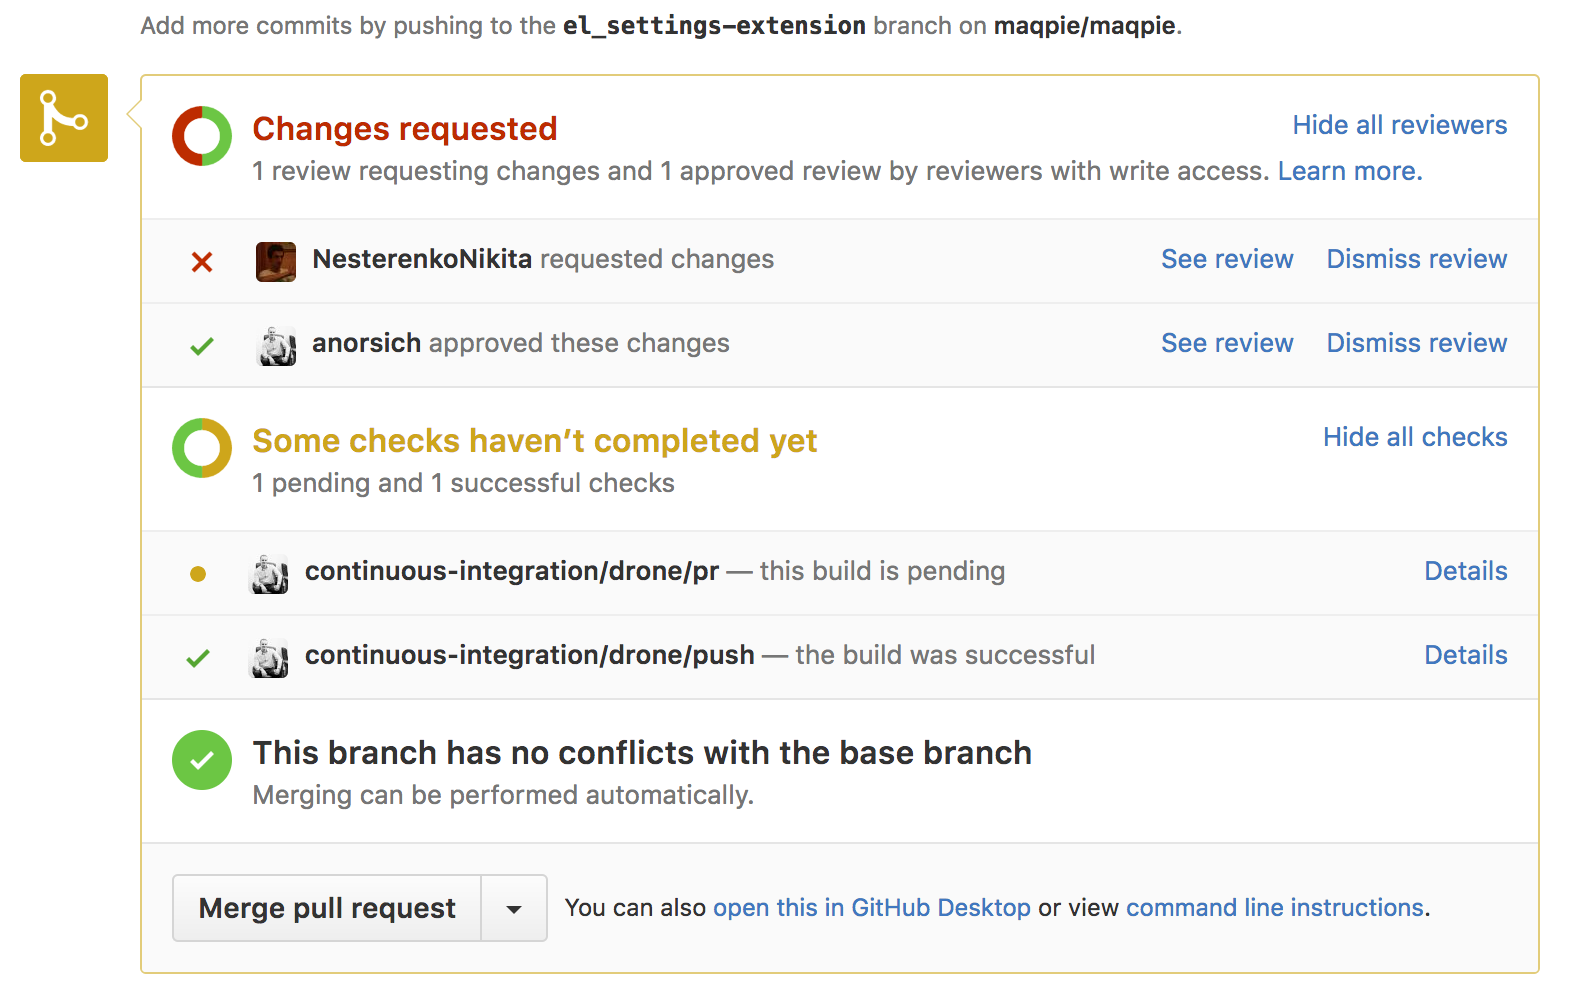
- Each pull request is necessarily viewed by two team members. One of them runs the code locally and checks all changes in the user interface. If the test run was successful and the review was completed, the code is merged into the main branch (master) and the process of automatic deployment to the pre-production environment begins.
- Deployment consists of two steps. First of all, we publish all our Docker containers on DockerHub, and then we run a small Ansible script that deploys the application on our servers.
- After a little manual testing, all changes are added to the "production" branch, and the automatic deployment process starts in the "production" environment.
The process has several drawbacks and will require some changes when our team becomes larger. But today it suits us completely and, in our opinion, is ideal for small teams of up to 10 people. The main disadvantages include:
- Despite a large number of tests, some changes that fall into the master contain defects. This blocks the deployment of other pull requests to eliminate defects.
- When our master branch is not in the "production ready" state, we have to deviate from the process and correct problems encountered by our clients right in the "production" branch, which adds the need to transfer these changes back to the master branch.
- We have not fully worked out the process of rollback changes, if something went wrong. It consists in rolling back the "production" branch to the pre-deployment state. If changes are required in the database - they are carried out manually at this stage.
We will deal with the elimination of these shortcomings as our team grows. To date, we can already almost painlessly deploy our project several times a day. We are not deploying the application as Github yet, but the first steps have already been taken :)
Drone ci
After comparing different tools, our choice fell on the Drone CI and over the past three months we have completely switched to it. Drone CI has 9003 stars on Github (March 15, 2017). Drone CI is in the top 20 apps written in Go on Github. The channel in Gitter never sleeps - there you can get answers to any questions.
Installation
Drone CI is a single Docker container of 8 megabytes . This container contains two services:
- Drone UI is a simple user interface and server that coordinates agents and displays build statuses.
- Drone Agent is another service where the build of your projects starts.
All data about past and current builds are stored in the database. The default is Sqlite , but it is possible to use other relational databases, such as PostgreSQL and MySQL. Especially for this article, we have prepared a Github repository that will help you install the Drone CI on your local environment or on your production environment in just a few minutes.
Beginning of work
For a start, I would like to briefly introduce you to the principle of the Drone CI. After you have installed and logged into the Drone CI using your Github account, the Drone automatically displays all your repositories. The first step is to enable the repositories for which you want to configure continuous integration:
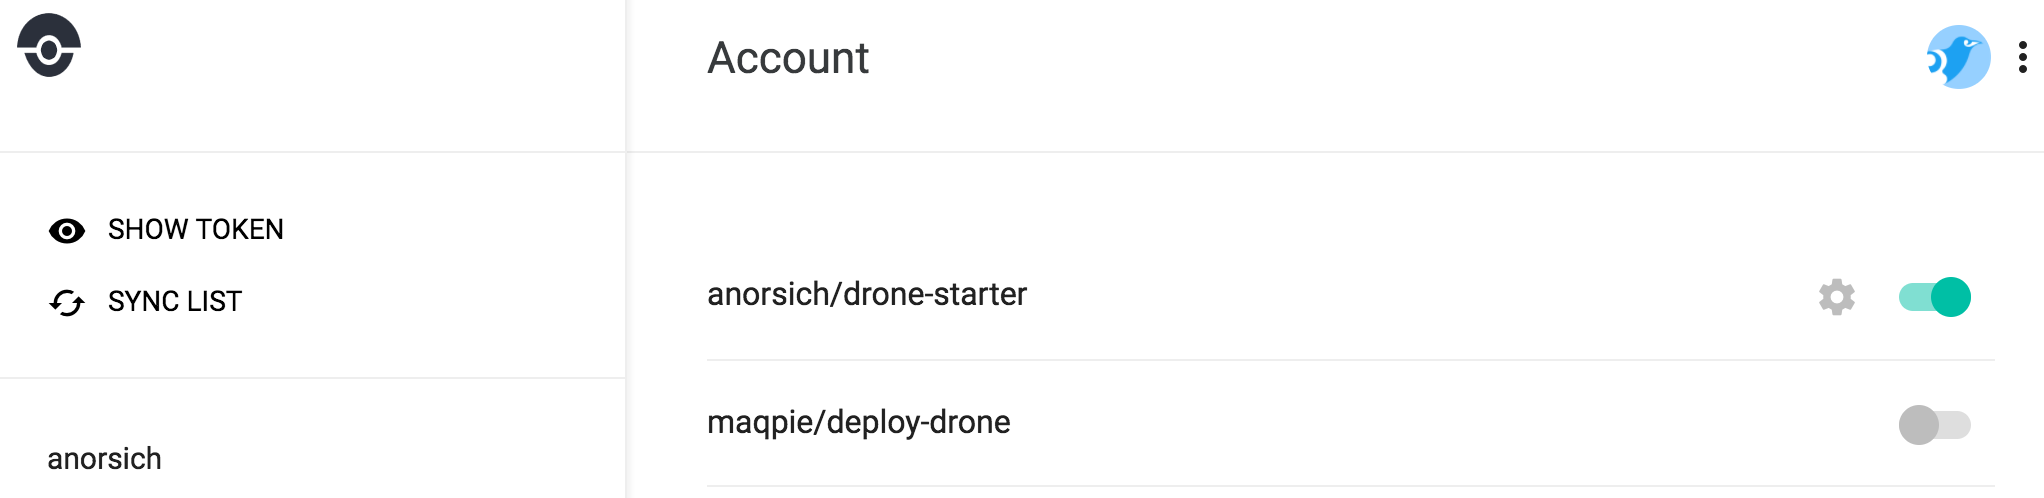
At this work with the user interface is almost over. Further it will be needed only to view the status of your builds.
All configuration of deployment steps is carried out in one file: drone.yml . This file is usually located in the root of your repository and fully describes everything that happens on your CI server. In essence, .drone.yml is an arbitrary set of steps, each of which is launched in a separate, isolated Docker container. At each commit, before running the steps from .drone.yml , Drone automatically clones our repository and adds it as a Docker volume for each step.
To make it clearer, let's look at a simple configuration that runs tests, builds an image of a docker, publishes it on Dockerhub, and sends a simple notification to Slack when the build is finished.
pipeline: run-tests: image: node:6.3.0 commands: - cd ./api && npm i --quiet - npm test publish-api-docker: image: plugins/docker:1.12 username: ${DOCKER_USERNAME} password: ${DOCKER_PASSWORD} email: ${DOCKER_EMAIL} repo: anorsich/ds-api tags: - latest dockerfile: ./api/Dockerfile context: ./api/ slack-notification: image: plugins/slack webhook: https://hooks.slack.com/services/... username: drone-ci channel: andrew icon_emoji: ":rocket:" It's all! Now, with each commit to the repository, you will run tests, collect containers, and arrive at Slack.
Third-party dependencies and isolation of assembly steps
Each step in Drone is performed in a separate Docker container, which allows you not to worry about installing and updating dependencies on server agents. An important difference is that the dependencies for each step can be completely different. In one step, you can run tests for Node.JS, and in the next one, quietly start building an application written on Go. Transition to new versions of platforms is carried out only by changing the container version. For example, we can easily add a new step that will run the tests and build the project on the latest version of Node.JS:
run-tests-on-latest-node: image: node:7.7 commands: - cd ./api && npm i --quiet - npm test In fact, you only need to configure your CI server in one case - if a new version of the CI server itself is released. Everything else is configured directly in the repository in .drone.yml , without a single click. Install - and forget :)
It is important to note that each step is completely isolated from the others, as it is performed in a separate container. No more version conflicts!
Another possibility that we do not use yet, but I would like to mention is the support of matrix assemblies , which allows you to immediately test your code on various versions of platforms, databases, and so on.
Run by condition
Sometimes there is a need to run a step in your build only under certain conditions. By default, all steps are launched sequentially and, if one of the steps is broken, the next ones are not launched. The main limitations that we use are:
- Branch name (master, production)
- Build status (success, failure)
- Github event (pull_request, push, tag, deployment)
For example, we want to send a notification to Slack when the build was successful and when it broke. To do this, we use the when section and add status :
slack-notification: image: plugins/slack ... when: status: [ success, failure ] event: [ push, tag, deployment, pull_request ] More information about the limitations can be found here .
Another interesting feature worth mentioning is the ability not to start the build by adding a commit message to the messages: [ci skip] .
Plugins
Plugins is a Drone CI approach for integration with third-party services, such as Amazon S3, Dockerhub, Slack. A complete list of all plugins can be found here . Each plugin is a separate Docker container that performs a predefined task. In our example above, we used two plugins:
- Docker plugin (
plugins/docker) - to build and publish Docker image on Dockerhub. - Slack plugin (
plugins/slack) - for sending notifications to Slack.
To date, plug-ins solve most common tasks, but not all. To start any task specific to your project, you just need to wrap this task in a Docker image - and you can start using it in the Drone CI. You have access to any programming languages that you can run in Docker. Continuous integration for your special steps can be organized again with the help of Drone.
Console utility
The console Drone utility allows you to communicate with a remote server and perform various administrative tasks. After installation, you need to connect to your remote server. To do this, you need to export two variables in the terminal:
export DRONE_SERVER=http://MY_DRONE_URL- URL of your Drone server.export DRONE_TOKEN=- personal token that is created after you log in to the Drone UI. You can find it on the following page:https://MY_DRONE_URL/account. Just pressSHOW TOKENand copy.
Now the console utility should be configured.
Secrets
Drone has very convenient tools for safe work with private information, such as passwords and ssh keys (in a word - secrets). In the example above, we used the Docker plugin to publish the Docker image on Dockerhub, which needs your password and username.
In Github repositories with an example of organization of continuous integration for Node.JS applications using Drone, we also use Ansible . With it, we run Docker containers on a remote server. To communicate with a remote server requires a separate key. As you know, storing sensitive information in the Github repository is considered bad practice, which can be used by hackers to compromise your application. In Drone CI, this problem is solved.
First of all, let's see how we can add a password and username for Dockerhub (used by the plugins/docker plugin):
drone global secret add DOCKER_USERNAME andrew drone global secret add DOCKER_PASSWORD password drone global secret add DOCKER_EMAIL email You can add secrets only to a specific repository or for all repositories within your Drone CI using global . If you want to add a secret only for a specific repository, you need to specify its name and not use global :
drone secret add maqpie/drone-starter DOCKER_USERNAME andrew Once your secrets are added, you can use them using the simple ${DOCKER_USERNAME} syntax directly in .drone.yml . Here is a small example:
publish-api-docker: image: plugins/docker:1.12 username: ${DOCKER_USERNAME} password: ${DOCKER_PASSWORD} email: ${DOCKER_EMAIL} As mentioned earlier, we also need an ssh key to work with a remote server. The key can be added as follows:
drone global secret add SSH_KEY @/Users/andrew/.ssh/id_rsa-drone-demo Securing and signing secrets
To protect your secrets, Drone uses a simple signature mechanism for your .drone.yml . With each change in .drone.yml , you need to re-sign it. Drone checks the signature each time before starting the builds. If the signature does not match, secrets will not be published and will not be available.
To sign, use your personal authorization key, which you added when setting up the drone console utility:
drone sign maqpie/drone-starter When signing, you must specify the name of the repository in which .drone.yml is located. As a result of this command, the .drone.yml.sig file should appear, which should be transferred to the repository.
Important: Before signing your .drone.yml for your repository, make sure that this repository is included in the Drone UI - otherwise the signature file will not be created.
Despite the good secrets protection mechanism in Drone, hackers still have several opportunities to access them. For example, if you use a bash script in one of the steps, a hacker might use curl or another tool to access your password or ssh key. Always apply general safety guidelines.
Services
Services in Drone UI allow you to run any container during the execution of your build process. All services are on the same subnet as the process build containers. This feature can be very useful for various types of integration testing. Services are usually declared at the end of .drone.yml . An example of starting a MySQL database is as follows:
services: database: image: mysql environment: - MYSQL_DATABASE=test - MYSQL_ALLOW_EMPTY_PASSWORD=yes At the current stage, we do not use services; instead, we use a simpler approach for us using docker-compose.
Running tests with docker-compose
In our previous article, we shared our love for docker-compose . I would like to dwell on how we run our tests in the Drone CI. The step in .drone.yml looks like this:
run-tests-in-compose: image: michalpodeszwa/docker-compose:latest volumes: - /var/run/docker.sock:/var/run/docker.sock commands: - ./bin/drone-run-tests.sh api-tests - ./bin/drone-run-tests.sh web-tests when: event: [pull_request] /bin/drone-run-tests.sh runs tests with a small wrapper over docker-compose. Before delving into our approach, I would like to talk about the trade-offs that we went to. First of all, we refused to isolate the container in this line:
volumes: - /var/run/docker.sock:/var/run/docker.sock In short, this line actually allows this container to run any command that the docker service can start, which allows you to run any command on the host, since the docker service is started as root user. In more detail with all the consequences you can find in this article. This method is definitely not suitable for shared repositories.
Why did we take such a risk? There are several reasons:
- We have a closed project, which deals with one team.
- Our Drone CI is running on a separate server, and even if someone wants to break it using the lack of isolation, we won’t lose anything. Raising a new Drone CI will take us no more than 5 minutes, taking into account the DNS update.
- The most important reason is that we wanted to use the Docker cache effectively. We make about 20-100 commits to the repository every day, and each of them runs our tests. If we did not use the Docker cache, at each commit the containers would be rebuilt again, which takes a lot of time.
Now that you know about the drawbacks in our approach, let's take a look at the approach itself. In fact, to run the tests, we simply use docker-compose up --file docker-compose.drone-tests.yml . In the same way, tests are run on work environments. The only problem we encountered when running tests through docker-compose is that the exit code of docker-compose was always 0. Drone, like any other CI, in this case believes that the build was successful and proceeds to the next step. To remedy this situation, we wrote a small script that analyzes the exit codes of the containers after running the tests and, if at least one of the containers came out with a non-zero code, uses this code to exit. The contents of the script /bin/drone-run-tests.sh , which you saw above in the test launch step, looks like this:
#!/bin/sh # remove old containers docker-compose --file docker-compose.drone-tests.yml rm -f # run tests docker-compose --file docker-compose.drone-tests.yml up --build echo "Inspecting exited containers:" docker-compose --file docker-compose.drone-tests.yml ps docker-compose --file docker-compose.drone-tests.yml ps -q | xargs docker inspect -f '{{ .State.ExitCode }}' | while read code; do if [ "$code" != "0" ]; then exit $code fi done Links and Tips
As with any tool, there are some things in the Drone CI that are in development and do not always work as desired. Fortunately, there were only a few of them:
- Drone UI freezes if the process of your build displays too much information. In all of our Docker files for Node.JS, we had to add
--quietwhen runningnpm install- less useless information was displayed. I do not quite understand why this option is not used by default in npm. - There are two versions of Drone 0.4 and 0.5. The latter is now in active development, but fairly stable (we have not had any problems in 2 months). There are a lot of differences from 0.4. When searching for different answers, we often found old answers that are no longer relevant.
- Documentation for version 0.5 is located at the following address: http://readme.drone.io/0.5/ . Documentation is probably the weakest side of Drone at the moment. From myself I can say that the first version (read the comments below) of the Webpack documentation was also not the best, but this did not prevent him from becoming the standard for most web projects.
If we managed to convince you to try Drone, below you can find a list of links that may be useful:
- Drone github
- Drone plugins github
- Drone 0.5 documentation
- Drone gitter
- Drone 0.4 documentation - some parts of this documentation are not yet fully migrated to version 0.5.
Conclusion
Drone CI is a modern solution for continuous integration problems. Using Drone, you will never set up your servers again, get a completely isolated environment for running your builds and be able to scale your CI server to infinity. For two months of work, we completely fell in love with him.
To help you get started using Drone CI, we have prepared two Github repositories:
- Deploy Drone — Drone CI production .
- Drone Starter — Drone CI, Ansible, Docker Node.js .
, 51%, 49% — Github :)
, !
')
Source: https://habr.com/ru/post/324588/
All Articles