Resizing images based on content
Image resizing based on content (Content Aware Image Resize), liquid stretching (liquid resizing), retargeting (retargeting) or cutting seam (seam carving) refer to the resizing method of the image, where you can insert or delete seams , or the least important ways, to reduce or enlarge the image. I learned about this idea from a YouTube video , from Shai Avidan and Ariel Shamir.
In this article, a simple trial implementation of the idea of resizing an image based on its content will be considered, naturally in Rust.
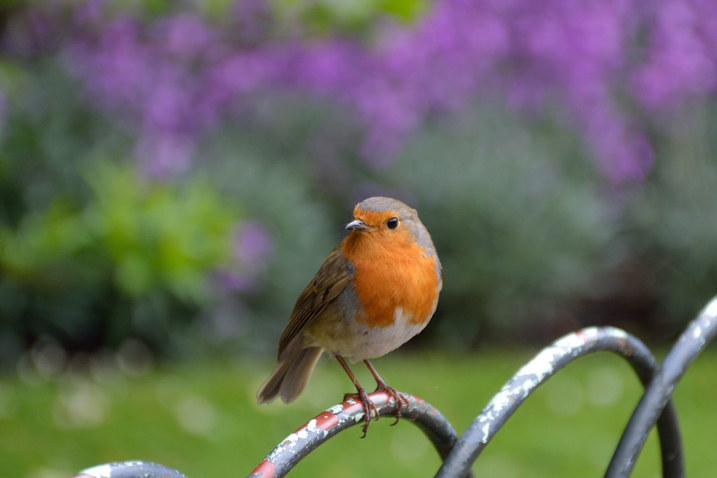
For the test image, I searched on request for 1 "sample image" , and found it 2 :
Create a layout according to the top-down approach.
Let's start brainstorming. I think our library can be used like this:
/// caller.rs let mut image = car::load_image(path); // ? image.resize_to(car::Dimensions::Absolute(800, 580)); // 20 ? image.resize_to(car::Dimensions::Relative(0, -20)); // ? car::show_image(&image); // ? image.save("resized.jpeg"); The most important functions in lib.rs could be:
/// lib.rs pub fn load_image(path: Path) -> Image { // :) Image { inner: some_image_lib::load(path).unwrap(), } } impl Image { pub fn resize_to(&mut self, dimens: Dimensions) { // /? let (mut xs, mut ys) = self.size_diffs(dimens); // , // , // . while xs != 0 && ys != 0 { let best_horizontal = image.best_horizontal_path(); let best_vertical = image.best_vertical_path(); // . if best_horizontal.score < best_vertical.score { self.handle_path(best_horizontal, &mut xs); } else { self.handle_path(best_vertical, &mut ys); } } // . while xs != 0 { let path = image.best_horizontal_path(); self.handle_path(path, &mut xs); } while ys != 0 { let path = image.best_vertical_path(); self.handle_path(path, &mut ys); } } } This gives us some insight into how to approach the writing system. We need to upload a picture, find these stitches or paths, and process the removal of such a path from the image. In addition, we would like to see the result. Let's load our image first. We already know which API to use.
image
The image library from the Piston developers seems appropriate, so we’ll add to our Cargo.toml entry: image = "0.12" . A quick document search is all that is required to write an image loading function:
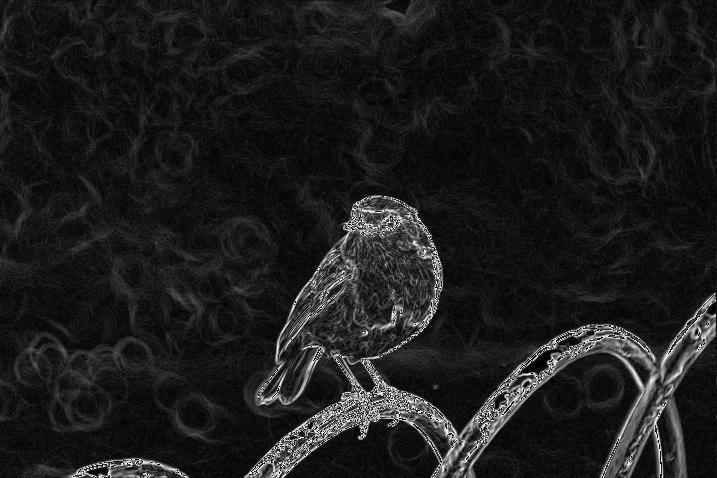
struct Image { inner: image::DynamicImage, } impl Image { pub fn load_image(path: &Path) -> Image { Image { inner: image::open(path).unwrap() } } } Naturally the next step is to find out how to get the gradient value fromimage::DynamicImage . The container image cannot do this, but the imageproc container has a function: imageproc::gradients::sobel_gradients . However, a small problem awaits us. 3 The sobel_gradient function takes an 8-bit image in grayscale, and returns a 16-bit image in grayscale. The image we downloaded is an RGB image with 8 bits per channel. So you have to decompose the channels into R, G and B, convert each channel into separate images in shades of gray and calculate the gradients of each of them. And then combine the gradients together into one image, in which we will look for a way.
Is it elegant? Not. Will it work? Maybe.
type GradientBuffer = image::ImageBuffer<image::Luma<u16>, Vec<u16>>; impl Image { pub fn load_image(path: &Path) -> Image { Image { inner: image::open(path).unwrap() } } fn gradient_magnitude(&self) -> GradientBuffer { // RGB let (red, green, blue) = decompose(&self.inner); let r_grad = imageproc::gradients::sobel_gradients(red.as_luma8().unwrap()); let g_grad = imageproc::gradients::sobel_gradients(green.as_luma8().unwrap()); let b_grad = imageproc::gradients::sobel_gradients(blue.as_luma8().unwrap()); let (w, h) = r_grad.dimensions(); let mut container = Vec::with_capacity((w * h) as usize); for (r, g, b) in izip!(r_grad.pixels(), g_grad.pixels(), b_grad.pixels()) { container.push(r[0] + g[0] + b[0]); } image::ImageBuffer::from_raw(w, h, container).unwrap() } } fn decompose(image: &image::DynamicImage) -> (image::DynamicImage, image::DynamicImage, image::DynamicImage) { let w = image.width(); let h = image.height(); let mut red = image::DynamicImage::new_luma8(w, h); let mut green = image::DynamicImage::new_luma8(w, h); let mut blue = image::DynamicImage::new_luma8(w, h); for (x, y, pixel) in image.pixels() { let r = pixel[0]; let g = pixel[1]; let b = pixel[2]; red.put_pixel(x, y, *image::Rgba::from_slice(&[r, r, r, 255])); green.put_pixel(x, y, *image::Rgba::from_slice(&[g, g, g, 255])); blue.put_pixel(x, y, *image::Rgba::from_slice(&[b, b, b, 255])); } (red, green, blue) } After launch, Image::gradient_magnitune takes our bird image and returns it:
The path of least resistance
Now we have to implement, perhaps, the most difficult part of the program: DP is an algorithm for finding the path of least resistance. Let's see how it will work. For ease of understanding, we will consider only the case of finding a vertical path. Imagine that in the table below this is a 6x6 pixel image gradient.
The essence of the algorithm is to find the way from one of the top cells in one of the lower so as to minimize . This can be done by creating a new table S using the following recurrence relation (without taking into account the boundary):
That is, each cell in table S is the minimum amount from the current cell to the lowest cell. Each cell selects one of the three neighboring cells located in the row below, with the lowest weight - this will be the next cell in the path. When we have completed filling out the S table, we simply select the smallest number in the topmost row as the starting cell.
Let's find s:
And here it is! We see that there is a path, with the sum of all the cells of the path equal to 8, and that this path begins in the upper right corner. In order to find a path, we could remember which way we went for each cell (left, down or right), but we don’t need it: we simply choose a neighbor with the lowest weight, because the cell weight values in the table S indicate the shortest path from the current cell to the lowest one. Also note that there are two paths that add up to 8 (these paths have two lower cells).
Implementation
So, as we write only a program layout, then we will do it in a simple way. We will create a structure with our table in the form of an array and simply walk through it with a for loop according to the algorithm.
struct DPTable { width: usize, height: usize, table: Vec<u16>, } impl DPTable { fn from_gradient_buffer(gradient: &GradientBuffer) -> Self { let dims = gradient.dimensions(); let w = dims.0 as usize; let h = dims.1 as usize; let mut table = DPTable { width: w, height: h, table: vec![0; w * h], }; // gradient[h][w], let get = |w, h| gradient.get_pixel(w as u32, h as u32)[0]; // for i in 0..w { let px = get(i, h - 1); table.set(i, h - 1, px) } // J, // . for row in (0..h - 1).rev() { for col in 1..w - 1 { let l = table.get(col - 1, row + 1); let m = table.get(col , row + 1); let r = table.get(col + 1, row + 1); table.set(col, row, get(col, row) + min(min(l, m), r)); } // : let left = get(0, row) + min(table.get(0, row + 1), table.get(1, row + 1)); table.set(0, row, left); let right = get(0, row) + min(table.get(w - 1, row + 1), table.get(w - 2, row + 1)); table.set(w - 1, row, right); } table } } Once launched, we can convert the DPTable table back to a GradientBuffer , and write it to a file. The pixels in the image below are the path weights divided by 128.
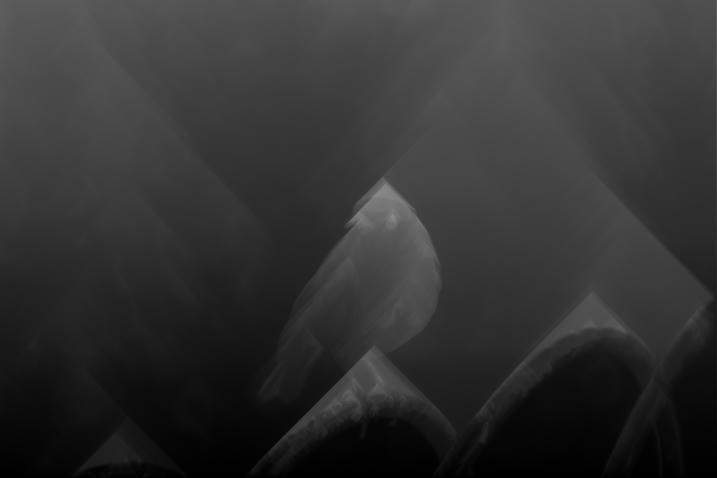
This picture can be described as follows: white pixels are cells that have the greatest weight. The gradient of these pixels is more detailed, which indicates a high speed of color changes (and we would like to preserve these sections of the picture).
Since the pathfinding algorithm will search for the smallest weights, which are represented here by “darker paths”, the algorithm will try to avoid light pixels. That is the white areas of the picture.
Finding the way
Now that we have the entire table, finding the best path is easy: this is just a search from the top row and creating a vector of indices, always choosing the smallest neighbor by weight from the bottom line:
impl DPTable { fn path_start_index(&self) -> usize { // ?! // . self.table.iter() .take(self.width) .enumerate() .map(|(i, n)| (n, i)) .min() .map(|(_, i)| i) .unwrap() } } struct Path { indices: Vec<usize>, } impl Path { pub fn from_dp_table(table: &DPTable) -> Self { let mut v = Vec::with_capacity(table.height); let mut col: usize = table.path_start_index(); v.push(col); for row in 1..table.height { // , . if col == 0 { let m = table.get(col, row); let r = table.get(col + 1, row); if m > r { col += 1; } // , } else if col == table.width - 1 { let l = table.get(col - 1, row); let m = table.get(col, row); if l < m { col -= 1; } } else { let l = table.get(col - 1, row); let m = table.get(col, row); let r = table.get(col + 1, row); let minimum = min(min(l, m), r); if minimum == l { col -= 1; } else if minimum == r { col += 1; } } v.push(col + row * table.width); } Path { indices: v } } } To see that the chosen paths are more or less plausible, I generated them
10 pieces, and painted yellow:

In my opinion, it seems to be true!
Deletion
The only thing left to do now is to remove the yellow colored paths. Since we just want to do something working, we can do it very simply: take the raw bytes from our image, copy the intervals between the indices that we want to delete into a new array and create a new image from it.
impl Image { fn remove_path(&mut self, path: Path) { let image_buffer = self.inner.to_rgb(); let (w, h) = image_buffer.dimensions(); let container = image_buffer.into_raw(); let mut new_pixels = vec![]; let mut path = path.indices.iter(); let mut i = 0; while let Some(&index) = path.next() { new_pixels.extend(&container[i..index * 3]); i = (index + 1) * 3; } new_pixels.extend(&container[i..]); let ib = image::ImageBuffer::from_raw(w - 1, h, new_pixels).unwrap(); self.inner = image::DynamicImage::ImageRgb8(ib); } } Finally it is time. Now we can delete a line from the image, or call this function in a loop and delete, say, 200 lines:
let mut image = Image::load_image(path::Path::new("sample-image.jpg")); for _ in 0..200 { let grad = image.gradient_magnitude(); let table = DPTable::from_gradient_buffer(&grad); let path = Path::from_dp_table(&table); image.remove_path(path); } 
However, we see that the algorithm removed a bit too much on the right side of the image, although the image is more or less reduced, this is one of the problems that must be fixed! A quick and slightly dirty fix, just to slightly change the gradient, by explicitly setting boundaries on some large number, say 100.

Tadam!
There are a lot of shoals, which makes the end result a little less satisfactory. However, the bird almost did not suffer and looks great (in my opinion). You can say that we destroyed the whole point of the composition in the process of reducing the image. To this I will say ... well ... well, yes.
I will see - I will believe
Saving images to a file and looking at them is cool, but it’s not super-cool-resizing-images-in real-time! Finally, let's try to put everything together.
First, we need the ability to load, receive and resize images outside the container. We will try to do something like our original plan:
extern crate content_aware_resize; use content_aware_resize as car; fn main() { let mut image = car::load_image(path); image.resize_to(car::Dimensions::Relative(-1, 0)); let data: &[u8] = image.get_image_data(); // } We will start with a simple one, adding the most necessary and, if possible, following a short path.
pub enum Dimensions { Relative(isize, isize), } ... impl Image { fn size_difference(&self, dims: Dimensions) -> (isize, isize) { let (w, h) = self.inner.dimensions(); match dims { Dimensions::Relative(x, y) => { (w as isize + x, h as isize + x) } } } pub fn resize_to(&mut self, dimensions: Dimensions) { let (mut xs, mut _ys) = self.size_difference(dimensions); // if xs < 0 { panic!("Only downsizing is supported.") } if _ys != 0 { panic!("Only horizontal resizing is supported.") } while xs > 0 { let grad = self.gradient_magnitude(); let table = DPTable::from_gradient_buffer(&grad); let path = Path::from_dp_table(&table); self.remove_path(path); xs -= 1; } } pub fn get_image_data(&self) -> &[u8] { self.inner.as_rgb8().unwrap() } } Just a little copy-paste!
Now, maybe we want a resizable window. We can quickly add a new project using the sdl2 container.
extern crate content_aware_resize; extern crate sdl2; use content_aware_resize as car; use sdl2::rect::Rect; use sdl2::event::{Event, WindowEvent}; use sdl2::keyboard::Keycode; use std::path::Path; fn main() { // let mut image = car::Image::load_image(Path::new("sample-image.jpeg")); let (mut w, h) = image.dimmensions(); // sdl2 let sdl_ctx = sdl2::init().unwrap(); let video = sdl_ctx.video().unwrap(); let window = video.window("Context Aware Resize", w, h) .position_centered() .opengl() .resizable() .build() .unwrap(); let mut renderer = window.renderer().build().unwrap(); // "" let update_texture = |renderer: &mut sdl2::render::Renderer, image: &car::Image| { let (w, h) = image.dimmensions(); let pixel_format = sdl2::pixels::PixelFormatEnum::RGB24; let mut tex = renderer.create_texture_static(pixel_format, w, h).unwrap(); let data = image.get_image_data(); let pitch = w * 3; tex.update(None, data, pitch as usize).unwrap(); tex }; let mut texture = update_texture(&mut renderer, &image); let mut event_pump = sdl_ctx.event_pump().unwrap(); 'running: loop { for event in event_pump.poll_iter() { // match event { Event::Quit {..} | Event::KeyDown { keycode: Some(Keycode::Escape), .. } => { break 'running }, Event::Window {win_event: WindowEvent::Resized(new_w, _h), .. } => { // , // let x_diff = new_w as isize - w as isize; if x_diff < 0 { image.resize_to(car::Dimensions::Relative(x_diff, 0)); } w = new_w as u32; texture = update_texture(&mut renderer, &image); }, _ => {} } } // , . renderer.clear(); renderer.copy(&texture, None, Some(Rect::new(0, 0, w, h))).unwrap(); renderer.present(); } } That's all. One day of work, some knowledge of sdl2 , image , and little experience writing blog posts.
I hope you enjoyed it, at least a little.
- For some reason, duckduck-koed does not work, and Google, too, if the verb is used. [↑]
- http://imgsv.imaging.nikon.com/lineup/lens/zoom/normalzoom/af-s_dx_18-140mmf_35-56g_ed_vr/img/sample/sample1_l.jpg [↑]
- I wonder if there is an easier way! Besides,
saving the result of a gradient to a campaign is unrealistic because the function returnsImageBufferoveru16, whileImageBuffer::saverequires that
The basic data was inu8. I also could not figure out how to createDynamicImage(which also hasa::savewith a more intuitive interface)
fromImageBuffer, because it is possible. [↑]
Translator's Note
I thank the whole community of Russian-speaking rastamans ruRust .
Special thanks to:
- Sergey Veselkov (@vessd)
- Igor (@ Gordon-F)
- Mikhail Pankov (@mkpankov)
and: - Sherzod Mutalova (@shmutalov)
- Andrei Lesnikov (@ozkiff) for his help with translation and the subsequent review.
')
Source: https://habr.com/ru/post/324284/
All Articles