Preparing a springboard for the react-application

I want to talk about the process of creating a platform for the react application that uses mobx as M odel-i. Walk from the empty project directory to the working example. Consider the main points that I paid attention to during the development process. I will try to fill the text with clarifying links, additional notes will be in italics marked "Note:" .
The story will consist of two parts:
')
- Preparing a springboard for the react application
- Mobx + react, side view
I will write “as I see”, therefore suggestions and comments on improvements are welcome. I hope the reader knows what npm, node.js and react.js are, has a basic knowledge of props and state. At the time of this writing, I have windows and an unstable node.js 7.3.0 version.
Preparing a springboard for the react application
There are thousands of react skeletons and boilerplates , so what can we say, even “fb” released its own with blackjack and hotreload. We will not use ready-made, but we will collect everything with our own hands and see how it works. We will independently go through this path and look into all the dark corners in order to understand the whole mechanics of the process, as well as to understand the details that were previously incomprehensible. I do not pretend to another bike, rather the development for the sake of education. Overwhelmed with enthusiasm, open the console in your favorite IDE, create a new directory for the project and go inside. Let's go!
npm init Everything is simple, you will be offered a few general questions, after which npm will create a package.json dependency management file for us.
Note: To not fill out information about yourself every time, you can register
npm set init.author.name "your name" npm set init.author.email "your email" npm set init.author.url "your site url" Next, we will install the packages necessary for the work of react, and write about them in package.json in the dependencies section. We will use react-router , so we will immediately install it as well:
npm i --save react react-dom react-router Put the project structure and create a couple of directories. In most cases, a client-server application is required. I like to have two separate directories for the client and server parts, here you can holivarit infinitely long, for example, I chose the following structure:
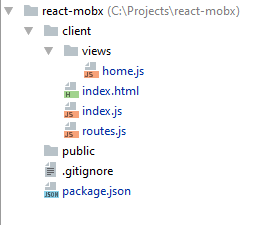
For the skeleton we need:
- index.js - entry point to the client application. This is the first file in the application that I look at, if I see someone else’s project for the first time, this is the thread from which you start to unravel the whole tangle;
- routes.js - configure the router. For starters, one route is enough to show
- home.js - home page;
- index.html - we will do SPA , index.html - this is the only page;
index.html
<!doctype html> <html> <head> </head> <body> <div id="app"></div> </body> </html> Here you should pay attention to the div # app, this is a container for our future react application. We will add a script here a bit later.
index.js
import React from 'react'; import ReactDOM from 'react-dom'; import AppRouter from './routes'; ReactDOM.render(<AppRouter />, document.getElementById("app")); Render the <AppRouter /> into that same div # app.
views / home.js es6
import React from 'react'; export default class Home extends React.Component { render() { return ( <h1>Hello Kitty!</h1> ); } } Before the route, let's look at the home (and so far the only) view. This is the react component, which simply displays the greeting sign.
We will use the ES6 way when creating the react component. How to make friends with ES6, you can read in the document or here in Russian. I recommend immediately trying to write on ES6, you will immediately feel the benefits, especially since the topic is easy to understand.
Of course, for convenience, we will use jsx notation. In order for the browser to understand our code, we will use the babel translator, besides, we want to keep up with the times and use ES6 / ES2015 features , but not all browsers support this standard, so I’ll turn to babel again for help. It turns out that babel is a transpiler that rewrites the code written in the new standards into the es5 standard code, which almost all browsers understand, and can also translate the react jsx code into a code that the browser understands. And also, it supports a bunch of plugins. It is very cool!
Note: All this transformation magic can be felt even online.
Try inserting any react or es6 code and see what it transforms into, for example, the code from home.js
If you have done this procedure, then you might have noticed that 9 lines of the react ES6 code (~ 400 bytes) turned into 44! ES5 lines (~ 2200 bytes)
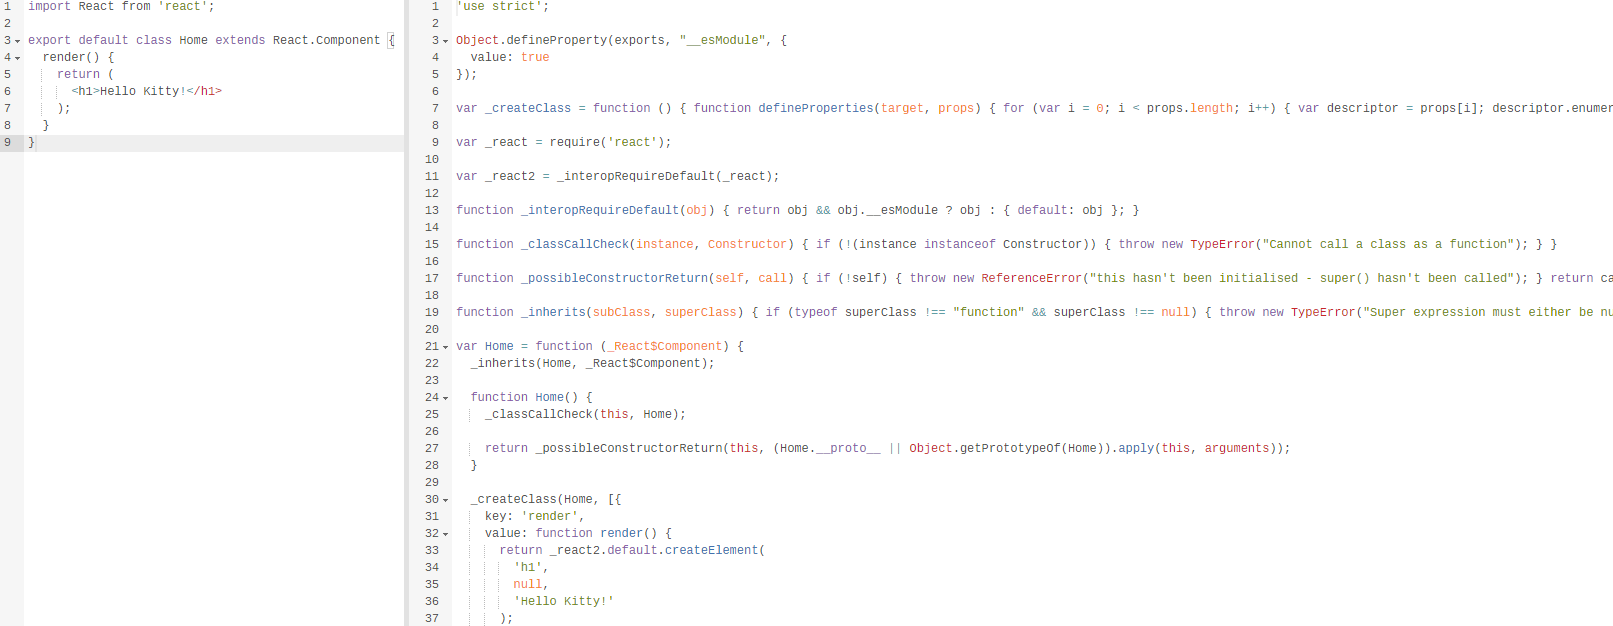
This is the price paid for syntactic sugar, because there are no classes in javascript-e. You can observe how babel made a function out of class with a light hand.
Likely, at this stage it is necessary to tell a couple of lines about stateless components. Roughly speaking, such are called components that have no state. Our Home component just does not have a state, so we can rewrite it as:
stateless home.js
import React from 'react'; const Home = (props) => { return ( <h1>Hello Kitty</h1> ); }; export default App; We got rid of the class, so this code will be much shorter in the final ES5 syntax, and its volume will decrease by more than 5 times. In addition, we can make the source code even more concise:
stateless home.js
import React from 'react'; const Home = () => ( <h1>Hello Kitty</h1> ); export default App; Note: I like this article on stateless components, I recommend.
routes.js
import React from 'react'; import { Router, Route, browserHistory } from 'react-router'; import Home from './views/home'; export default () => ( <Router history={browserHistory}> <Route path='/' component={Home} /> </Router> ); Finally, in the routes, we will write only one path to the Home component. There should be no questions, the library is simple, but at the same time it has powerful functionality .
To give the browser a readable code is only half the case, since the project consists of many files, and in the end we need only one minimized js file (which we connect to index.html), then we will also need a module builder. We will collect using webpack .
We put it:
npm i --save-dev webpack Note: Please note that the webpack is placed in the devDependencies section.
Everything connected with the development and will not be used in the production environment is put with the --save-dev flag, often these are: collectors and plugins for them, tests, linters, loaders, post / preprocessors and so on.
As described above for all code transformations, we need babel and the necessary presets (sets of plug-ins) to it:
npm i --save-dev babel-loader babel-core babel-preset-es2015 babel-preset-react Webpack will need a configuration file , we will create webpack.config.js in the root directory of the project.
webpack.config.js
var webpack = require('webpack'); module.exports = { entry: './client/index.js', output: { path: __dirname + '/public', filename: 'bundle.js' }, module: { loaders: [ { test: /.jsx?$/, loader: 'babel-loader', exclude: /node_modules/ } ] } }; Babel also recommends using a .babelrc file, here we describe what presets we want to use.
{ "presets": ["es2015", "react"] } Note: A couple of useful links: 6 things you need to know about babel 6 and what's the difference in how presets are declared .
Here we tell the collector that the entry point to our application is the client / index.js file, the webpack will start its work from this file, we don’t need to tell it which files should be included in the assembly, it will do all this for us. The output should be one bundle.js file in the public directory. Roughly speaking, with this config we tell babel: “Hey, put all the necessary files into one, starting from index.js and make sure that babel converts all .js and .jsx files into code that is understandable to browsers.” great The webpack setup is ready, go to the console and start the collector:
webpack The file bundle.js should appear in the public directory. Public is our public directory, after the build all “ready-made” files (for us this is index.html + bundle.js) should get here. Bundle is ready, it's time to do html. Here you should understand that the current index.html is only a workpiece, in the future we, for example, need to attach CSS or js files, minimize or add some content, while performing different operations for different assemblies. For these purposes we will need HtmlWebpackPlugin . We put it:
npm i --save-dev html-webpack-plugin After we go to the configuration file and configure the plugin:
webpack.config.js
var webpack = require('webpack'); var HtmlWebpackPlugin = require('html-webpack-plugin'); module.exports = { entry: './client/index.js', output: { path: __dirname + '/public', filename: 'bundle.js' }, module: { loaders: [ { test: /.jsx?$/, loader: 'babel-loader', exclude: /node_modules/, } ] }, plugins: [ new HtmlWebpackPlugin({ template: './client/index.html', inject: "body" }) ] }; With this we say webpack, so that it inserts a 'script' tag with a link to the bundle.js it bundles in our index.html template. In this case, the “ready” index.html will be located next to the bundle, that is, in public. Run the webpack again and see this by checking the public directory.
Let's go back to our banner that the webpack brought us. The attentive reader will notice that ~ 710KB is a bit too much for 'Hello Kitty!'. I agree, but we still have a development version that provides additional functionality to help the developer, for example, shows various versions in the console. Let's try to hint react-y that we want to build a project for products. To do this, you need to minimize the final bundle.js and set the NODE_ENV environment variable to “production”. In the config add plugins, with nothing extra to download and install do not need.
webpack.config.js
plugins: [ new webpack.DefinePlugin({ "process.env": { NODE_ENV: JSON.stringify("production") } }), new webpack.optimize.UglifyJsPlugin({ compress: { warnings: true } }), new HtmlWebpackPlugin({ template: './client/index.html', inject: "body" })] You can view the full list of plugins here .
Note: If you do not specify NODE_ENV = production, but simply compress the file, then react will display a warning in the console:

We will rebuild the project using plugins and look at our fresh bundle again.

It is already possible to work with this, but this is not the limit, let's look at another configuration of the webpack's configuration - " devtool ". This option also affects the size of the final file and build speed. Therefore, we will use different values for products and developers. Here you can read how each option works. For myself, I chose a source-map for production and an inline-source-map for a developer, although these values may vary for different projects. Here you need to play and choose the best for yourself.
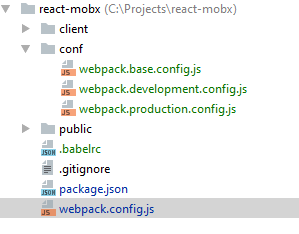
It is time to change the configuration file, because now we can easily collect our project for different needs, I do not like the solution, when the settings are adjusted in the same config file through the conditions. With an increase in settings and / or types of assemblies, the config becomes hard to read, so we will use webpack-config .
npm install --save-dev webpack-config As you can see from the description, this is an assistant for loading, expanding and merging configuration files. In this example, I would like to be able to do two assemblies: development and production. Add a conf directory and three configs, as shown in the figure:
webpack.base.config.js
import Config from 'webpack-config'; import HtmlWebpackPlugin from 'html-webpack-plugin'; export default new Config().merge({ entry: './client/index.js', output: { path: __dirname + '/../public', }, module: { loaders: [ { test: /.jsx?$/, loader: 'babel-loader', exclude: /node_modules/, } ] }, plugins: [ new HtmlWebpackPlugin({ template: './client/index.html', inject: "body" })] }); In the base config there are general settings that are valid for two assemblies.
webpack.development.config.js
import Config from 'webpack-config'; export default new Config().extend('conf/webpack.base.config.js').merge({ output: { filename: 'bundle.js' } }); In the development config, we specify only the name of the final bundle - 'bundle.js'
webpack.production.config.js
import webpack from 'webpack'; import Config from 'webpack-config'; export default new Config().extend('conf/webpack.base.config.js').merge({ output: { filename: 'bundle.min.js' }, plugins: [ new webpack.optimize.UglifyJsPlugin({ compress: { warnings: true } })] }); For production, we add a plugin to minimize, as well as change the name of the bundle. As you can see, both configs expand from the base.
webpack.config.js
import Config, { environment } from 'webpack-config'; environment.setAll({ env: () => process.env.NODE_ENV }); export default new Config().extend('conf/webpack.[env].config.js'); Now we can manage assemblies using the NODE_ENV environment variable; depending on its value, webpack-config will automatically pull up the necessary file.
Note: webpack.config.js uses the ES6 syntax, so when you try to start the webpack, you will see the error "SyntaxError: Unexpected token import". To solve the problem, just rename this file to webpack.config.babel.js. By this we pass the config through the babel-loader.
Add the necessary webpack startup scripts to package.json in the scripts section:
"scripts": { "build-dev": "set NODE_ENV=development&& webpack --progress", "build-prod": "set NODE_ENV=production&& webpack --progress" }, With the --progress flag you can see the progress and report on the bundles. Now we can build two different assemblies; for products:
npm run build-prod and for development:
npm run build-dev Note: I work in windows, so the assignment looks like this “set NODE_ENV = production”. For other operating systems, the assignment looks different.
The last touch is hot loader. This piece allows you to rebuild the project on the fly when you change the source files. At the same time the page will not be reloaded and the state will not be lost. This speeds up development at times, and the process of development turns into pleasure. You can listen to this podcast in more detail, as there are links to interesting resources on this topic.
For this we need: react-hot-loader , webpack-dev-middleware and webpack-hot-middleware and, of course, the server itself, we will use express .
npm i --save express npm i --save-dev react-hot-loader@next webpack-dev-middleware webpack-hot-middleware Note: Please note that you need to install the react-hot-loader next version.
Add a file to the project root
server.js
import express from 'express'; import path from 'path'; const PORT = 7700; const PUBLIC_PATH = __dirname + '/public'; const app = express(); const isDevelopment = process.env.NODE_ENV === 'development'; if (isDevelopment) { const webpack = require('webpack'); const webpackConfig = require('./webpack.config.babel').default; const compiler = webpack(webpackConfig); app.use(require('webpack-dev-middleware')(compiler, { hot: true, stats: { colors: true } })); app.use(require('webpack-hot-middleware')(compiler)); } else { app.use(express.static(PUBLIC_PATH)); } app.all("*", function(req, res) { res.sendFile(path.resolve(PUBLIC_PATH, 'index.html')); }); app.listen(PORT, function() { console.log('Listening on port ' + PORT + '...'); }); The minimum express server, the only caveat is setting up the middleware for development build. As you can see, the data for middleware is taken from webpack.config.babel
The next step is to add the plugins section to .babrrc.
"plugins": [ "react-hot-loader/babel" ] The configuration file for development now looks like this:
webpack.development.config.js
import webpack from 'webpack'; import Config from 'webpack-config'; export default new Config().extend('conf/webpack.base.config.js').merge({ entry: [ 'webpack-hot-middleware/client?reload=true', 'react-hot-loader/patch', __dirname + '/../client/index.js' ], devtool: 'inline-source-map', output: { filename: 'bundle.js' }, plugins: [ new webpack.HotModuleReplacementPlugin() ] }); Also undergone changes
index.js
import React from 'react'; import { AppContainer } from 'react-hot-loader'; import ReactDOM from 'react-dom'; import AppRouter from './routes'; const render = (Component) => ReactDOM.render( <AppContainer> <Component /> </AppContainer>, document.getElementById('app') ); render(AppRouter); if (module.hot) { module.hot.accept('./routes', () => { require('./routes'); render(AppRouter); }); } And finally, the scripts in package.json should look like this
"scripts": { "build-dev": "set NODE_ENV=development&& node server.js", "build-prod": "set NODE_ENV=production&& webpack && node server.js" }, Note: if you try to run the script, you will again see the error "SyntaxError: Unexpected token import". Because server.js uses ES6 import s and tries to read webpack.config.babel.js, which also uses import s. And they promise support only in version 8. Babel will be required for the babel-cli command line:
npm i --save-dev babel-cli We will use babel-node, instead of node, everything should work:
"scripts": { "build-dev": "set NODE_ENV=development&& babel-node server.js", "build-prod": "set NODE_ENV=production&& webpack && babel-node server.js" }, We try to build both assemblies, while for production, the minimized bundle.min.js will gather and the server will start on port 7700, and for development a hot reboot will work, and you will not see any files in the public directory, the whole process will be in memory. For the test we will complicate the home.js code
home.js
import React from 'react'; export default class Home extends React.Component { constructor() { super(); this.state = { name: "Kitty" }; this.clickHandler = this.clickHandler.bind(this); } clickHandler() { this.setState({ name: "Bunny" }); } render() { return ( <h1 onClick={this.clickHandler}> {`Hello ${this.state.name}!`} </h1> ); } } By the way, if you started the development build, then all changes should be pulled right away. Let's click on the title, thereby changing the name state from “Kitty” to “Bunny”, then in the code we will replace the text in the title from “Hello” to “Bye”. Go to the browser and see the inscription "Bye Bunny", i.e. hot reboot worked, while the changed state is not reset.
At first I didn’t want to add work with CSS, but in the process of writing this article I realized that all the same for the complete set you need to add a build process of styles.
Probably, everybody had a case when you edit the layout in one place and unwittingly create a new problem in another, the styles overwritten each other, or the same classes described above were used. We will write react components, so why don't we immediately use CSS for components, and not globally? We will use CSS modules ! We will need post-css and its plugins . To begin with, we will be interested in autoprefixer and precss to speed up development, install:
npm i --save-dev css-loader style-loader postcss-loader autoprefixer precss Making changes to configs
webpack.base.config.js
import webpack from 'webpack'; import Config from 'webpack-config'; import HtmlWebpackPlugin from 'html-webpack-plugin'; import autoprefixer from 'autoprefixer'; import precss from 'precss'; export default new Config().merge({ entry: './client/index.js', output: { path: __dirname + '/../public', }, module: { loaders: [ { test: /.jsx?$/, loader: 'babel-loader', exclude: /node_modules/, } ] }, plugins: [ new HtmlWebpackPlugin({ template: './client/index.html', inject: "body" }), new webpack.LoaderOptionsPlugin({ options: { postcss: [precss, autoprefixer] } }) ] }); webpack.development.config.js
import webpack from 'webpack'; import Config from 'webpack-config'; export default new Config().extend('conf/webpack.base.config.js').merge({ entry: [ 'webpack-hot-middleware/client?reload=true', 'react-hot-loader/patch', __dirname + '/../client/index.js' ], devtool: 'inline-source-map', output: { filename: 'bundle.js' }, module: { loaders: [{ test: /\.css$/, use: [ 'style-loader', { loader: 'css-loader', options: { modules: true, importLoaders: 1, localIdentName: "[local]__[hash:base64:5]", minimize: false } }, { loader: 'postcss-loader' }, ] }] }, plugins: [ new webpack.HotModuleReplacementPlugin() ] }); webpack.production.config.js
import webpack from 'webpack'; import Config from 'webpack-config'; export default new Config().extend('conf/webpack.base.config.js').merge({ output: { filename: 'bundle.min.js' }, devtool: 'source-map', module: { loaders: [{ test: /\.css$/, use: [ 'style-loader', { loader: 'css-loader', options: { modules: true, importLoaders: 1, localIdentName: "[hash:base64:10]", minimize: true } }, { loader: 'postcss-loader' }, ] }] }, plugins: [ new webpack.optimize.UglifyJsPlugin({ compress: { warnings: true } })] }); We add a plugin to the base config, add loaders for the rest, only the settings differ. The localIdentName option is interesting here, it allows you to assign CSS names to classes, for the production version we will use a hash of 10 characters, for a developer, the names of classes + a hash of 5 characters. This is very convenient, because when you debug you always know which class you need to fix. For example, let's add the Menu component:
Project structure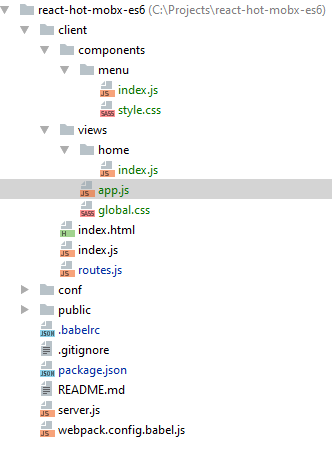
menu / index.js
import React from 'react'; import styles from './style.css'; const Menu = () => ( <nav className={styles.menu}> <div className={styles['toggle-btn']}>☰</div> </nav> ); export default Menu; Notice how the css module is used. These are local styles, i.e. for another menu, we can also use the .menu class with other styles, and they will not intersect.
menu / style.css
.menu { position: fixed; top: 0; left: 0; bottom: 0; width: 40px; background-color: tomato; & .toggle-btn { position: absolute; top: 5px; right: 10px; font-size: 26px; font-weight: 500; color: white; cursor: pointer; } } app.js
import React from 'react'; import Menu from '../components/menu'; // Global CSS styles import './global.css'; const App = () => ( <div className="app-container"> <Menu /> <div className="page-container"></div> </div> ); export default App; But we can also use “global” styles, for example, for html and body. Enough to connect their app.js.
routes.js
import React from 'react'; import { Router, Route, browserHistory } from 'react-router'; import App from './views/app'; import Home from './views/home'; export default () => ( <Router history={browserHistory}> <Route path='/' component={App}> <Route path='home' component={Home} /> </Route> </Router> ); Add a little nesting, now we have an App container with an embedded Home page.
The webpack settings will also allow for a hot reboot for styles, just try making some changes to the styles.
This is the first part over. I do not pretend to be the most correct option, but I went this way and learned a few interesting things while writing this article, I hope it will turn out to be something useful and different.
Link to what happened: github.com/AlexeyRyashencev/react-hot-mobx-es6
Source: https://habr.com/ru/post/324232/
All Articles