Migrating an outdated information system to the CUBA platform

The rapid development of technologies and software development tools leads to the fact that the technologies underlying the information system, lose their relevance and become a heavy burden. Take, for example, some development of a company for automating processes, written in Visual Basic 6.0 or Delphi 7, which, to put it mildly, does not combine with the new trends “all on the web, everything in the clouds”, and does not correspond to the ambitions of the developers.
The problem of transferring old IP to new technologies, reaching the leadership, traditionally rests on money: “let's live and so on ...”. For developers, in turn, already transferring the data model and the template programming of standard screens causes a negative. At the same time, it is often complicated by the requirement to preserve the health of the old IS at the stage of developing and implementing a new one. One way or another, in my experience, the product either dies completely, causing torture of both programmers and users, or the understanding still comes that updating the IP is an urgent need.
Based on the problems described, as well as the increasing requests as a platform vendor to help migrate legacy systems to CUBA , we decided to add a mechanism that would make this process as easy as possible for programmers and cheap for management.
Under the cat step by step instructions on how to upgrade an outdated system with minimal effort to transfer the data model and standard CRUD screens.
To demonstrate the migrator, which since version 2.1 is presented in CUBA Studio, we have prepared step-by-step instructions on how to upgrade an outdated system, minimizing efforts to transfer the data model and standard CRUD screens. Since Microsoft officially stopped supporting LightSwitch , a popular tool for the rapid development of corporate information systems, we chose the LightSwitch Vision Clinic demo application and transferred it to the CUBA platform and posted it on GitHub with a detailed description of the actions taken. If you have a need or experience in software upgrading, we invite you to follow the suggested example.
We will use the migrator built into CUBA Studio for reverse engineering. It extracts metadata from the old database and uses them to automatically:
1. Generate a data model based on the existing database
2. Update the database to create the necessary CUBA Platform system tables,
3. Generate a standard CRUD UI.
Thus, the main routine takes on CUBA Studio. However, business logic and screen design, which is different from the standard one, must be manually transferred to the new application.
If you are just curious to see what we got in the end, scroll to the section Can I run the application without MSSQL?
A couple of words about the original application
Now that is the legacy application that we have chosen as a victim for migration. We downloaded a demo application for an abstract eye clinic from the official Microsoft website . It is written in the Microsoft Lightswitch development environment, which Microsoft officially discontinued several months ago.
In fact, this is a standard 3-layer application that demonstrates the main pieces of LightSwitch: the creation of a data model, screen scaffolding and calculated attributes of entities. The VisionClinic example stores data simultaneously in 2 different databases connected to each other. To simplify, we merged these two bases into one.
CUBA system tables will be created in the same database. These changes will not affect the tables used by the old LightSwitch application, so it can be run on the same database instance.

Note: Legacy DB can be connected to CUBA application as an additional datastore . In this case, the old database will remain completely unchanged, and the Cuban tables will be stored separately.
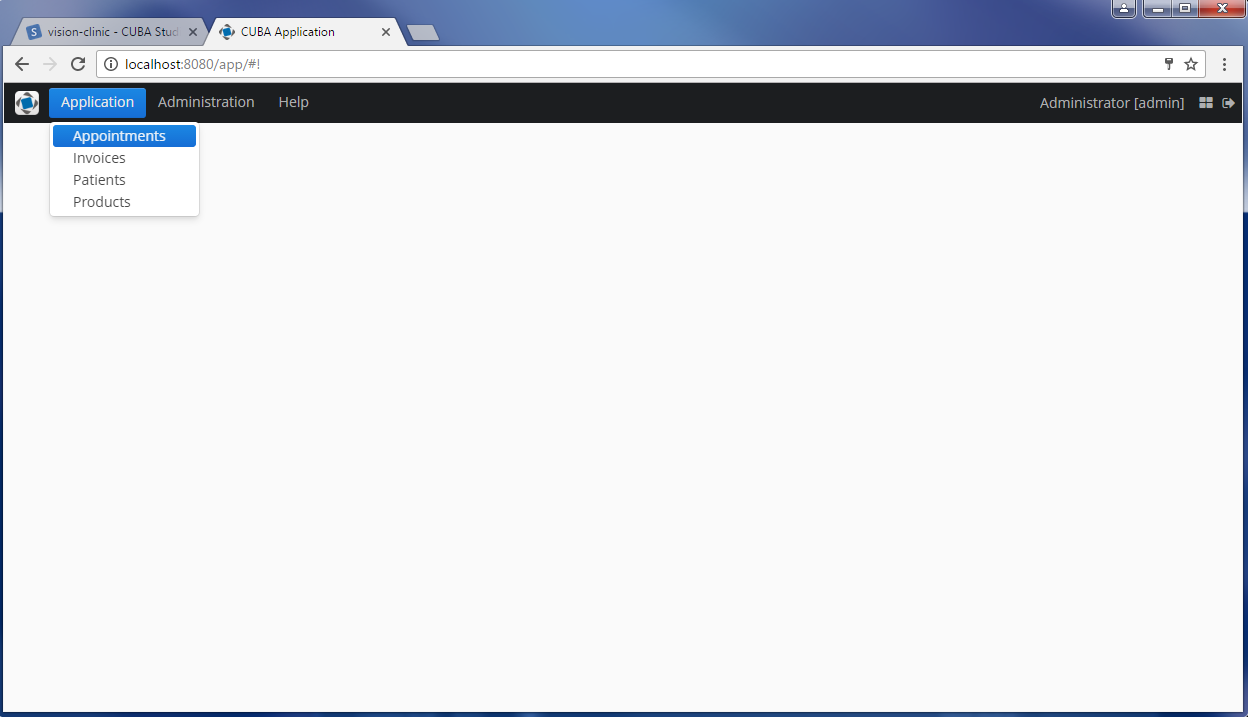
This is what the Lightswitch UI looks like. We liked the Products list screen the most - it is a bit more complicated than the rest:
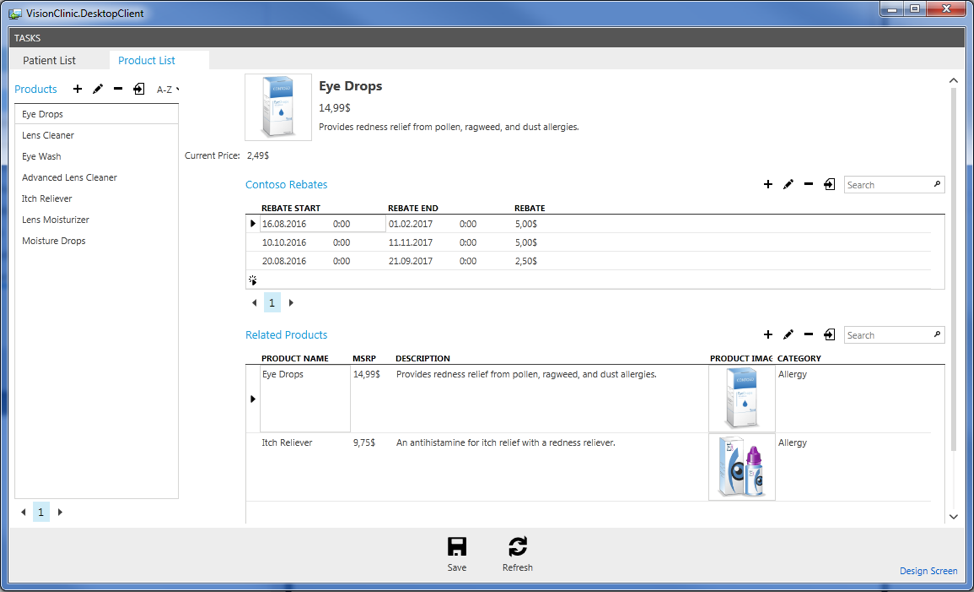
In general, this is the classic layout of the enterprise screen: the top is the main menu, the screens open as new tabs in the same window. If you want, you can create it yourself according to the instructions , or just download it . We only need a database from the entire application. How to install it is described in detail in the appropriate section.
CUBA based application
Looking ahead, I will say that we want to get in the end. We will create a fully functional Java application, traditionally consisting of 3 layers, with a full-fledged web client, repeating the UI and business logic of the original Lightswitch application. As already mentioned, the application will not change the structure of existing tables, so that both applications will be able to work in parallel on the same database instance.
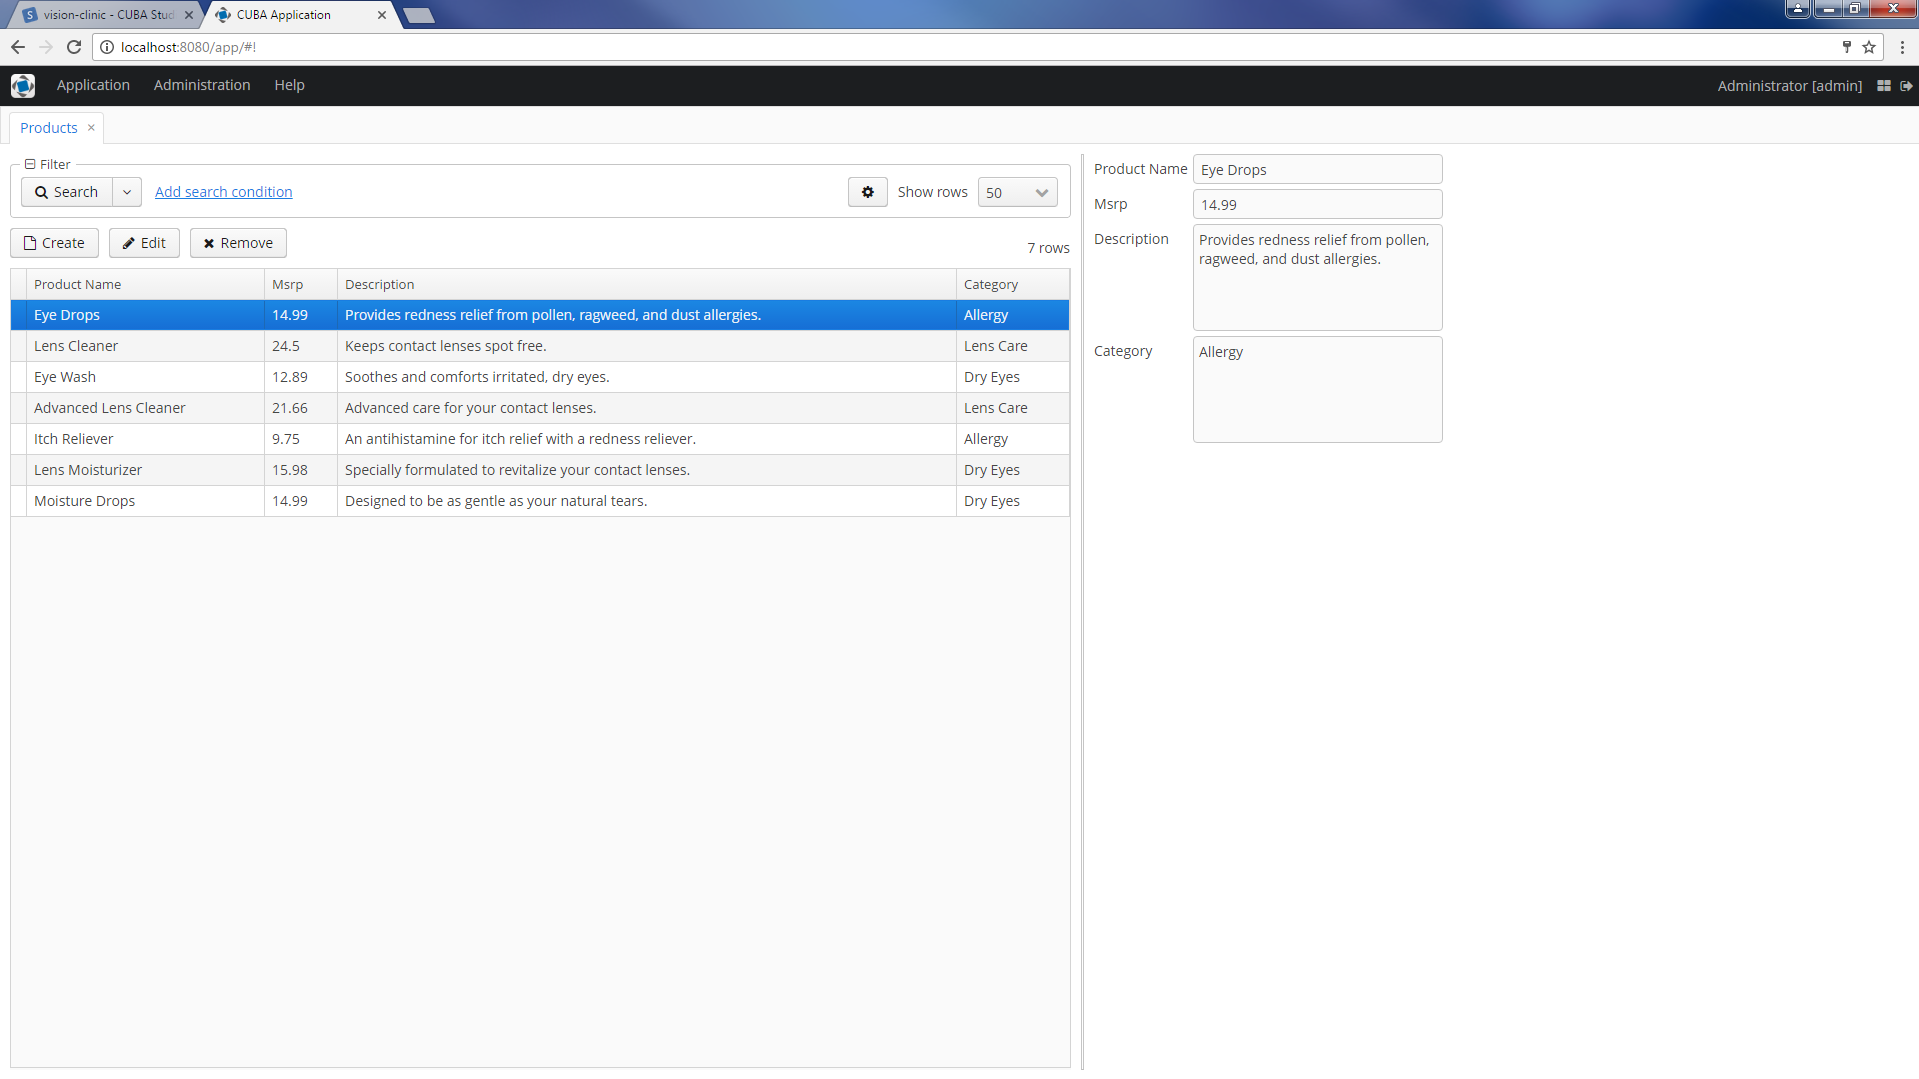
The screenshot below shows the same product screen, but already in the CUBA application, you can compare:

Step 1. Install the Environment and Database
1. Download and install the CUBA platform according to the Installation Instructions from the platform documentation.
2. Download and install MS SQL Server 2012+ from the official site . Skip this step if you already have a server installed.
3. Run the create-db.sql script on the MS SQL DB instance to create the VisionClinic database.
4. Run the insert-data.sql script on the newly created VisionClinic database to fill it with test data.
5. Enable SQL Server and Windows Authentication mode and log on as the sa user, as shown here . Remember the password for sa , it will be needed to connect to the database from the CUBA application.
Step 2. Creating a project on CUBA
1. Launch the CUBA Studio server (1) and open the Studio in the browser (2).

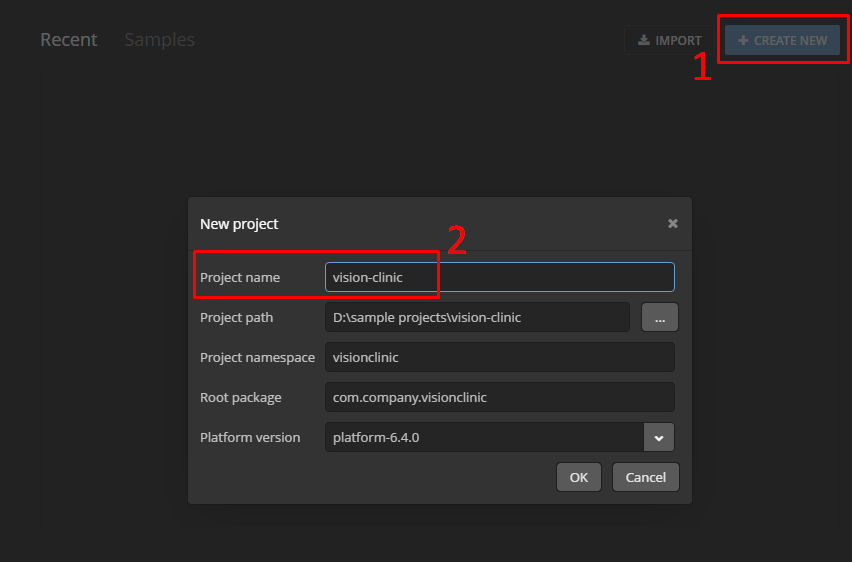
2. Create a new project (1), enter the vision-clinic in the project name field (2) and click OK.
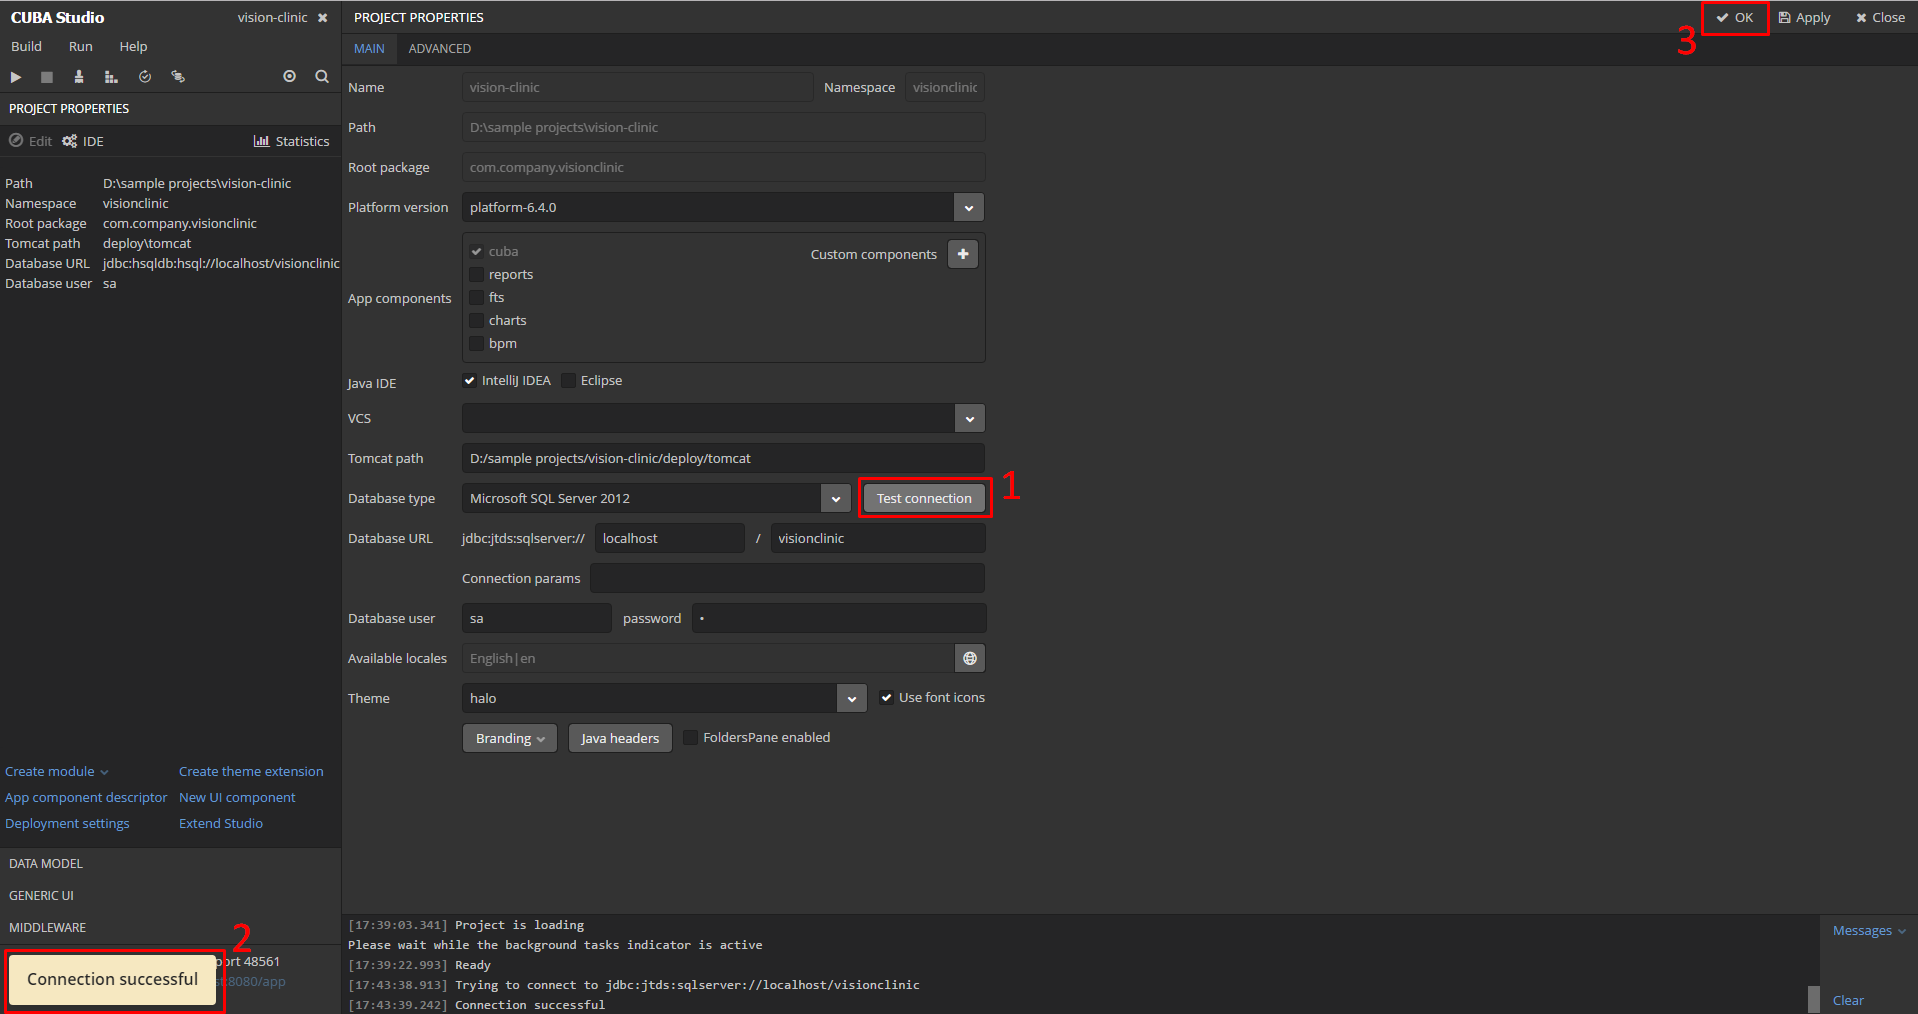
3. In the Project properties section we establish a connection to the VisionClinic database and fill in the following fields:
- Database type - Microsoft SQL Server 2012 , here indicate your installed version (1)
- Database URL - localhost , or domain name / IP of the computer with installed SQL Server (2)
- Database name - visionclinic , this name was created when the create-db.sql script was executed in step 1, paragraph 3 (3)
- Database user and Database password - use your login parameters for the sa in the SQL server, or another user with administrator rights (4)

4. Click Test connection (1) and check if Studio has connected to the database we need. After receiving the message Connection successful (2), click OK (3) to save the entered parameters.
Step 3. Migrator - Data Model and CRUD UI Generation
In this step, we will generate a data model (that is, an entity) based on the structure of the existing database, and a simple user interface for data manipulation.
1. Go to the DATA MODEL tab and click on the Generate model link.
2. CUBA Studio will request a database update to create its own tables, necessary for the operation of the platform, such as: security settings, state auditing, dynamic attributes, etc. Confirm the update.

3. The GENERATE MODEL FROM DATABASE window appears. Here we will configure the mapping of database tables and their columns to entities and their fields.
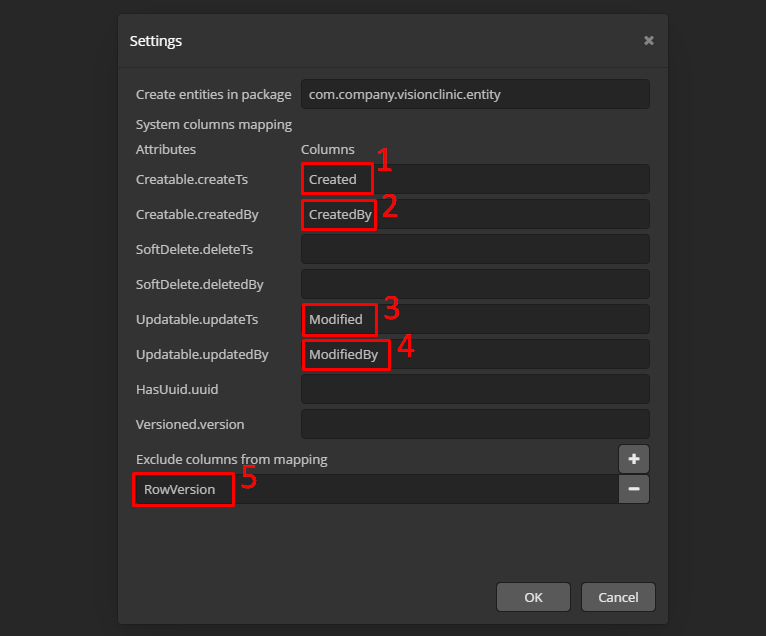
4. Click on the Settings button in the top panel to configure general mapping parameters. In our demo application, both frameworks allow you to track who created or modified an entry in the database, so we link the predefined Cuban fields createTs, createdBy, updateTs, updatedBy with the corresponding system columns in the existing database, which are in almost all its tables: Created (1), CreatedBy (2), Modified (3), ModifiedBy (4).
RowVersion (5) is another system column that is used in Lightswitch for optimistic locking. Unfortunately, it cannot be tied to the version column used in the platform for the same purpose, since the types of these fields do not match. To support optimistic locking in the CUBA application, you can create another field, but since we decided not to change anything in the table structure, we simply remove this column from the mapping and click OK.
5, Click on the Show tables button in the top panel and select the tables by which entities will be created in the new application. Select everything with the Select all button and remove the selection from sysdiagrams (1), this is the MS SQL service table in which the database schema is stored, we do not need it for migration. Click Next (2).

6. At this stage, you can configure mapping more subtly, at the level of individual entities and their fields. For example, CUBA provides that the names of all entities should be in the singular, since Studio generates the main UI strings based on them, such as screen names and menu item headers. Therefore, we rename the entities, removing the inheritance of the plural from everywhere. Select the Appointments table, click on the Edit mapping button, edit the class name and save the changes by clicking OK.

7. Repeat this step for other entities that have a plural in the name: InvoiceDetails, Invoices, and Patients.
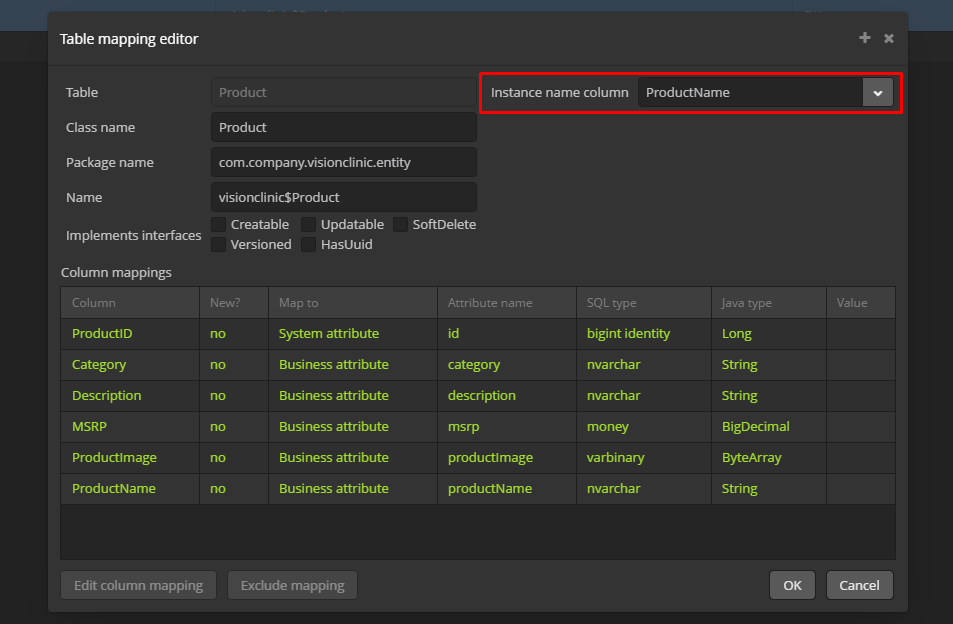
8. Also at this stage, you can specify for the entity its Instance Name - a string representation of the entity (record) to which it will be represented in the UI, for example, in table cells or drop-down lists. Select the Product table, click Edit mapping, select the ProductName attribute in the Instance name field and click OK.
9. All these parameters can be corrected later, so it’s not scary if we missed something or got it wrong somewhere. Click Next.
10. Now you can automatically create CRUD-screens for entities that provide access to data. The CUBA platform offers several standard screen templates:
- Browser - a screen for viewing a list of records from the database, by default it includes a data filter and pagination is supported;
- Editor - a screen for viewing and editing a single entry;
- Browser and Editor - just means that both screens will be created;
- Single screen - embeds the editor in the browser screen, so the list of all entries is displayed on the left, and the details of the selected entry are displayed on the right.
Note: Starting from version 6.4, the platform supports the creation of custom screen templates. Also, any screen can be subsequently edited in Studio and IDE.
11. Select the following templates and click Next:

We do not see any scripts on the screen of database update scripts. Everything as we planned, the original table remains unchanged. Click Save and wait for the platform to generate the data model and CRUD screens.
Step 4. First launch
Starting from this stage, we can already start the application and look at the newly created standard UI.
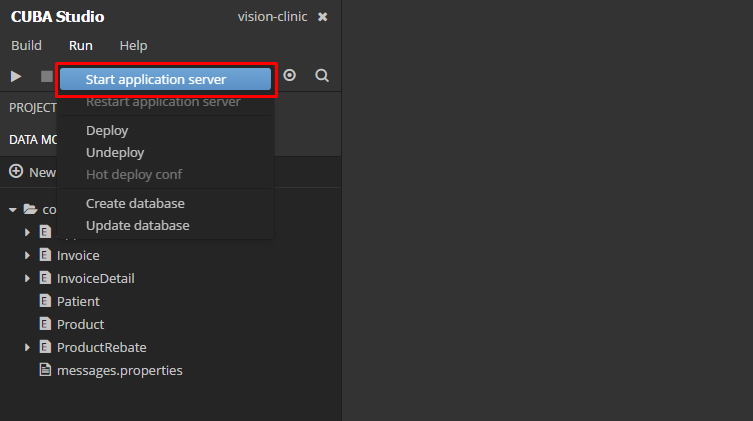
1. Run the CUBA application with the Run - Start application command in the main menu.
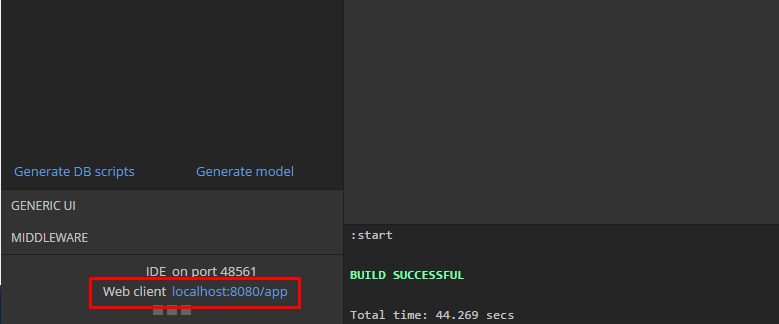
2. Click the Web client link in the lower left corner of Studio and go to the application that opens in a new browser tab.
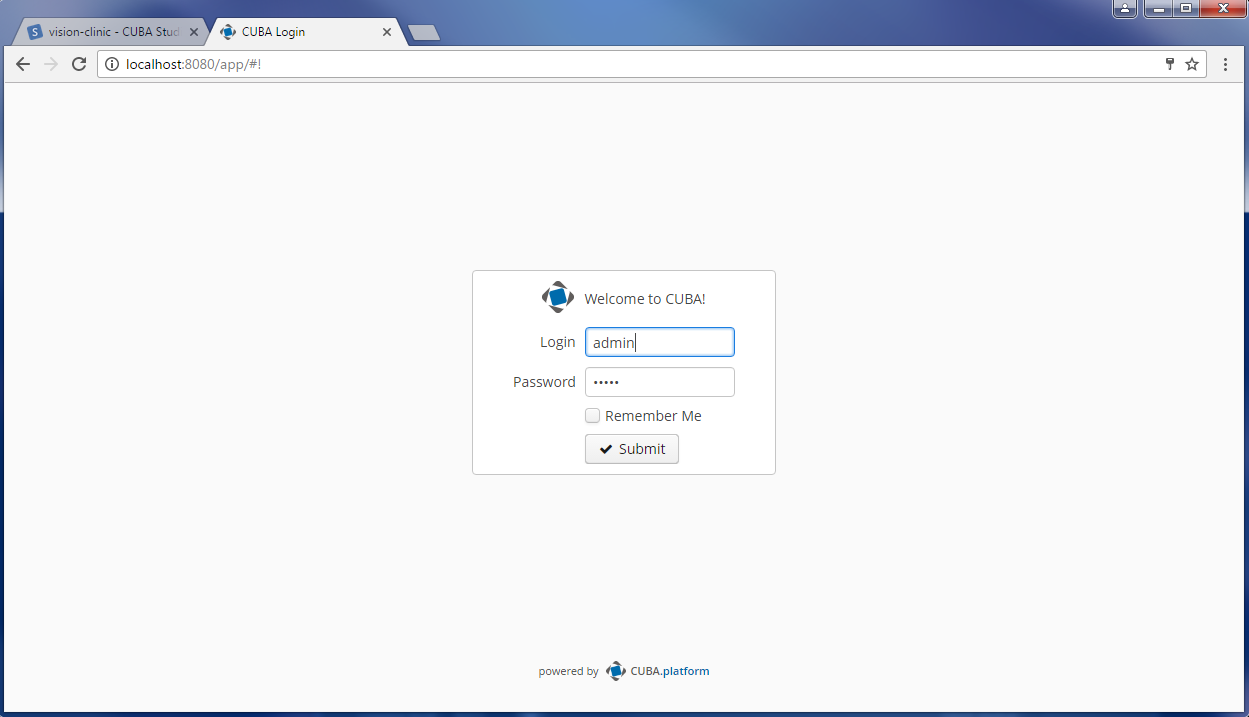
3. The default login and password is admin / admin, confirm and enter the application.
4. The screens we created are available from the Application menu at the top of the application.
5. Open the Products screen and see how it looks with the standard markup of the single screen template.
Of course, it will take some time to transfer business logic and interface design, but at this stage we already have the first version of the cross-platform application, completely based on open-source technologies.
Further development
What to do with the application further, here you have complete freedom of choice. The CUBA Platform does not prohibit changing the generated application code, as well as the source code of the platform itself. You can also integrate any third-party technologies from the Java world into the application.
For example, you may have noticed that on the standard Product view screen there is not enough information about discounts, a table of similar products and images. Using the platform and CUBA Studio, you can easily bring the screen to the kind that it had in the original LightSwitch application.
The source code for the augmented Product entity and the Product screen descriptor can be viewed in a project on GitHub. I want to note that all changes in the entity declaration and screen descriptor were created in the CUBA Studio visual editor.

All manual changes in the code are registered in the screen controller . You can also see an example of creating calculated attributes in the source code of the Product entity (see method Product # getCurrentPrice ).
Can I run an application without MSSQL?
By default, our application on GitHub is configured for use with the lightweight HyperSQL Database. Therefore, simply by tilting it from the repository, you can start it, and when you start it, Studio will create the required database itself. True, this database will be empty, and you will have to fill it yourself through the user interface of the application.
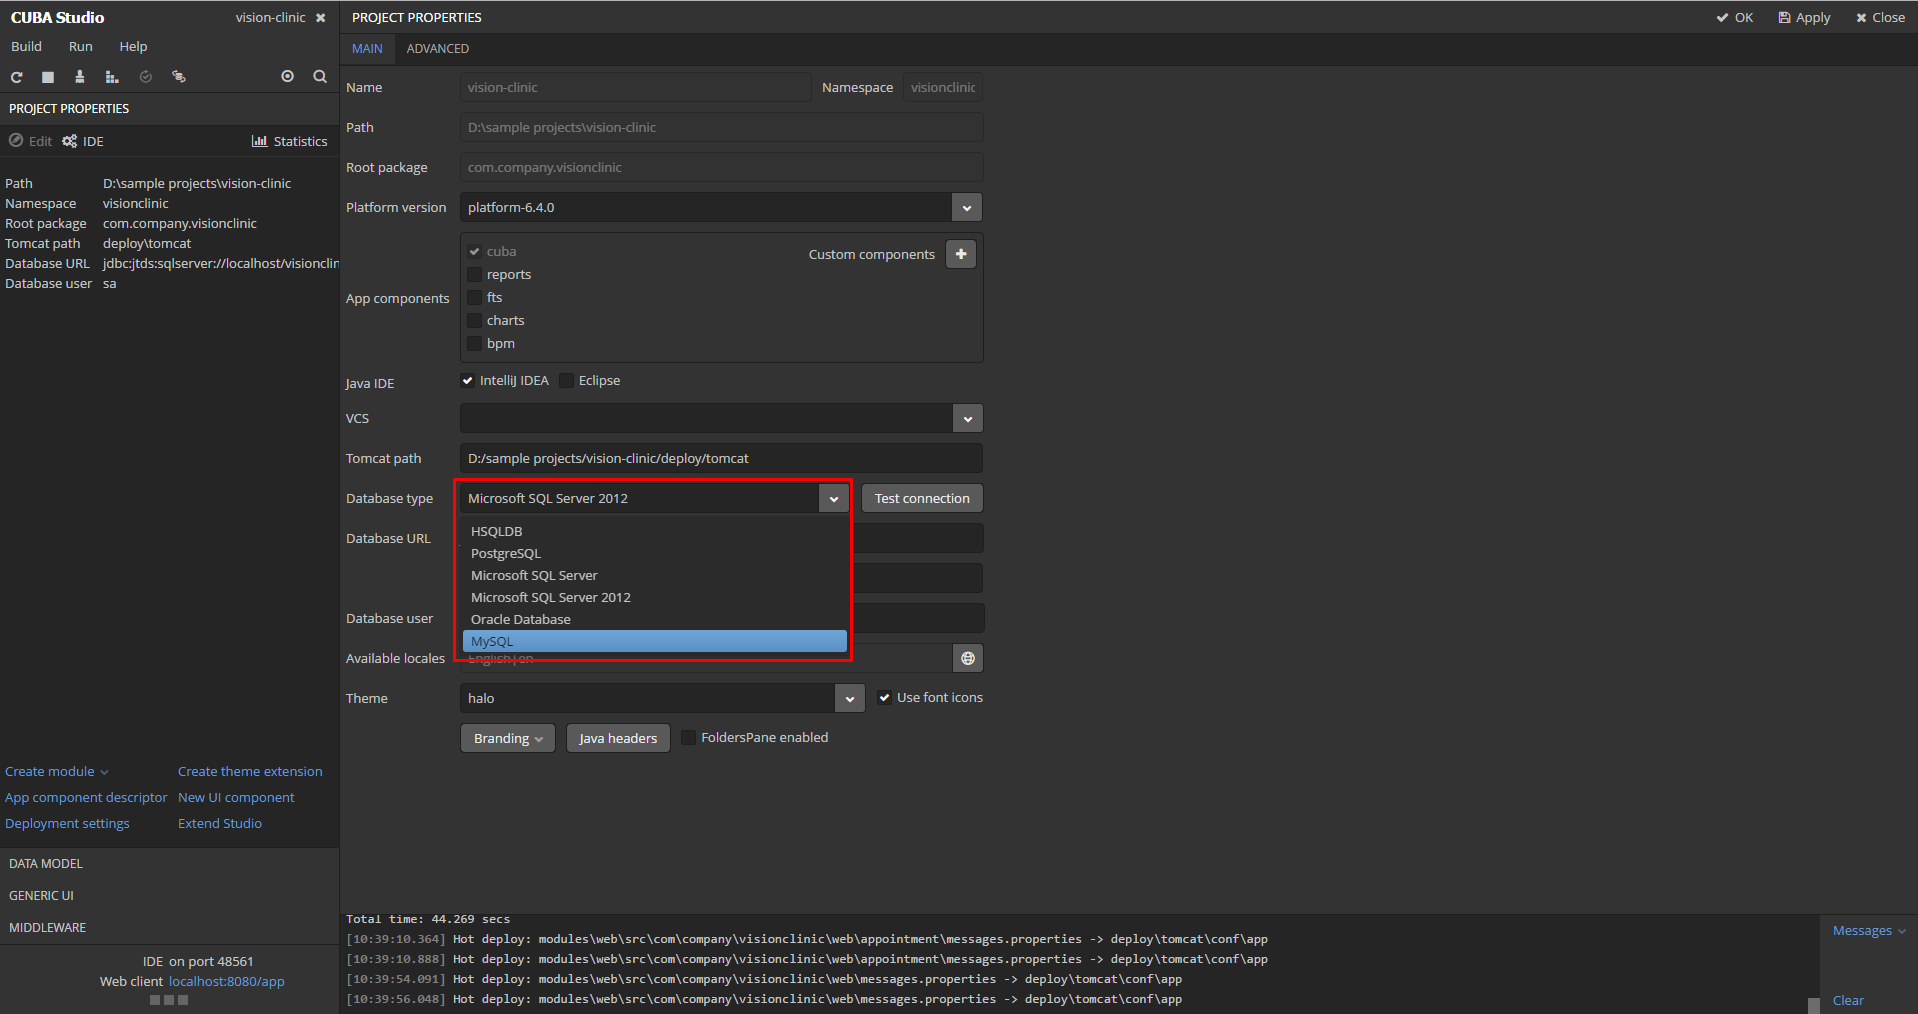
If you want to change the type of database used in CUBA Studio, this is implemented quite straightforwardly: to migrate to another DBMS, open the project settings in the Project Properties section and select the database type from the drop-down list. Studio will create new scripts to create and update the database, and you can run the application from any selected database.
Summarizing, if you have a need or experience in software upgrading, we invite you to evaluate the tool and, possibly, suggest options for improving the migration mechanism. We will be happy to receive feedback on our support forum .
')
Source: https://habr.com/ru/post/324226/
All Articles