Network configuration in guest Ubuntu 16.04 Server on VirtualBox + Windows 7
Spring, again drawn to the experiments. Well, in my understanding of the word. I decided to install a virtual machine in Windows 7, and in this machine - Ubuntu 16.04 Server (under which the hosting for my sites works). And it’s not that OpenServer somehow doesn’t suit me - it’s quite good as a home WAMP, but sometimes you want to have LAMP on hand locally, just because. As a virtual machine [expected] I chose VirtualBox.
In general, the installation of Ubuntu 16.04 Server on VirtualBox did not cause any special questions, but the configuration of the network in Ubuntu so that it could be seen from Windows put me at a dead end. Because the experience in this matter is 0, and although the manuals on the topic are gully in many, each of them for some reason is only partially covered, and requires a certain level of knowledge of Linux and the principles of network interfaces.
In the end, I decided this question and now I am sharing with those to whom it is also relevant. Let's get started
')
1. Download VirtualBox for Windows www.virtualbox.org/wiki/Downloads
2. Download Ubuntu Server 16.04 www.ubuntu.com/download/server
3. We install VirtualBox into the system (it is easy to put it, I will not disclose this question here, as a last resort - there are many cribs on the subject on the network).
4. We put Ubuntu Server 16.04 in VirtualBox. Here, too, everything is no more difficult (and even easier) than installing Windows, for example, and all sorts of good manuals with pictures (they, in general, are not required - everything is intuitively clear). But there are a couple of nuances:
4.1 When installing a network, select auto setup.
4.2 When installing packages, immediately put the daws on the OpenSSH and LAMP server (the rest is optional) - it's easier.
5. I believe that everything went fine with you, Ubuntu was loaded, and the Internet is there (you can check it with the command ping yandex.ru for example). However, the question remains how, for example, to connect with Ubuntu from Windows, say, via SSH. Or simply even open in the browser a site running on Ubunt Apache.
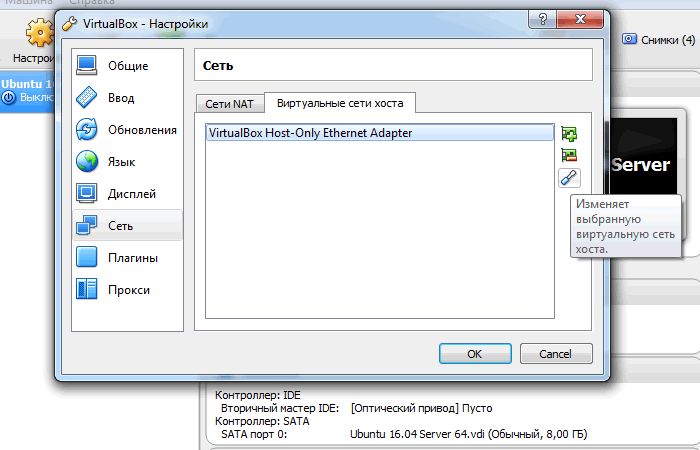
6. So, stop our Ubuntu, close the window with the terminal, and in the main window of VirtualBox go to File → Settings → Network → Virtual host networks - on the right are three small icons - click on the bottom with a screwdriver image.
7. See IP-address: 192.168.56.1 - this is the address at which Windows accesses VirtualBox.
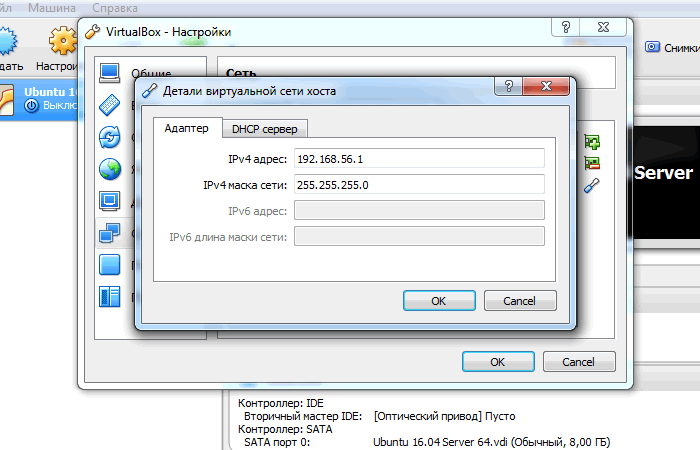
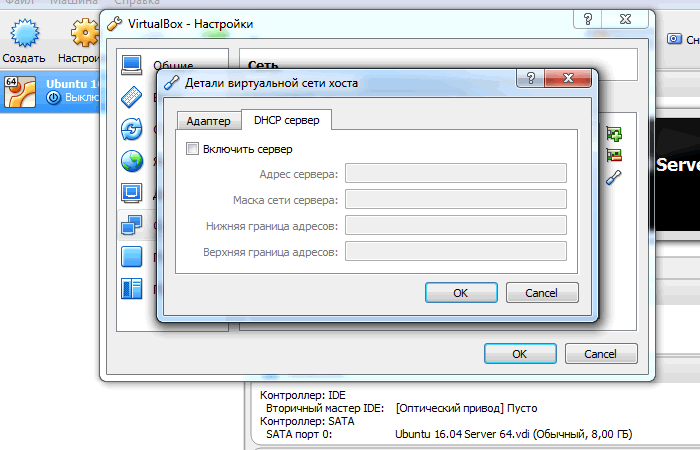
8. Next to it is the “DHCP Server” tab in our case, it is empty (the checkbox is not selected). And let it remain so.
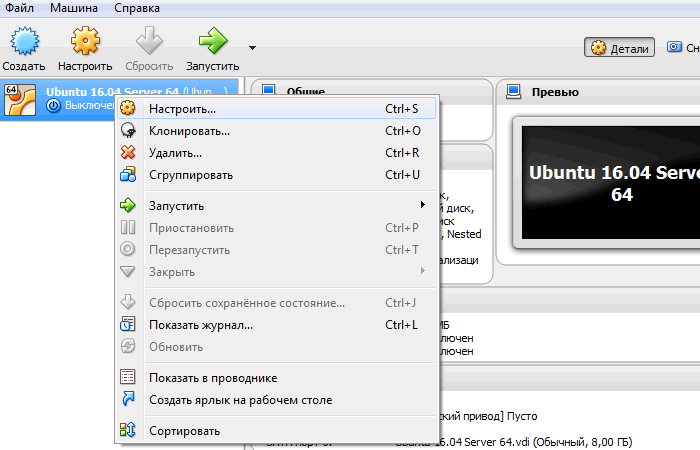
9. Next, go to the settings of the guest system (in our case, Ubuntu 16.04.2 Server), right-click on the tab with the system and select the uppermost item “Configure ...”.
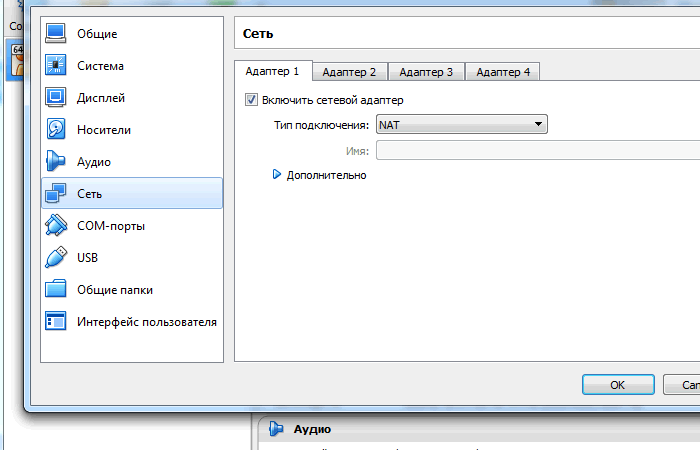
10. Here we go to the “Network” again (we have two Network points of the same name, but in the first case we set up the Windows network and VirtualBox, and now we set up the guest network - Ubuntu in conjunction with the rest). Here we see that NAT is marked for the first adapter. Do not change.
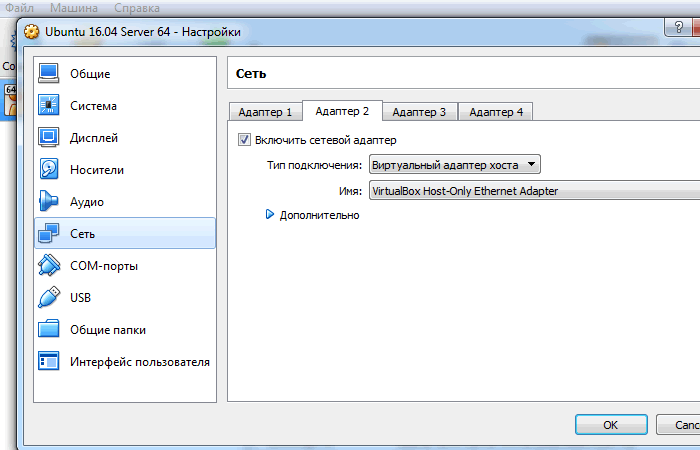
11. Open the “Adapter 2” tab, check the “Enable network adapter” box and select the connection type in the list: “Virtual host adapter”. Click OK. This action will add a network adapter to us in Ubuntu, through which we will cut a window into the outside world, and in which you can look at Ubuntu from Windows, through a browser or an SSH client, for example.
12. Next, go to the Ubuntu terminal window, log in (if not already), and immediately set mc
What makes our further life much easier for us (here we recall the statement of an ancient philosopher: - This is how it was necessary to dislike people in order to create vi)
13. We look at what network interfaces are available to us:
We need this in order to understand what name in Ubuntu is that “Virtual Host Adapter” that we created in step 11
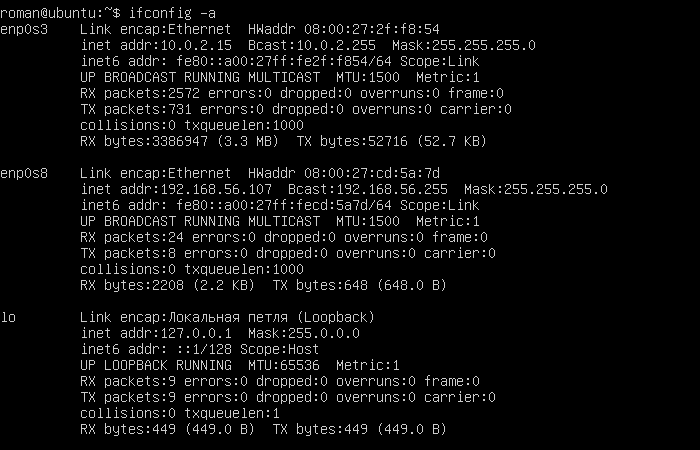
On the screen you see already configured interfaces, but you will have about the same thing. In this situation, we are exclusively interested in what name the network interface bears, through which we will access from Windows to Ubuntu.
Here we see that there are three interfaces: lo is a local loop, enp0s3 is “Adapter 1” which is configured as NAT (Internet traffic goes through Ubuntu), and finally, enp0s8 is the above-mentioned “Adapter 2 "(" Virtual Host Adapter "). It now remains to configure it.
14. Run mc on behalf of the superuser:
15. And open the file for editing.
(translate the cursor to it and press F4), or just a command
But personally, I prefer via mc - I have to type less letters :)
16. And add the following lines to the end of the text:
It turns out something like as shown in the screenshot:
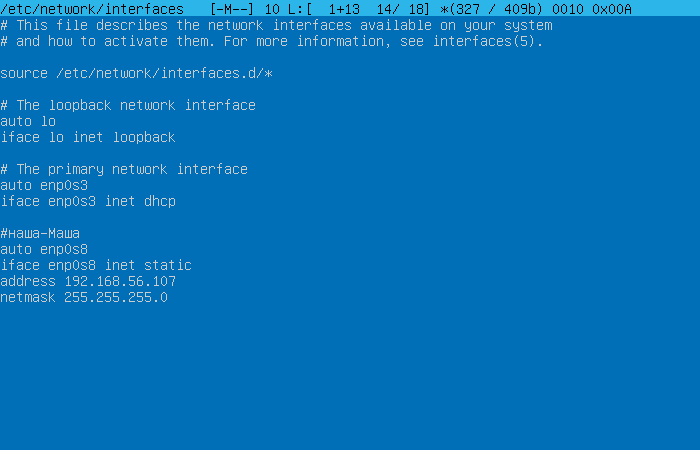
If in two words, we thereby gave our “Adapter 2” a static IP address: 192.168.56.107 (you can change it to 192.168.56.101 for example, or 192.168.56.110, no difference). And now through this address, Ubuntu will be visible from Windows.
17. Save the changes - F2 and exit the editor - F10.
18. Next, restart the interfaces, for example:
or you can just restart Ubuntu Server.
19. Now, if the stars in the sky are located correctly, then open the browser and type in the address bar:
You will see the welcome page of Apache2 installed in LAMP (see p. 4.2 above).
Or you can connect via SSH via port 22 to the same IP address: 192.168.56.107
In general, the installation of Ubuntu 16.04 Server on VirtualBox did not cause any special questions, but the configuration of the network in Ubuntu so that it could be seen from Windows put me at a dead end. Because the experience in this matter is 0, and although the manuals on the topic are gully in many, each of them for some reason is only partially covered, and requires a certain level of knowledge of Linux and the principles of network interfaces.
In the end, I decided this question and now I am sharing with those to whom it is also relevant. Let's get started
')
1. Download VirtualBox for Windows www.virtualbox.org/wiki/Downloads
2. Download Ubuntu Server 16.04 www.ubuntu.com/download/server
3. We install VirtualBox into the system (it is easy to put it, I will not disclose this question here, as a last resort - there are many cribs on the subject on the network).
4. We put Ubuntu Server 16.04 in VirtualBox. Here, too, everything is no more difficult (and even easier) than installing Windows, for example, and all sorts of good manuals with pictures (they, in general, are not required - everything is intuitively clear). But there are a couple of nuances:
4.1 When installing a network, select auto setup.
4.2 When installing packages, immediately put the daws on the OpenSSH and LAMP server (the rest is optional) - it's easier.
5. I believe that everything went fine with you, Ubuntu was loaded, and the Internet is there (you can check it with the command ping yandex.ru for example). However, the question remains how, for example, to connect with Ubuntu from Windows, say, via SSH. Or simply even open in the browser a site running on Ubunt Apache.
6. So, stop our Ubuntu, close the window with the terminal, and in the main window of VirtualBox go to File → Settings → Network → Virtual host networks - on the right are three small icons - click on the bottom with a screwdriver image.
7. See IP-address: 192.168.56.1 - this is the address at which Windows accesses VirtualBox.
8. Next to it is the “DHCP Server” tab in our case, it is empty (the checkbox is not selected). And let it remain so.
9. Next, go to the settings of the guest system (in our case, Ubuntu 16.04.2 Server), right-click on the tab with the system and select the uppermost item “Configure ...”.
10. Here we go to the “Network” again (we have two Network points of the same name, but in the first case we set up the Windows network and VirtualBox, and now we set up the guest network - Ubuntu in conjunction with the rest). Here we see that NAT is marked for the first adapter. Do not change.
11. Open the “Adapter 2” tab, check the “Enable network adapter” box and select the connection type in the list: “Virtual host adapter”. Click OK. This action will add a network adapter to us in Ubuntu, through which we will cut a window into the outside world, and in which you can look at Ubuntu from Windows, through a browser or an SSH client, for example.
12. Next, go to the Ubuntu terminal window, log in (if not already), and immediately set mc
sudo apt-get install mc
What makes our further life much easier for us (here we recall the statement of an ancient philosopher: - This is how it was necessary to dislike people in order to create vi)
13. We look at what network interfaces are available to us:
ifconfig -a
We need this in order to understand what name in Ubuntu is that “Virtual Host Adapter” that we created in step 11
On the screen you see already configured interfaces, but you will have about the same thing. In this situation, we are exclusively interested in what name the network interface bears, through which we will access from Windows to Ubuntu.
Here we see that there are three interfaces: lo is a local loop, enp0s3 is “Adapter 1” which is configured as NAT (Internet traffic goes through Ubuntu), and finally, enp0s8 is the above-mentioned “Adapter 2 "(" Virtual Host Adapter "). It now remains to configure it.
14. Run mc on behalf of the superuser:
sudo mc
15. And open the file for editing.
/ etc / network / interfaces
(translate the cursor to it and press F4), or just a command
mcedit / etc / network / interfaces
But personally, I prefer via mc - I have to type less letters :)
16. And add the following lines to the end of the text:
auto enp0s8
iface enp0s8 inet static
address 192.168.56.107
netmask 255.255.255.0
It turns out something like as shown in the screenshot:
If in two words, we thereby gave our “Adapter 2” a static IP address: 192.168.56.107 (you can change it to 192.168.56.101 for example, or 192.168.56.110, no difference). And now through this address, Ubuntu will be visible from Windows.
17. Save the changes - F2 and exit the editor - F10.
18. Next, restart the interfaces, for example:
sudo service networking restart
or you can just restart Ubuntu Server.
19. Now, if the stars in the sky are located correctly, then open the browser and type in the address bar:
http://192.168.56.107You will see the welcome page of Apache2 installed in LAMP (see p. 4.2 above).
Or you can connect via SSH via port 22 to the same IP address: 192.168.56.107
Source: https://habr.com/ru/post/324016/
All Articles