Prototype table in Axure
Hello. It so happened that a number of years ago I rejected the mundane and embarked on the thorny path of the designer and interface designer. Then there were few sensible materials on the topic, now the situation seems to be corrected, but, in my opinion, it is one-sided. At the moment there are a lot of resources, where they will tell in detail and accessible how to prototype websites and mobile applications, how to choose colors and make a beautiful picture. But there is practically no information on the development of interfaces for desktop and complex web applications, which implies its own specifics in the work. Of course they are, but there is one gap in them - they consider the general theory and rarely give practical advice. Let's try to correct the situation.
For a start, a small digression. All that I will talk about is not objective truth. These are just conclusions that I drew from my personal / private experience, and it is not at all surprising if some of them turn out to be wrong, and the solutions applied by me are not the most practical ones. I would only be glad if you correct me. Next, I will try with simple examples to tell you how I design interfaces, what are common approaches and methods, what you should pay attention to and how to put all this into practice. At the end of the post I attached a link to the resulting prototype.
Let's try to make a prototype table. In order not to dig into the data, I propose to take some abstract table of customer accounting. Design for simplicity, we take on the Google Material.
Introductory requirements:
Content Display
Sort content
Filtering (for example, for the last day)
')
To fill our table with something, let's take a few positions:
Full name
Floor
Age
Phone
Email
Registration date
Naturally, in combat conditions, all of this information you or the analyst will have to receive in the process of communication with interested and not very personal persons. How sensible to collect information from the contingent and correctly deal with it, I will tell in one of the following issues.
To begin with, we will do the markup according to the design. Open the Google Material Guide and read carefully. Then we arrange the guides and place the name of the table and the header with the names of the columns. Naturally, when we do not have any design guides, we compose and design the content ourselves, or transmit a prototype with an approximate layout for the design to a specially trained person.
Following the results we get the following:
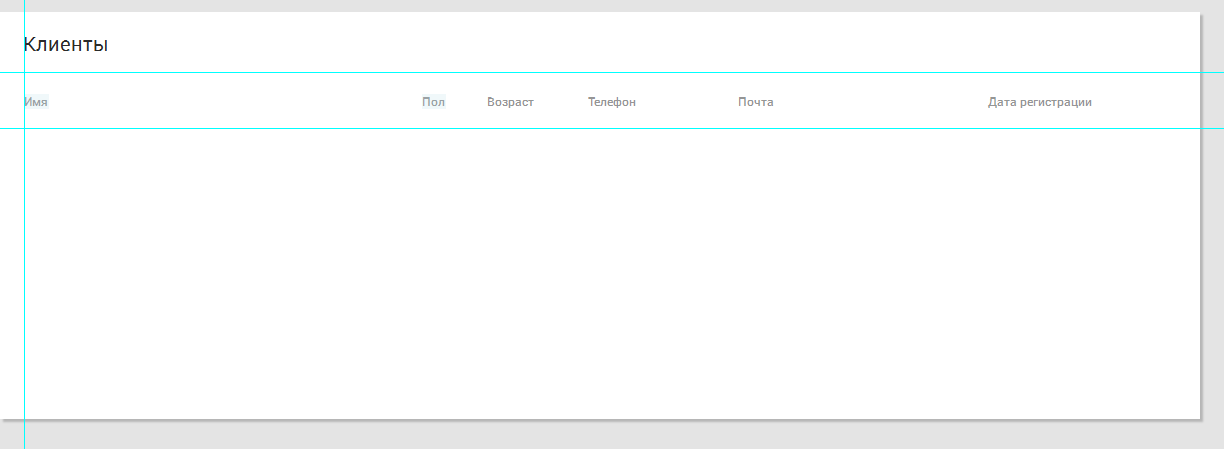
Fig. one
Now it is the turn of the “body” of the table in which the content will be placed. It's not so simple. Axure has a standard “Table” widget that doesn’t fit us at all. At the output, we get a set of cells with which almost nothing can be done, while our goal is to reasonably bring the prototype of interactivity to the final application. Note that “it is reasonable to bring closer” —that is, having spent the least amount of time, make a prototype as close as possible to a live application. In other words, we need to try to make sure that when using the prototype of questions, how one or another element works, it remains as little as possible. Such an approach can save you from unpleasant surprises in the future, when you make a superficial assumption about the element's work (“Well, everything is clear here”) and without working on it, you can run into reworking half of the prototype (and this happens).
We return to Axure. To make an adequate table, I use the “Repeater” widget. It works as follows: in fact, it is a dynamic panel, multiplied as many times as necessary. It can contain any objects and we can attach a value from the base to each object (the base is located in the panel on the right).
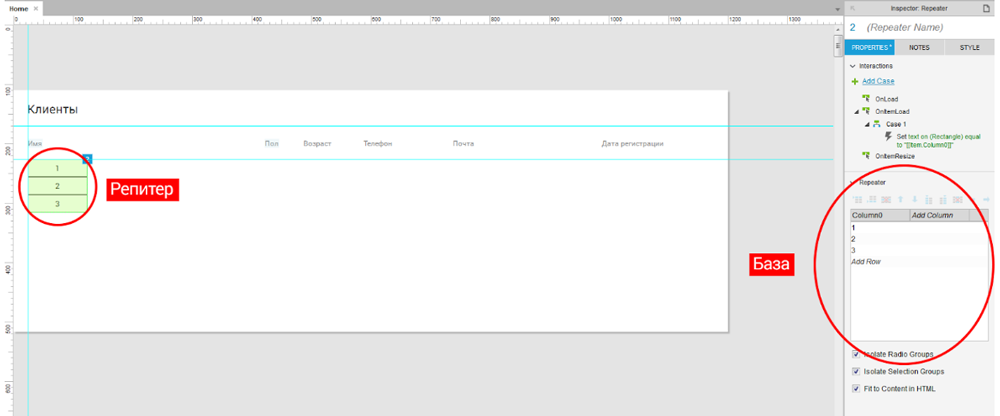
Fig. 2
So we pulled the repeater into the workspace and now we are starting to configure it. Double click to go inside the repeater and change the size of the standard rectangle to the size of the standard table row in Google Material - 40px tall. We set the width from the lantern - 1000 pixels (this will be the width of our table). Customize the Interaction Style for the string.
Next we throw containers into which we will put content (in our case, text widgets). From experience, I recommend entering the name of the corresponding column and calling the container itself in the same way. We need this to assign values from the database.
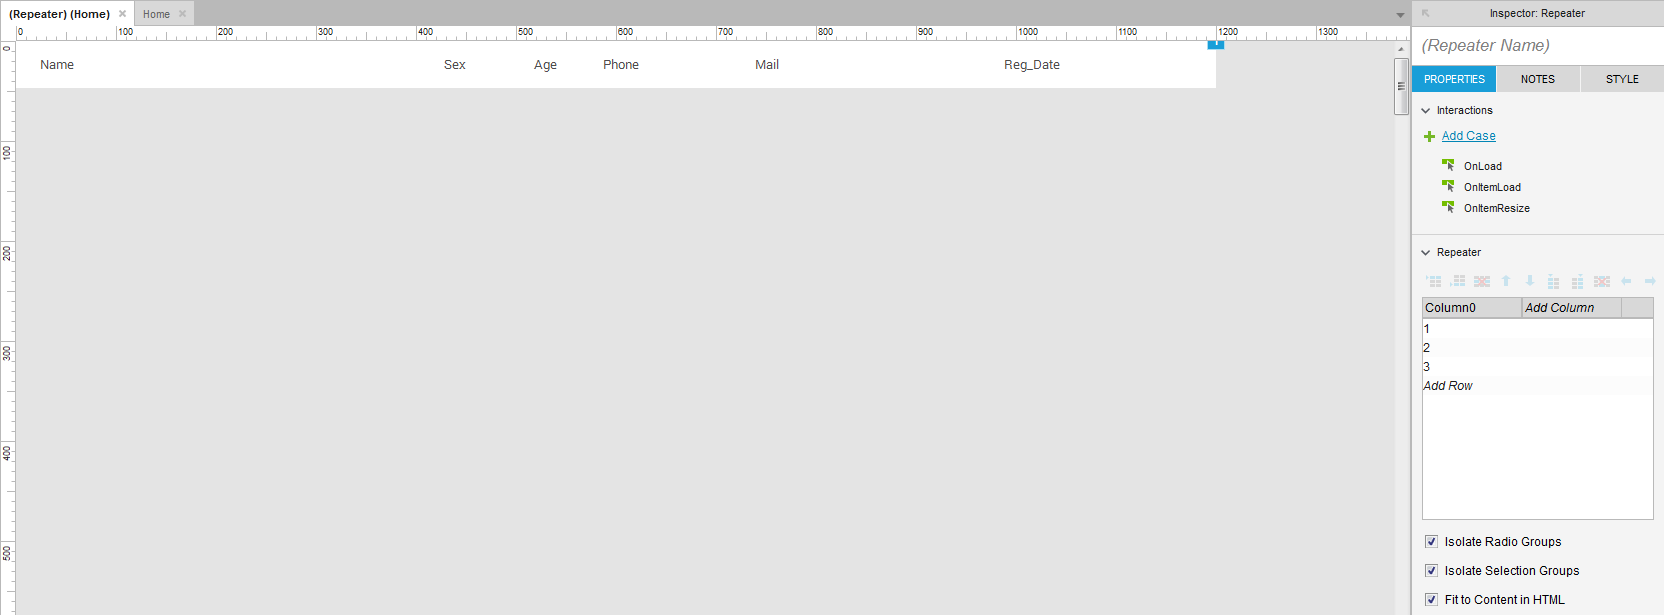
Fig. 3
Now fill the base. In fact, we need to create the exact same table that we want to see in the prototype. Hence we name each column of the base in the same way as our containers are called. It is best to keep the order in which the columns go, for the convenience of subsequent adjustments.
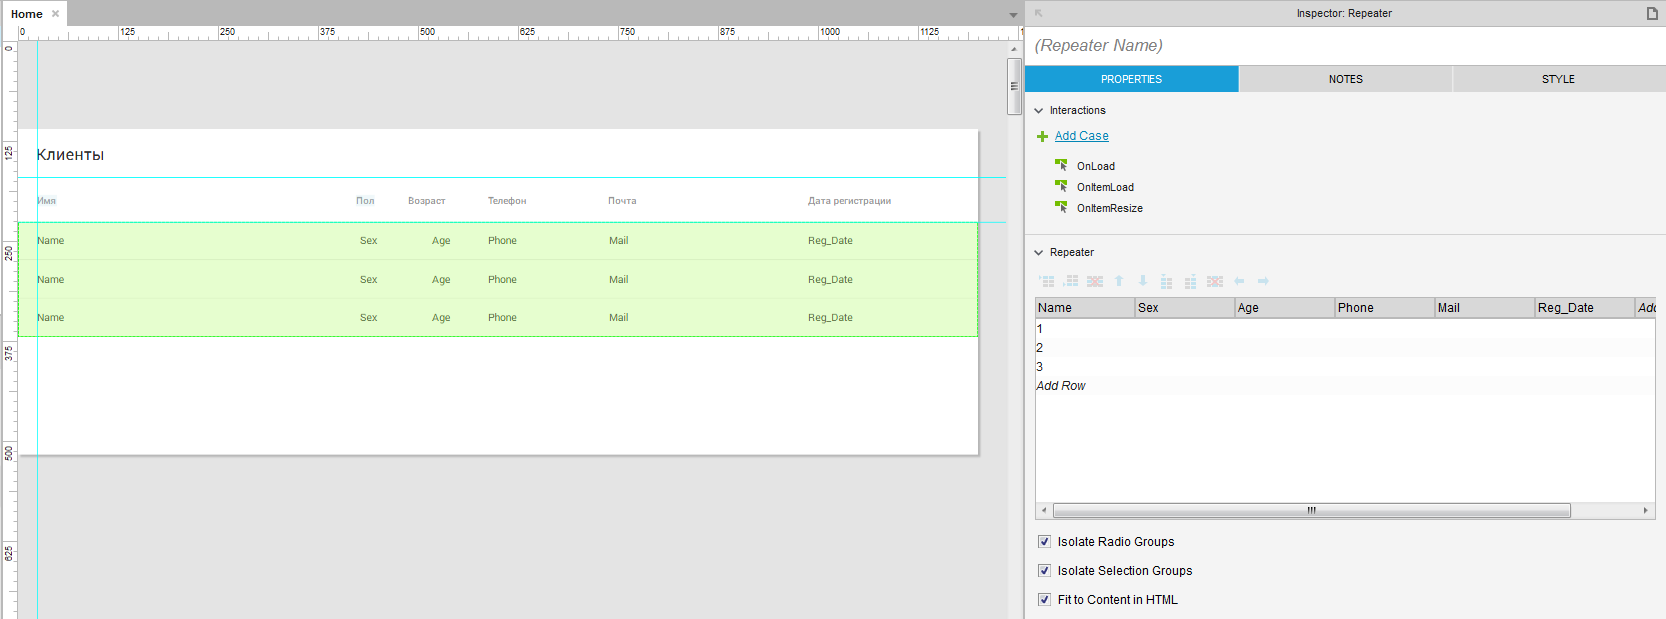
Fig. four
The next step is filling the database with content. At this step, you need to sit down and think about the “texture” of the content, that is, to estimate where and how many signs there can be. From our requirements, we can isolate that the supposedly longest inscriptions will be contained in the full name and e-mail columns. It is in them that we must show on the prototype what the longest and shortest content will look like. Based on this proceed to filling.
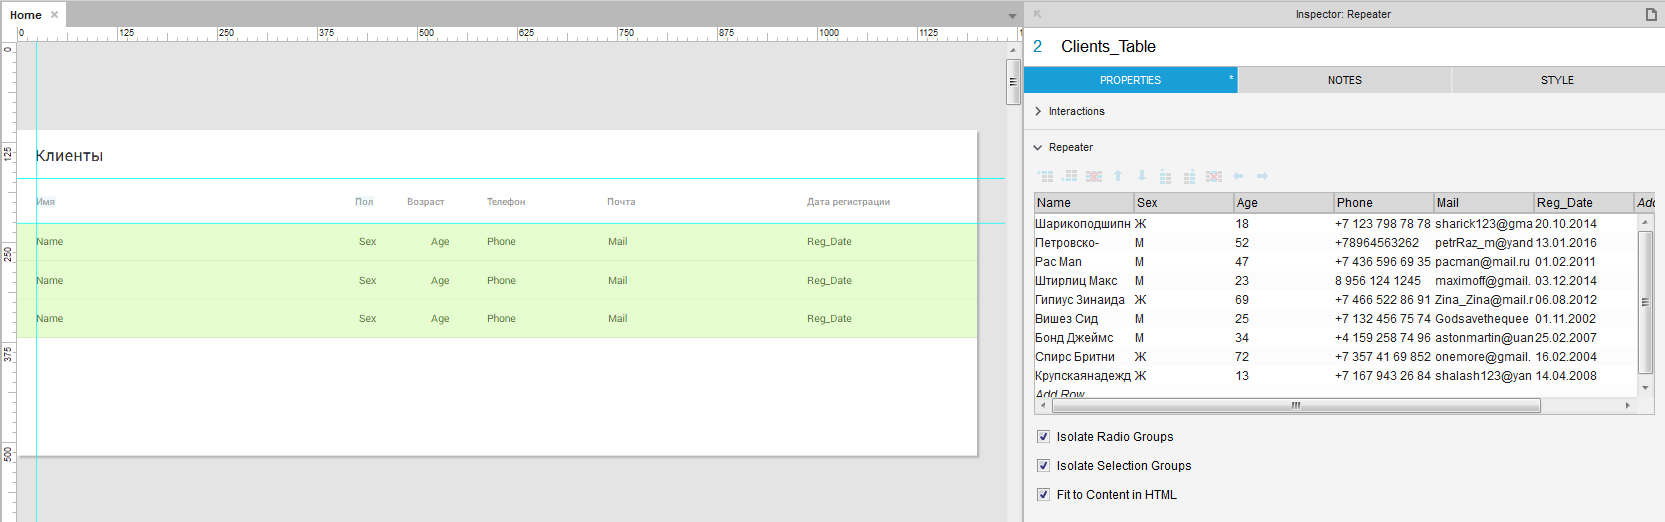
Fig. five
As you can see, I used absurdly long and as short as possible examples to show extreme cases of filling, as well as average length of the full name, to show the most probable filling of the table. It will not be superfluous to demonstrate how an inscription that does not fit in a column behaves. For complete realism, some inscriptions were typed out of register, and some in Latin, for the profession obliges us to be pessimists.
We bind our containers to the corresponding database items. This is done through the event “OnItemLoad”, to which we assign the action ”Set Text”. In this action, we find our repeater (the repeater must be called in advance) and turn on the checkbox on the required container. We set the text value to the item from the database, this can be done through the control “fx”, selecting the desired item through “Insert Variable or Function ...”, or you can simply write in the input field “Set text to” [[Item.choose_column_you_you want to assign]] . On the same action we hang the remaining items.
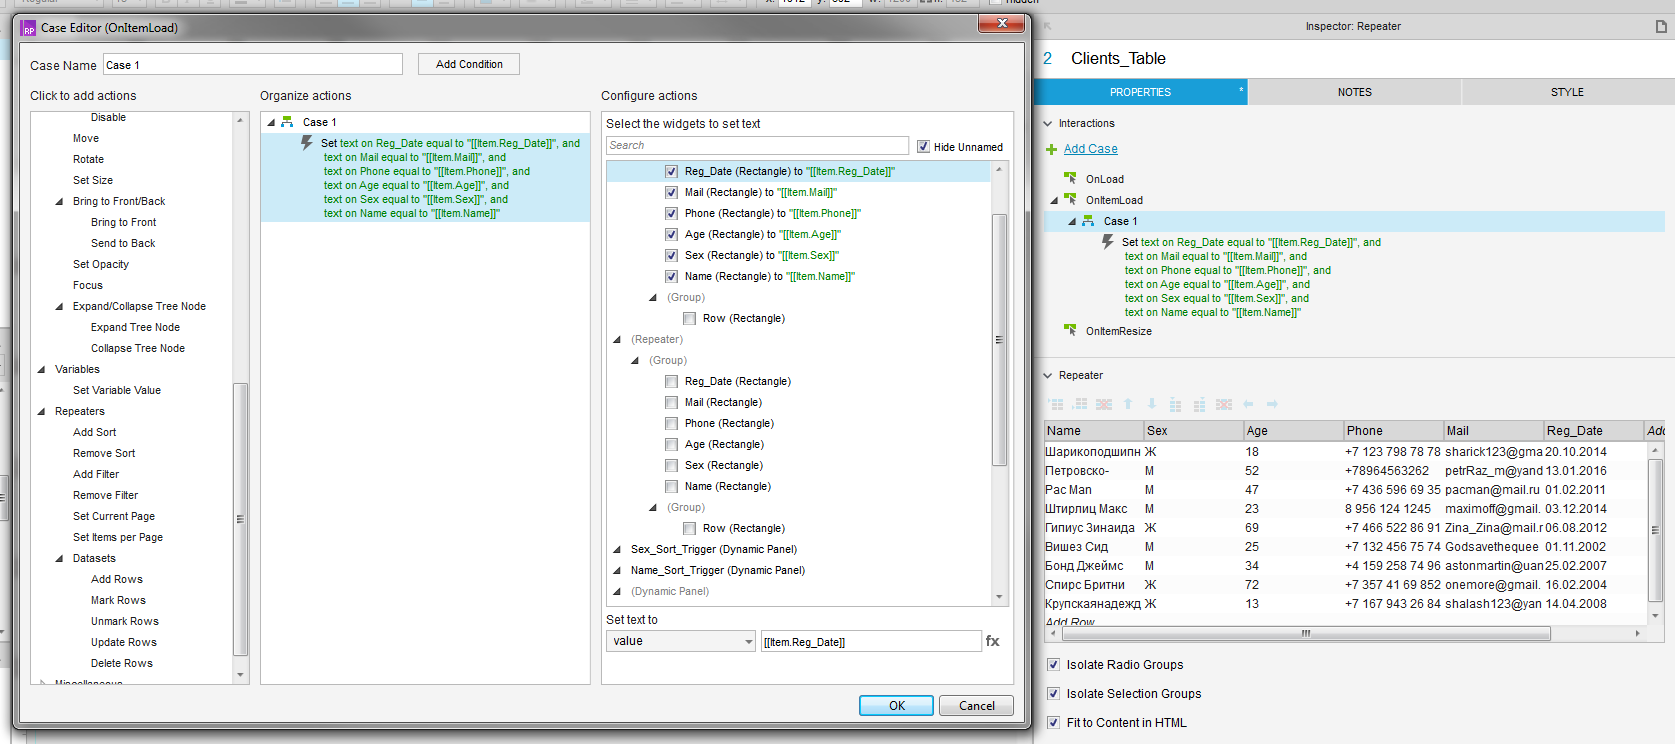
Fig. 6
Now the repeater will automatically take data from the database.

Fig. 7
Align the names of the columns in the header relative to the content of the repeater and look in the browser, what we did.
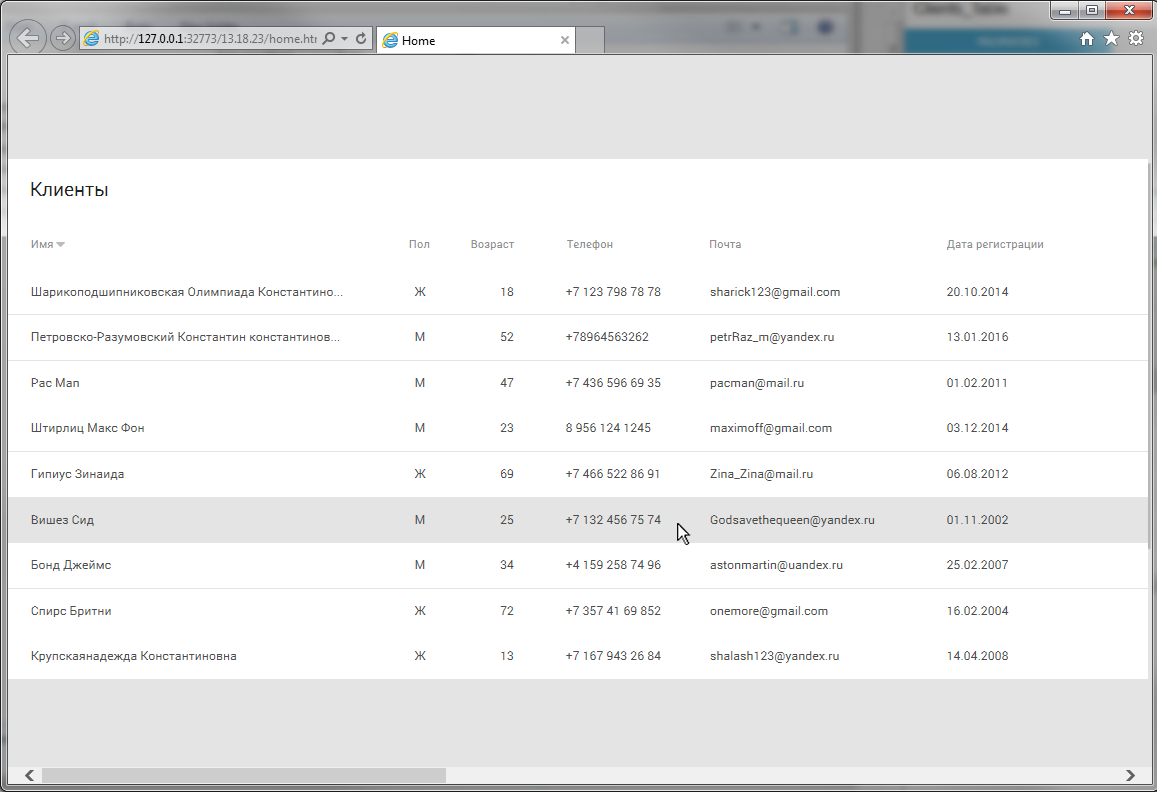
Fig. eight
We find an unpleasant moment: when hovering over the text inside the line, MouseOver is dropped from it. We fix this by going inside the repeater and combining all its contents into a group, after which we put a checkmark “Triggered Mouse Interaction Style” in the group properties - that is, we indicate that all objects in the group will change their states at the same time during actions with any of them. (In fact, it is possible not to do this, but it seems to me such trifles are the usual accuracy and discipline in the work). We are checking. Works.

Fig. 9
It remains only to show the scroll. To do this, we translate the table into a dynamic panel and reduce it to the desired size. Now all the content that goes beyond the dynamic panel is clipped. To make scrolling in the settings of the dynamic panel, select the item “Vertical as Needed” from the drop-box “Scrollbars”. We look in the browser, it works.
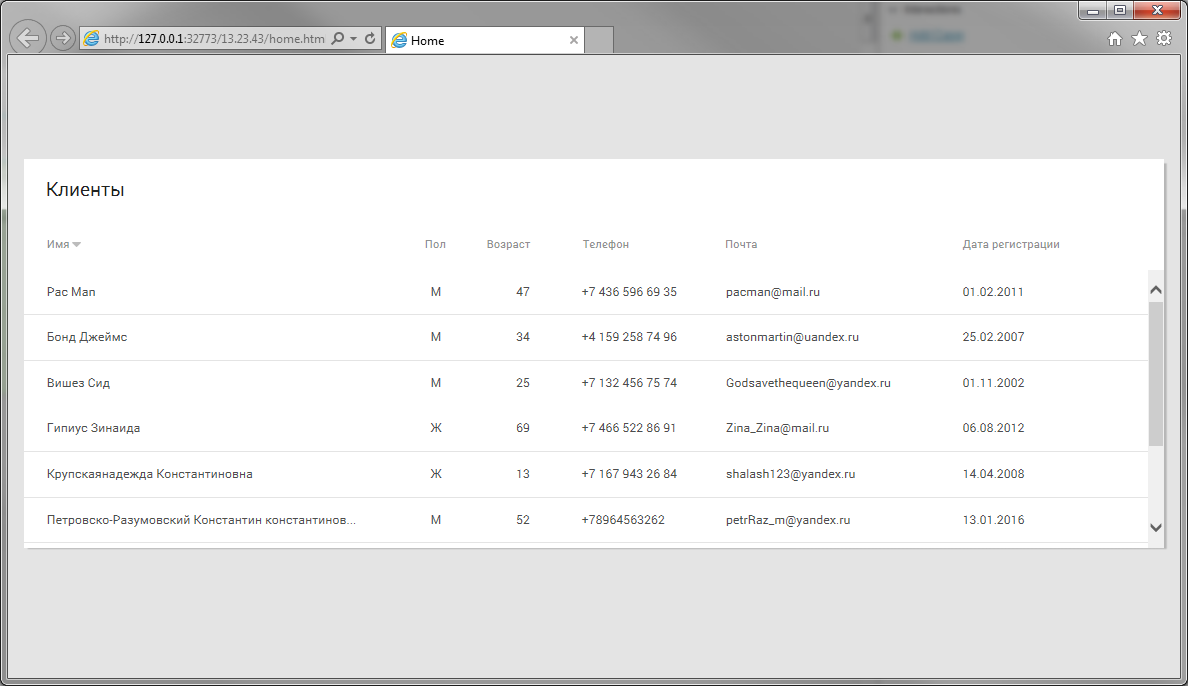
Fig. ten
But there was also a software scrolbar, which is strongly out of the general design and creeps onto the table. To hide it will have to use the Indian trick. The software scrolbar width is 17px, we add them to the width of the dynamic panel and on top of it we put a plate of the background color. Everything, it is not visible. Now we draw a suitable scrolbar. The new scrolbar will not move when scrolling, but we will leave it as it is, because we remember: we need to make a prototype within a reasonable time (although, of course, Axure allows us to do that too).
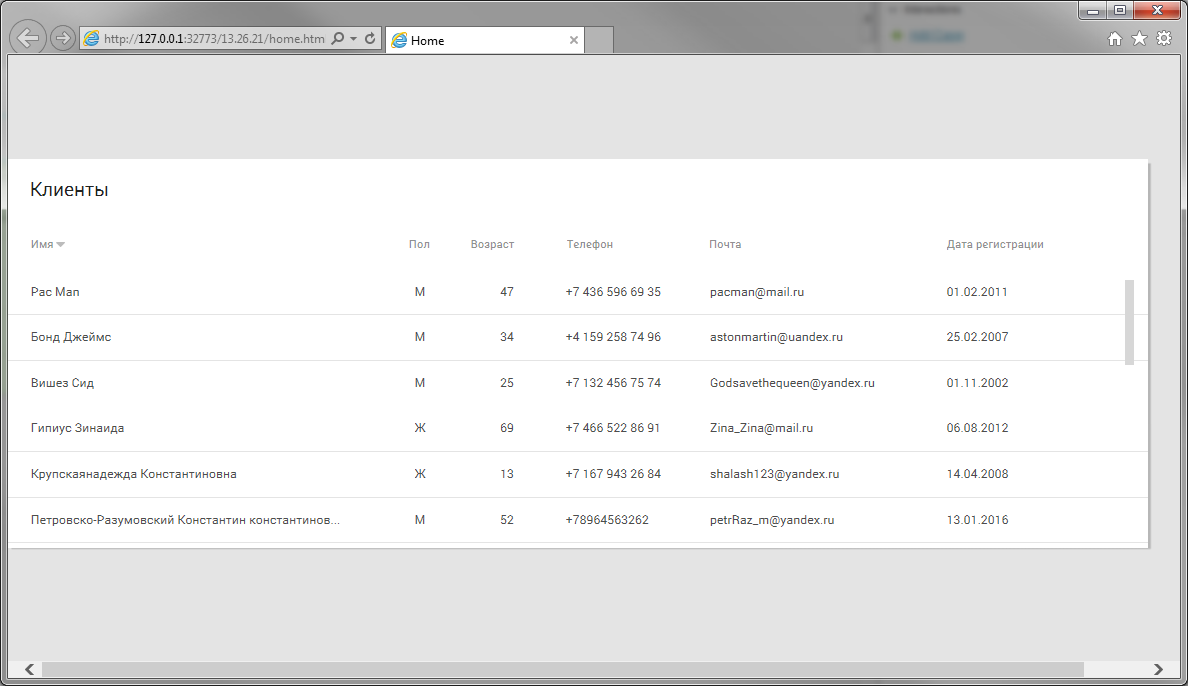
Fig. eleven
We return to the list of requirements. We made a display of content - this is the first point. Go to the second - Sort.
Sorting is very easy to organize through the repeater. That's what it is made for. To label the sorting I will use the “caret down” icon from the awesome font. The icon will appear next to the name of the column by which we will sort the content. We make the dynamic panel of the column name, add two new states to it. The first state is called “Unsorted”, the second - “Sorted_Ascending”, the third - “Sorted_Descending”. In the second state, copy the text from the first and put the marker icon on the right, in the third copy all the objects from the second and turn the icon 180 degrees. Thus, we prepared for prototyping three sorting states: Not sorted, Sorted in ascending order, Sorted in descending order.

Fig. 12
Now we make it all work. We select our panel and assign the action “Set Panel State” to the “OnClick” event, in which we change the panel state to “Next” and turn on the “Wrap from last to first” checkbox, that is, our dynamic panel will change its states in a circle. Also on “OnClick” we assign the action “Ad sort”, in which we select our repeater and specify the sort name (useful when we want to cancel it), select the column by which sorting will occur, how to sort the contents of the column (as text, numbers or dates) and sorting order (ascending, descending or switching from one to another). Is done. Now, by clicking on the column name, we will have a sort, first ascending, then descending, and with the third click - again ascending, but the marker will disappear, simulating resetting the sort.

Fig. 13
Do the same for the remaining columns that you plan to sort. Now we have a completely working sort in the prototype. In order not to spend a lot of time, I recommend making two columns with sorting (see the prototype, short boxes: “Name” and “Gender”). In the accompanying documentation is necessary to describe in detail the work of sorting content.
The third item of requirements is Filtering. For example, we will filter by date “For today”. For the current date, we take the latest date in the content. And again, thanks to the fact that we used the repeater, this is quite simple. We’ll control the filtering checkbox, for the “OnSelected” event, we assign the “Add Filter” action from the actions tab to the repeaters, call this filter “Today” (in this case, the name is necessary, but in general I recommend making a habit of calling objects as can be more thoroughly, it disciplines and at times increases the speed of making adjustments to the prototype). In the “Rule” field (the rules that will filter) we write the following: [[Item. Column name by which you want to filter == 'value for filtering' ']]] (if anyone has not guessed, Axure uses logical operators from Java ; if you learn them, the work will be simplified at times). You should get the following:
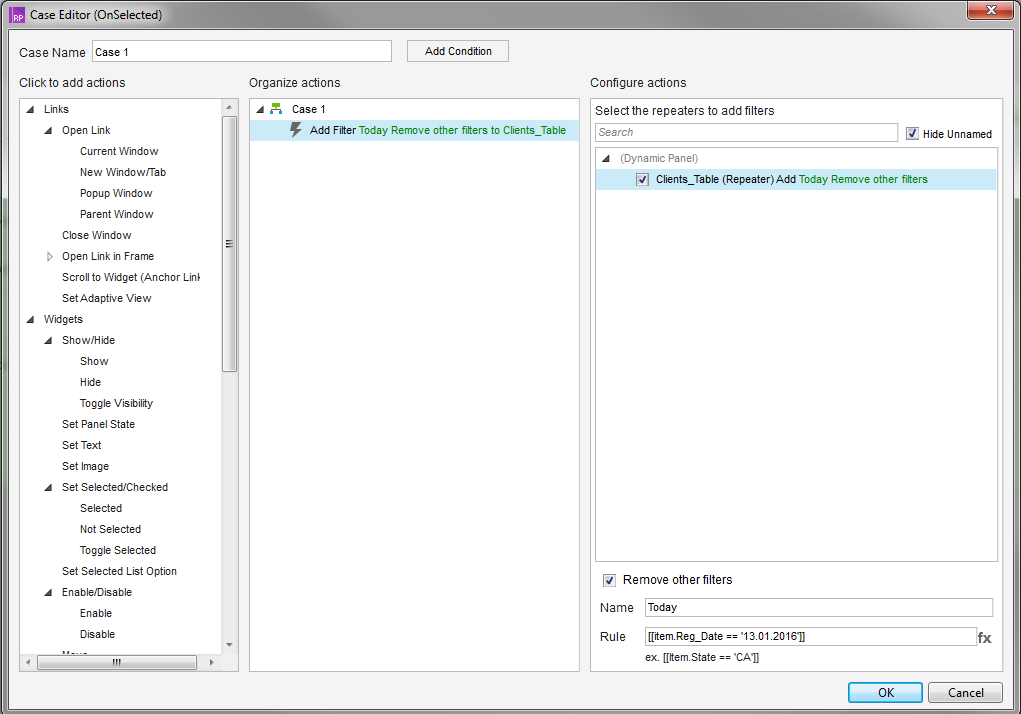
Fig. 14
To cancel filtering in the same checkbox, we hang the “Remove filter” action on the “OnUnselected” event (indicating the filter name that we set earlier).
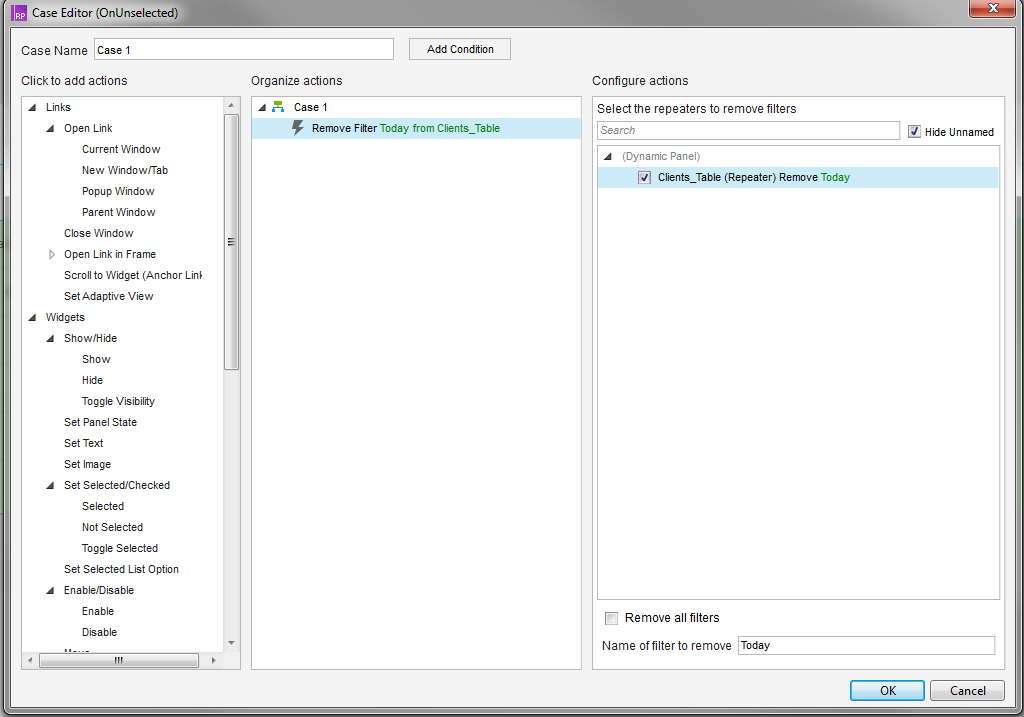
Fig. 15
For a snack, another Indian trick. To make a table with lines shaded in one, you need to make a corresponding striped substrate for the repeater, and in the repeater itself change the transparency of the normal state of the substrate to zero (naturally, in this case it is better to remove the ability to scroll the table, because the content will scroll over the fixed substrate).
That's all. With the right approach, about an hour and a half is spent on all the work, and at the output we get a very plausibly working prototype, which can be run through testing and which makes it possible to understand its functionality in sufficient detail. Of course, in most cases, such a study is not needed, especially if you work in a studio and you are always short of time. But, as I said above, we are considering work on complex desktop and web applications, which, as a rule, are carried out by grocery companies with their staff of designers and designers. Accordingly, you have more than enough time to dive into the project and to elaborate it in more detail. Of course, in your best interest from the very beginning to make such a prototype, which will be easy to edit and most importantly easy to understand, opening it a year after putting into development.
→ Link to the resulting prototype
In the next issues I will try to tell you what methods I use to optimize my work. It will be about interesting, but for today everything.
Thanks for attention.
For a start, a small digression. All that I will talk about is not objective truth. These are just conclusions that I drew from my personal / private experience, and it is not at all surprising if some of them turn out to be wrong, and the solutions applied by me are not the most practical ones. I would only be glad if you correct me. Next, I will try with simple examples to tell you how I design interfaces, what are common approaches and methods, what you should pay attention to and how to put all this into practice. At the end of the post I attached a link to the resulting prototype.
Let's try to make a prototype table. In order not to dig into the data, I propose to take some abstract table of customer accounting. Design for simplicity, we take on the Google Material.
Introductory requirements:
Content Display
Sort content
Filtering (for example, for the last day)
')
To fill our table with something, let's take a few positions:
Full name
Floor
Age
Phone
Registration date
Naturally, in combat conditions, all of this information you or the analyst will have to receive in the process of communication with interested and not very personal persons. How sensible to collect information from the contingent and correctly deal with it, I will tell in one of the following issues.
To begin with, we will do the markup according to the design. Open the Google Material Guide and read carefully. Then we arrange the guides and place the name of the table and the header with the names of the columns. Naturally, when we do not have any design guides, we compose and design the content ourselves, or transmit a prototype with an approximate layout for the design to a specially trained person.
Following the results we get the following:
Fig. one
Now it is the turn of the “body” of the table in which the content will be placed. It's not so simple. Axure has a standard “Table” widget that doesn’t fit us at all. At the output, we get a set of cells with which almost nothing can be done, while our goal is to reasonably bring the prototype of interactivity to the final application. Note that “it is reasonable to bring closer” —that is, having spent the least amount of time, make a prototype as close as possible to a live application. In other words, we need to try to make sure that when using the prototype of questions, how one or another element works, it remains as little as possible. Such an approach can save you from unpleasant surprises in the future, when you make a superficial assumption about the element's work (“Well, everything is clear here”) and without working on it, you can run into reworking half of the prototype (and this happens).
We return to Axure. To make an adequate table, I use the “Repeater” widget. It works as follows: in fact, it is a dynamic panel, multiplied as many times as necessary. It can contain any objects and we can attach a value from the base to each object (the base is located in the panel on the right).
Fig. 2
So we pulled the repeater into the workspace and now we are starting to configure it. Double click to go inside the repeater and change the size of the standard rectangle to the size of the standard table row in Google Material - 40px tall. We set the width from the lantern - 1000 pixels (this will be the width of our table). Customize the Interaction Style for the string.
Next we throw containers into which we will put content (in our case, text widgets). From experience, I recommend entering the name of the corresponding column and calling the container itself in the same way. We need this to assign values from the database.
Fig. 3
Now fill the base. In fact, we need to create the exact same table that we want to see in the prototype. Hence we name each column of the base in the same way as our containers are called. It is best to keep the order in which the columns go, for the convenience of subsequent adjustments.
Fig. four
The next step is filling the database with content. At this step, you need to sit down and think about the “texture” of the content, that is, to estimate where and how many signs there can be. From our requirements, we can isolate that the supposedly longest inscriptions will be contained in the full name and e-mail columns. It is in them that we must show on the prototype what the longest and shortest content will look like. Based on this proceed to filling.
Fig. five
As you can see, I used absurdly long and as short as possible examples to show extreme cases of filling, as well as average length of the full name, to show the most probable filling of the table. It will not be superfluous to demonstrate how an inscription that does not fit in a column behaves. For complete realism, some inscriptions were typed out of register, and some in Latin, for the profession obliges us to be pessimists.
We bind our containers to the corresponding database items. This is done through the event “OnItemLoad”, to which we assign the action ”Set Text”. In this action, we find our repeater (the repeater must be called in advance) and turn on the checkbox on the required container. We set the text value to the item from the database, this can be done through the control “fx”, selecting the desired item through “Insert Variable or Function ...”, or you can simply write in the input field “Set text to” [[Item.choose_column_you_you want to assign]] . On the same action we hang the remaining items.
Fig. 6
Now the repeater will automatically take data from the database.
Fig. 7
Align the names of the columns in the header relative to the content of the repeater and look in the browser, what we did.
Fig. eight
We find an unpleasant moment: when hovering over the text inside the line, MouseOver is dropped from it. We fix this by going inside the repeater and combining all its contents into a group, after which we put a checkmark “Triggered Mouse Interaction Style” in the group properties - that is, we indicate that all objects in the group will change their states at the same time during actions with any of them. (In fact, it is possible not to do this, but it seems to me such trifles are the usual accuracy and discipline in the work). We are checking. Works.
Fig. 9
It remains only to show the scroll. To do this, we translate the table into a dynamic panel and reduce it to the desired size. Now all the content that goes beyond the dynamic panel is clipped. To make scrolling in the settings of the dynamic panel, select the item “Vertical as Needed” from the drop-box “Scrollbars”. We look in the browser, it works.
Fig. ten
But there was also a software scrolbar, which is strongly out of the general design and creeps onto the table. To hide it will have to use the Indian trick. The software scrolbar width is 17px, we add them to the width of the dynamic panel and on top of it we put a plate of the background color. Everything, it is not visible. Now we draw a suitable scrolbar. The new scrolbar will not move when scrolling, but we will leave it as it is, because we remember: we need to make a prototype within a reasonable time (although, of course, Axure allows us to do that too).
Fig. eleven
We return to the list of requirements. We made a display of content - this is the first point. Go to the second - Sort.
Sorting is very easy to organize through the repeater. That's what it is made for. To label the sorting I will use the “caret down” icon from the awesome font. The icon will appear next to the name of the column by which we will sort the content. We make the dynamic panel of the column name, add two new states to it. The first state is called “Unsorted”, the second - “Sorted_Ascending”, the third - “Sorted_Descending”. In the second state, copy the text from the first and put the marker icon on the right, in the third copy all the objects from the second and turn the icon 180 degrees. Thus, we prepared for prototyping three sorting states: Not sorted, Sorted in ascending order, Sorted in descending order.
Fig. 12
Now we make it all work. We select our panel and assign the action “Set Panel State” to the “OnClick” event, in which we change the panel state to “Next” and turn on the “Wrap from last to first” checkbox, that is, our dynamic panel will change its states in a circle. Also on “OnClick” we assign the action “Ad sort”, in which we select our repeater and specify the sort name (useful when we want to cancel it), select the column by which sorting will occur, how to sort the contents of the column (as text, numbers or dates) and sorting order (ascending, descending or switching from one to another). Is done. Now, by clicking on the column name, we will have a sort, first ascending, then descending, and with the third click - again ascending, but the marker will disappear, simulating resetting the sort.
Fig. 13
Do the same for the remaining columns that you plan to sort. Now we have a completely working sort in the prototype. In order not to spend a lot of time, I recommend making two columns with sorting (see the prototype, short boxes: “Name” and “Gender”). In the accompanying documentation is necessary to describe in detail the work of sorting content.
The third item of requirements is Filtering. For example, we will filter by date “For today”. For the current date, we take the latest date in the content. And again, thanks to the fact that we used the repeater, this is quite simple. We’ll control the filtering checkbox, for the “OnSelected” event, we assign the “Add Filter” action from the actions tab to the repeaters, call this filter “Today” (in this case, the name is necessary, but in general I recommend making a habit of calling objects as can be more thoroughly, it disciplines and at times increases the speed of making adjustments to the prototype). In the “Rule” field (the rules that will filter) we write the following: [[Item. Column name by which you want to filter == 'value for filtering' ']]] (if anyone has not guessed, Axure uses logical operators from Java ; if you learn them, the work will be simplified at times). You should get the following:
Fig. 14
To cancel filtering in the same checkbox, we hang the “Remove filter” action on the “OnUnselected” event (indicating the filter name that we set earlier).
Fig. 15
For a snack, another Indian trick. To make a table with lines shaded in one, you need to make a corresponding striped substrate for the repeater, and in the repeater itself change the transparency of the normal state of the substrate to zero (naturally, in this case it is better to remove the ability to scroll the table, because the content will scroll over the fixed substrate).
That's all. With the right approach, about an hour and a half is spent on all the work, and at the output we get a very plausibly working prototype, which can be run through testing and which makes it possible to understand its functionality in sufficient detail. Of course, in most cases, such a study is not needed, especially if you work in a studio and you are always short of time. But, as I said above, we are considering work on complex desktop and web applications, which, as a rule, are carried out by grocery companies with their staff of designers and designers. Accordingly, you have more than enough time to dive into the project and to elaborate it in more detail. Of course, in your best interest from the very beginning to make such a prototype, which will be easy to edit and most importantly easy to understand, opening it a year after putting into development.
→ Link to the resulting prototype
In the next issues I will try to tell you what methods I use to optimize my work. It will be about interesting, but for today everything.
Thanks for attention.
Source: https://habr.com/ru/post/323926/
All Articles