How to add reference tables in the Advanced Reporting Tool

Simplified SIEM-system Advanced Reporting Tool allows you to add custom reference tables for customizing reports in accordance with the needs of the enterprise. Consider how this can be done.
Today we will talk in detail about how you can customize reports in the simplified SIEM-system Advanced Reporting Tool (ART) using reference tables. This may be required when you need to add certain characteristics of the analyzed corporate network, for example:
')
• Link IP addresses to business units and remote offices or geographic location
• Highlight corporate and non-corporate applications
• Specify the end points of VIP employees (management, accounting, etc.)
To do this, we need to provide the SIEM system with a user reference table prepared with the following aspects in mind:
• File format: comma-delimited CSV
• No special characters
• First row with column names in English
• Maximum size: 2 GB
• Primary key column
• Additional columns allowed
As an example, consider the situation when we decided to organize all executable files into categories with reference to the manufacturer. For this we will use the file Executable_Category.csv . Below is a fragment of the contents of this file:
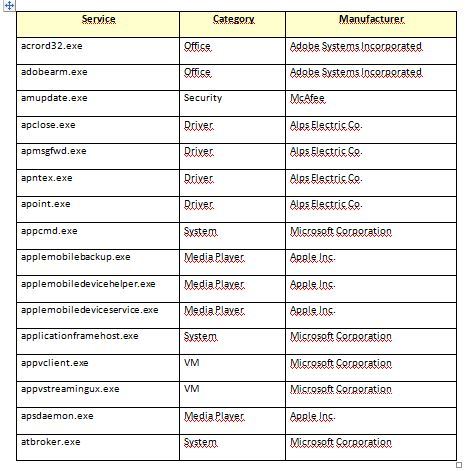
The Service column will play the role of a primary key column.
So let's get started.
If you want to simultaneously perform these actions in parallel, then you can do it in the demo console of the product, which requires only the Google Chrome or Mozilla Firefox browser to be used.
URL: demologin.pandasecurity.com
Login: DRUSSIAN_FEDERATION_C16@panda.com
Password: DRUSSIAN # 123
After entering the Panda Adaptive Defense product demo console, at the top of the console you need to click on the Advanced Search button to switch to the Advanced Reporting Tool SIEM system.
Entering the ART interface, click on the Search icon, and on the page that opens, click on the Lookup Management tab.

The page that opens will display a list of user reference tables (perhaps it will be empty). In the upper right corner, click on the New Lookup button to load our table.

In the form that appears, specify the name of the table ( Table name ) and select the file ( Choose File ). After checking the file, a list of file columns will appear, in which you need to check that the Is Key label is specified for the Service column. Click the Upload button.

Click the Upload button and wait for about 10 minutes to refresh the table with the reference tables.

To download an updated version of this table, delete it, or check its structure, you can click on the options button (...).

Now let's go to the Ops table in ART: click on the Search icon

In the right section, click on Ops.

On the page that opens in the control panel above, click on the Create Column icon:
 and select the Filter Data tab.
Now let's select those entries that end in .exe in the ParentPath field. To do this, follow these steps:
• in the Operation drop-down list select Ends with
• press the New argument button
• in the String drop-down list, select the value of parentPath
• press the New argument button again
• at the Sufix argument , click the icon on the right to edit the entry and enter the value .exe

Now we need to extract the name of the executable file in ParentPath into a new column called ExecutableName .
To do this, click on the Create Column icon.
fill out the form as follows:• Enter the field name.
• Select Substitute function.
• Add an argument: the parentPath field
• Add an argument: the regular expression (. * \\) (? =. * (\. \ W *) $ | (\ w +) $) .
For example, this regular expression retrieves “chrome.exe” from “PROGRAM_FILESX86 | \ Google \ Chrome \ Application \ chrome.exe” into the ExecutableName column.
• Click on the Create column button.

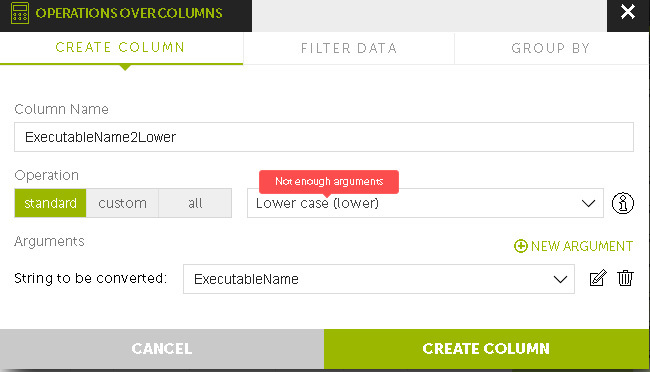
And now let's create another ExecutableName2Lower field, since the query we want to make is case sensitive. To do this, specify the following parameters in the form for adding a column:
• Field name
• Select the function Lower case
• Add an argument and select ExecutableName in the drop-down list.
• Click Create column
As a result, you should see something like this:

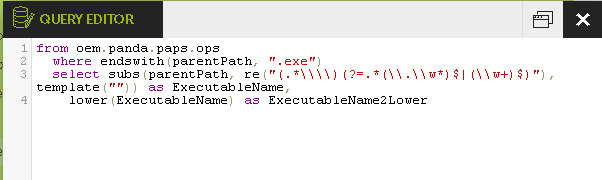
If the process described above seems somewhat cumbersome to you, then you can click on the Toggle Query Editor icon
 and write the following query in the query editor:
from oem.panda.paps.ops
where endswith (parentPath, ".exe")
select subs (parentPath, re ("(. * \\\\) (? =. * (\\. \\ w *) $ | (\\ w +) $)"), template ("")) as ExecutableName ,
lower (ExecutableName) as ExecutableName2Lower
As a result, you will get the same result, provided that you correctly loaded the reference table (which we spoke about at the very beginning).
Click the Create Column icon again:
Now we will insert the Category field from our reference table for those records for which the value of the Executable2Lower field is equal to the corresponding value of the Service field in the reference table in a new column called Software Category .

You will now see the new column in the query results:

In addition to this new column, you can use the Data Extract function to see the total distribution of the results by category. To do this, move the mouse over the down arrow icon in the upper right corner of the title of the Software Category column. A value of Null indicates that this entry was not found in the reference table.

Now we group the Software Category and ExecutableName . To do this, follow these steps:
• Highlight these columns.
• In the control panel, click on the Group button.


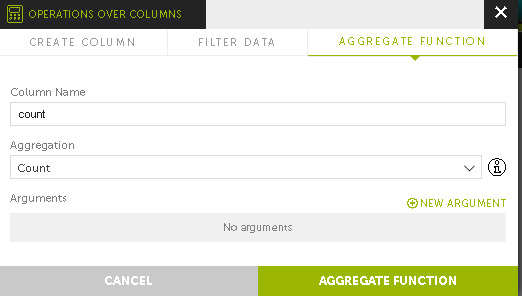
After that, add a column using the appropriate button in the control panel and the Aggregate function tab in the form that opens:
As a result of these actions, you should get something like the following:

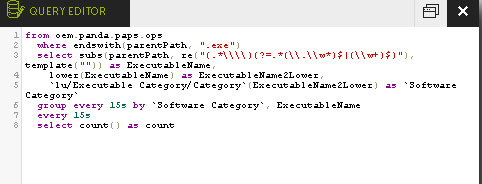
If the process described above seems somewhat cumbersome to you, then you can click on the Toggle Query Editor icon
and write the following query in the query editor:from oem.panda.paps.ops
where endswith (parentPath, ".exe")
select subs (parentPath, re ("(. * \\\\) (? =. * (\\. \\ w *) $ | (\\ w +) $)"), template ("")) as ExecutableName ,
lower (ExecutableName) as ExecutableName2Lower
select `lu / Executable_Category / Category` (ExecutableName2Lower) as` Software Category`
group every 15s by `Software Category`, ExecutableName
every 0
select count () as count
And finally, with this newly added counter, we can do something more visual: for example, the Voronoi diagram. Click the Setup button on the control panel.
 and select Charts → Diagrams → Voronoi tree map
Now drag the Sofware Category and ExecutableName to the SIGNALS panel in the Voronoi diagram settings.

Also drag count to the VALUE panel.
And ... done!
We hope that this will help you to more flexibly customize our simplified Advanced Reporting Tool SIEM system to the specific needs of your enterprise.
Source: https://habr.com/ru/post/323850/
All Articles