Accelerate Home ESXi 6.5 with SSD Caching
Good day!
In this article I want to talk about how to slightly improve the performance of an ESXi host using SSD caching. At work and at home I use products from the company VMware, the home laboratory is based on Free ESXi 6.5. The host runs virtual machines for both the home infrastructure and for testing some working projects (somehow I had to run the VDI infrastructure on it). Gradually, applications of thick VMs began to rest on the performance of the disk system, and everything did not fit on the SDD. The solution was chosen lvmcache. The logic diagram looks like this:

The basis of the whole scheme is a CentOS 7 based svm VM. It presented HDD disks using RDM and a small VMDK disk from an SSD datastor. Caching and data mirroring are implemented by software - mdadm and lvmcache. VM disk space is mounted to the host as an NFS datastore. Part of the SSD datastor is dedicated to VMs that need a high-performance disk subsystem.
')
Computing node assembled on the desktop gland:
MB: Gygabyte GA-Z68MX-UD2H-B3 (rev. 1.0)
HDD: 2 x Seagate Barracuda 750Gb, 7200 rpm
SSH: OCZ Vertex 3 240Gb
There are 2 RAID controllers on the motherboard:
- Intel Z68 SATA Controller
- Marvell 88SE9172 SATA Controller
I didn’t manage to set up 88SE9172 in ESXi (Marvell adapters (at least 88SE91xx)), I decided to leave both controllers in ACHI mode.
RDM (Raw Device Mapping) technology allows a virtual machine to directly access a physical drive. Communication is provided through special mapping files on a separate VMFS volume. RDM uses two compatibility modes:
- Virtual mode - works in the same way as in the case of a virtual disk file, allows you to take advantage of the virtual disk in VMFS (file locking mechanism, instant snapshots);
- Physical mode - provides direct access to the device for applications that require a lower level of control.
In virtual mode, read / write operations are sent to the physical device. The RDM device is represented in the guest OS as a virtual disk file, the hardware characteristics are hidden.
In physical mode, almost all SCSI commands are transmitted to the device, in the guest OS, the device is represented as real.
By connecting the disk drives to the VM using RDM, you can get rid of the VMFS interlayer, and in the physical compatibility mode, their state can be monitored on the VM (using SMART technology). In addition, if something happens to the host, then you can access the VM by mounting the HDD to the working system.
lvmcache provides transparent caching of data of slow HDD devices on fast SSD devices. LVM cache places the most frequently used blocks on a fast device. Turning on and off caching can be done without interrupting work.

When you try to read the data, it turns out whether this data is in the cache. If the required data is not there, then the reading takes place from the HDD, and along the way the data is written to the cache (cache miss). Further reading of the data will come from the cache (cache hit).
- Write-through mode - when a write operation occurs, data is recorded both in the cache and on the HDD disk, a safer option, the probability of data loss in case of an accident is small;
- Write-back mode - when a write operation occurs, data is first written to the cache, then flushed to disk, there is a possibility of data loss in the event of a crash. (A faster option, since the write operation completion signal is transmitted to the managing OS after receiving the data by the cache).
This is how to reset the data from the cache (write-back) to the disks:
SSD datastore is created on the host. I chose this scheme for using the available space:
A virtual network looks like this:
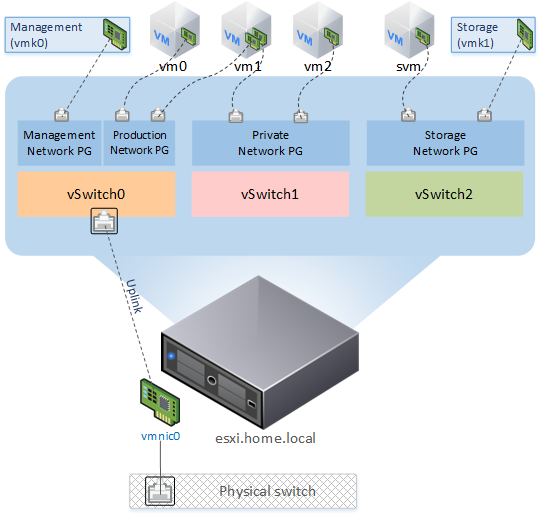
Created a new vSwitch:
The VMkernel NIC connects to it via the port group:
Created port group to which VM svm will be connected:
You must log in to the ssh host and run the following commands:
Now these disks can be connected (Existing hard disk) to the new VM. Template CentOS 7, 1vCPU, 1024Gb RAM, 2 RDM disk, 61Gb ssd disk, 2 vNIC (VM Network group port, svm_Network) - during installation of the OS we use Device Type - LVM, RAID Level - RAID1
Setting up an NFS server is quite simple:
Prepare cache and metadata volumes to enable caching of the volume cl_svm / data:
Array status change notifications:
At the end of the /etc/mdadm.conf file, add parameters containing the address to which messages will be sent in case of problems with the array, and, if necessary, specify the sender's address:
For the changes to take effect, you must restart the mdmonitor service:
Mail from VM is sent by means of ssmtp. Since I use RDM in the virtual compatibility mode, the state of the disks will be checked by the host itself.
Host preparation
Add NFS datastore to ESXi:
Configure VM autostart:
This policy will allow VM svm to start first, the hypervisor will mount the NFS datastore, after that the rest of the machines will turn on. Shutdown occurs in reverse order. The launch delay time of the VM was selected according to the results of the crash test, since with a small Start delay NFS value, the datastor could not be mounted, and the host tried to start the VMs that are not yet available. You can also play with the
More flexibly, autostart VMs can be configured using the command line:
Small optimization
Enable Jumbo Frames on the host:
In Advanced Settings, set the following values:
Enable Jumbo Frames on VM svm:
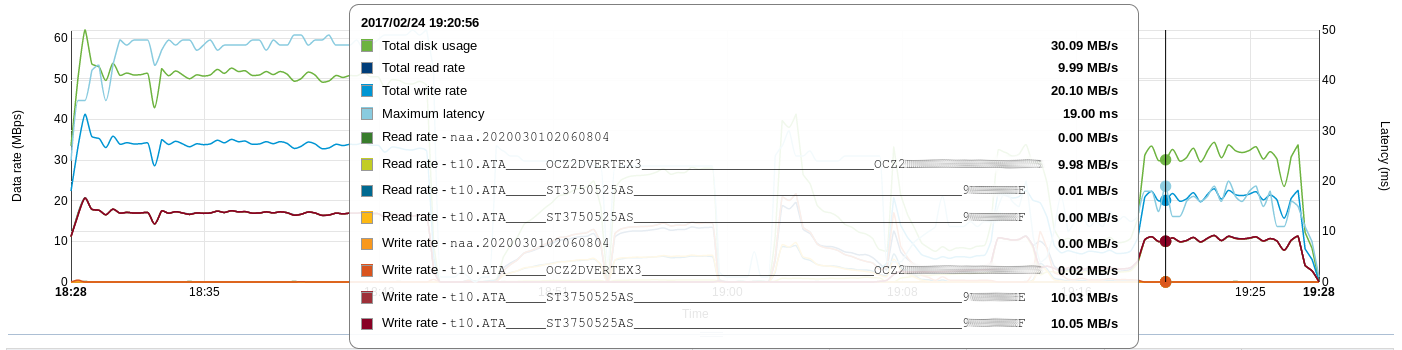
Performance was measured by synthetic dough (for comparison, I took readings from the cluster at work (at night)).
Used software on test VM:
- CentOS OS 7.3.1611 (8 vCPU, 12Gb vRAM, 100Gb vHDD)
- fio v2.2.8
The results obtained are presented in tables (* during the tests noted the average CPU usage on VM svm):
The results that you can touch with your hands turned out when you simultaneously run five VMs with Windows 7 and an office suite (MS Office 2013 Pro + Visio + Project) at startup. As the cache warms up, the VMs loaded faster, while the HDD practically did not participate in the load. At each launch, I noted the time for a full load of one of the five VMs and a full load of all VMs.
The loading time of a single VM was:
In the form of a graph:

After powering on and loading the VM host, the svm was booted with the FS scan (data remained in the cache), the NFS datastore was mounted on the host, then the rest of the VMs were loaded, problems and data loss were not observed.
I decided to power off the SATA drive. Unfortunately, hot swapping is not supported, it is necessary to shut down the host in an emergency. Immediately after turning off the disk information appears in the Events.

The unpleasant moment was that when a disk was lost, the hypervisor asked the VM svm to answer the question - “Retry. Click Cancel to terminate this session ”- the machine is in a freeze state.
If we imagine that there was a temporary, insignificant problem with the disk (for example, the reason for the loop), then after the problem is fixed and the host is turned on, everything is loaded in the normal mode.
The most unpleasant situation is the failure of ssd. Access to the data is in emergency mode. When replacing ssd, you must repeat the system setup procedure.
If a disk is about to happen (according to the results of SMART), in order to replace it with a worker, you must perform the following procedure (on the VM svm):
In the VM settings, you need to “tear off” the dying vHDD, then replace the HDD with a new one.
Then prepare an RDM drive and add svm to the VM:
One of the disks connects to the workstation, then you need to “collect” RAID, disable the cache and access the data by mounting the LVM volume:
I also tried to boot the system directly from the disk, set up the network, and on another host I connected an NFS datastor - VMs are available.
As a result, I use lvmcache in write-through mode and a section for a 60Gb cache. Slightly sacrificing the host's CPU and RAM resources - instead of 210Gb is very fast and 1.3Tb of slow disk space, I got 680Gb of fast and 158Gb of very fast, but fault tolerance appeared (but if you unexpectedly fail the disk you will have to participate in the data access process).
In this article I want to talk about how to slightly improve the performance of an ESXi host using SSD caching. At work and at home I use products from the company VMware, the home laboratory is based on Free ESXi 6.5. The host runs virtual machines for both the home infrastructure and for testing some working projects (somehow I had to run the VDI infrastructure on it). Gradually, applications of thick VMs began to rest on the performance of the disk system, and everything did not fit on the SDD. The solution was chosen lvmcache. The logic diagram looks like this:
The basis of the whole scheme is a CentOS 7 based svm VM. It presented HDD disks using RDM and a small VMDK disk from an SSD datastor. Caching and data mirroring are implemented by software - mdadm and lvmcache. VM disk space is mounted to the host as an NFS datastore. Part of the SSD datastor is dedicated to VMs that need a high-performance disk subsystem.
')
Computing node assembled on the desktop gland:
MB: Gygabyte GA-Z68MX-UD2H-B3 (rev. 1.0)
HDD: 2 x Seagate Barracuda 750Gb, 7200 rpm
SSH: OCZ Vertex 3 240Gb
There are 2 RAID controllers on the motherboard:
- Intel Z68 SATA Controller
- Marvell 88SE9172 SATA Controller
I didn’t manage to set up 88SE9172 in ESXi (Marvell adapters (at least 88SE91xx)), I decided to leave both controllers in ACHI mode.
Rdm
RDM (Raw Device Mapping) technology allows a virtual machine to directly access a physical drive. Communication is provided through special mapping files on a separate VMFS volume. RDM uses two compatibility modes:
- Virtual mode - works in the same way as in the case of a virtual disk file, allows you to take advantage of the virtual disk in VMFS (file locking mechanism, instant snapshots);
- Physical mode - provides direct access to the device for applications that require a lower level of control.
In virtual mode, read / write operations are sent to the physical device. The RDM device is represented in the guest OS as a virtual disk file, the hardware characteristics are hidden.
In physical mode, almost all SCSI commands are transmitted to the device, in the guest OS, the device is represented as real.
By connecting the disk drives to the VM using RDM, you can get rid of the VMFS interlayer, and in the physical compatibility mode, their state can be monitored on the VM (using SMART technology). In addition, if something happens to the host, then you can access the VM by mounting the HDD to the working system.
lvmcache
lvmcache provides transparent caching of data of slow HDD devices on fast SSD devices. LVM cache places the most frequently used blocks on a fast device. Turning on and off caching can be done without interrupting work.
When you try to read the data, it turns out whether this data is in the cache. If the required data is not there, then the reading takes place from the HDD, and along the way the data is written to the cache (cache miss). Further reading of the data will come from the cache (cache hit).
Record
- Write-through mode - when a write operation occurs, data is recorded both in the cache and on the HDD disk, a safer option, the probability of data loss in case of an accident is small;
- Write-back mode - when a write operation occurs, data is first written to the cache, then flushed to disk, there is a possibility of data loss in the event of a crash. (A faster option, since the write operation completion signal is transmitted to the managing OS after receiving the data by the cache).
This is how to reset the data from the cache (write-back) to the disks:
System Setup
SSD datastore is created on the host. I chose this scheme for using the available space:
220Gb — DATASTORE_SSD
149Gb —
61Gb —
10Gb — Host Swap Cache
A virtual network looks like this:
Created a new vSwitch:
Networking → Virtual Switches → Add standart virtual switch — (svm_vSwitch, svm_), .The VMkernel NIC connects to it via the port group:
Networking → VMkernel NICs → Add VMkernel NIC
— Port group — New Port group
— New port group — — svm_PG
— Virtual switch — svm_vSwitch
— IPv4 settings — Configuration — Static — IP
Created port group to which VM svm will be connected:
Networking → Port Groups → Add port group — (svm_Network) svm_vSwitchDisk preparation
You must log in to the ssh host and run the following commands:
: # ls -lh /vmfs/devices/disks/ lrwxrwxrwx 1 root root 72 Feb 22 20:24 vml.01000000002020202020202020202020203956504257434845535433373530 -> t10.ATA_____ST3750525AS_________________________________________9*E lrwxrwxrwx 1 root root 72 Feb 22 20:24 vml.01000000002020202020202020202020203956504257434b46535433373530 -> t10.ATA_____ST3750525AS_________________________________________9*F , «mapping file»: # cd /vmfs/volumes/DATASTORE_SSD/ RDM : # vmkfstools -r /vmfs/devices/disks/vml.01000000002020202020202020202020203956504257434845535433373530 9*E.vmdk # vmkfstools -r /vmfs/devices/disks/vml.01000000002020202020202020202020203956504257434b46535433373530 9*F.vmdk VM preparation
Now these disks can be connected (Existing hard disk) to the new VM. Template CentOS 7, 1vCPU, 1024Gb RAM, 2 RDM disk, 61Gb ssd disk, 2 vNIC (VM Network group port, svm_Network) - during installation of the OS we use Device Type - LVM, RAID Level - RAID1
Setting up an NFS server is quite simple:
# yum install nfs-utils # systemctl enable rpcbind # systemctl enable nfs-server # systemctl start rpcbind # systemctl start nfs-server # vi /etc/exports /data 10.0.0.1(rw,sync,no_root_squash,no_subtree_check) # exportfs -ar # firewall-cmd --add-service=nfs --permanent # firewall-cmd --add-service=rpc-bind --permanent # firewall-cmd --add-service=mountd --permanent # firewall-cmd --reload Prepare cache and metadata volumes to enable caching of the volume cl_svm / data:
: # pvcreate /dev/sdc # vgextend cl_svm /dev/sdc , "man" , 1000 : # lvcreate -L 60M -n meta cl_svm /dev/sdc : # lvcreate -L 58,9G -n cache cl_svm /dev/sdc - : # lvconvert --type cache-pool --cachemode writethrough --poolmetadata cl_svm/meta cl_svm/cache - : # lvconvert --type cache --cachepool cl_svm/cache cl_svm/data : # lvs -o cache_read_hits,cache_read_misses,cache_write_hits,cache_write_misses CacheReadHits CacheReadMisses CacheWriteHits CacheWriteMisses 421076 282076 800554 1043571 Array status change notifications:
At the end of the /etc/mdadm.conf file, add parameters containing the address to which messages will be sent in case of problems with the array, and, if necessary, specify the sender's address:
MAILADDR alert@domain.ru
MAILFROM svm@domain.ru
For the changes to take effect, you must restart the mdmonitor service:
#systemctl restart mdmonitor Mail from VM is sent by means of ssmtp. Since I use RDM in the virtual compatibility mode, the state of the disks will be checked by the host itself.
Host preparation
Add NFS datastore to ESXi:
Storage → Datastores → New Datastore → Mount NFS Datastore
Name: DATASTORE_NFS
NFS server: 10.0.0.2
NFS share: /data
Configure VM autostart:
Host → Manage → System → Autostart → Edit Settings
Enabled — Yes
Start delay — 180sec
Stop delay — 120sec
Stop action — Shut down
Wait for heartbeat — No

Virtual Machines → svm → Autostart → Increase Priority
( , Inventory )
This policy will allow VM svm to start first, the hypervisor will mount the NFS datastore, after that the rest of the machines will turn on. Shutdown occurs in reverse order. The launch delay time of the VM was selected according to the results of the crash test, since with a small Start delay NFS value, the datastor could not be mounted, and the host tried to start the VMs that are not yet available. You can also play with the
NFS.HeartbeatFrequency parameter.More flexibly, autostart VMs can be configured using the command line:
: # vim-cmd hostsvc/autostartmanager/get_autostartseq (): # update_autostartentry VMId StartAction StartDelay StartOrder StopAction StopDelay WaitForHeartbeat : # vim-cmd hostsvc/autostartmanager/update_autostartentry 3 "powerOn" "120" "1" "guestShutdown" "60" "systemDefault" Small optimization
Enable Jumbo Frames on the host:
Jumbo Frames: Networking → Virtual Switches → svm_vSwitch MTU 9000;
Networking → Vmkernel NICs → vmk1 MTU 9000
In Advanced Settings, set the following values:
NFS.HeartbeatFrequency = 12
NFS.HeartbeatTimeout = 5
NFS.HeartbeatMaxFailures = 10
Net.TcpipHeapSize = 32 ( 0)
Net.TcpipHeapMax = 512
NFS.MaxVolumes = 256
NFS.MaxQueueDepth = 64 ( 4294967295)
Enable Jumbo Frames on VM svm:
# ifconfig ens224 mtu 9000 up # echo MTU=9000 >> /etc/sysconfig/network-scripts/ifcfg-ens224 Performance
Performance was measured by synthetic dough (for comparison, I took readings from the cluster at work (at night)).
Used software on test VM:
- CentOS OS 7.3.1611 (8 vCPU, 12Gb vRAM, 100Gb vHDD)
- fio v2.2.8
: # dd if=/dev/zero of=/dev/sdb bs=2M oflag=direct # fio -readonly -name=rr -rw=randread -bs=4k -runtime=300 -iodepth=1 -filename=/dev/sdb -ioengine=libaio -direct=1 # fio -readonly -name=rr -rw=randread -bs=4k -runtime=300 -iodepth=24 -filename=/dev/sdb -ioengine=libaio -direct=1 # fio -name=rw -rw=randwrite -bs=4k -runtime=300 -iodepth=1 -filename=/dev/sdb -ioengine=libaio -direct=1 # fio -name=rw -rw=randwrite -bs=4k -runtime=300 -iodepth=24 -filename=/dev/sdb -ioengine=libaio -direct=1 The results obtained are presented in tables (* during the tests noted the average CPU usage on VM svm):
| Disc type | FIO depth 1 (iops) | FIO depth 24 (iops) | ||
|---|---|---|---|---|
| randread | randwrite | randread | randwrite | |
| HDD | 77 | 99 | 169 | 100 |
| SSD | 5639 | 17039 | 40868 | 53670 |
| SSD Cache | FIO depth 1 (iops) | FIO depth 24 (iops) | CPU / Ready *% | ||
|---|---|---|---|---|---|
| randread | randwrite | randread | randwrite | ||
| Off | 103 | 97 | 279 | 102 | 2.7 / 0.15 |
| On | 1390 | 722 | 6474 | 576 | 15 / 0.1 |
| Disc type | FIO depth 1 (iops) | FIO depth 24 (iops) | ||
|---|---|---|---|---|
| randread | randwrite | randread | randwrite | |
| 900Gb 10k (6D + 2P) | 122 | 1085 | 2114 | 1107 |
| 4Tb 7.2k (8D + 2P) | 68 | 489 | 1643 | 480 |
The results that you can touch with your hands turned out when you simultaneously run five VMs with Windows 7 and an office suite (MS Office 2013 Pro + Visio + Project) at startup. As the cache warms up, the VMs loaded faster, while the HDD practically did not participate in the load. At each launch, I noted the time for a full load of one of the five VMs and a full load of all VMs.
| No | Datastore | First start | Second run | Third launch | |||
|---|---|---|---|---|---|---|---|
| Load time of the first VM | Load time of all VMs | Load time of the first VM | Load time of all VMs | Load time of the first VM | Load time of all VMs | ||
| one | Hdd VMFS6 | 4 min. 8s | 6 min. 28s | 3 min. 56s | 6 min. 23s | 3 min. 40sec. | 5 minutes. 50 sec. |
| 2 | NFS (SSD Cache Off) | 2 minutes. 20sec | 3 min. 2s | 2 minutes. 34 sec. | 3 min. 2s | 2 minutes. 34 sec. | 2 minutes. 57sec |
| 3 | NFS (SSD Cache On) | 2 minutes. 33 sec. | 2 minutes. 50 sec. | 1 minute. 23s | 1 minute. 51 sec. | 1 minute. 0sec. | 1 minute. 13s |
The loading time of a single VM was:
— HDD VMFS6 - 50
— NFS - 35
— NFS - 26
In the form of a graph:
Crush test
Power down
After powering on and loading the VM host, the svm was booted with the FS scan (data remained in the cache), the NFS datastore was mounted on the host, then the rest of the VMs were loaded, problems and data loss were not observed.
HDD failure (imitation)
I decided to power off the SATA drive. Unfortunately, hot swapping is not supported, it is necessary to shut down the host in an emergency. Immediately after turning off the disk information appears in the Events.
The unpleasant moment was that when a disk was lost, the hypervisor asked the VM svm to answer the question - “Retry. Click Cancel to terminate this session ”- the machine is in a freeze state.
If we imagine that there was a temporary, insignificant problem with the disk (for example, the reason for the loop), then after the problem is fixed and the host is turned on, everything is loaded in the normal mode.
SSD failure
The most unpleasant situation is the failure of ssd. Access to the data is in emergency mode. When replacing ssd, you must repeat the system setup procedure.
Service (disk replacement)
If a disk is about to happen (according to the results of SMART), in order to replace it with a worker, you must perform the following procedure (on the VM svm):
: # cat /proc/mdstat : # mdadm --detail /dev/md126 /dev/md126 : # mdadm --manage /dev/md127 --fail /dev/sda1 # mdadm --manage /dev/md126 --fail /dev/sda2 : # mdadm --manage /dev/md127 --remove /dev/sda1 # mdadm --manage /dev/md126 --remove /dev/sda2 In the VM settings, you need to “tear off” the dying vHDD, then replace the HDD with a new one.
Then prepare an RDM drive and add svm to the VM:
, X — SCSI Virtual Device Node vHDD: # echo "- - -" > /sys/class/scsi_host/hostX/scan sfdisk : # sfdisk -d /dev/sdb | sfdisk /dev/sdc , : # mdadm --manage /dev/md127 --add /dev/sdc1 # mdadm --manage /dev/md126 --add /dev/sdc2 # grub2-install /dev/sdc Emergency data access
One of the disks connects to the workstation, then you need to “collect” RAID, disable the cache and access the data by mounting the LVM volume:
# mdadm --assemble --scan # lvremove cl_svm/cache # lvchanange -ay /dev/cl_svm/data # mount /dev/cl_svm/data /mnt/data I also tried to boot the system directly from the disk, set up the network, and on another host I connected an NFS datastor - VMs are available.
Summary
As a result, I use lvmcache in write-through mode and a section for a 60Gb cache. Slightly sacrificing the host's CPU and RAM resources - instead of 210Gb is very fast and 1.3Tb of slow disk space, I got 680Gb of fast and 158Gb of very fast, but fault tolerance appeared (but if you unexpectedly fail the disk you will have to participate in the data access process).
Source: https://habr.com/ru/post/323824/
All Articles