Attempts to make learning path finding algorithms easier.
Path finding algorithms are an integral part of game development. As well as various navigation systems, orientation and much more. But we will focus on the gaming industry and the algorithms that are used in it.
Each game developer is faced with a task in which it is necessary to force a character (or bot) to pass from one point to another, without having collected all the walls. And strategy developers still need to take into account the permeability of cells (roads, swamps, forests, and so on). This is where path finding algorithms come to the rescue.
From the foregoing, we can conclude that any game developer will sooner or later have to face and deal with finding a path, and later modify and optimize it for their own projects. And since so many newbies go to GameDev right away, it’s not always easy for them to read several articles and understand one or another algorithm. This post describes the attempts to create software that will help ease the process of understanding the principles of operation of path finding algorithms.
')
We will consider 3 basic algorithms. Now briefly about each of the main algorithms and screenshots of the visualization of their work in the program (slightly ahead of the event).
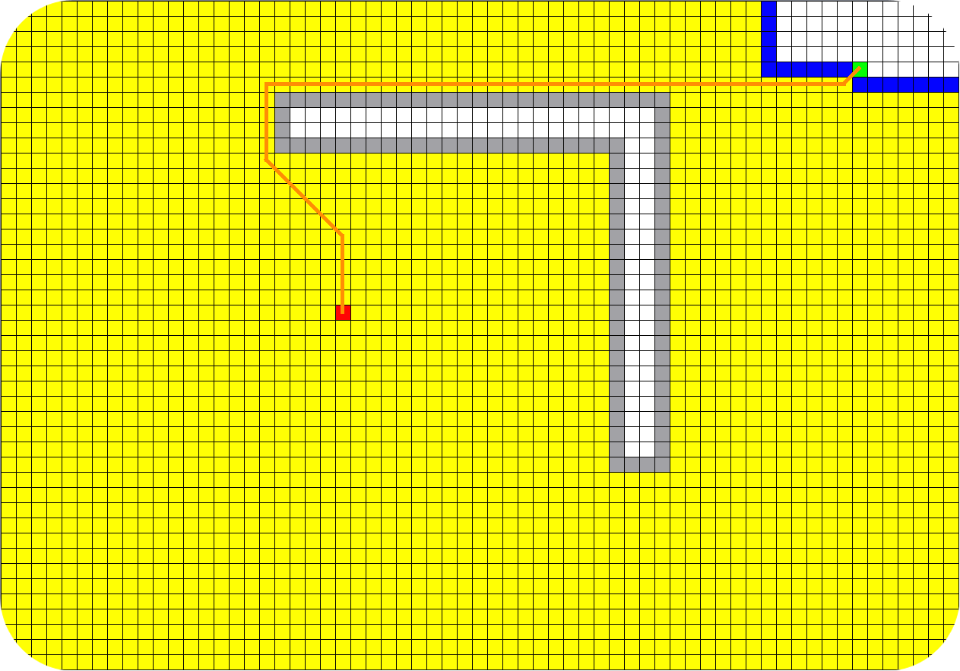
Developed by the Netherlands scientist Edsger Dijkstra in 1959. The algorithm will check each of the vertices of the graph until it finds the shortest path to the original vertex. More details can be read, for example, here .
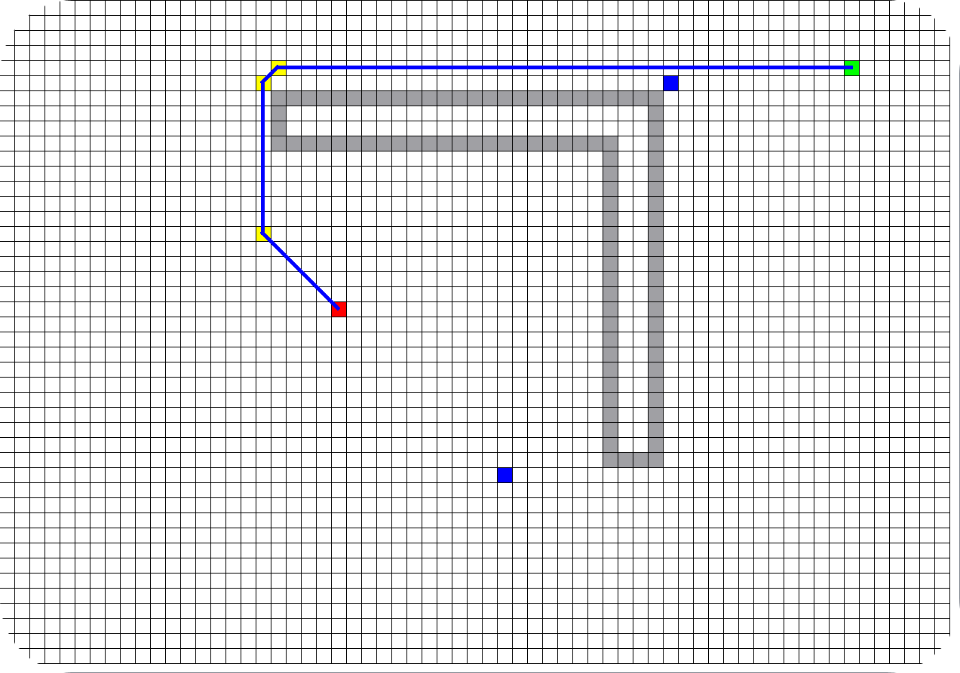
This algorithm was first described in 1968 by Peter Hart, Nils Nilson and Bertram Rafael. When considering each individual vertex, the transition is made to that neighboring vertex, the supposed path from which to the desired vertex is the shortest.
You can start learning here .
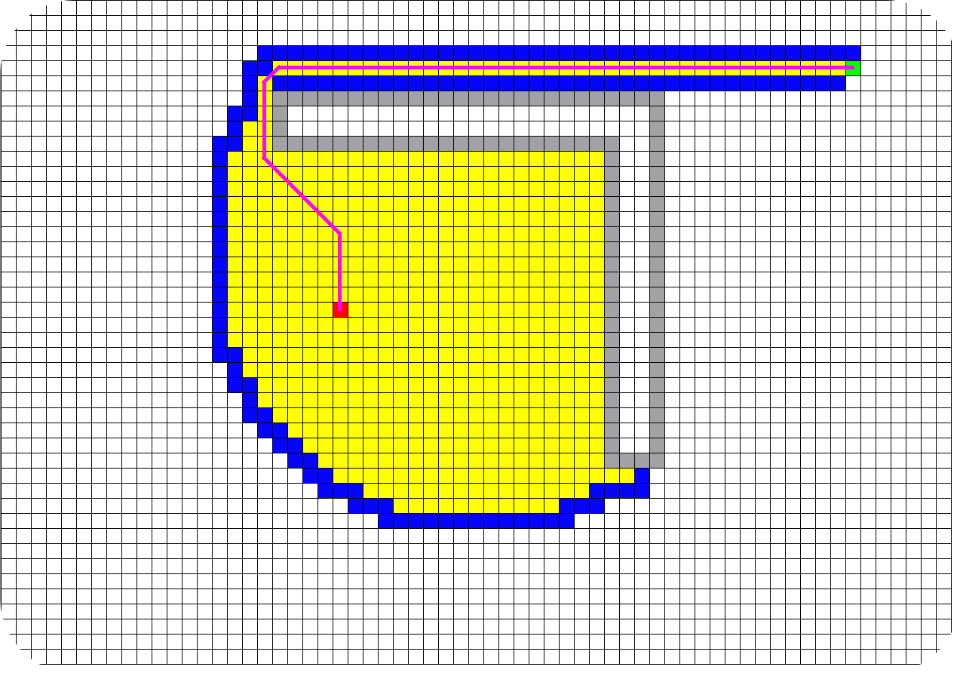
This algorithm was introduced in 2011 by D. Harbor and A. Grastien. JPS speeds up the search for a path by "jumping over" many places that need to be viewed. “Jump points” allow speeding up the path finding algorithm, considering only the “necessary” nodes. The working principle here is very well explained.
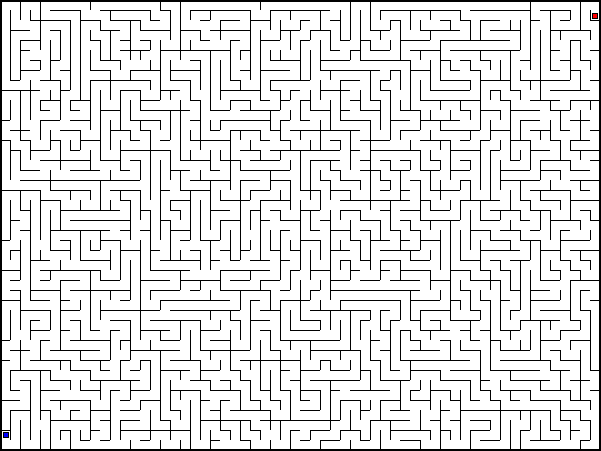
It is worth noting that the Growing Tree generator, also presented in the program, creates a “classic maze” as in the picture below (only bigger), the height and width in the settings are then set specifically for it. This generator was added to create a “Wow effect” for a beginner and to demonstrate the path built by the most basic algorithms (Rule of the right or left hand, DFS), in the post I will not stop here and focus on manual mode.
The search works on a graph, the easiest to create a graph from a map is toarrange the waypoints to translate the map into a checkered field. Since the goal is to facilitate understanding of the basics, we are going to work with square cells.
First we need to determine the class of the cell. The user should be able to set the input, output and put impassable obstacles on the field, also for studying it is useful to know the characteristics of the cell, its parent and status right during the operation of the algorithm. As a result, we get the presented class (I removed the set-, get-functions to save space):
The pressButton and updateStatus functions handle changing the status and color of a cell. And showInfo and deleteInfo for infobox, about which further. The variables x and y are responsible for the coordinates; f, g, h, weight for the characteristics required for the search algorithms, status and listStatus for
cell status, isEnter and isExit, whether there is an input and output on the card, par beyond the parent cell (necessary to restore the constructed path).
We have created a checkered field, now it would be good to give the user the opportunity to apply the entrance and exit, arrange the walls and call the aforementioned infobox.
Fortunately, the QGraphicsView class from the Qt framework, on which we create the interface, provides us with virtual functions of clicking, double clicking and moving the cursor (mousePressEvent, doubleClickEvent, mouseMoveEvent, respectively). We also overload them in a class of a scene which contains our cells.
The checkPos function checks that the cursor is over the cell object.
The implementation of the click function. We determine by which cell we clicked and ask it to update its status. Infobox had to be installed on PCM, since in Qt, when using a double click, the normal click function is first called and this caused the cell to flicker (we updated the cell state with a single click and returned it back when we realized that the click was double).
The input is set to 'Ctrl + LKM', and the output to the mouse wheel or to the touchpad 'Alt + LKM'. Conveniently enough. The wall is installed ordinary paintwork.
I also wanted to allow the user to draw the walls, as it was done in the usual graphic editors, holding the LMB and driving across the field.
To do this, overload the mouseMoveEvent () function. We check that we are above the cells, and we ask you to update the state of the cell under the cursor. If we start drawing from an empty cell, then we will continue to draw the walls, if we have erased the wall, then we will continue in the eraser mode. The function is still responsible for removing the infobox if we remove the cursor from the cell where it was called.
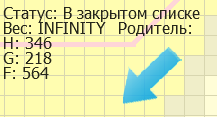
Create the infobox as a regular rectangle, which shows the characteristics of weight, F, G, H (if you are familiar with the algorithms presented above, you know these notations), the current status of the cell and its parent.
Everything, we provided the field for visualization, half of the complex work was done, hurray!
The most interesting part of the program is what should turn a boring (or not so) article into something:
There is also a step-by-step mode, which, in conjunction with infoboxes, will help you to understand 100% of the operation of each algorithm.
Now a few words about how it was implemented. For example, consider the function of the algorithm AStar, the other algorithms are implemented similarly. We will also leave the signal from the button to the function itself.
We implemented step-by-step mode and complete solution with one function, so you have to transfer mode IDs (0 is a complete solution and 1 is for the next step). Further, if this is a complete solution or the first step in a step-by-step procedure, we clear the field of the remnants of the previous solution, clean up the cell status and update the characteristics using the clearLabyr function. The functions of the algorithms themselves are implemented in such a way that they return true if the end point of the search is reached or the search cannot continue, and false if it is possible to continue working. Therefore, for a complete solution with the while operator, we call the function until it returns true and plot the line of the path on the scene by calling the updatePictureSolve function. For step-by-step mode, we call the function with each click, if the path is found, we also send it to the drawing and display a message so that the user does not accidentally click the solution point.
The search algorithms themselves update the status of cells when they are entered into an open or closed list.
The program includes:
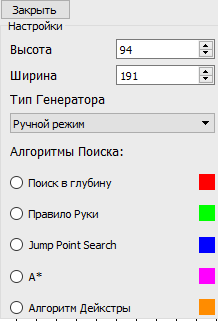
It was necessary to allow the user to conveniently switch between the named options. The result of thegreat design work was a small panel of the menu in the workspace, which can be hidden and called through the toolbar. It is possible to change the colors of the path line by clicking on the color field. (if you don't like my taste)
The program can also be used to select the most efficient algorithm for this situation:
It is obvious that for more or less serious projects "by eye" is not enough, so you need to display statistics.
We will do this in the form of a widget with a brief statistics of the current algorithm in the workspace and a separate window displaying the work of all the algorithms for the session and allowing you to create a report that can be copied, for example, in Excel, to build graphs there.
Implementing a widget with brief statistics is very much like implementing a widget with settings, and it looks almost the same:

The algorithm itself calculates the number of operations. The length of the path can be learned from the characteristics of the exit cell, and we consider time as timers, subtracting the time spent on drawing (although this is not very accurate). When the algorithm finishes, it passes the statistics to the widget and calls the function to create a record in the table. As a result, has the following table:

It should be said separately why A * and Dextra have the same results, while JPS has excellent results. This is due to the fact that 2 different methods for calculating distances between cells are used: A * and Dijkstra use the cost of vertical and horizontal transition 10 and diagonal 14, and then divide the total result by 10; JPS uses 1 and sqrt (2), respectively, and divides nothing, but also rounds. JPS shows the path length somewhat more precisely, which is why the numbers are different.
We got a program that helps beginners, and not only programmers to understand the path finding algorithms. At least I did help a couple of my friends)
The author will be happy to listen to your wishes and fulfill them as soon as he writes the exams.
Perhaps a series of improvements will lead to the fact that we will get a powerful library with algorithms, and the program will become a pleasant demo for it (Like PathFinding.js , only better).
If you might like to write an article about finding a path, you can attach this program to it.

→ Experienced research material: PathFinding.js
→ Download the archive with the program can be from the poison or with DropBox .
UPD: initially, by mistake, a not fully debugged version was published, now everything is ok. I apologize. 03/14/2017 (yes, for about 4 days, the downloaded version hung: C)
→ Source project VS2013: POISON and Dropbox
Each game developer is faced with a task in which it is necessary to force a character (or bot) to pass from one point to another, without having collected all the walls. And strategy developers still need to take into account the permeability of cells (roads, swamps, forests, and so on). This is where path finding algorithms come to the rescue.
What for?
From the foregoing, we can conclude that any game developer will sooner or later have to face and deal with finding a path, and later modify and optimize it for their own projects. And since so many newbies go to GameDev right away, it’s not always easy for them to read several articles and understand one or another algorithm. This post describes the attempts to create software that will help ease the process of understanding the principles of operation of path finding algorithms.
')
A few words about the basic algorithms
We will consider 3 basic algorithms. Now briefly about each of the main algorithms and screenshots of the visualization of their work in the program (slightly ahead of the event).
Dijkstra's Algorithm
Developed by the Netherlands scientist Edsger Dijkstra in 1959. The algorithm will check each of the vertices of the graph until it finds the shortest path to the original vertex. More details can be read, for example, here .
A * (A Star)
This algorithm was first described in 1968 by Peter Hart, Nils Nilson and Bertram Rafael. When considering each individual vertex, the transition is made to that neighboring vertex, the supposed path from which to the desired vertex is the shortest.
You can start learning here .
Jump Point Search
This algorithm was introduced in 2011 by D. Harbor and A. Grastien. JPS speeds up the search for a path by "jumping over" many places that need to be viewed. “Jump points” allow speeding up the path finding algorithm, considering only the “necessary” nodes. The working principle here is very well explained.
Slight reservation
It is worth noting that the Growing Tree generator, also presented in the program, creates a “classic maze” as in the picture below (only bigger), the height and width in the settings are then set specifically for it. This generator was added to create a “Wow effect” for a beginner and to demonstrate the path built by the most basic algorithms (Rule of the right or left hand, DFS), in the post I will not stop here and focus on manual mode.
Search base - checkered field
The search works on a graph, the easiest to create a graph from a map is to
First we need to determine the class of the cell. The user should be able to set the input, output and put impassable obstacles on the field, also for studying it is useful to know the characteristics of the cell, its parent and status right during the operation of the algorithm. As a result, we get the presented class (I removed the set-, get-functions to save space):
enum Status{ Click, Unclick, Enter, Exit, NoStatus }; enum ListStatus {NoList, InClosed, InOpen}; class GraphicsCell : public QGraphicsRectItem { public: GraphicsCell(int, int, int, bool *, bool *, bool *, QGraphicsItem *parent = 0); void pressButton(int buttonID); void showInfo(QPoint pos); void updateStatus(int upd); void deleteInfo(); private: int x; int y; int f; int g; int h; int weight = INT_MAX; Status status; ListStatus listStatus; bool *isEnter; bool *isExit; bool visited; GraphicsCell *par; QGraphicsRectItem *infoBox; }; The pressButton and updateStatus functions handle changing the status and color of a cell. And showInfo and deleteInfo for infobox, about which further. The variables x and y are responsible for the coordinates; f, g, h, weight for the characteristics required for the search algorithms, status and listStatus for
cell status, isEnter and isExit, whether there is an input and output on the card, par beyond the parent cell (necessary to restore the constructed path).
Work with field
We have created a checkered field, now it would be good to give the user the opportunity to apply the entrance and exit, arrange the walls and call the aforementioned infobox.
Fortunately, the QGraphicsView class from the Qt framework, on which we create the interface, provides us with virtual functions of clicking, double clicking and moving the cursor (mousePressEvent, doubleClickEvent, mouseMoveEvent, respectively). We also overload them in a class of a scene which contains our cells.
The checkPos function checks that the cursor is over the cell object.
void MazeWindow::mousePressEvent(QMouseEvent *event) { checkPos(event); GraphicsCell *currCell = static_cast<GraphicsCell *>(scene()->itemAt(mapFromGlobal(cursor().pos()), QTransform())); if (currCell == NULL) return; if (startStatus == Status::NoStatus) { if (currCell->status == Status::Click) startStatus = Status::Click; else startStatus = Status::Unclick; } if (event->button() == Qt::RightButton) { currCell->showInfo(mapFromGlobal(cursor().pos())); cellWithInfo = currCell; } else currCell->pressButton(event->button()); } The implementation of the click function. We determine by which cell we clicked and ask it to update its status. Infobox had to be installed on PCM, since in Qt, when using a double click, the normal click function is first called and this caused the cell to flicker (we updated the cell state with a single click and returned it back when we realized that the click was double).
The input is set to 'Ctrl + LKM', and the output to the mouse wheel or to the touchpad 'Alt + LKM'. Conveniently enough. The wall is installed ordinary paintwork.
void MazeWindow::mouseMoveEvent(QMouseEvent *event) { checkPos(event); GraphicsCell *currCell = static_cast<GraphicsCell *>(scene()->itemAt(mapFromGlobal(cursor().pos()), QTransform())); if (currCell == NULL) return; if (cellWithInfo != NULL && currCell != cellWithInfo) { cellWithInfo->deleteInfo(); cellWithInfo = NULL; } if (currCell->status == Status::Enter || currCell->status == Status::Exit) return; if (event->buttons() & Qt::LeftButton) { if (startStatus == Status::Click && currCell->status == Status::Click) currCell->updateStatus(1); else if (startStatus == Status::Unclick && currCell->status == Status::Unclick) currCell->updateStatus(0); } } I also wanted to allow the user to draw the walls, as it was done in the usual graphic editors, holding the LMB and driving across the field.
To do this, overload the mouseMoveEvent () function. We check that we are above the cells, and we ask you to update the state of the cell under the cursor. If we start drawing from an empty cell, then we will continue to draw the walls, if we have erased the wall, then we will continue in the eraser mode. The function is still responsible for removing the infobox if we remove the cursor from the cell where it was called.
Create the infobox as a regular rectangle, which shows the characteristics of weight, F, G, H (if you are familiar with the algorithms presented above, you know these notations), the current status of the cell and its parent.
Everything, we provided the field for visualization, half of the complex work was done, hurray!
Visualization of the course of work on the search path
The most interesting part of the program is what should turn a boring (or not so) article into something:
There is also a step-by-step mode, which, in conjunction with infoboxes, will help you to understand 100% of the operation of each algorithm.
Now a few words about how it was implemented. For example, consider the function of the algorithm AStar, the other algorithms are implemented similarly. We will also leave the signal from the button to the function itself.
bool MazeWindow::ASolve(int mode) { currMode = 0; if (a == NULL) { // , if (aL != NULL) scene()->removeItem(aL); clearLabyr(); a = new A(&labyr); a->solveMaze(0); } if (mode == 0) { while (!a->solveMaze(1)); // updatePictureSolve(Algorithms::AStarAlgo); currMode = 1; return true; } else { if (a->solveMaze(1)) { // updatePictureSolve(Algorithms::AStarAlgo); QMessageBox msgBox; msgBox.setText(tr("Sucsess")); msgBox.setIcon(QMessageBox::Information); msgBox.exec(); currMode = 1; return true; } } return false; } We implemented step-by-step mode and complete solution with one function, so you have to transfer mode IDs (0 is a complete solution and 1 is for the next step). Further, if this is a complete solution or the first step in a step-by-step procedure, we clear the field of the remnants of the previous solution, clean up the cell status and update the characteristics using the clearLabyr function. The functions of the algorithms themselves are implemented in such a way that they return true if the end point of the search is reached or the search cannot continue, and false if it is possible to continue working. Therefore, for a complete solution with the while operator, we call the function until it returns true and plot the line of the path on the scene by calling the updatePictureSolve function. For step-by-step mode, we call the function with each click, if the path is found, we also send it to the drawing and display a message so that the user does not accidentally click the solution point.
The search algorithms themselves update the status of cells when they are entered into an open or closed list.
Control Panel
The program includes:
- Two types of generators: Growing Tree and manual mode (check field mentioned above)
- Five types of algorithms: DFS and search by hand rule for Generator Growing Tree, as well as Dijkstra, AStar, JPS for manual mode.
It was necessary to allow the user to conveniently switch between the named options. The result of the
Work with statistics
The program can also be used to select the most efficient algorithm for this situation:
- Approximately draw the necessary map, it turns out something like in the picture
- We start all 3 algorithms, by eye we estimate work.
What approximately can turn out
It is obvious that for more or less serious projects "by eye" is not enough, so you need to display statistics.
We will do this in the form of a widget with a brief statistics of the current algorithm in the workspace and a separate window displaying the work of all the algorithms for the session and allowing you to create a report that can be copied, for example, in Excel, to build graphs there.
Implementing a widget with brief statistics is very much like implementing a widget with settings, and it looks almost the same:
The algorithm itself calculates the number of operations. The length of the path can be learned from the characteristics of the exit cell, and we consider time as timers, subtracting the time spent on drawing (although this is not very accurate). When the algorithm finishes, it passes the statistics to the widget and calls the function to create a record in the table. As a result, has the following table:
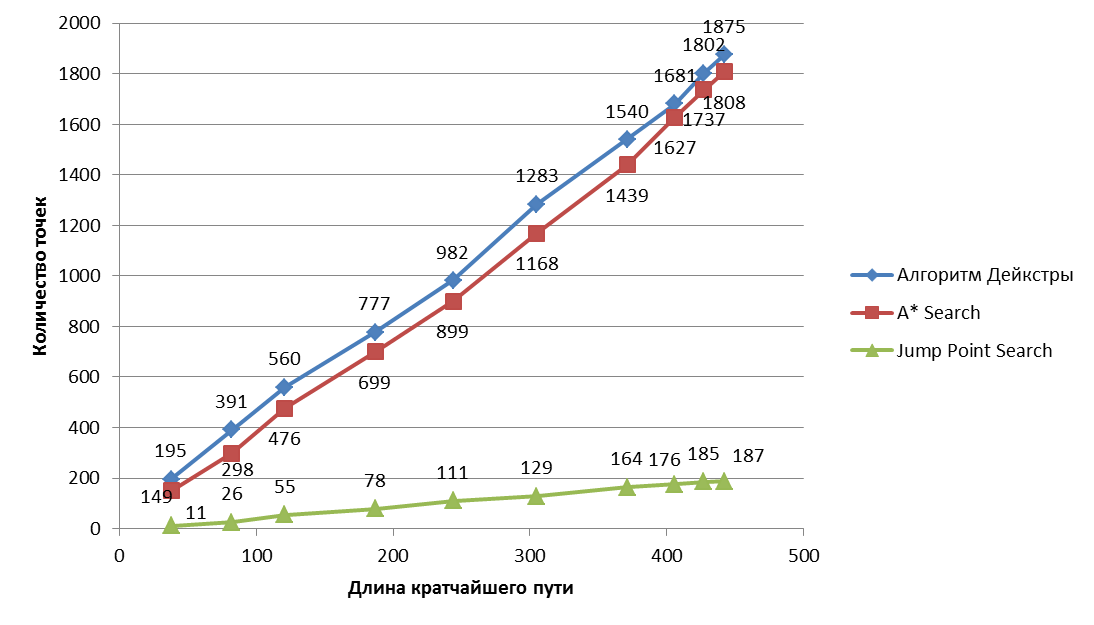
It should be said separately why A * and Dextra have the same results, while JPS has excellent results. This is due to the fact that 2 different methods for calculating distances between cells are used: A * and Dijkstra use the cost of vertical and horizontal transition 10 and diagonal 14, and then divide the total result by 10; JPS uses 1 and sqrt (2), respectively, and divides nothing, but also rounds. JPS shows the path length somewhat more precisely, which is why the numbers are different.
After processing the data, you can get something like this:
For such a situation:

This schedule:
This schedule:
Conclusion
We got a program that helps beginners, and not only programmers to understand the path finding algorithms. At least I did help a couple of my friends)
The author will be happy to listen to your wishes and fulfill them as soon as he writes the exams.
Perhaps a series of improvements will lead to the fact that we will get a powerful library with algorithms, and the program will become a pleasant demo for it (Like PathFinding.js , only better).
If you might like to write an article about finding a path, you can attach this program to it.
→ Experienced research material: PathFinding.js
→ Download the archive with the program can be from the poison or with DropBox .
UPD: initially, by mistake, a not fully debugged version was published, now everything is ok. I apologize. 03/14/2017 (yes, for about 4 days, the downloaded version hung: C)
→ Source project VS2013: POISON and Dropbox
Source: https://habr.com/ru/post/323650/
All Articles