Development for Sailfish OS: Qt / C ++ Unit Testing under Sailfish OS
Hello! This article is a continuation of a series of articles on testing Sailfish applications ( previous article ), and this time we will consider the unit testing of C ++ as part of projects for Sailfish OS.
So, we have an elementary example of an application under Sailfish OS, which is available in the repository of this project (how to create an application for Sailfish OS can be found in a previous article ). The QML component contains a single welcome screen.
In addition, there is one small class in the C ++ language:
Its meaning is simple - it stores 2 values and finds their sum and product. This class we will test.
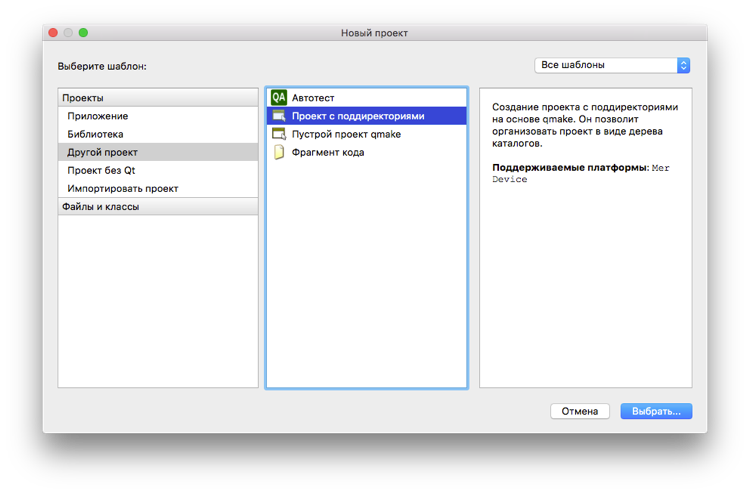
Tests and the application itself must be placed as subdirectories of one project. To do this, when creating a new project, select the item “Project with subdirectories”:
')
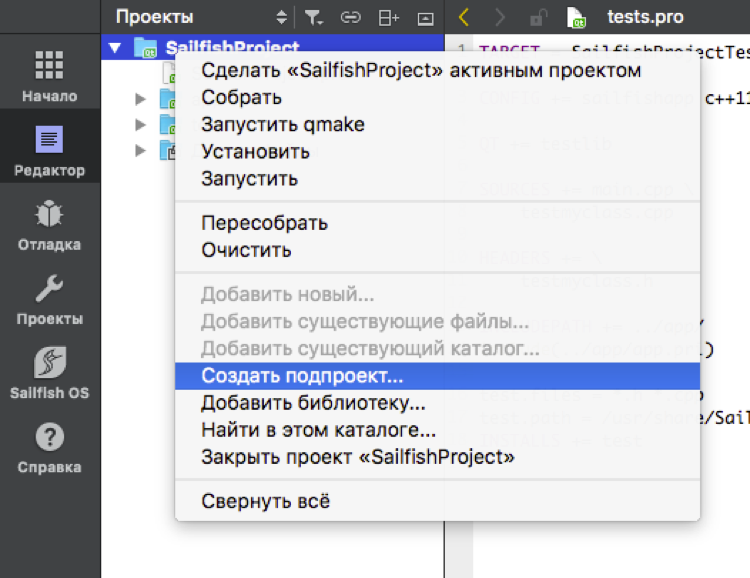
Or in the already created * .pro file specify TEMPLATE = subdirs . This template indicates that the project contains subdirectories. Now in the context menu of the main project you can add subprojects:
There are at least two such subprojects: one of them will be the application itself, the second one will be tests for it. When created using QtCreator, they are automatically added to the * .pro file as a subdirectory. If the application has already been created, its name can simply be added to the SUBDIRS variable in * .pro manually. As a result, SUBDIRS will look something like this:
Let's proceed to the creation of the tests themselves. For unit testing in Qt, the QtTest framework, which was already mentioned in the previous article, is used . To use it, you need to add Qt5Test in the * .yaml project file depending on the build with PkgConfig.
To create tests, in the * .pro subproject file containing the test suite, you must connect the testlib module:
Also, you need to specify the files to be tested. The easiest way to do this is to create a * .pri file in a subdirectory with the project, and indicate the path to the tested classes in it:
Then it needs to be included in the * .pro files of the application and the project with tests:
In TARGET the name of the subproject is indicated. Later, a file with the same name will need to be run to run the tests.
After that, the * .pro file of the test subproject will look something like this:
For writing tests, a separate class is implemented containing test scripts. It must be a successor to the QObject class. The tests themselves are added in the form of private slots of this class. Each of the slots will act as a test function.
It should be noted that in the QtTest library there are methods that allow you to configure data for tests before they are executed, and also to tidy up after the tests are completed:
By applying the information described above, you can get about this class, responsible for testing our project:
To compare the results of the function execution with the expected result, macro substitutions are used:
More information about macros can be found in the QTest documentation .
We use the information above to write our test functions:
Since in our project the testing class is divided into .h and .cpp files, the process of writing unit tests is completed at this step. However, if the .h file is missing and the entire class is fully described in the .cpp file, then you need to connect the automatically generated .moc file. For example,
The last thing to do is to organize the entry point to run the tests. To do this, in the * .cpp class file with tests, or in a separate main.cpp , one of three macros is used: QTEST_MAIN () / QTEST_APPLESS_MAIN () / QTEST_GUILESS_MAIN () . The name of the test class is passed as an argument. Each macro declares a main () function, so it can only be used once in a subproject. Different classes with unit tests should be placed in separate subprojects.
So, the project is ready, we start it from the environment. After a successful launch, a file with the name specified in TARGET will appear on the device in the / usr / bin directory. Just execute this file.
This article has reviewed the way of writing unit tests for testing applications for the Sailfish OS platform. As an example, a simple application was considered, the source of which (along with the tests) are available on GitHub .
Technical issues can also be discussed on the Sailfish OS Russian-speaking community channel in a Telegram or VKontakte group .
Posted by: Maxim Kosterin
Test application
So, we have an elementary example of an application under Sailfish OS, which is available in the repository of this project (how to create an application for Sailfish OS can be found in a previous article ). The QML component contains a single welcome screen.
import QtQuick 2.0 import Sailfish.Silica 1.0 ApplicationWindow { Label { x: Theme.horizontalPageMargin text: "Hello Sailors" color: Theme.secondaryHighlightColor font.pixelSize: Theme.fontSizeExtraLarge } } In addition, there is one small class in the C ++ language:
class MyClass { public: MyClass(); MyClass(int first, int second); int add() const; int multiply() const; private: int firstValue, secondValue; }; Its meaning is simple - it stores 2 values and finds their sum and product. This class we will test.
Project creation
Tests and the application itself must be placed as subdirectories of one project. To do this, when creating a new project, select the item “Project with subdirectories”:
')
Or in the already created * .pro file specify TEMPLATE = subdirs . This template indicates that the project contains subdirectories. Now in the context menu of the main project you can add subprojects:
There are at least two such subprojects: one of them will be the application itself, the second one will be tests for it. When created using QtCreator, they are automatically added to the * .pro file as a subdirectory. If the application has already been created, its name can simply be added to the SUBDIRS variable in * .pro manually. As a result, SUBDIRS will look something like this:
SUBDIRS = \ app \ tests Let's proceed to the creation of the tests themselves. For unit testing in Qt, the QtTest framework, which was already mentioned in the previous article, is used . To use it, you need to add Qt5Test in the * .yaml project file depending on the build with PkgConfig.
To create tests, in the * .pro subproject file containing the test suite, you must connect the testlib module:
QT += testlib Also, you need to specify the files to be tested. The easiest way to do this is to create a * .pri file in a subdirectory with the project, and indicate the path to the tested classes in it:
HEADERS += $$PWD/src/myclass.h SOURCES += $$PWD/src/myclass.cpp Then it needs to be included in the * .pro files of the application and the project with tests:
INCLUDEPATH += ../app/ include(../app/app.pri) In TARGET the name of the subproject is indicated. Later, a file with the same name will need to be run to run the tests.
After that, the * .pro file of the test subproject will look something like this:
TARGET = SailfishProjectTest CONFIG += sailfishapp qt c++11 QT += testlib HEADERS += testmyclass.h SOURCES += testmyclass.cpp \ nain.cpp INCLUDEPATH += ../app/ include(../app/app.pri) Writing tests
For writing tests, a separate class is implemented containing test scripts. It must be a successor to the QObject class. The tests themselves are added in the form of private slots of this class. Each of the slots will act as a test function.
It should be noted that in the QtTest library there are methods that allow you to configure data for tests before they are executed, and also to tidy up after the tests are completed:
- initTestCase () - is called before the first test function, if an error occurs in it, no test function will be executed.
- cleanupTestCase () - called after the execution of all test functions.
- init () is called before each test function, if an error occurs in it, the subsequent test will not be executed.
- cleanup () is called after each test function.
By applying the information described above, you can get about this class, responsible for testing our project:
#include <QObject> #include "src/myclass.h" class TestMyClass : public QObject { Q_OBJECT private: MyClass myClass; private slots: void init(); void testAdd(); void testMultiply(); }; To compare the results of the function execution with the expected result, macro substitutions are used:
- QVERIFY (condition) takes an expression as an argument and, if it is wrong, displays a standard error message in the test log.
- QVERIFY2 (condition, message) is similar to QVERIFY () , but outputs the message specified in the arguments if the condition is false.
- QTRY_VERIFY_WITH_TIMEOUT (condition, timeout) is similar to QVERIFY () , but repeats the comparison until the condition is true or until the time specified in the second argument expires.
- QTRY_VERIFY2_WITH_TIMEOUT (condition, message, timeout) is similar to QVERIFY2 () , repeats the comparison in the same way as QTRY_VERIFY_WITH_TIMEOUT () .
- QTRY_VERIFY (condition) , QTRY_VERIFY2 (condition, message) are similar to those described above, but with a timer of 5 seconds.
- QCOMPARE (actual, expected) gives more detailed information about the failed test. The arguments are the result of the function execution and the expected result. If they do not match, then both of these values are displayed in the test log.
- QTRY_COMPARE_WITH_TIMEOUT (actual, expected, timeout) is similar to QCOMPARE () , but repeats the comparison until the values are correct, or until the specified time is reached in milliseconds.
- QTRY_COMPARE (actual, expected) is the same as QTRY_COMPARE_WITH_TIMEOUT () , but with a timer of 5 seconds.
More information about macros can be found in the QTest documentation .
We use the information above to write our test functions:
#include <QtTest/QtTest> #include "src/myclass.h" #include "testmyclass.h" void TestMyClass::init() { myClass = MyClass(4, 2); } void TestMyClass::testAdd() { QCOMPARE(myClass.add(), 6); } void TestMyClass::testMultiply() { QCOMPARE(myClass.multiply(), 8); } Since in our project the testing class is divided into .h and .cpp files, the process of writing unit tests is completed at this step. However, if the .h file is missing and the entire class is fully described in the .cpp file, then you need to connect the automatically generated .moc file. For example,
#include "testmyclass.moc" .The last thing to do is to organize the entry point to run the tests. To do this, in the * .cpp class file with tests, or in a separate main.cpp , one of three macros is used: QTEST_MAIN () / QTEST_APPLESS_MAIN () / QTEST_GUILESS_MAIN () . The name of the test class is passed as an argument. Each macro declares a main () function, so it can only be used once in a subproject. Different classes with unit tests should be placed in separate subprojects.
Running tests
So, the project is ready, we start it from the environment. After a successful launch, a file with the name specified in TARGET will appear on the device in the / usr / bin directory. Just execute this file.
*********Start testing of TestMyClass ********* Config: Using QtTest library 5.2.2 Qt 5.2.2 PASS : TestMyClass::initTestCase() PASS : TestMyClass::testAdd() PASS : TestMyClass::testMultiply() PASS : TestMyClass::cleanupTestCase() Totals: 4 passed, 0 failed, 0 skipped ********Finish testing of TestMyClass ********* Conclusion
This article has reviewed the way of writing unit tests for testing applications for the Sailfish OS platform. As an example, a simple application was considered, the source of which (along with the tests) are available on GitHub .
Technical issues can also be discussed on the Sailfish OS Russian-speaking community channel in a Telegram or VKontakte group .
Posted by: Maxim Kosterin
Source: https://habr.com/ru/post/323518/
All Articles