Screencasting on the site via WebRTC from the Chrome browser

Screencasting in Chrome
Screencasting (screencasting, screenshots) is already running in the Google Chrome browser and allows you to capture both the browser window itself and any other application window. For example, you can capture Firefox running in a nearby window.
Everything is great, but there is a security issue. In the Chrome browser, screening is turned off.
To enable it, you need to use the Chrome Desktop Capture API and we will show in this article how to do it.
')
Screencast extension
In order for screening to work, the user must install your extension (Chrome Extension), which was created specifically for your site (domain).
The very first launch of screencasting will require several actions from the user:
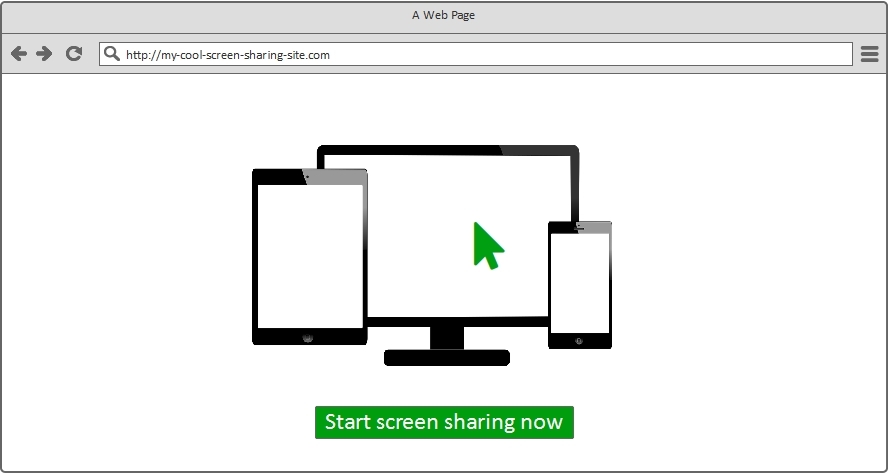
- The user enters the site and presses the Start screen demonstration button.
- The user is invited to add an extension for this action.
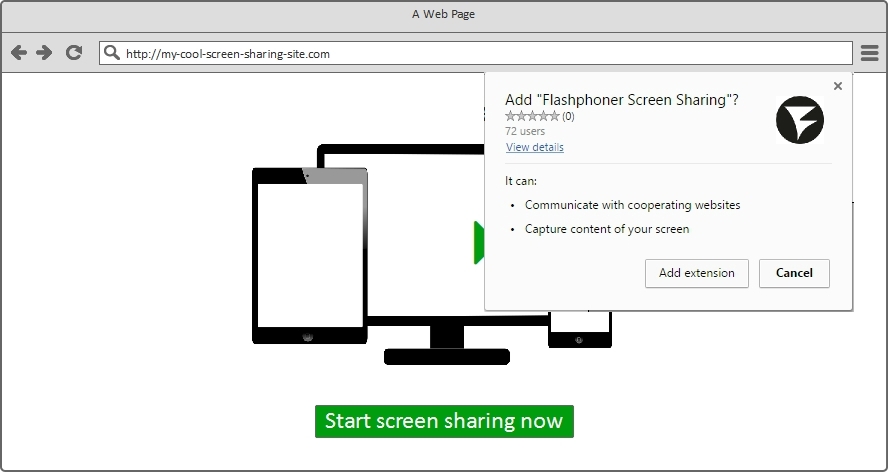
Adding an extension occurs in a neat block, which is displayed by Chrome itself - the browser offers to add the extension in 1 click. The box indicates that the extension will be able to capture the screen.
Own extension
The next step is to create an extension for your domain. For example, your test domain is mysupercat.com . In this case, when creating an extension, you will need to register your domain in the extension code.
In addition, your domain (site on this domain) must work via HTTPS. Accordingly, your screening page should open something like this: mysupercat.com/screen-sharing.php
Domain and HTTPS - this is probably all that is required to create your own extension for screening. It is not necessary to buy SSL certificates. Self-signed certificates will also work. The main thing is that your page opens on HTTPS, even with a red line:

Although, you will need something else - five US dollars. Exactly so much will have to pay for membership in the club developers under Chrome.
Let's sum up. To start creating and testing your own extension, we need:
- Domain name
- hosting with https
- 5 dollars on the card
Post extension
- Go to the Chrome Developer Dashboard and pay for the harvested 5 bucks.

- We are preparing a ZIP archive with extension files.
To do this, download 2 files here .
Change the manifest.json file and affix yours:- name
- author
- description
- homepage_url
for example"Name" : "My cool screen sharing extension", "Author" : "I am", "Description" : "The extensions shares screens from my website", "Homepage_url" : "https://mysupercat.com",{ "name" : "Flashphoner Screen Sharing", "author": "Flashphoner", "version" : "1.4", "manifest_version" : 2, "minimum_chrome_version": "34", "description" : "This Chrome extension is developed for http://flashphoner.com WCS Api to enable screen capture.", "homepage_url": "http://flashphoner.com", "background": { "scripts": ["background-script.js"], "persistent": false }, "externally_connectable": { "matches": [ "https://flashphoner.com/*", "https://*.flashphoner.com/*", "*://localhost/*", "*://127.0.0.1/*" ] }, "icons": { "16": "logo16.png", "48": "logo48.png", "128": "logo128.png" }, "permissions": [ "desktopCapture" ], "web_accessible_resources": [ "logo48.png" ] }
In addition, change the icons and substitute your domain code externally_connectable"externally_connectable": { "matches": [ "https://mysupercat.com/*", "https://*.mysupercat.com/*", "*://localhost/*", "*://127.0.0.1/*" ] }
The result is such manifest.json :{ "name" : "My cool screen sharing extension", "author": "I am", "version" : "1.0", "manifest_version" : 2, "minimum_chrome_version": "34", "description" : "The extensions shares screens from my website", "homepage_url": "https://mysupercat.com", "background": { "scripts": ["background-script.js"], "persistent": false }, "externally_connectable": { "matches": [ "https://mysupercat.com/*", "https://*.mysupercat.com/*", "*://localhost/*", "*://127.0.0.1/*" ] }, "icons": { "16": "logo16.png", "48": "logo48.png", "128": "logo128.png" }, "permissions": [ "desktopCapture" ], "web_accessible_resources": [ "logo48.png" ] }
We pack these files into a ZIP archive with all the icons and other pictures. You can read about the icons here . And about the additional pictures here .
Next, click Add new item .
Next, after reading the agreement, fill in our ZIP-archive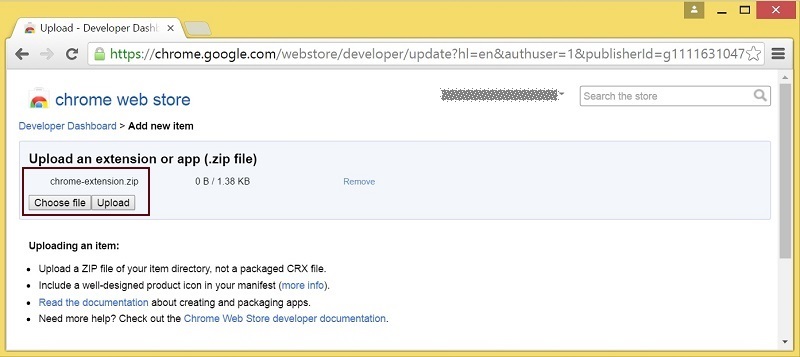
After downloading the archive, you need to carefully check everything and save
It remains to publish the extension from the Dashboard by clicking the Publish button.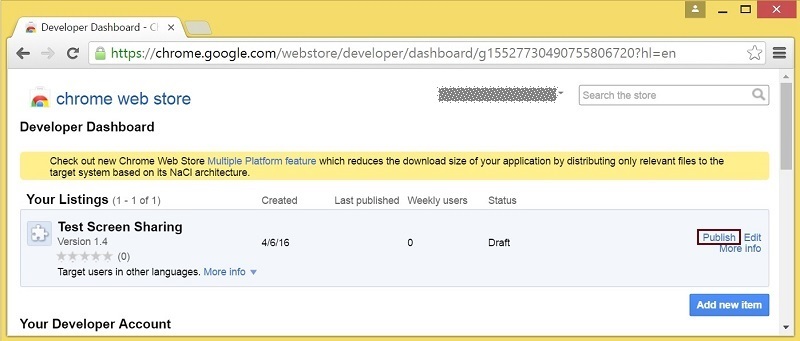
The published extension in the Dashboard looks like this: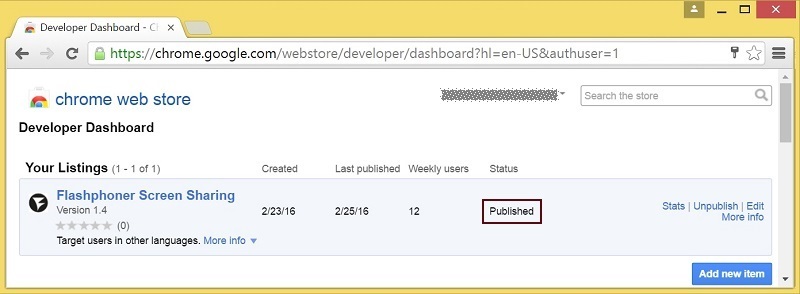
Is done. The extension is packaged, published and available for installation in the browser.Inline installation
Without an inline installation, your users would have to go to the Chrome Store site and install extensions there. This is certainly not deadly, but:- For the user, this is not very convenient.
- The user may get confused on the install page of the extension and not return
Inline installation of the extension is called just this neat window, which does not force the user to go to the Chrome Store:
To set up an inline installation, you need to have control over the domain and hosting that you described in the manifest ( file manifest.json ).
For example, if your domain is mysupercat.com, then you will need to go through the standard verification procedure and confirm ownership of this domain.
To enable inline installation, set the This item uses inline install flag on the extension's edit page.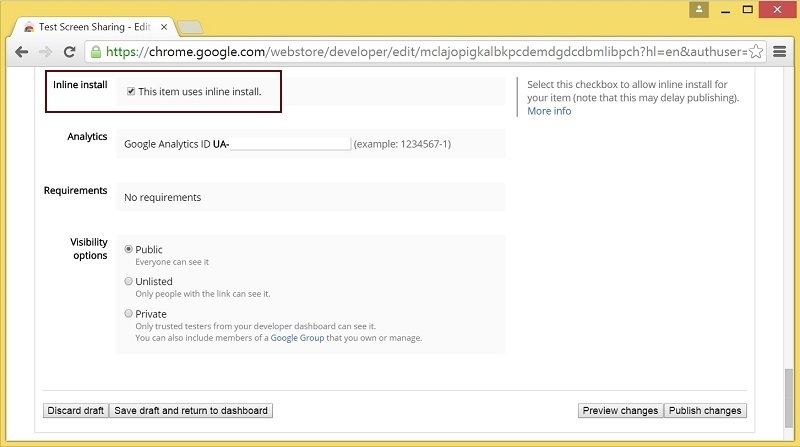
Next, add your website.
Search Console opens in a new window, where you can go through the verification procedure.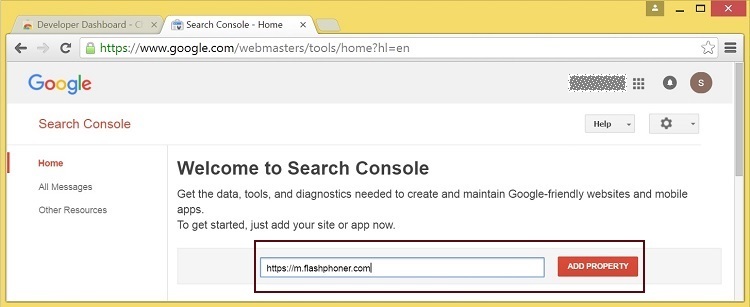
The next step is to upload the file identifier to your hosting to confirm your domain / site ownership.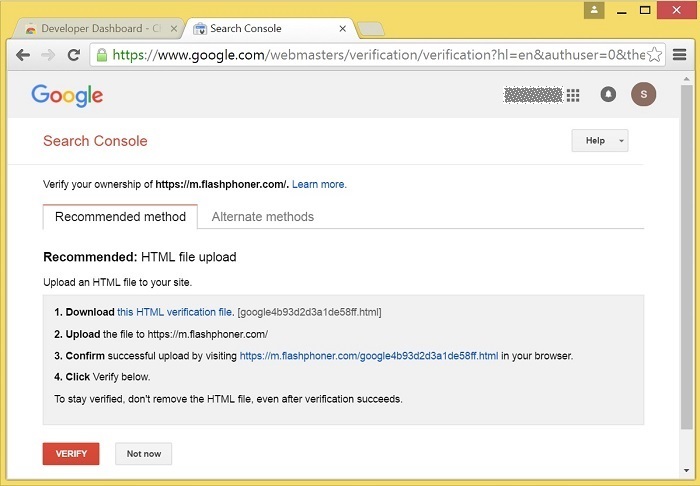
The verification procedure was successful.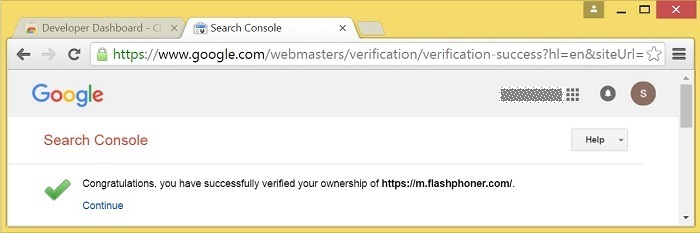
The verified site becomes available in the list for this extension and now it is possible to use inline installation on it.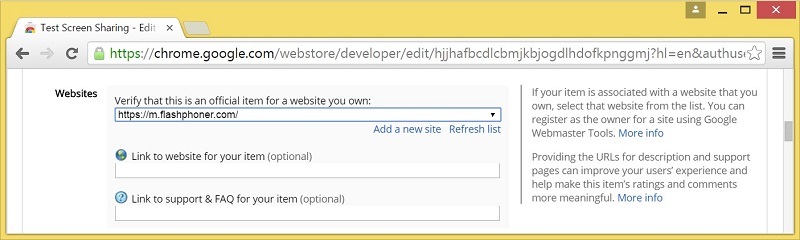
Screencasting Integration into a Web Page
The extension is ready and configured for inline installation. It remains to embed the extension call code in the HTML page and test.
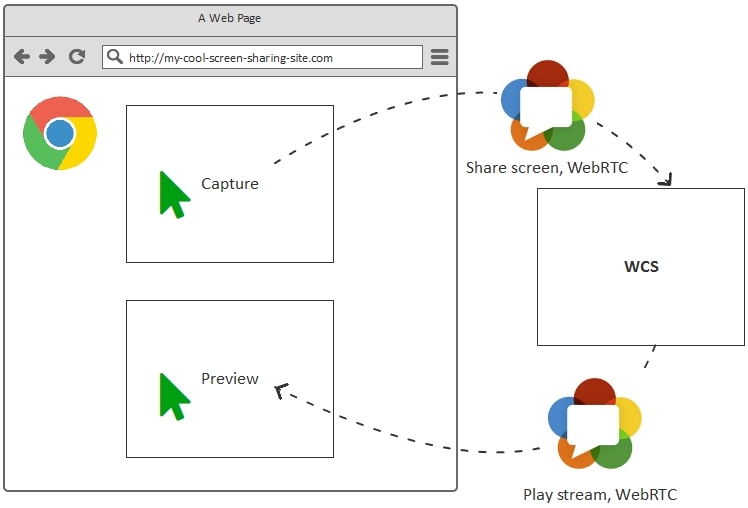
Screencasting in Google Chrome browser uses the WebRTC API . Therefore, to complete this test, we need a WebRTC platform.
As a server WebRTC platform, we will use Web Call Server and Web SDK — a set of API scripts for this server.
1. Create an HTML page for screening screen-sharing.html
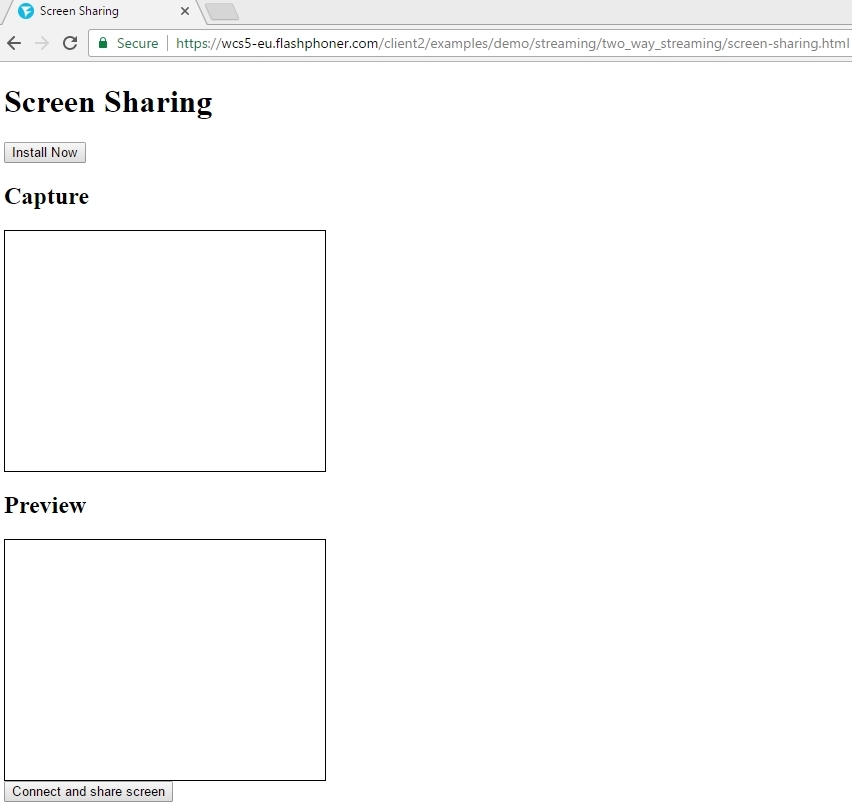
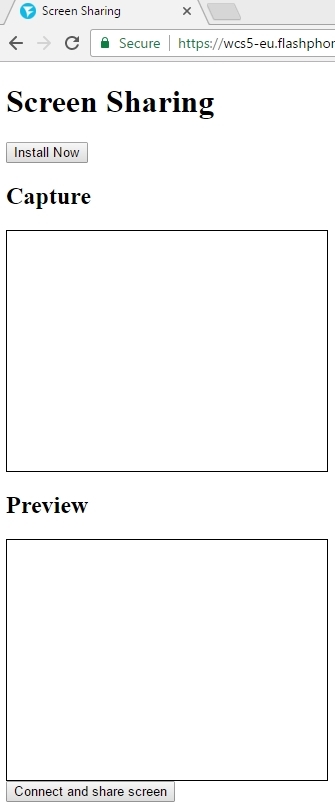
A page consists of 20 lines of code and looks like this:
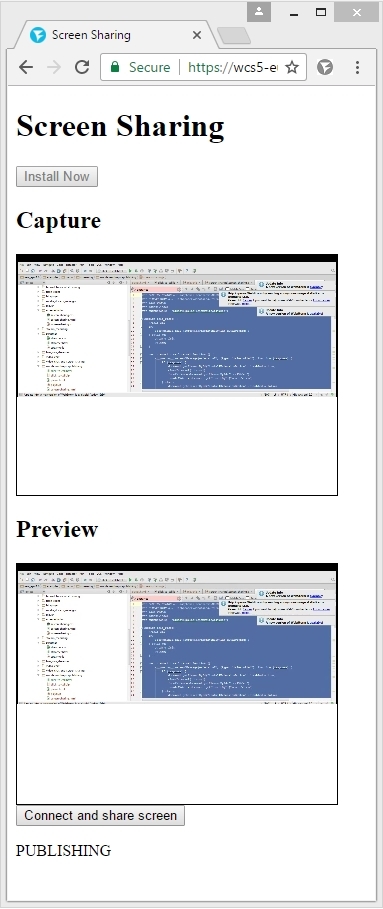
<!DOCTYPE html> <html lang="en"> <head> <title>Screen Sharing</title> <script type="text/javascript" src="../../../../flashphoner.js"></script> <script type="text/javascript" src="screen-sharing.js"></script> <link rel="chrome-webstore-item" href="https://chrome.google.com/webstore/detail/nlbaajplpmleofphigmgaifhoikjmbkg"> </head> <body onload="init_page()"> <h1>Screen Sharing</h1> <button type="button" id="installExtensionButton" onclick="installExtension()">Install Now </button> <h2>Capture</h2> <div id="localVideo" style="width:320px;height:240px; border: 1px solid"></div> <h2>Preview</h2> <div id="remoteVideo" style="width:320px;height:240px; border: 1px solid"></div> <button id="publishBtn" type="button" onclick="connectAndShareScreen()">Connect and share screen</button> <p id="status"></p> </body> </html> Let's take it apart.
1) Load API file flashphoner.js
<script type="text/javascript" src="../../../../flashphoner.js"></script> 2) We load the screen-sharing.js script - we will analyze it a bit later.
<script type="text/javascript" src="screen-sharing.js"></script> 3) Specify where to look for an extension for screening.
<link rel="chrome-webstore-item" href="https://chrome.google.com/webstore/detail/nlbaajplpmleofphigmgaifhoikjmbkg"> 4) Add a button, by clicking on which the installation of the extension will occur.
<button type="button" id="installExtensionButton" onclick="installExtension()">Install Now </button> 5) Add a div - localVideo element in which the captured screen will be displayed locally
<div id="localVideo" style="width:320px;height:240px; border: 1px solid"></div> 6) Add a div - the remoteVideo element, which will be a player displaying what came from the server, i.e. will play the video stream that was captured in localVideo and sent to the server.
<div id="remoteVideo" style="width:320px;height:240px; border: 1px solid"></div> 7) Button on which we will start screencasting and display of stream status
<button id="publishBtn" type="button" onclick="connectAndShareScreen()">Connect and share screen</button> <p id="status"></p> In the "design" our page looks like this.
2. Create JavaScript code for screencasting screen-sharing.js
All code is available for download here . The code takes a couple of pages and contains 5 basic functions.
var SESSION_STATUS = Flashphoner.constants.SESSION_STATUS; var STREAM_STATUS = Flashphoner.constants.STREAM_STATUS; var localVideo; var remoteVideo; var extensionId = "nlbaajplpmleofphigmgaifhoikjmbkg"; function init_page() { //init api try { Flashphoner.init({screenSharingExtensionId: extensionId}); } catch (e) { //can't init return; } var interval = setInterval(function () { chrome.runtime.sendMessage(extensionId, {type: "isInstalled"}, function (response) { if (response) { document.getElementById("installExtensionButton").disabled = true; clearInterval(interval); localVideo = document.getElementById("localVideo"); remoteVideo = document.getElementById("remoteVideo"); } else { document.getElementById("installExtensionButton").disabled = false; } }); }, 500); } function connectAndShareScreen() { var url = "wss://wcs5-eu.flashphoner.com:8443"; console.log("Create new session with url " + url); Flashphoner.createSession({urlServer: url}).on(SESSION_STATUS.ESTABLISHED, function (session) { //session connected, start streaming startStreaming(session); }).on(SESSION_STATUS.DISCONNECTED, function () { setStatus(SESSION_STATUS.DISCONNECTED); }).on(SESSION_STATUS.FAILED, function () { setStatus(SESSION_STATUS.FAILED); }); } function startStreaming(session) { var streamName = "test123"; var constraints = { video: { width: 320, height: 240, frameRate: 10, type: "screen" } }; session.createStream({ name: streamName, display: localVideo, constraints: constraints }).on(STREAM_STATUS.PUBLISHING, function (publishStream) { setStatus(STREAM_STATUS.PUBLISHING); //play preview session.createStream({ name: streamName, display: remoteVideo }).on(STREAM_STATUS.PLAYING, function (previewStream) { //enable stop button }).on(STREAM_STATUS.STOPPED, function () { publishStream.stop(); }).on(STREAM_STATUS.FAILED, function () { //preview failed, stop publishStream if (publishStream.status() == STREAM_STATUS.PUBLISHING) { setStatus(STREAM_STATUS.FAILED); publishStream.stop(); } }).play(); }).on(STREAM_STATUS.UNPUBLISHED, function () { setStatus(STREAM_STATUS.UNPUBLISHED); //enable start button }).on(STREAM_STATUS.FAILED, function () { setStatus(STREAM_STATUS.FAILED); }).publish(); } //show connection or local stream status function setStatus(status) { var statusField = document.getElementById("status"); statusField.innerHTML = status; } //install extension function installExtension() { chrome.webstore.install(); } Let us examine this code in detail.
1) At the beginning, several variables are declared: statuses, localVideo and remoteVideo elements, and extensionId, which contains a unique identifier for the screencasting extension.
var SESSION_STATUS = Flashphoner.constants.SESSION_STATUS; var STREAM_STATUS = Flashphoner.constants.STREAM_STATUS; var localVideo; var remoteVideo; var extensionId = "nlbaajplpmleofphigmgaifhoikjmbkg"; 2) Next, the extensionId is passed to the Flashphoner API and as a result, the API knows which extension will be used for screening.
Flashphoner.init({screenSharingExtensionId: extensionId}); 3) Periodically we turn to Chrome and check if the extension is installed. If the extension is installed, we no longer need the Install extension button and can hide it.
chrome.runtime.sendMessage(extensionId, {type: "isInstalled"}, function (response) {...} 4) The connectAndShareScreen function establishes a connection with the server and as soon as the connection is established (ESTABLISHED), starts capturing and sending the video stream, passing control to the startStreaming function.
function connectAndShareScreen() { var url = "wss://wcs5-eu.flashphoner.com:8443"; console.log("Create new session with url " + url); Flashphoner.createSession({urlServer: url}).on(SESSION_STATUS.ESTABLISHED, function (session) { //session connected, start streaming startStreaming(session); }).on(SESSION_STATUS.DISCONNECTED, function () { setStatus(SESSION_STATUS.DISCONNECTED); }).on(SESSION_STATUS.FAILED, function () { setStatus(SESSION_STATUS.FAILED); }); } 5) Before starting screencasting, stream parameters such as video resolution and FPS are set.
var constraints = { video: { width: 320, height: 240, frameRate: 10, type: "screen" } }; 6) Next, the stream itself is created and the publish () method is called. Note that the stream is given the name test123
session.createStream({ name: streamName, display: localVideo, constraints: constraints }).publish(); 7) After successfully sending the test123 stream to the server, the code gets into the PUBLISHING event handler.
on(STREAM_STATUS.PUBLISHING, function (publishStream) {...} 8) It remains only to play the stream in the next div-block remoteVideo . To do this, call the play () function.
session.createStream({ name: streamName, display: remoteVideo }).play(); The page and script are ready and you can start testing.
Preparation for testing
As a result, we have the following files:
- screen-sharing.html
- screen-sharing.js
- flashphoner.js
flashphoner.js is part of the Web SDK assembly. The latest build can be downloaded from this page .
In addition to html and js-files, you will need a relay server that will receive the video stream and relay it to others (in this case, back to the same page).
We use Web Call Server 5 for testing. Therefore, there are several options:
- Install on your host
- Run on Amazon EC2
- Use the demo server at wss: //wcs5-eu.flashphoner.com: 8443
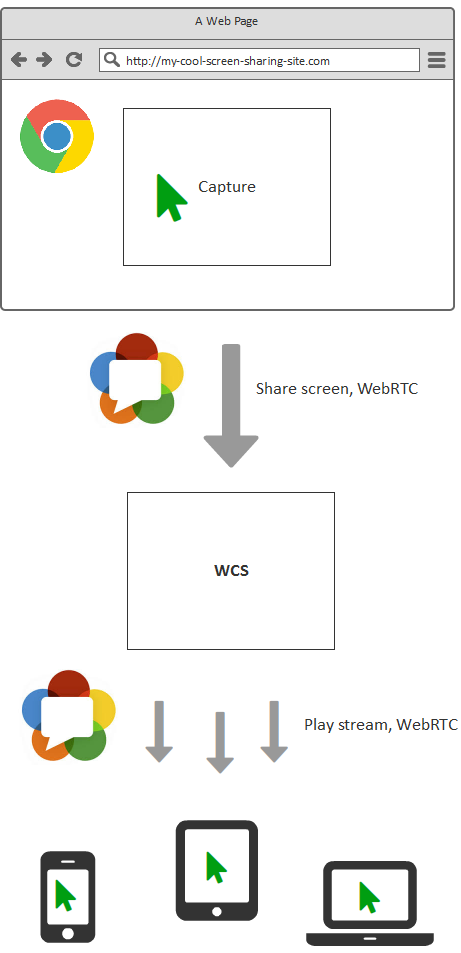
Screencasting testing scheme will be as follows:
With the same success, you can distribute a screening stream to a lot of connected users.
Testing screencasting in Chrome
- Open the screen-sharing.html HTTPS page in the Google Chrome browser.
- Click the Install Now button to add an extension by inline installation.
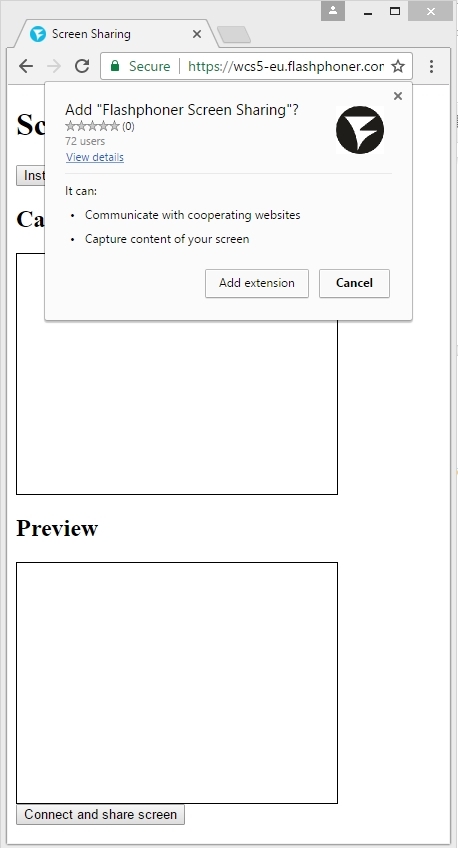
- Click Add extension and you can immediately start the screen casting on the Connect and share screen button. Chrome will ask you to choose exactly what we will capture. This can be a tab or a Chrome window or another application.
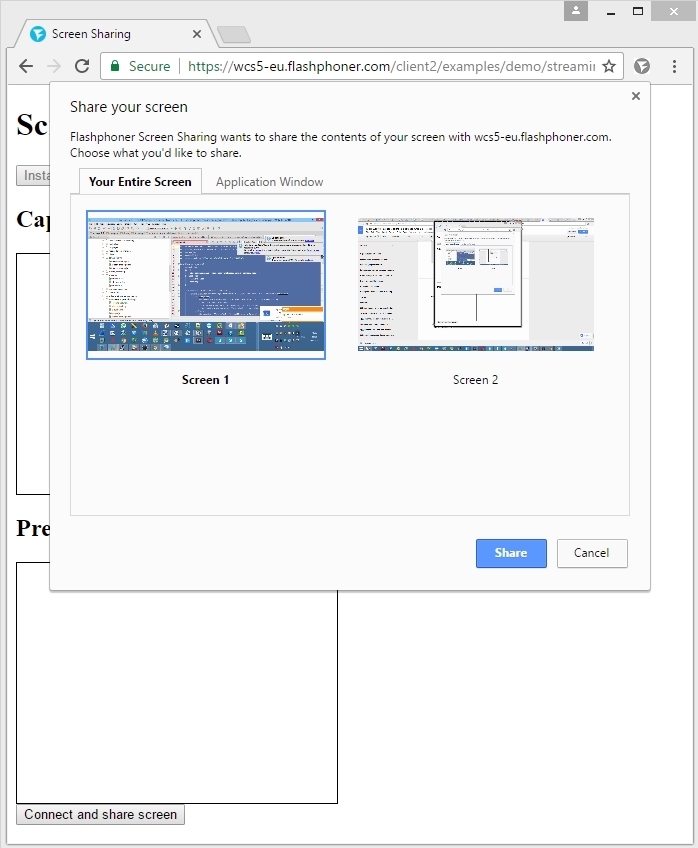
- Click the Share button and arrive at the final result. The screen is captured, sent to the server via WebRTC and passes back, displayed in the Preview block.
Let's sum up
Thus, we successfully tested screening with a simple test page screen- sharing.html in the Google Chrome browser . The test page contains an extension for screening, which we published in the Chrome Store and which is installed in one click without switching to the Store.
When testing, the page worked on HTTPS and sent / received video via Web Call Server - WebRTC media server for streaming video broadcasts.
To integrate screencasting into an HTML page, the flashphoner.js script was used , which is part of the Web SDK build for the WCS server.
Links
Chrome API for capturing desktop video
Dashboard for Chrome developers
Minimum code for screencasting extension
Packaging icons in the extension
Packing additional images in the extension
Download screencasting sample code
Installing Web Call Server on your host
Run Web Call Server on Amazon EC2
Web Call Server 5 Demo Server
Web call server
Web SDK
Source: https://habr.com/ru/post/323486/
All Articles