Overview uniset2-testsuite - a small bike for functional testing

As a natural continuation of the work on libuniset2 , the uniset2-testsuite project was born . This is your little bike for functional testing. As a result, it has evolved to a more or less universal solution with “plugins”. Written in python. If you are interested in reading, then please ... come in.
The basic idea of testing embedded in the uniset2-testsuite is simple: "The impact was applied, the reaction was checked . " This abstract idea materialized as a result in the following artifacts:
Test script
A test script is an xml file that records a sequence of tests. Each test is in turn divided into “actions” (action) and checks (check). Tests can call other tests, and, moreover, you can call tests that are in other files. All this allows you to build quite complex and spreading test sequences, make common parts into separate files, call them “as procedures”, etc. In addition, a replace mechanism (replace) is supported, which allows you to write test patterns with some abstract names of “variables” that are replaced by specific ones at the time of the test call.
')
Actions
Three types of actions are supported:
- 'SET'. Setting value
- 'MSLEEP'. Pause in milliseconds
- 'SCRIPT'. Call an external script
There is nothing special to explain. The examples below will be seen.
Checks
- '='. Validation of equivalence condition
- '! ='. Negative check
- '> or> ='. Checking the condition that the value is greater than (or equal to) the specified
- '<or <='. Check the condition that the value is less than (or equal to) the specified
- 'LINK'. Link to another test in this file
- 'OUTLINK'. Link to another file
- HOLD. Constant condition check for a specified time
Here, I think, too, more or less everything is obvious.
As a result, a simple test script has the following form:
<?xml version = '1.0' encoding = 'utf-8'?> <TestScenario> <Config> ... </Config> <TestList type="uniset"> <test name="Processing" comment=" "> <action set="OnControl_S=1" comment=" ' '"/> <check test="CmdLoad_C=1" comment=" ''"/> <check test="CmdUnload_C=0" comment=" ''"/> <check test="Level_AS>=90" comment=" .." timeout="15000"/> <check test="CmdLoad_C=0" comment=" ''"/> <check test="CmdUnload_C=1" comment=" ''"/> <check test="Level_AS<=10" comment=" .." timeout="15000"/> </test> <test name="Stopped" comment=" "> <action set="OnControl_S=0" comment=" ' '"/> <check test="CmdLoad_C=0" comment=" '' " holdtime="3000"/> <check test="CmdUnload_C=0" comment=" '' " holdtime="3000"/> <check test="Level_AS<=80" comment=" " holdtime="10000"/> </test> </TestList> </TestScenario> As can be seen from the above example. Actions are recorded as a tag.
<action set="..."/> checks are written as
<check test=".."/> Test Player
Once there is a script, then someone must execute it. At first, there was a desire to make a system that allows you to write your own “players”, each of which could have its own script format. But in the end, since xml was chosen as the format, uniset2-testsuite-xmlplayer was written accordingly . Console player that executes xml scripts. And then it did not go, because the xml-format was quite successful and enough xmlplayer to solve all current problems. Although the repository itself still has uniset2-testsuite-gtkplayer, it is a GUI-player written in python-gtk. But at some point its development was frozen as unnecessary and it does not support many functions.
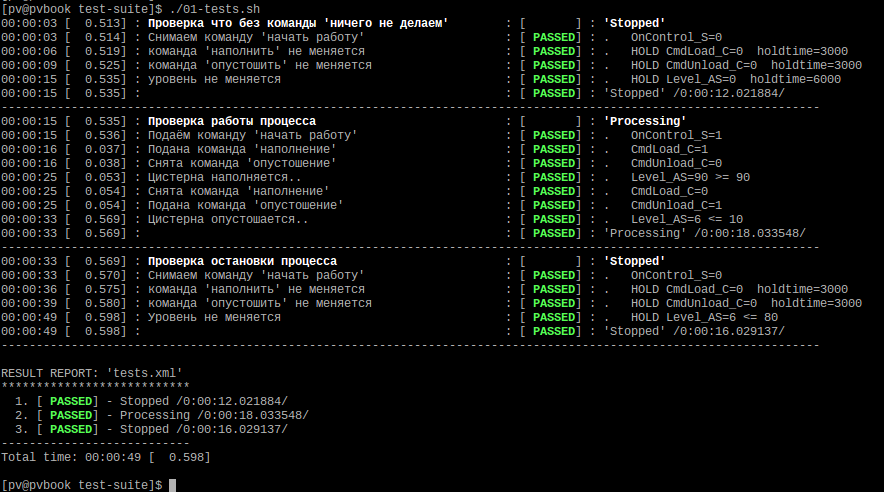
In total, it turned out that there are scenarios consisting of actions and checks and there is a player who performs the scenarios. If you run all this, then at the output you can see something like this.
A little background ...
At the beginning, uniset2-testsuite was considered solely as part of working with libuniset , in which the basic concept is “everything is a sensor” . Therefore, the recording format implies operating with sensor identifiers (numeric or names) and checking only numeric values (integer). But gradually evolving, the possibility of interaction via the modbus protocol ( type = "modbus" ) was added, the ability to work through snmp ( type = "snmp" ) was added recently. And as a result, it became more obvious that the interface for testing can be reduced to just the two main functions GET and SET . Those. to test any system, it is sufficient to implement only two functions get_value (id) and set_value (id, value) . And the protocol of interaction with the system under test is not important. The developer simply provides his own implementation of these two functions to interact with his system. This idea formed the basis for creating an analogue of the plugin system. Those. to implement interaction with some of its tested system, it is enough to implement a special python interface and put it (connect) in the right place. How to write your own interface for testing will be discussed in the second part. In the meantime, I will describe briefly the possibilities. Since there are a lot of them, I will tell you about the main ones, you can read about the rest in the documentation wiki.etersoft.ru/UniSet2/testsuite
Feature Description
Automatic start of programs
Of course, I would like it if not only test scripts were executed, but also when starting the test, all the programs required for the test were run. For this case, the RunList section is provided in the test script.
Pseudo-example:
<?xml version = '1.0' encoding = 'utf-8'?> <TestScenario> <RunList after_run_pause="5000"> <item after_run_pause="2000" script="./start_my_testprog1.sh" args="arg1 arg2" name="TestProg1"/> <item script="./start_my_testprog2.sh" args="arg1 arg2" chdir="../../TestPrograms/" name="TestProg2"/> <item script="./start_my_testprog3.sh" args="arg1 arg2" ignore_terminated="1" name="TestProg3"/> </RunList> <TestList> ..... </TestList> <TestScenario> In this section, you can specify a list of what you need to run before starting the test. For each program being started, the launch parameters ( args ) are specified, the programs may be in other directories ( chdir ). You can set a unique name ( name ), which in the case of departure of the program will be displayed in the logs. In this case, as can be seen from the example, it is also possible to set pauses after the launch of a program or all of them together. You can set the silent_mode = [0,1] parameter, where 1 means redirect all output to / dev / null). Or you can specify the logfile = “filename” parameter, in which all output will be redirected to the specified file (cancels the silent_mode action).
All programs run in the background. By default, if any of them suddenly crashes during the test, the test is interrupted with an error. But this can be disabled with the parameter ignore_terminated = "1" . All running programs are completed after passing the test (no matter whether it is successful or not). Those. as a result, RunList allows you to run the necessary environment for testing, which will be automatically completed after. Well, either make some preparatory actions before the test.
Run scripts on completion
Another possibility of uniset2-testsuite is to run the specified scripts (programs) with successful or failed test passing.
<?xml version="1.0" encoding="utf-8"?> <TestScenario> <Success> <item script="./success.sh param1 param2"/> <item script="./success.sh param3 param4"/> </Success> <Failure> <item script="./failure.sh param1 param2"/> <item script="./failure.sh param3 param4"/> </Failure> .... ... </TestScenatio> It can be used in different cases. For example (from the obvious):
- send a notification in case of failure of the test.
- “Clean up after dough” after completion
- copy the artifacts of the failed (or successful) test "aside"
Tags
When you have a lot of spreading tests that contain “full coverage”, you may not want to drive them all away in some cases in order to test any one “logical branch of tests”. To solve this problem come to the aid of "tags". You can mark each test with one or more tags.
... <test name="Test3" tags="#tag1#tag2"> <check test="outlink" file="Test4.xml" link="ALL"/> </test> <test name="Test5" tags="#tag1"> <check test="outlink" file="Test6.xml" link="ALL"/> </test> <test name="Test7" tags="#tag2"> <check test="outlink" file="Test8.xml" link="ALL"/> </test> ... And when you run the script, you can specify that only tests with the specified tags --play-tags "# tag1 # tag2 #" need to be executed.
Test Tree Output
Since If there is a mechanism for invoking tests from other tests and other files, then with a rather complex structure of tests, I would like to see how they will be called, in what sequence, and "who calls whom." To do this, there is a special command that displays a tree of tests on the screen - show-test-tree
Test1 Test2 Test3 Test 4 Test 5 Test 6 Test 7 Moreover, if for this command you specify --play-tags "# tag1 # tag2 #" , then the test tree will be displayed taking into account the tags.
Test1 [#tag1] Test2 [#tag2] Test3 [#tag1] Script validation
An important part of the complex structure of tests is validation.
Some tests can take quite a long time. And it is “offensive” when, after an hour of the test, it falls out on some “typo” in the name. To solve this problem, there are two special test test modes:
- --check-scenario - Script checking that ends on the first error.
- --check-scenario-ignore-failed — Script check, ignoring errors ...
In these modes, the actual "execution" of checks does not occur, there are no pauses and timeouts. Those. there is just a “syntactic” test of the test and parameters for correctness.
Here is the result:

Call Tree upon test departure
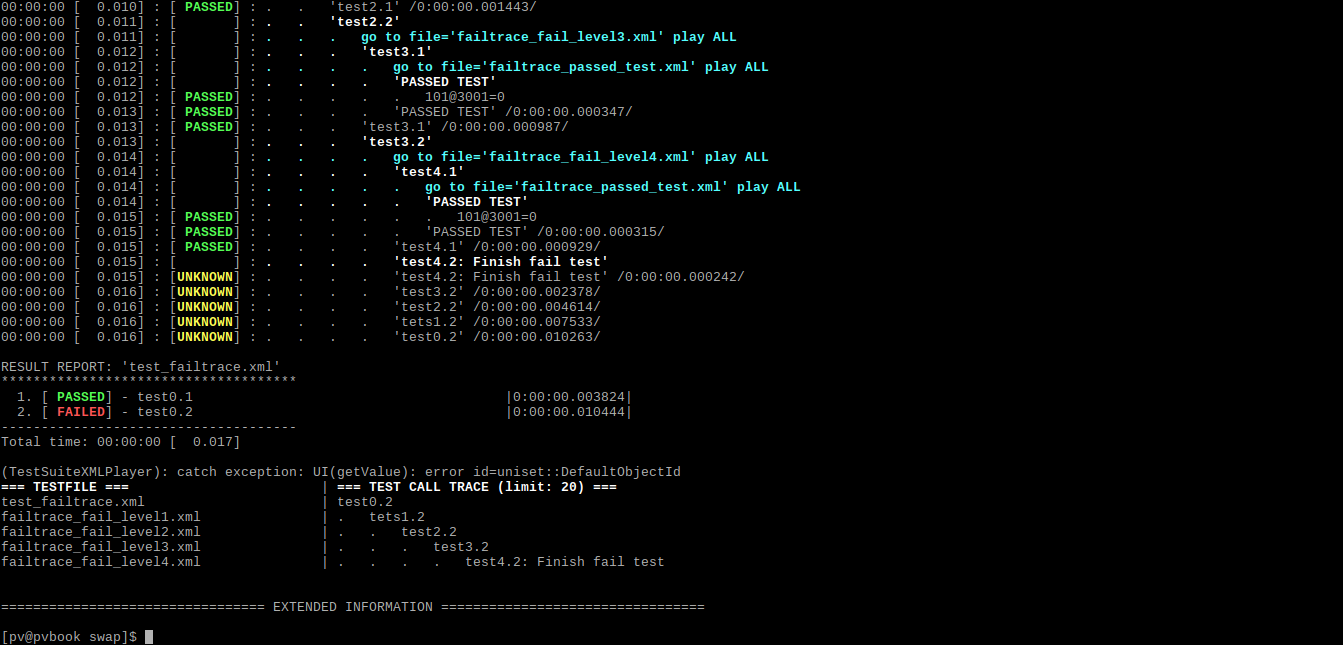
If during the test departure you want to see the trace of calls, there is a special parameter --print-calltrace that displays the call tree from the departure point to the beginning. There is a special parameter that limits the depth --print-calltrace-limit N
It looks like this:
Test Templates
Of course, the "templates" is a handy thing. And uniset2-testsuite is also a simple implementation of this mechanism. In this case, we are talking about a simple way to automatically replace the "one" by "the other." For example, we write:
... <test name="Check [MyVariable]" lname="tname"> .... <check test="[MyVariable]=[MyValue]"/> </test> ... And then we want to call this test with various parameters as MyVariable , MyValue . Easy…
... <test name="Check Name1=100"> <check test="outlink" file="my-template-test.xml" link="lname=tname" replace="[MyVariable]:Name1,[MyValue]:100"/> </test> <test name="Check Name2=200"> <check test="outlink" file="my-template-test.xml" link="lname=tname" replace="[MyVariable]:Name2,[MyValue]:200"/> </test> ... The replace rules have three visibility areas:
- global - valid throughout testing
- test level - operates at the level of a specific test
- check level (link or outlink) - valid at the link or outlink call level
Global replace is written in the TestList section .
<TestList replace="[MyVariable]:Name2,[MyValue]:200" The test level is specified in the test section and is valid only for this test and all the link, the outlink that is used inside it.
<test name="MySuperTes replace="[MyVariable]:Name2,[MyValue]:200"> <check test="[MyVariable]=11"/> <check test="Othrer=[MyValue]"/> <check test="outlink" file="my-template-test.xml" link="lname=tname"/> </test> The level of a specific check is specified in the check section and acts only on a specific call to the link or outlink test
<test name="Check Name2=200"> <check test="outlink" file="my-template-test.xml" link="lname=tname" replace="[MyVariable]:Name2,[MyValue]:200" /> </test> I would like to note that this replace mechanism acts not only on the action , check , set , test tags, but also on the names of tests, their parameters and even the replace properties in nested tests.
Well, in the end, what is not told:
- junit reports
- saving report to file
- use of several types of interfaces in one script
- "Compare" - a comparison of the parameters with each other, and not with the number
- ignoring tests while executing
- Oddly enough,
instead of a thousand words, I will also give helphelpUsage: uniset2-testsuite-xmlplayer [--confile [configure.xml|alias@conf1.xml,alias2@conf2.xml,..] --testfile scenario.xml [..other options..] --testfile tests.xml - Test scenarion file. --test-name test1,prop2=test2,prop3=test3,... - Run tests from list. By default prop=name --ignore-run-list - Ignore <RunList> --ignore-nodes - Do not use '@node' or do not check node available for check scenario mode --default-timeout msec - Default <check timeout='..' ../>.' --default-check-pause msec - Default <check check_pause='..' ../>.' --print-calltrace - Display test call trace with test file name. If test-suite FAILED. --print-calltrace-limit N - How many recent calls to print. Default: 20. --supplier-name name - ObjectName for testsuite under which the value is stored in the SM. Default: AdminID. --check-scenario - Enable 'check scenario mode'. Ignore for all tests result. Only check parameters --check-scenario-ignore-failed - Enable 'check scenario mode'. Ignore for all tests result and checks --play-tags '#tag1#tag2#tag3..' - Play tests only with the specified tag --show-test-tree - Show tree of tests --hide-result-report - Hide result report --confile [conf.xml,alias1@conf.xml,..] - Configuration file for uniset test scenario. TestSuiteConsoleReporter (--log) -------------------------------------------- --log-show-tests - Show tests log --log-show-actions - Show actions log --log-show-result-only - Show only result report (Ignore [show-actions,show-tests]) --log-show-comments - Display all comments (test,check,action) --log-show-numline - Display line numbers --log-show-timestamp - Display the time --log-show-test-filename - Display test filename in test tree --log-show-test-comment - Display test comment --log-show-test-type - Display the test test type --log-hide-time - Hide elasped time --log-hide-msec - Hide milliseconds --log-col-comment-width val - Width for column "comment" --log-no-coloring-output - Disable colorization output --log-calltrace-disable-extended-info - Disable show calltrace extended information TestSuiteLogFileReporter (--logfile) -------------------------------------------- --logfile-name filename - Save log to file --logfile-trunc - Truncate logile --logfile-flush - flush every write TestSuiteJUnitReporter (--junit) -------------------------------------------- --junit-filename name - Save junit report to file --junit-deep val - Deep tree of test for report. '-1' - all tests
In the second part we will look at how to write your own interface for verification.
Source: https://habr.com/ru/post/323290/
All Articles