Painless resolution of Merge conflicts in Git
I offer readers "Habrakhabr" translation of the publication "Painless Merge Conflict Resolution in Git"
from blog blog.wuwon.id.au.
In my daily work, I often have to deal with a lot of git branches (branch). These may be branches of intermediate releases, branches with an obsolete API supported by some clients, or branches with experimental properties. The ease of creating branches in the Git model tempts developers to create more and more branches, and usually the burden of a large number of branches becomes very noticeable when you have to maintain and periodically merge all these branches with other branches.
Mergers are very important for keeping the code up to date, and as a rule, the mistake made during the merge can lead to a bigger headache than the mistake made with a simple commit. Unfortunately, merge errors are far from uncommon, because in the first place, several parental branches have merges. Even when analyzing the history of the merging of branches, it is very difficult to understand what changes were made to resolve the conflict. Secondly, the abolition of an unsuccessful merger can turn into a big headache. Thirdly, most of the merge conflicts occur when working with someone else's code, because the very concept of branches implies a lot of users, i.e. far from always the merging is made by the same person who worked with one or another branch. The bottom line is making a mistake when merging is very easy, it is difficult to fix and difficult to find. Thus, the time spent on learning and understanding the process of merging the branches will pay off with interest.
Surprisingly, I found that many of the tools and interfaces available to perform merges are not well equipped to effectively complete this process. Often, the programmer simply hopes that the git merge team will do all the work for it. But when a conflict does occur, usually the merging strategy consists in a quick scan of the code around the conflict line, and intuitively guessing what exactly this piece of code is preferable to the other.
In this article, I hope to demonstrate that the conflict resolution process can be step-by-step accurate, which eliminates the need to guess anything there.
Blue Roses (Roses are Blue)
Let's assume that your team was assigned to write poems in a repository set aside for this purpose. (What a nightmare!) And you have been entrusted with the most important thing - to merge the latest fixes from the master branch into the beta branch. So, you switch to the beta branch and run the following command:
$ git merge master Auto-merging roses.txt CONFLICT (content): Merge conflict in roses.txt Automatic merge failed; fix conflicts and then commit the result. Wow, this is a conflict. You decide to view the file referenced by git:
$ cat roses.txt <<<<<<< HEAD roses are #ff0000 violets are #0000ff all my base are belong to you ======= Roses are red, Violets are blue, All of my base Are belong to you. >>>>>>> master (Listing 1) Wonderful! The whole file, as shown by Listing 1, is in a conflict state. What variant of the file is more correct? Both options look correct. The upper version is written in hacker-style with elements of color coding in the style of HTML and using only lowercase letters. The lower version looks more natural, using punctuation and capital letters.
If this was your project, you could just choose one option and end this merger. But the problem is that this is not your poem, you have never read this poem before, you were not responsible for writing or editing, and you understand perfectly well that in case of an inappropriate decision, someone’s hard work may sink into oblivion. However, you are still appointed responsible for the merger of these branches. What do you do?
Back to Base
The trick is that Listing 1 does not give you all the information you need to complete the correct merge. In fact, four important pieces of information (states) are involved in the merger process, three of which are simply necessary for a successful resolution of the conflict. In the case of Listing 1, Git provided you with only two states.
The following diagram illustrates these four states:
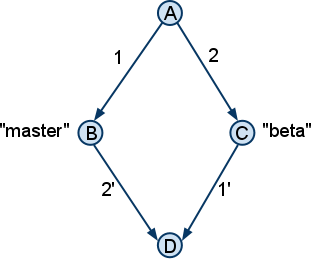
The states (B) and © refer to the current positions (head) of the master and beta branches, respectively, these two states are exactly reflected in Listing 1. State (D) is the result of the merge, what you ultimately want to get / generate ( in most cases, Git automatically generates a state (D)). The state (A) at the very top represents the base (base) of the merging of the master and beta branches. The merge base (A) is the last common ancestor of the master and beta branches, and for the time being we assume that this merge base is unique. As we will see later, state (A) plays a key role in conflict resolution. In the diagram, I also reflected the deltas 1 and 2, which represent the changes between the states (A) - (B) and (A) - ©, respectively. Knowing the states (A), (B) and © deltas 1 and 2 can be easily obtained (calculated). Note that deltas 1 and 2 can consist of more than one commit. But for our purposes, we will assume that all deltas are monolithic.
To understand how to get state (D), you need to understand what the merge operation is trying to do. State (D) must be a combination of changes made to the master and beta branches, respectively. Those. in other words, the combination of deltas 1 and 2. The idea is simple on the surface and most of the time does not require human intervention, except in special cases when deltas affect layered (intersecting) parts of the file. In such a situation, you need to help the machine generate the result (D), by comparing the deltas 1 and 2.
Identifying the Differences
In order to find the changes made to each branch, you need to know what the merge base looks like, state (A). The easiest way to get information about a merge database is to set the merge.conflictstyle option to diff3
$ git config merge.conflictstyle diff3 After enabling this option, try to re-do the merge (git reset --hard; git merge master) and inspect the conflicting file again:
$ cat roses.txt <<<<<<< HEAD roses are #ff0000 violets are #0000ff all my base are belong to you ||||||| roses are red violets are blue all my base are belong to you ======= Roses are red, Violets are blue, All of my base Are belong to you. >>>>>>> master (Listing 2) Now we see the third fragment in the middle, which is the base of the merge or state (A). The changes are clearly visible: in the beta (HEAD) branch, the human color names were replaced with HTML codes, and capitalization and punctuation were added to the master branch. Based on this knowledge, we now know that the result should include capitalization, punctuation and HTML color codes.
In principle, this could be finished, because the result has been achieved. But there is a better solution.
Graphic Merge (GUI Merging)
Although a simple textual representation of a merge conflict does its job in simple cases, in practice conflicts can be more radical and complex. In such cases, graphic tools can help. I chose a simple tool written in Python under the name meld , but any other graphical tool that can present a merge in three-column form may be appropriate.
To use the graphical tool (it must be installed), after git complained that there is a conflict, enter the following command:
$ git mergetool The next question is which merge program you would like to use, just type meld and press Enter. Here's how the program window might look like (implying the merge.conflictstyle option was not included):
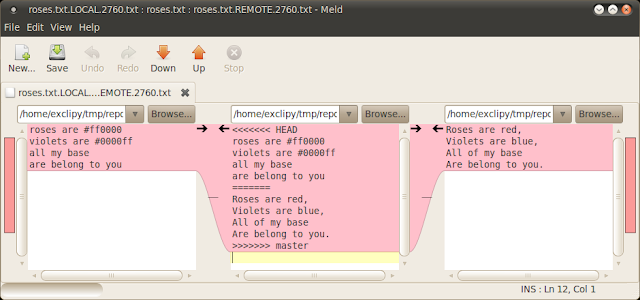
Despite the fact that the information is presented side by side, it does not display the necessary fragments that were in Listing 2. We do not see here a fragment of the merge base (state (A)), what we see is the file roses.txt.LOCAL.2760.txt in the left column and the file roses.txt.REMOTE.2760.txt in the right column and the file in the middle is an unfortunate merge. Those. in fact, we were presented with states (B), © and a failed state (D), but state (A) is absent ...
Really absent? Let's check in the good old terminal:
$ ls -1 roses.txt roses.txt.BACKUP.2760.txt roses.txt.BASE.2760.txt roses.txt.LOCAL.2760.txt roses.txt.REMOTE.2760.txt See the file we are interested in: roses.txt.BASE.2760.txt. This is the merge base file. Now we just have to find the changes made to the master and beta branches with respect to the database. We can do this with two separate meld calls:
$ meld roses.txt.LOCAL.2760.txt roses.txt.BASE.2760 & $ meld roses.txt.BASE.2760 roses.txt.REMOTE.2760.txt & (Someone may notice that it would be more reasonable to change the order of the arguments in the first call, so that the base file is in the left column in both cases, but this order preserves the similarity of the three-column view, in which the base remains in the middle. ) Result of execution - two windows as shown below:

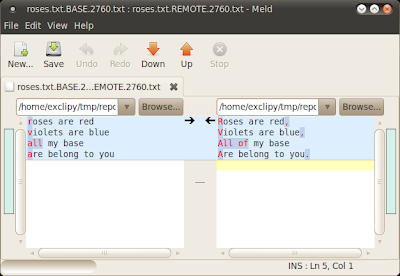
When reading the first window from right to left and the second window from left to right, it becomes clear as the day what changes have occurred in each branch. Since the meld has kindly highlighted all the changes, it is now almost impossible to skip even the very small edits (Has anyone noticed the addition of the preposition "of" when viewing the textual representation of conflict resolution Listing 1 or even Listing 2?)
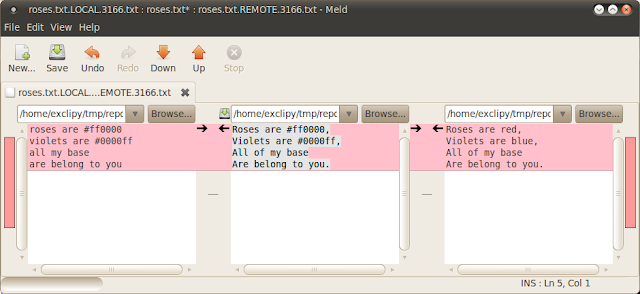
Armed with this knowledge, we can now return to the three-column view and make changes. My manual merge strategy is to take all the text from a branch with more significant changes (in this case, master / REMOTE, ie beta), and make step changes on top of it, i.e. make changes made to another branch (master). Here's what happened:
And now all together (All Together Now)
I hope you find this three-window conflict resolution method as helpful as I find it. But agree that it is not very convenient to start new calls meld manually every time you resolve conflicts. The solution is to configure git so that all three windows open automatically when you invoke the git mergetool command. To do this, you can create an executable script that must be in the PATH environment variable (for example, $ HOME / bin / gitmerge), with the following contents:
#!/bin/sh meld $2 $1 & sleep 0.5 meld $1 $3 & sleep 0.5 meld $2 $4 $3 And add the following to your ~ / .gitconfig file:
[merge] tool = mymeld [mergetool "mymeld"] cmd = $HOME/bin/gitmerge $BASE $LOCAL $REMOTE $MERGED Now, the next time you run the git mergetool command to resolve the conflict, all three windows will open:
BASE LOCAL BASE REMOTE - After you get used to this conflict resolution using the three windows mentioned above, you will most likely find that the process has become more methodical and mechanical. In most cases, you don’t even have to read and understand the pieces of code from each branch in order to understand which option to apply to the merge. You no longer need to guess, because you will be much more confident in the correctness of your commit. Because of this confidence, there will be a feeling that conflict resolution has become a fascinating activity.
Translator Bonus
For those who use tmux and n? Vim, I suggest the following gitmerge script:
#!/bin/sh sn=gitmerge tmux new-session -d -s "$sn" -n "diff3" "nvim -d $2 $4 $3" tmux split-window -t "$sn:1" -v "nvim -d $2 $1" tmux split-window -t "$sn:1" -h "nvim -d $1 $3" Note : if you do not use this option in your ~ / .tmux.conf, then you need to change in the last two lines "$sn:1" to "$sn:0"
Accordingly, add the following to your ~ / .gitconfig
[mergetool "gitmerge"] cmd = $HOME/bin/gitmerge \"$BASE\" \"$LOCAL\" \"$REMOTE\" \"$MERGED\" [merge] tool = gitmerge Vorkflou conflict resolution will look like this:

For now, ignore the question (Was the merge successful [y / n]?) And switch to a session called gitmerge (a combination of TMUXPREFIX + s):

We see our three-window view on one screen. Numbers indicate splits (panes) tmux'a, letters corresponding states. Making edits to resolve the conflict, i.e. edit the state (D) and save. After that, we go back to the original tmux session and confirm that the merge was successful.

git rebase master
Personally, I prefer and consider it more correct to do rebase master first in the beta branch, and only after that switch to master and do git merge beta. In principle, a workflow is not much different, with the exception of the three-window view.

Switch to gitmerge session
Note that the states (B) and © swap places:

I recommend everyone to play with the example of the repository at least once, to make the resolution of the conflict according to the above scheme. Personally, I no longer wonder what to choose "Accept theirs" or "Accept yours".
')
Source: https://habr.com/ru/post/323234/
All Articles