How to write your own program for the controller ROBO TX
Good day! Today I will share the experience of developing a program for the ROBO TX controller from the German company Fischertechnik. It is possible that at the moment it is not a top model, however, the basic principles that I am going to describe below may be useful for young developers who will encounter controllers from this manufacturer.
This controller is mainly designed to construct simple robots for learning. Included is a graphical programming environment that helps lay simple algorithms into it. Also, the guys from the Russian office of Fischertechnik suggested that there is a dynamic library with API from the creators, which provides full control and allows you to solve the required tasks more flexibly by developing your own software, which is exactly what happened in my case.
Earlier, when I was studying, I worked in the CTPO “Intellectual Robots” on the basis of the MGUPI Institute. The center was engaged in the preparation of applicants and high school students in the field of robotics. And Andrei Nazarovich Budnyak, who headed it at that time, proposed to create a program for this controller, which would allow controlling the robot in real time. There was also an interesting option to control this controller via Bluetooth, in order to get a kind of control panel like a radio typewriter.
To solve the problem, it was necessary to study the documentation that came with the library. Fortunately, it is quite informative.
')
It turned out that the controller has two modes:
We are interested in the second. It is divided into several stages:
As it turned out, in the case of a Bluetooth connection, this mechanism is the same and at the program level does not differ at all. The only task in advance to raise the COM port via Bluetooth.
When developing I used the OOP approach. For this kind and scale of the task, it is not too necessary and in some places, I would even say, redundant. However, it allows to decompose the structure of the program in the form of components for easier understanding by an outsider. In addition, this article is aimed at novice programmers, and it is useful for them to get used to just such a key.
All source code with comments is posted on Github as a draft for QT. Here I will describe the key points on it.
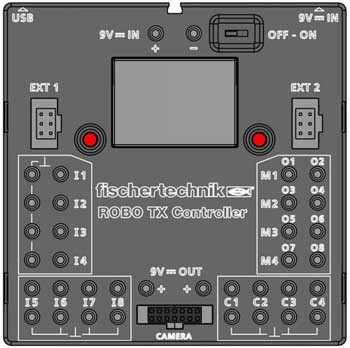
The controller has 8 pins for connecting 4 motors (M1-M4). Our task when pressing / releasing a key is to give a signal to the controller, which will enable / disable a certain motor.
We will need a list of keys in which we save the key code and the corresponding motor number. But that's not all. The ROBO TX contacts are capable of producing pulse-width modulated (PWM) pulses for adjusting the speed of rotation of the motors. The adjustment range is from 1 to 512. This means that the smaller the number, the less often the voltage is applied, which always has the same value (12V). There is still a direction of rotation. And in addition, the controllers are able to unite into groups using loops up to 9 at a time (1 master and 8 additional).
We summarize and at the same time, for quick understanding, we look at the final interface of the key parameter input form:
Having the list, we will be able to find it when you press a key with a certain code, determine which parameters are passed to the controller, and send them. That's all in general.
To store the button state in memory, I used the following structure:
The method from the ftMscLib.dll dynamic library, which transfers parameters to a specific motor, is called setOutPwmValues .
Takes 4 parameters:
The program’s functionality was broken down into the following components implemented by individual classes:
Returning to the stages that were listed at the beginning.
All the key work, in principle, is done for us by the ftMscLib.dll library. It is only important for us to wrap it in a convenient shell and adapt it to our needs.
This development was useful on the forum of robots in 2012 in the competition "Difficult road". With the help of it, the robot was monitored in real time.
All sources, release and the library itself are posted here . If you wish, you can make your own changes and improvements. Thank you all for your attention and have a nice day!
→ German Site Fischertechnik
→ Russian Site Fischertechnik
→ Site of the Russian community Fischertechnik
→ Archive with the library, documentation and examples from the German site Fischertechnik
Special thanks to Andrei Nazarovich Budnyak for help with writing this article.
ROBO TX Controller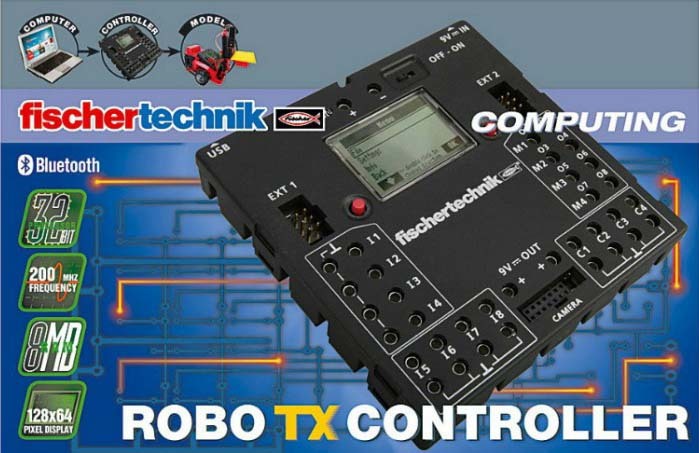
This controller is mainly designed to construct simple robots for learning. Included is a graphical programming environment that helps lay simple algorithms into it. Also, the guys from the Russian office of Fischertechnik suggested that there is a dynamic library with API from the creators, which provides full control and allows you to solve the required tasks more flexibly by developing your own software, which is exactly what happened in my case.
Earlier, when I was studying, I worked in the CTPO “Intellectual Robots” on the basis of the MGUPI Institute. The center was engaged in the preparation of applicants and high school students in the field of robotics. And Andrei Nazarovich Budnyak, who headed it at that time, proposed to create a program for this controller, which would allow controlling the robot in real time. There was also an interesting option to control this controller via Bluetooth, in order to get a kind of control panel like a radio typewriter.
To solve the problem, it was necessary to study the documentation that came with the library. Fortunately, it is quite informative.
')
It turned out that the controller has two modes:
- Firmware controller program in advance (using developer software).
- Connecting to the controller from a computer via a COM port and sending him commands in real time.
We are interested in the second. It is divided into several stages:
- Search for available COM ports
- Connection via a specific COM port
- Launch Transfer Area (protocol of communication between the controller and computer)
- Transmit Required Commands
- Finishing Transfer Area
- Close COM port
As it turned out, in the case of a Bluetooth connection, this mechanism is the same and at the program level does not differ at all. The only task in advance to raise the COM port via Bluetooth.
When developing I used the OOP approach. For this kind and scale of the task, it is not too necessary and in some places, I would even say, redundant. However, it allows to decompose the structure of the program in the form of components for easier understanding by an outsider. In addition, this article is aimed at novice programmers, and it is useful for them to get used to just such a key.
All source code with comments is posted on Github as a draft for QT. Here I will describe the key points on it.
Formulation of the problem
The controller has 8 pins for connecting 4 motors (M1-M4). Our task when pressing / releasing a key is to give a signal to the controller, which will enable / disable a certain motor.
We will need a list of keys in which we save the key code and the corresponding motor number. But that's not all. The ROBO TX contacts are capable of producing pulse-width modulated (PWM) pulses for adjusting the speed of rotation of the motors. The adjustment range is from 1 to 512. This means that the smaller the number, the less often the voltage is applied, which always has the same value (12V). There is still a direction of rotation. And in addition, the controllers are able to unite into groups using loops up to 9 at a time (1 master and 8 additional).
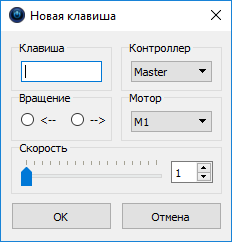
We summarize and at the same time, for quick understanding, we look at the final interface of the key parameter input form:
- Key code
- Controller number
- Engine number
- Direction of rotation
- Speed
Having the list, we will be able to find it when you press a key with a certain code, determine which parameters are passed to the controller, and send them. That's all in general.
Implementation
To store the button state in memory, I used the following structure:
struct Button { QString name; int code; int controller; int motor; bool direction; int speed; }; The method from the ftMscLib.dll dynamic library, which transfers parameters to a specific motor, is called setOutPwmValues .
Takes 4 parameters:
- COM port connection identifier
- Controller number (0 - main, 1-8 connectable)
- Contact number (1-8), but in our case this is the number of the motor (1-4) * 2 + direction (0-1)
- Pulse Density (0-512)
The program’s functionality was broken down into the following components implemented by individual classes:
- LibLoader - is responsible for connecting the ftMscLib.dll dynamic library.
- Connector - is responsible for connecting to the controller.
- ontroller - is responsible for controlling the controller motors depending on the list of keys and encapsulates it.
- FileManager - is responsible for uploading / loading a list of keys to / from a file.
Stages of interaction with the controller.
Returning to the stages that were listed at the beginning.
1. Search for available COM ports
Connector::Connector() { // found = false; connected = false; started = false; } // bool Connector::searchCom() { ports.clear(); char *portName = new char[256]; for (int i=0;i<libLoader.getAvailableComPorts(0);i++) { libLoader.enumComPorts(i,portName,256); ports.push_back(QString::fromLocal8Bit(portName)); } return found = ports.size()>0 || debug; } 2. Connection via a specific COM port
// bool Connector::openCom(char* comPortName) { DWORD errCode = FTLIB_ERR_SUCCESS; fthdl = libLoader.ftxOpenComDevice(comPortName, 38400, &errCode); if (errCode==FTLIB_ERR_SUCCESS || debug) connected = true; return connected; } 3. Launch Transfer Area
// (Transfer Area) [ ] bool Connector::startTA() { if (libLoader.ftxStartTransferArea(fthdl)==FTLIB_ERR_SUCCESS || debug) { started = true; } return started; } 4. Transfer of required commands
void Controller::exec(int buttonKey, bool pressed) // { if (connector.getStarted()) { // for (int i=0;i<getButtons().size();i++) { // if (buttonKey==getButtons()[i].code) { // libLoader.setOutPwmValues( // , ( ) connector.fthdl, getButtons()[i].controller, getButtons()[i].motor * 2 + (getButtons()[i].direction ? 1 : 0), getMemorySpeed(getButtons()[i], pressed) ); } } } } It is worth saying a few words about the getMemorySpeed method. This is a kind of buffer of clamped keys. It was added in order not to forget the order of the clamped keys belonging to the same motor, but transmitting different speeds. Returns the speed of the last key pressed for the current motor, if any. Otherwise, it stops the motor, returning 0.5. Completion of Transfer Area
// (Transfer Area) [ ] bool Connector::stopTA() { if (libLoader.ftxStopTransferArea(fthdl)==FTLIB_ERR_SUCCESS || debug) { started = false; } return !started; } 6. Close COM port
// bool Connector::closeCom() { if (libLoader.ftxCloseDevice(fthdl)==FTLIB_ERR_SUCCESS || debug) { started = false; connected = false; } return !connected; } All the key work, in principle, is done for us by the ftMscLib.dll library. It is only important for us to wrap it in a convenient shell and adapt it to our needs.
This development was useful on the forum of robots in 2012 in the competition "Difficult road". With the help of it, the robot was monitored in real time.
All sources, release and the library itself are posted here . If you wish, you can make your own changes and improvements. Thank you all for your attention and have a nice day!
→ German Site Fischertechnik
→ Russian Site Fischertechnik
→ Site of the Russian community Fischertechnik
→ Archive with the library, documentation and examples from the German site Fischertechnik
Special thanks to Andrei Nazarovich Budnyak for help with writing this article.
Source: https://habr.com/ru/post/323168/
All Articles