Protect a remote terminal server or two-factor authentication of RDG clients using Azure MFA
The realities of the countries where most habrovchan people live are such that keeping servers with important information outside the country of business has become a good tone, allowing you to save your nerves and data.
The first question that arises when moving to the cloud after data is encrypted, or maybe before it, is a guarantee that the data is accessed by the user account by the user, and not by someone else. And if a good way to encrypt data hosted in a private cloud is covered in an article by my colleague , then authentication is more complicated.
Pro users and methods of protection
The nature of a typical user is such that the preservation of passwords from user accounts is a rather frivolous attitude and cannot be corrected. Our experience shows that even if a company has strict policies, user training, etc., there will still be an unencrypted device that leaves the office, and looking through the list of products of one well-known company you understand that retrieving passwords from an unencrypted device is only a matter of time.
')
Some companies to establish access to data in the cloud establish tunnels between the cloud and the office, prohibit remote access https://habrahabr.ru/company/pc-administrator/blog/320016/ . In our opinion, this is not a completely optimal solution, firstly, some of the advantages of the cloud solution are lost, and secondly, there are performance problems noted in the article.
The solution using the terminal server and Remote Desktop Gateway (RDG) is more flexible, you can configure a high level of security, as described by my colleague https://habrahabr.ru/post/134860/ (2011 article, but the principle itself is still relevant) . This method allows you to prevent the transfer of data from the cloud, but imposes restrictions on the user's work and does not completely solve the authentication problem; rather, it is a DLP solution.
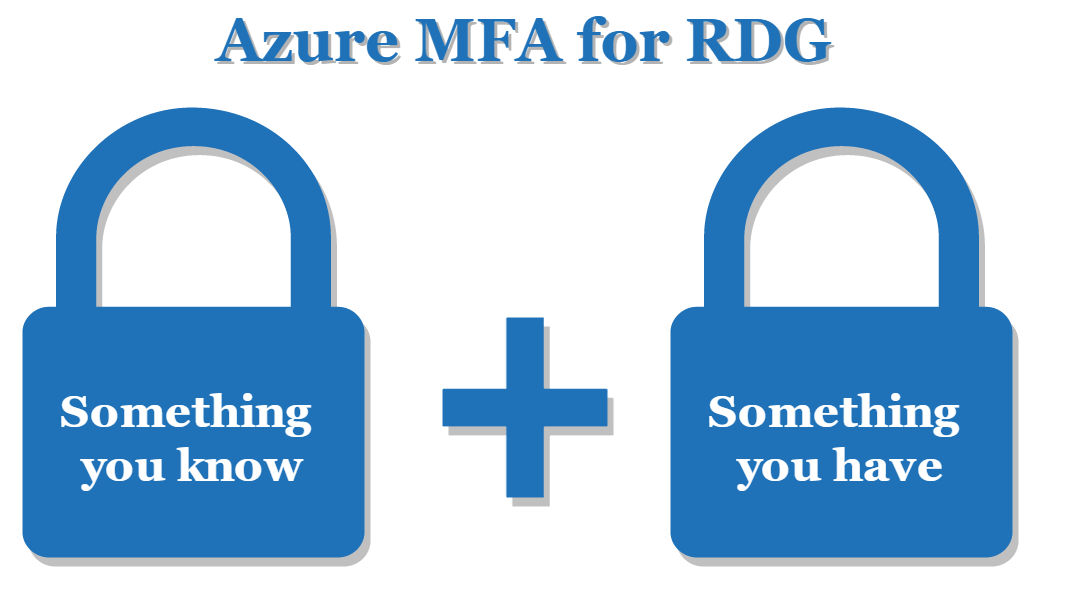
Perhaps the best way to ensure that an attacker does not work under a user account is two-factor authentication . The articles of my colleague https://habrahabr.ru/post/271259/ https://habrahabr.ru/post/271113/ describes how to configure MFA from Microsoft and Google for client VPN. The method is good, but, firstly, it requires the availability of CISCO ASA, which is not always easily realizable, especially in budget clouds, and secondly, work via VPN is inconvenient. Working with a terminal session via RDG is much more comfortable, and the SSL encryption protocol looks more versatile and reliable than VPN from CISCO.
There are many solutions with two-factor authentication on the terminal server itself, here is an example of setting up a free solution - http://servilon.ru/dvuhfaktornaya-autentifikaciya-otp/ . This solution, unfortunately, does not work through RDG.
')
Some companies to establish access to data in the cloud establish tunnels between the cloud and the office, prohibit remote access https://habrahabr.ru/company/pc-administrator/blog/320016/ . In our opinion, this is not a completely optimal solution, firstly, some of the advantages of the cloud solution are lost, and secondly, there are performance problems noted in the article.
The solution using the terminal server and Remote Desktop Gateway (RDG) is more flexible, you can configure a high level of security, as described by my colleague https://habrahabr.ru/post/134860/ (2011 article, but the principle itself is still relevant) . This method allows you to prevent the transfer of data from the cloud, but imposes restrictions on the user's work and does not completely solve the authentication problem; rather, it is a DLP solution.
Perhaps the best way to ensure that an attacker does not work under a user account is two-factor authentication . The articles of my colleague https://habrahabr.ru/post/271259/ https://habrahabr.ru/post/271113/ describes how to configure MFA from Microsoft and Google for client VPN. The method is good, but, firstly, it requires the availability of CISCO ASA, which is not always easily realizable, especially in budget clouds, and secondly, work via VPN is inconvenient. Working with a terminal session via RDG is much more comfortable, and the SSL encryption protocol looks more versatile and reliable than VPN from CISCO.
There are many solutions with two-factor authentication on the terminal server itself, here is an example of setting up a free solution - http://servilon.ru/dvuhfaktornaya-autentifikaciya-otp/ . This solution, unfortunately, does not work through RDG.
The benefits of Microsoft Azure Multi-Factor Authentication Server (MFAS) are described in the above article, so I’ll not bring them again, but let's start with the settings right away.
In order not to increase the volume of this article, we omit the initial installation and configuration of the RDG server, which authorizes users by login and password.
For clarity, here’s an authentication RDG request when using Azure MFA. The RDG server is running the Network Policy Server (NPS) role, which allows to forward Radius requests. The MFA server will be deployed in a separate virtual machine in the internal structure of the enterprise.
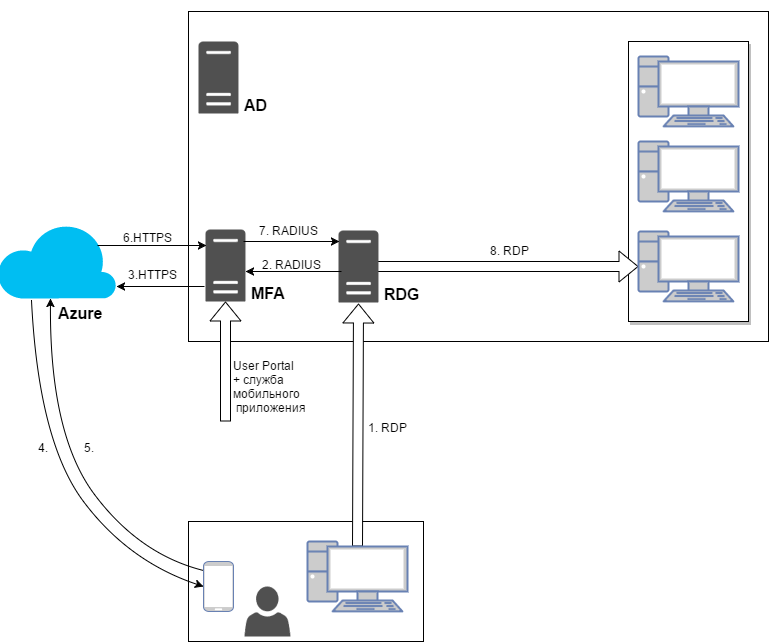
The RDG server asks for confirmation of authorization from the MFA server. MFA, depending on the chosen authentication method, calls, sends SMS or sends a request to the mobile application. The user confirms or rejects the request for access. The MFA returns the result of the second authentication factor to the RDG server.
Install and configure Azure Multi-Factor Authentication Server
Creating an authentication provider in the Microsoft Azure portal
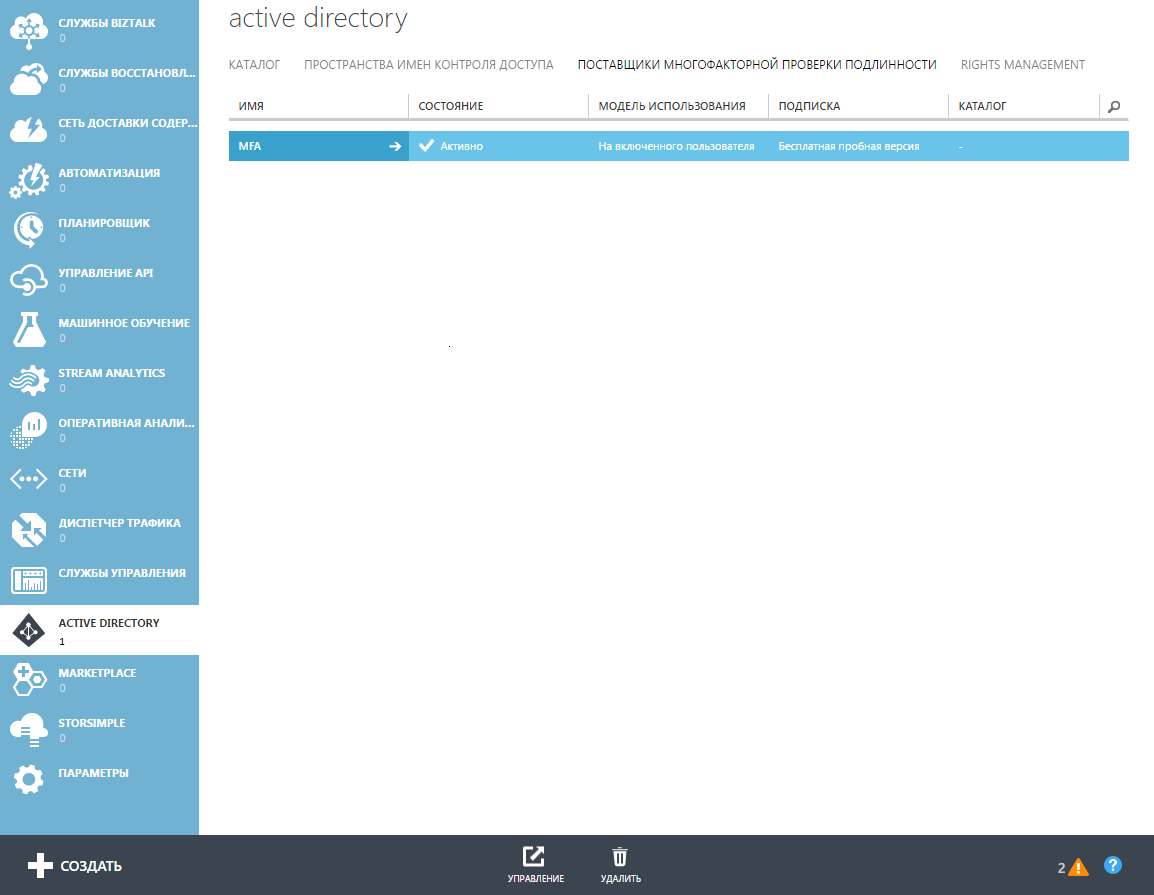
Go to Microsoft Azure (account must have a subscription or trial version installed) and find Multi-Factor Authentication (MFA).
At the moment, the MFA management is not added to the new version of the Azure portal, so the old version of the portal will open.
To create a new multifactor authentication provider, click “CREATE → Application Services → Active directory → Multifactor Authentication Provider → Quick Creation” at the bottom left. Specify the name and usage model.
The usage model depends on how the payment will be charged, either by the number of users, or by the number of authentications.

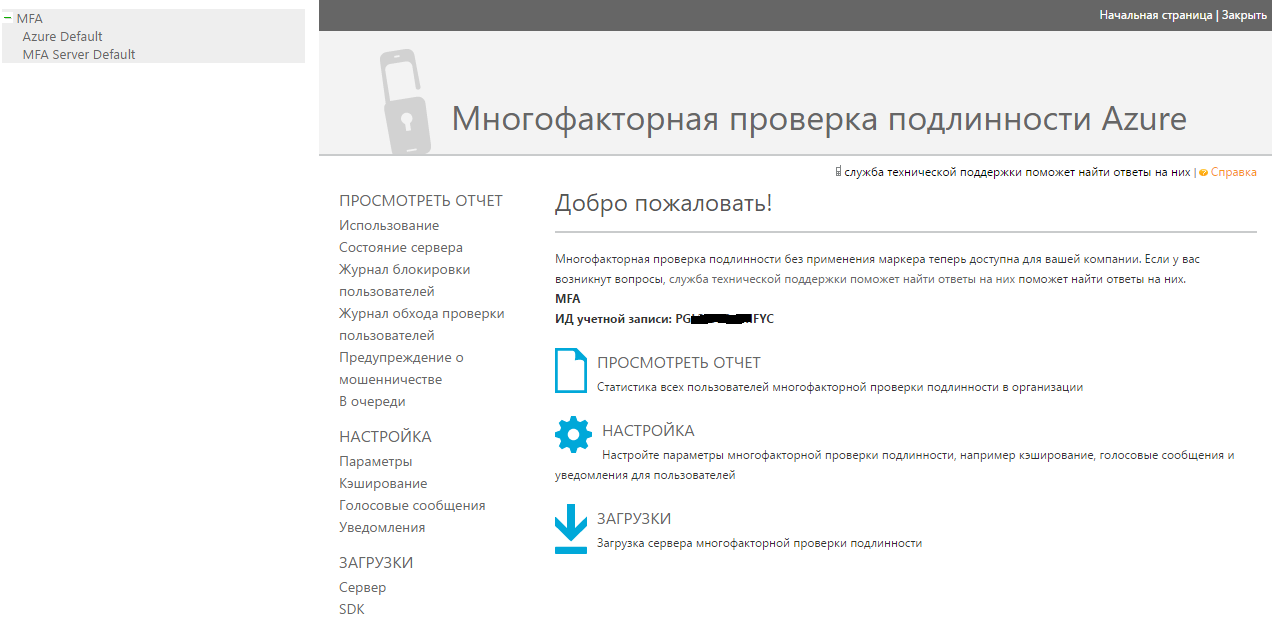
Once created, the MFA will appear in the list. Next, go to the management by clicking the appropriate button.
Go to download and download MFA server
Deploying MFA Server
Installing the MFA server is necessary on a virtual machine other than the RDG server. Operating systems older than Windows Server 2008 or Windows 7 are supported. Microsoft .NET Framework 4.0 is required.
The following addresses must be available on port 443:
Install the MFA server, when installing, we refuse the setup wizard.
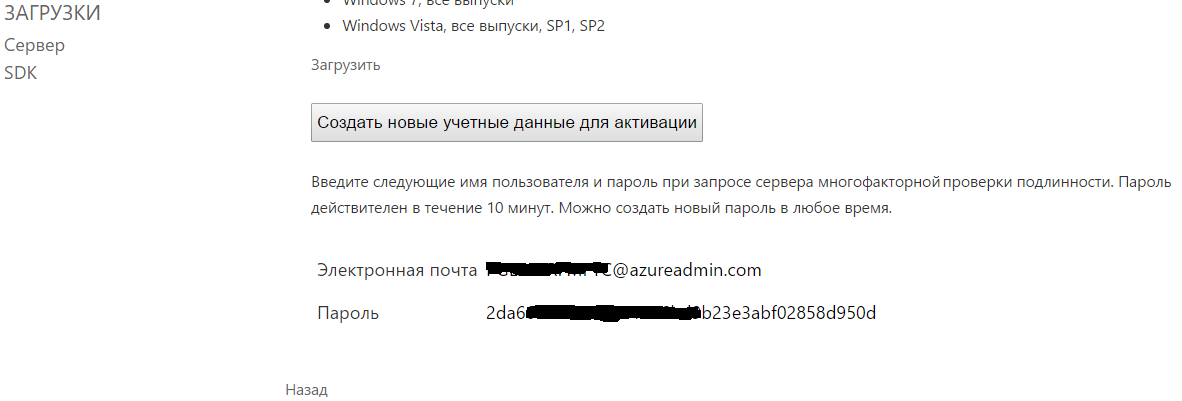
When you first start, you must enter the data from the account that must be generated on the server's boot page.
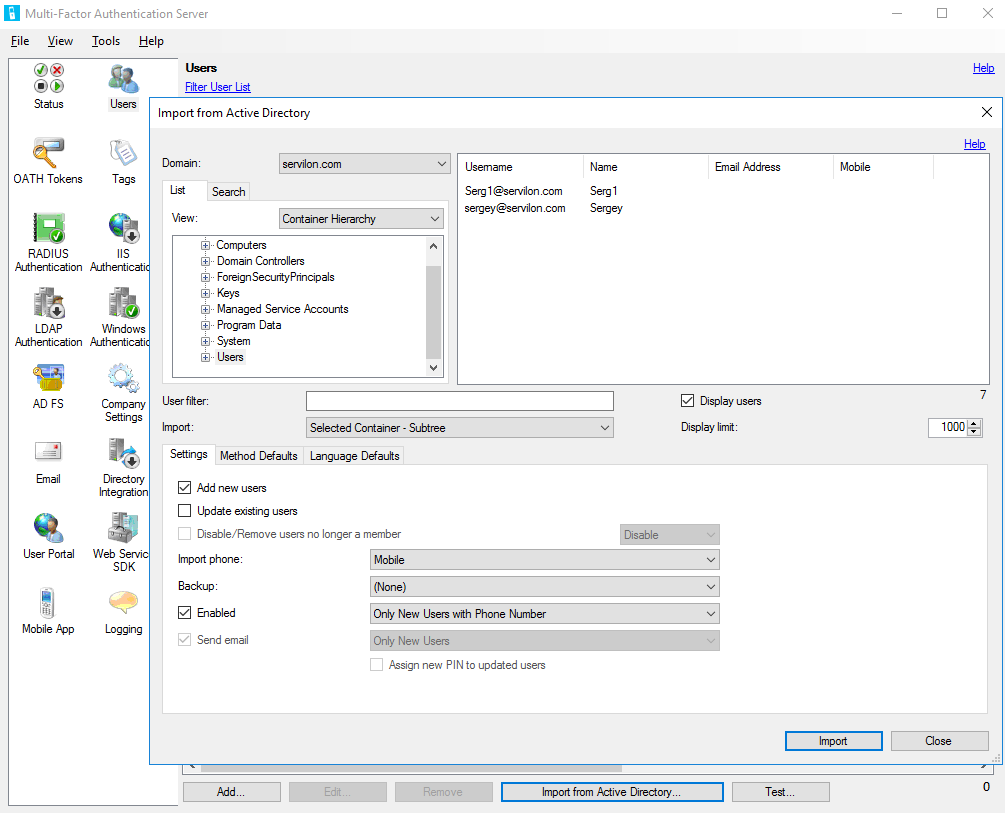
Next, add users. To do this, go to the Users section and click on Import from Active Directory, select the users to import.

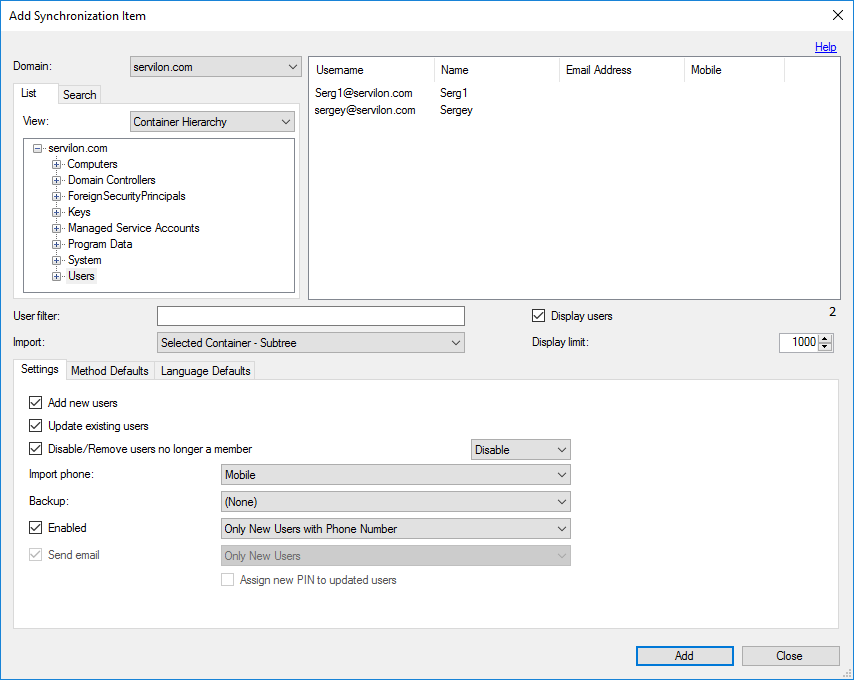
If necessary, you can configure the automatic addition of new users from AD:
“Directory Integration → Synchronization → Add”, and so on. Add a directory that will be automatically synchronized over the specified time interval.
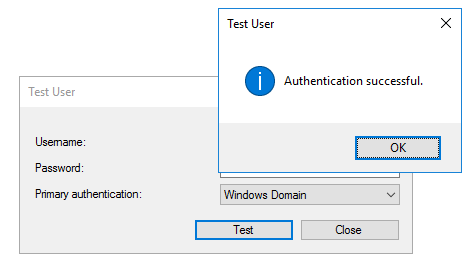
We will test the server MFA. Go to the Users section. For your account, specify the phone number (if not already set) and select the “Phone Ring” authentication method. Press the Test button and enter the login, password. A call should come to the phone. Answer it and press #.
Configuring the MFA server to work with Radius requests
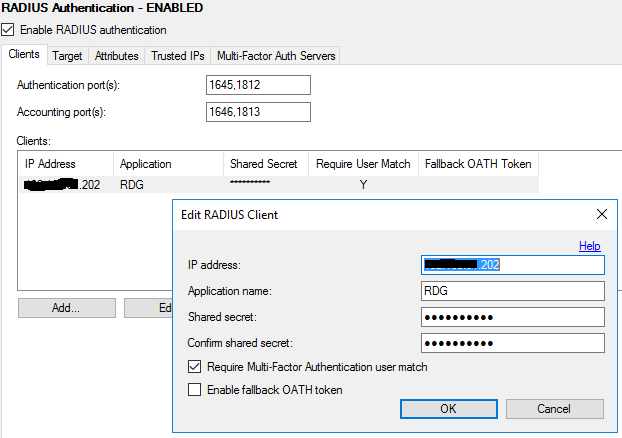
Go to the section Radius Authentication and put a tick "Enable RADIUS Authentication".
We add a new client, indicating the IP address of the NPS server and the shared secret key. If authentication is to be performed for all users, check the corresponding box (in this case, all users must be added to the MFA server).
It is also necessary to make sure that the ports specified for the connection correspond to the ports specified on the NPS server and are not blocked by the firewall.
Go to the Target tab and add the Radius server.
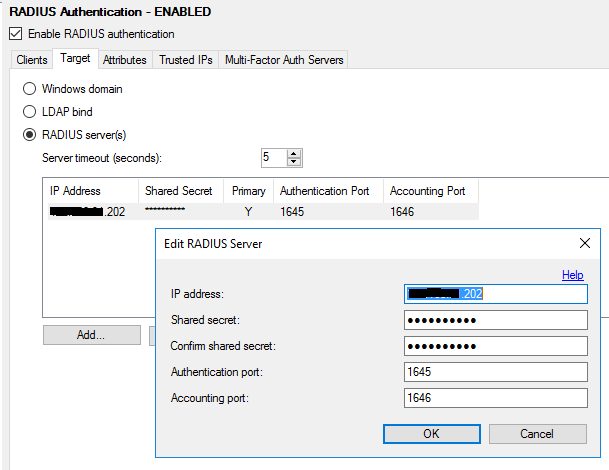
Note: If there is no central NPS server in the network, the Radius client and server IP addresses will be the same.
Configuring RDG and NPS server to work with MFA
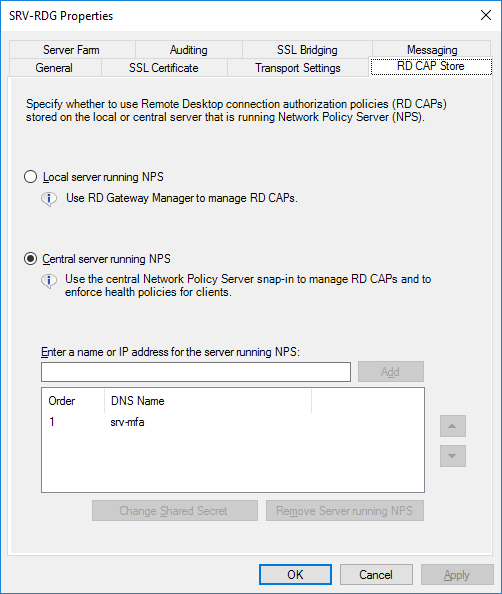
Remote Desktop Gateway must be configured to send requests to the MFA Radius server. To do this, open the gateway properties and go to the “RDG CAP Store” tab, select “NPS running on a central server” and specify the address of the MFA server and the shared secret key.
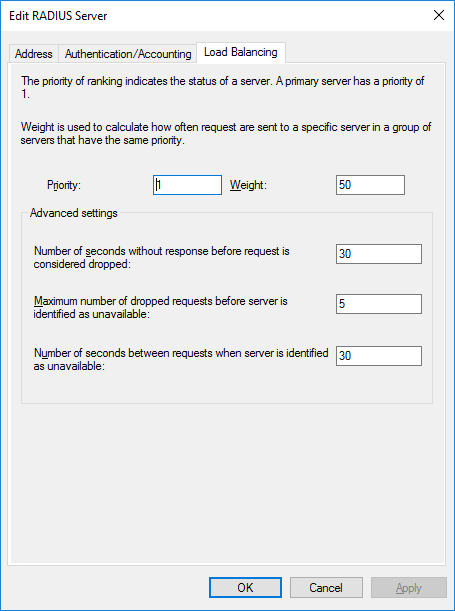
Next, configure the NPS server. Expand the section "Clients and Servers Radius → Remote Radius Server Groups". Open the properties of the group “TS gateway server group” (the group is created when configuring RDG) and add our MFA server.
When adding, on the tab "Load Balancing" we increase the server timeout limits. We set "The number of seconds without an answer, after which the request is considered to be dropped" and "The number of seconds between requests, after which the server is considered unavailable" in the range of 30-60 seconds.
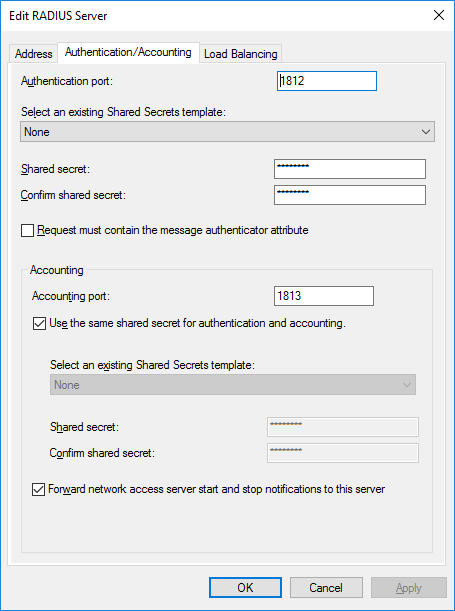
On the “Authentication / Accounting” tab, we check the correctness of the specified ports and set the shared secret key.
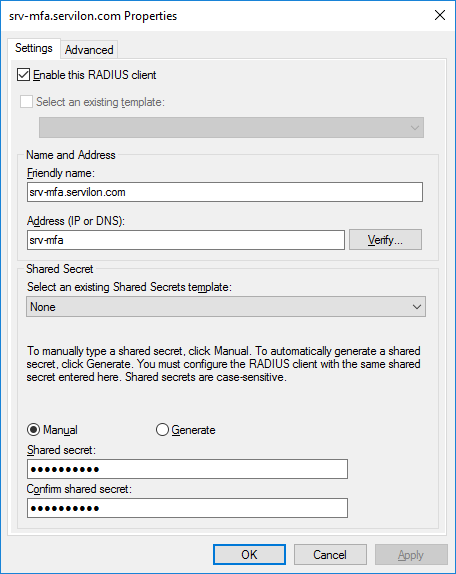
Now go to the section “Clients and Servers Radius → Clients Radius” and add the MFA server, specifying the “Friendly name”, address and shared secret.
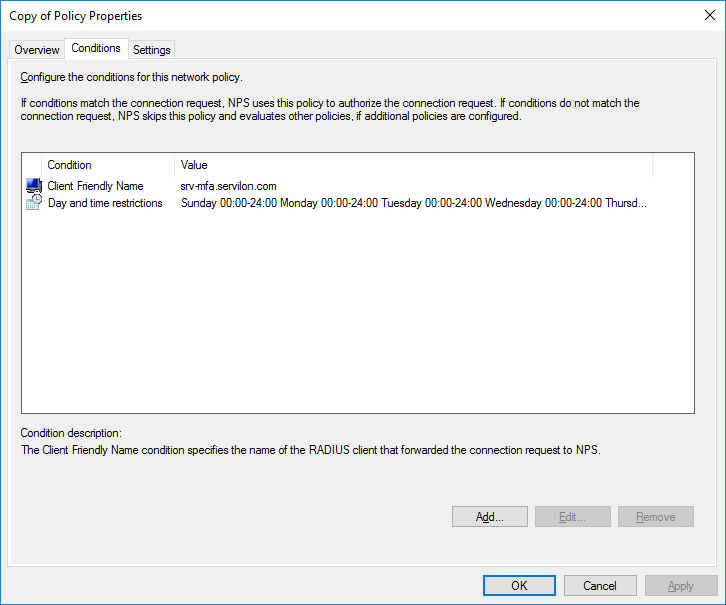
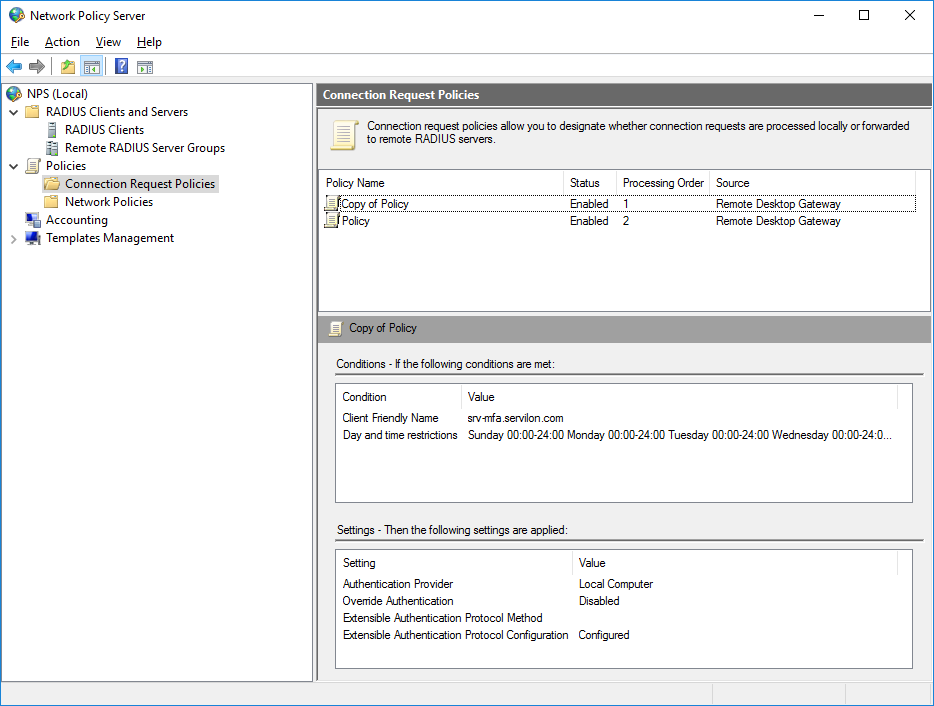
Go to the "Policies → Connection Request Policies" section. In this section there should be a policy created when configuring the RDG. This policy sends Radius requests to the MFA server.
Duplicate policy and go to its properties. Add a condition that matches the “Client Friendly Name” with the “Friendly name” specified in the previous step.
On the Settings tab, we change the authentication service provider to a local server.

This policy will ensure that when Radius receives a request from the MFA server, the request will be processed locally, which will eliminate the looping of requests.
We check that this policy is located above the original one.
At this stage, a bunch of RDG and MFA is in working condition. The following steps are necessary for those who need to be able to use authentication using a mobile application or to provide users with access to some multifactor authorization settings through a custom portal.
Install SDK, Mobile Application Web Services and Custom Portal
Connection to these components is made via the HTTPS protocol. Therefore, on the server where they will be deployed, you must install an SSL certificate.
The user portal and mobile app web service use the SDK to communicate with the MFA server.
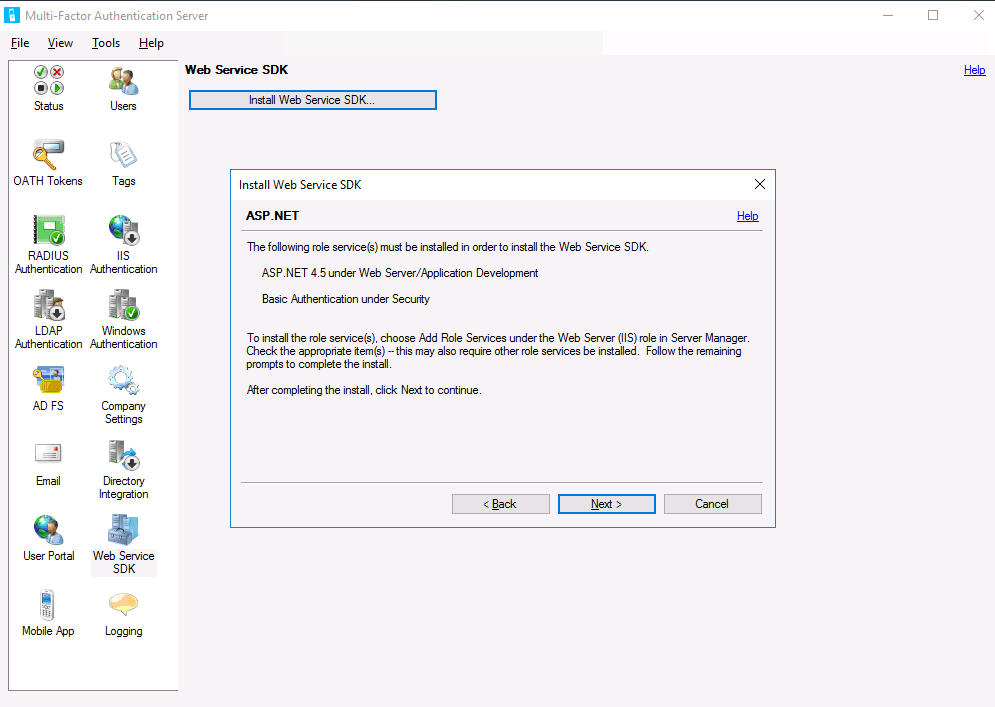
Install SDK
The SDK is installed on the MFA server and requires IIS, ASP.NET, Basic Authentication, which must be pre-installed using the Server Manager.
To install the SDK, go to the Web Service SDK section of the Multi-Factor Authentication Server and click the install button, follow the installation wizard.
Installing Mobile Application Web Service
This service is required for the mobile application to interact with the MFA server. For the service to work correctly, the computer to which it will be installed must have Internet access and port 443 is open for connection from the Internet.
The service installation file is located in the C: \ Program Files \ Azure Multi-Factor Authentication folder on the computer with the MFA installed. Run the installer and follow the installation wizard. For the convenience of users, you can replace the virtual directory name “MultiFactorAuthMobileAppWebService” with a shorter one.
After installation, go to the folder C: \ inetpub \ wwwroot \ MultiFactorAuthMobileAppWebService and change the file web.config . In this file, you need to set the keys WEB_SERVICE_SDK_AUTHENTICATION_USERNAME and WEB_SERVICE_SDK_AUTHENTICATION_PASSWORD , responsible for the account included in the security group PhoneFactor Admins. This account will be used to connect to the SDK.
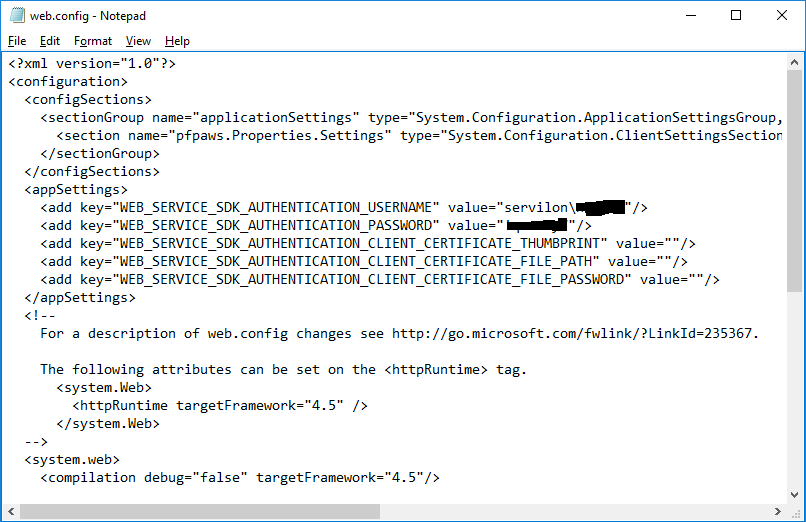
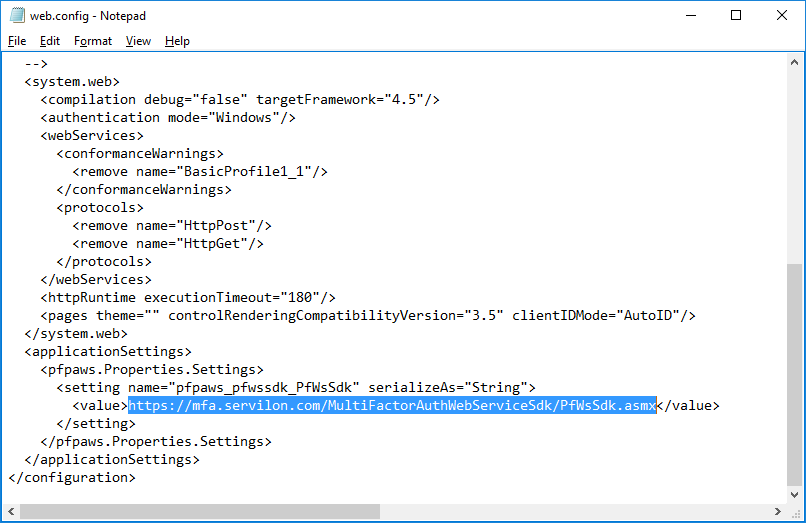
In the same file, you must specify the URL address where the SDK is available.
Note: The connection to the SDK is made using the SSL protocol, therefore, it is necessary to refer to the SDK by the server name (specified in the SSL certificate), and not by the IP address. If the call is made using a local name, you need to add a corresponding entry to the hosts file in order to use the SSL certificate.
Add the URL for which the mobile application web service is available to the Multi-Factor Authentication Server application in the Mobile App section. This is necessary to correctly generate the QR code in the user portal for connecting mobile applications.
Also in this section, you can tick the “Enable OATH tokens” checkbox, which allows using the mobile application as a Software token, to generate one-time passwords based on time.
Installing a custom portal
Installation requires IIS, ASP.NET and the IIS 6 meta base compatibility role (for IIS 7 or later).
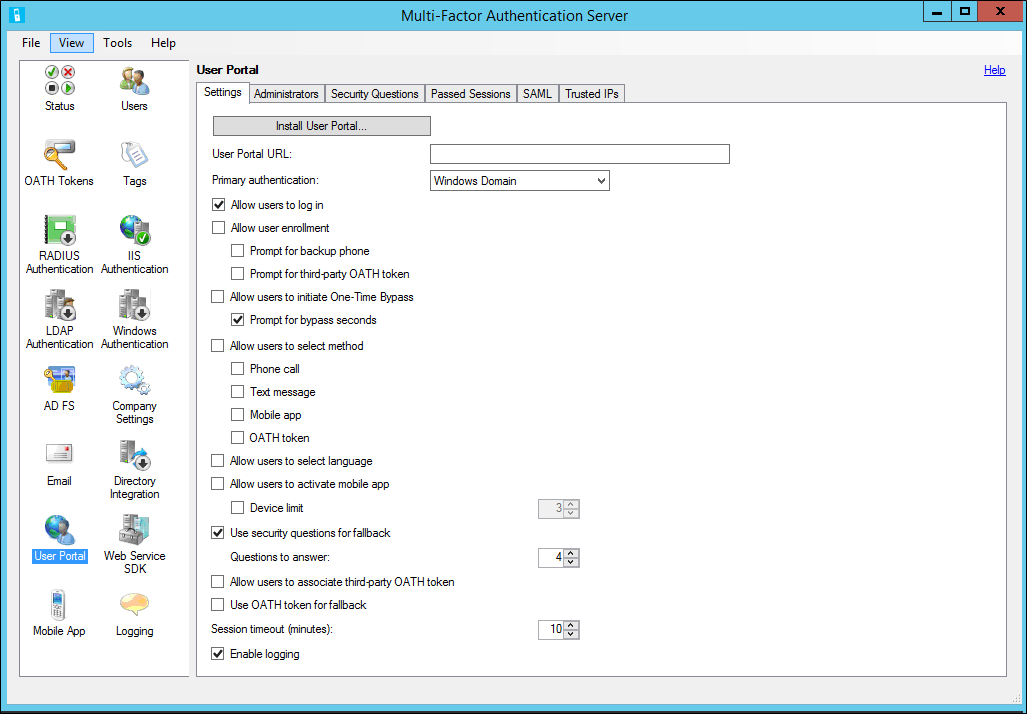
If the portal is installed on the MFA server, it is enough to go to the User Portal section in the Multi-Factor Authentication Server, click the install button and follow the installation wizard. If the computer is joined to a domain, then during installation a user will be created that is a member of the PhoneFactor Admins security group. This user is required to securely connect to the SDK.
When installing on a separate server, you must copy the installation file from the MFA server (the installation file is located in the C: \ Program Files \ Multi-Factor Authentication Server folder). Install and edit the web.config file in the location C: \ inetpub \ wwwroot \ MultiFactorAuth . In this file, you need to change the USE_WEB_SERVICE_SDK key from false to true. Specify the details of the account belonging to the PhoneFactor Admins group in the keys WEB_SERVICE_SDK_AUTHENTICATION_USERNAME and WEB_SERVICE_SDK_AUTHENTICATION_PASSWORD . And specify the URL address of the SDK service, not forgetting, if necessary, correct the hosts file so that the SSL protocol works.
Add a URL where the user portal is available in the Multi-Factor Authentication Server application in the User Portal section.
Showcase Azure MFA for RDG Connection Authentication
Consider the work of MFA will be from the user. In our case, the second authentication factor will be the mobile application, since the cellular network has a number of vulnerabilities, which, with proper training, intercept calls and SMS.
First of all, the user will need to log in to the user portal and enter his phone number (if not listed in AD) and link the mobile application to the account. We go to the portal under your account and enter the answers to secret questions (we will need them in case of restoration of access to the account).
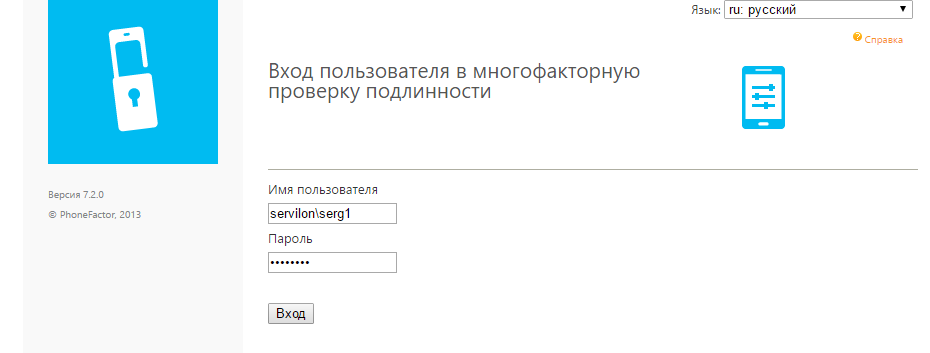
Next, select the authentication method, in our case, the mobile application and press the "Create activation code" button. A QR code will be generated, which must be scanned in a mobile application.
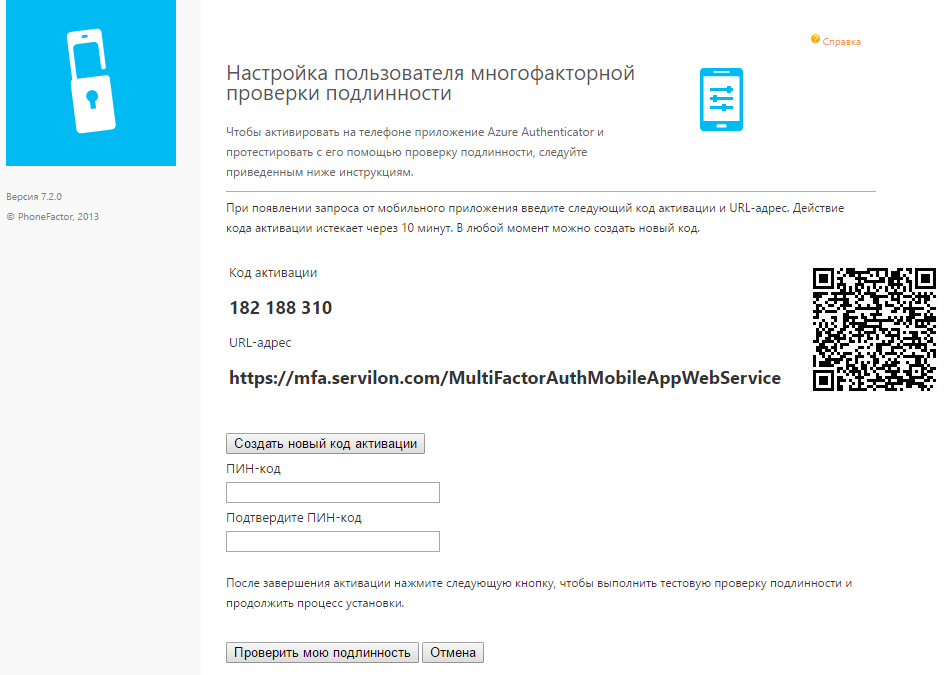
Since when importing users to the MFA server, authentication was provided using a PIN code, we will be asked to create it. Enter the desired PIN code and click "Verify my authenticity." In the mobile application, you must confirm the appeared request. After these actions, we have an application attached to the account and full access to the portal to change personal settings.
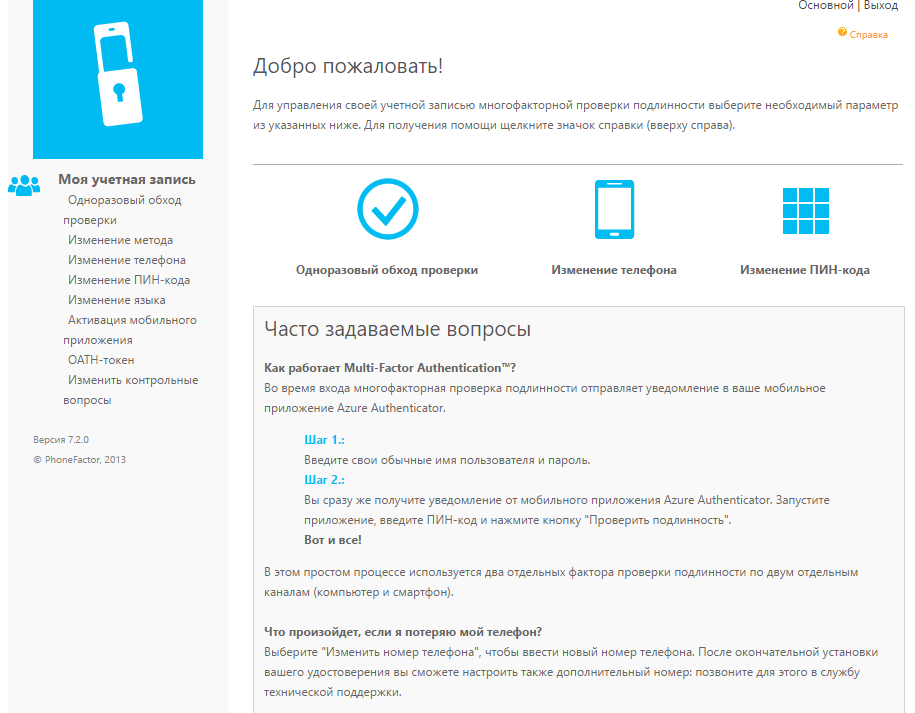
Note: The list of settings that a user can change through the portal is set by the administrator in the Multi-Factor Authentication Server application.
Next, consider connecting via RDG.
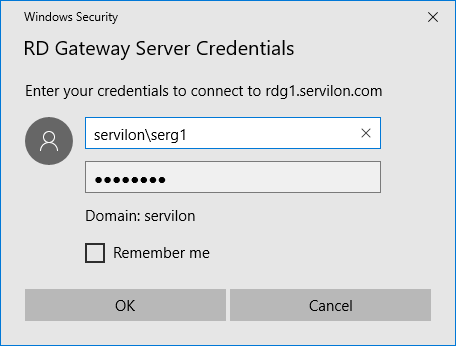
We create RDP connection, we specify our gateway and we are connected.

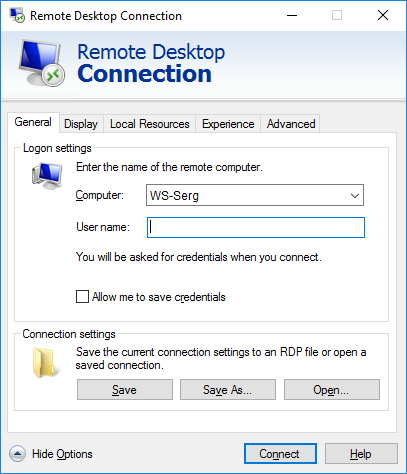
Enter the account information for authorization on the RDG server.
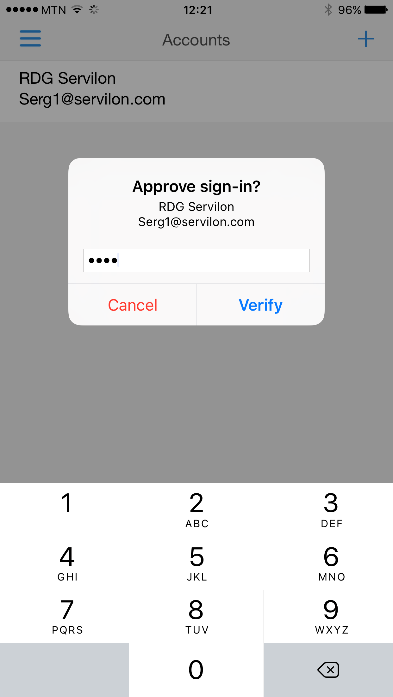
We confirm the request in the mobile application
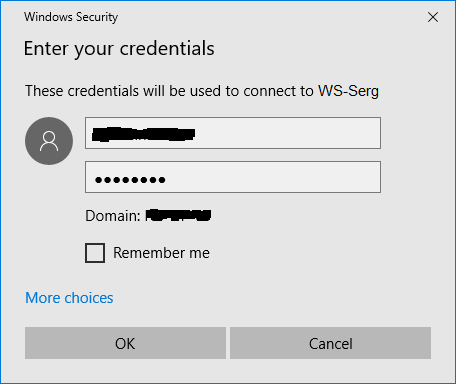
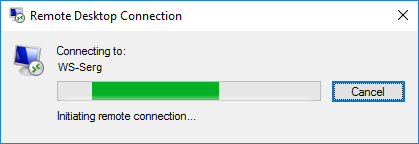
Enter the account information for authorization on the connected machine and wait for the connection.
Note: If the phone is equipped with a fingerprint sensor, the Authenticator application will offer to associate the PIN code with the fingerprint, in order to further confirm the authentication by simply touching the phone.
The authentication methods offered by Azure MFA:
Phone ring:
- pressing #
- enter PIN code and press #
SMS - you can use OTP or OTP + PIN:
- One-Way - the received code must be entered in the additional field during authorization
- Two-Way - the received code must be sent back by SMS
Mobile app:
- Simple confirmation
- You must enter the PIN code to confirm
OATH token - during authorization, you will need to enter a code from the token screen in the additional field. You can use a mobile application as a token.
SMS One-Way and OATH token methods are not universal, as they require an additional field to enter the code when authorizing.
In conclusion, we will talk about the MFA function, which allows you to monitor and defend against intruders trying to gain access without having the second authentication factor.
In the Azure portal in the MFA control panel, you can enable the feature that allows users to mark the incoming authentication request as fraudulent. It is also possible to automatically block the user upon receipt of this message and send an email notification to the support service.
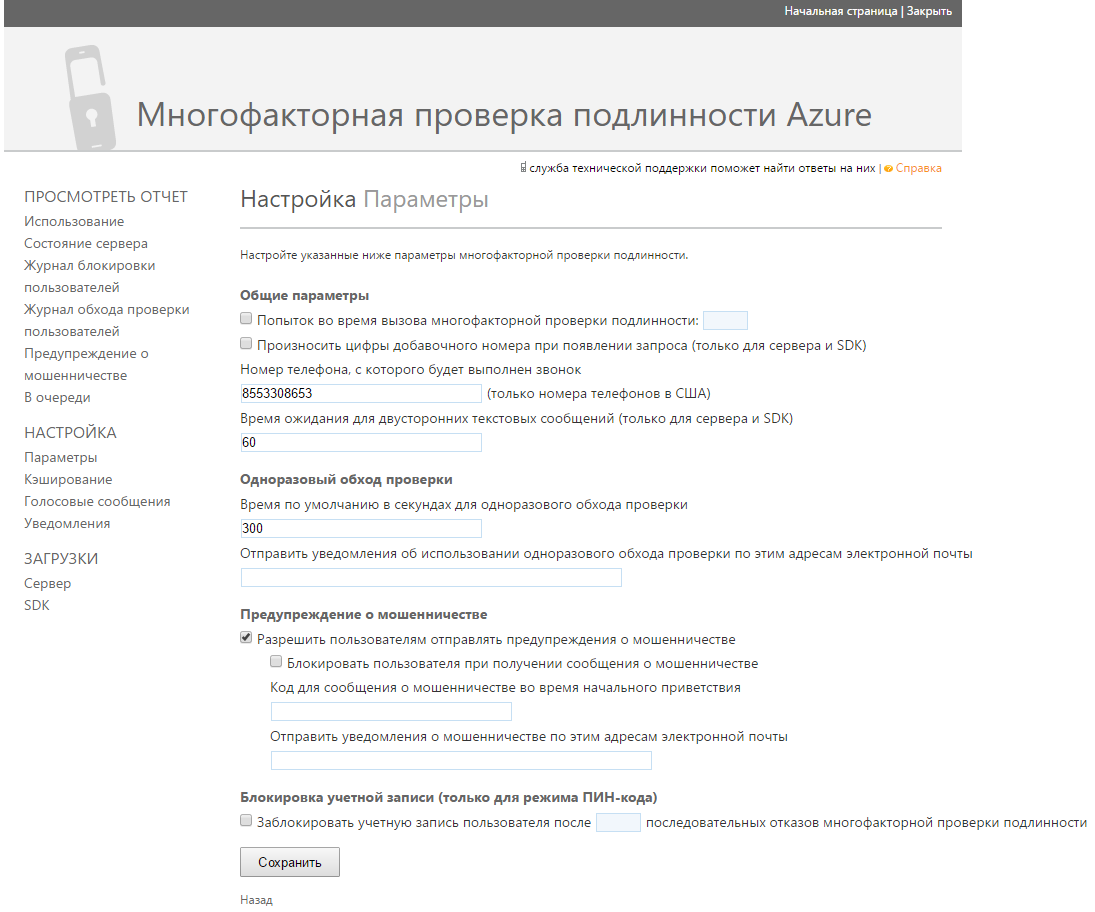
After this feature is enabled, users who have denied the authentication request will be shown a message asking them to notify the helpdesk about an illegitimate login attempt.


In the Azure MFA control panel there is a report displaying notifications of fraud:

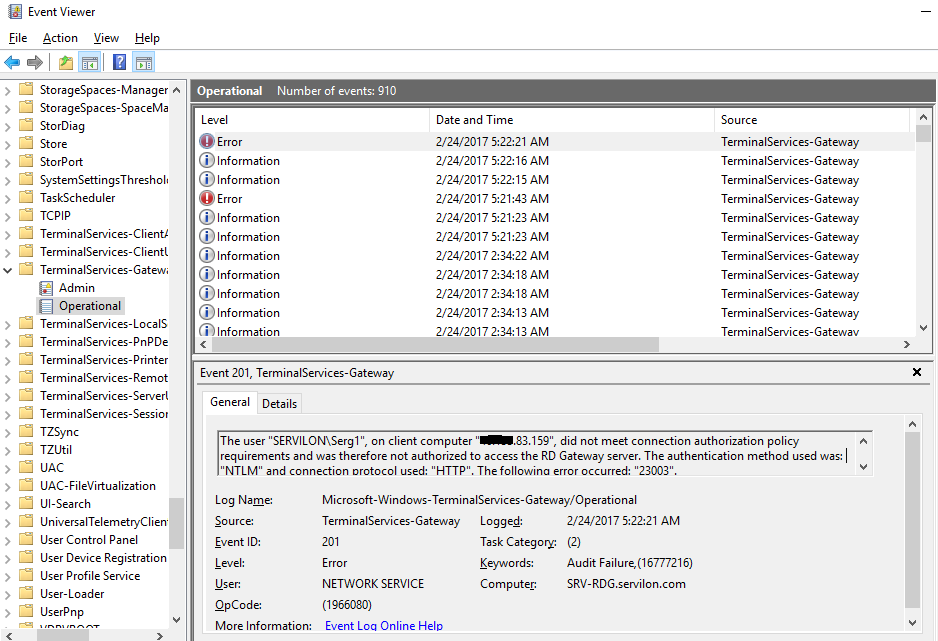
If you need to know the IP address from which the RDP session was initialized, you can view the logs of the RDG server in the Event Viewer. If the second authentication factor is not passed, the event will have the status Error, and the description will indicate the IP address from which the RDP connection was established.
References on the article:
→ Remote Desktop Gateway and Azure Multi-Factor Authentication Server using RADIUS
→ User Portal
→ Mobile App Web Service
Source: https://habr.com/ru/post/323110/
All Articles