Installation and use of the virtual network lab EVE-NG with Ansible. First experience

This article describes the experience of a network engineer in deploying a virtual lab EVE-NG at home, for the purpose of preparing for Cisco expert examinations.
I tried to collect all the major milestones of the settings scattered around the articles on the Internet and tried to add to the topology, while studying, in addition, the configuration management system. The draft of the article appeared by chance, because I was sorry to lose my experience and decided to save it in a separate file. Here I submit it to your judgment.
All solutions given in the article do not claim to be optimal, but they definitely work.
EVE-NG installation
Host preparation
As a host, I use the following system: Intel Xeon X3240, 32Gb RAM running Gentoo. Setting up KVM on Gentoo is a rather trivial matter and, to tell the truth, I don’t remember which pitfalls I had to face when deploying it. It was a long time.
The main thing that catastrophically affects the performance of an EVE-NG laboratory bench is the kernel parameter, which triggers the ability to use nested virtualization (nested virtualization).
For Intel processors:
kvm-intel.nested=1 More details can be read on the link .
Connecting network device images
Images of network devices for connection are freely available on cisco.com itself, for downloading it is enough to have an entry level account. We will need XRv and CSR .
We download on the specified links and follow the recommendations in how-to .
The problem I encountered when adding images is how to name the directories where you need to add the hda.qcow2 files. The solution, as always, is reverse engineering. The list of headers processed by EVE-NG is sewn into the file:
/opt/unetlab/html/includes/init.php I will give it here:
$node_templates = Array( 'a10' => 'A10 vThunder', 'clearpass' => 'Aruba ClearPass', 'timos' => 'Alcatel 7750 SR', 'veos' => 'Arista vEOS', 'barracuda' => 'Barraccuda NGIPS', 'brocadevadx' => 'Brocade vADX', 'cpsg' => 'CheckPoint Security Gateway VE', 'docker' => 'Docker.io', 'acs' => 'Cisco ACS', 'asa' => 'Cisco ASA', 'asav' => 'Cisco ASAv', 'cda' => 'Cisco Context Directory Agent', 'csr1000v' => 'Cisco CSR 1000V', 'csr1000vng' => 'Cisco CSR 1000V (Denali and Everest)', 'cips' => 'Cisco IPS', 'cucm' => 'Cisco CUCM', 'ise' => 'Cisco ISE', 'c1710' => 'Cisco IOS 1710 (Dynamips)', 'c3725' => 'Cisco IOS 3725 (Dynamips)', 'c7200' => 'Cisco IOS 7206VXR (Dynamips)', 'iol' => 'Cisco IOL', 'titanium' => 'Cisco NX-OSv (Titanium)', 'nxosv9k' => 'Cisco NX-OSv 9K', 'firepower' => 'Cisco FirePower', 'firepower6' => 'Cisco FirePower 6', 'ucspe' => 'Cisco UCS-PE', 'vios' => 'Cisco vIOS', 'viosl2' => 'Cisco vIOS L2', 'vnam' => 'Cisco vNAM', 'vwlc' => 'Cisco vWLC', 'vwaas' => 'Cisco vWAAS', 'phoebe' => 'Cisco Email Security Appliance (ESA)', 'coeus' => 'Cisco Web Security Appliance (WSA)', 'xrv' => 'Cisco XRv', 'xrv9k' => 'Cisco XRv 9000', 'nsvpx' => 'Citrix Netscaler', 'sonicwall' => 'Dell SonicWall', 'cumulus' => 'Cumulus VX', 'extremexos' => 'ExtremeXOS', 'bigip' => 'F5 BIG-IP LTM VE', 'fortinet' => 'Fortinet FortiGate', //'radware' => 'Radware Alteon', 'hpvsr' => 'HP VSR1000', 'olive' => 'Juniper Olive', 'vmx' => 'Juniper vMX', 'vmxvcp' => 'Juniper vMX VCP', 'vmxvfp' => 'Juniper vMX VFP', 'vsrx' => 'Juniper vSRX', 'vsrxng' => 'Juniper vSRX NextGen', 'vqfxre' => 'Juniper vQFX RE', 'vqfxpfe' => 'Juniper vQFX PFE', 'linux' => 'Linux', 'mikrotik' => 'MikroTik RouterOS', 'ostinato' => 'Ostinato', 'paloalto' => 'Palo Alto VM-100 Firewall', 'pfsense' => 'pfSense Firewall', 'riverbed' => 'Riverbed', 'sterra' => 'S-Terra', 'vyos' => 'VyOS', 'win' => 'Windows (Legacy template)', 'winstation' => 'Windows Workstation', 'winserver' => 'Windows Server', 'vpcs' => 'Virtual PC (VPCS)' ); That is, if we need to add an image with any Linux, as we will do below, it is enough to create a directory / opt / unetlab / addons / qemu / linux-something-there / and put the hda.qcow2 image file into it.
Setting up the environment
By environment we will understand everything that makes our life more convenient.
Access to the console of routers
Despite the fact that in EVE-NG, developers have introduced the ability to access network device consoles via web using HTML5, access from third-party clients is more convenient and familiar. The main convenience provided by putty in my case is the ability to use the clipboard. Copy / paste does not work in the web console.
So, the process is as follows:
Installing putty on the machine from where access will be made. I work on a PC with ubuntu, therefore:
sudo apt-get install putty But this is not enough, you also need to tell the browser, in my case it is a chrome, how to respond to telnet: // links. To do this, you need to create a file ~ / .local / share / applications / telnet.desktop with the following content:
[Desktop Entry] Version=1.0 Name=Telnet GenericName=Telnet Comment=Telnet Client Exec=/usr/bin/putty %U TryExec=/usr/bin/putty Terminal=false Type=Application Categories=TerminalEmulator;Network;Telnet;Internet;BBS; MimeType=x-scheme/telnet X-KDE-Protocols=telnet Keywords=Terminal;Emulator;Network;Internet;BBS;Telnet;Client; Register handler:
xdg-mime default telnet.desktop x-scheme-handler/telnet After that, the console will be excellent in putty. The task of switching to tabbed gnome-terminal or its analog will be left for later.
Starting a traffic sniffer
Wireshark - an urgent need when studying network technologies. A lot has been written about its use. I will not repeat. I will describe the process of setting it up.
Installation on the client:
sudo apt-get install wireshark But again, the browser does not understand how to handle the capture: // link
He will have to explain it in three stages:
Stage 1:
As in the case of consoles, the file ~ / .local / share / applications / wireshark.desktop :
[Desktop Entry] Name=Wireshark Exec=capture_chrom.sh %u MimeType=x-scheme-handler/capture; Type=Application Handler registration:
xdg-mime default wireshark.desktop x-scheme-handler/capture Stage 2:
Handler in the form of a script on bash on the client machine in any directory from the PATH list:
#!/bin/bash ip=`echo $@ | sed 's/.*\/\/\(.*\)\/\(.*\)/\1/g'` interface=`echo $@ | sed 's/.*\/\/\(.*\)\/\(.*\)/\2/g'` ssh root@$ip tcpdump -i $interface -U -w - | wireshark -k -i - Stage 3:
Key ssh access between the client machine and EVE-NG.
On the client machine (instead of ip_eve put the address EVE-NG):
ssh-keygen -t rsa ssh root@_ip_eve_ mkdir -p .ssh cat ~/.ssh/id_eve_ng.pub | ssh root@ip_eve 'cat >> .ssh/authorized_keys2' After that, capturing traffic in the wireshark on the client side will work. What we needed.
At this unassuming user can stop, but there is no limit to perfection, and we continue ...
Configure the ansible server instance
The need for ansible for virtual laboratory topologies at the beginning of the path was not obvious to me. But over time, in the second ten of laboratory hours, the thought comes - but not whether to automate the loading of start-up topologies into devices without overloading them, thereby saving time?
So where to start? With restrictions ansible! Yes, they really are. For me, as far enough from programming, the sentence on one of the forums turned out to be too cruel - to add the telnet handler myself. The telnet was needed for a head-on solution — configure the ansible on the EVE-NG virtual machine and telnet to the console ports of the virtual routers. But it was not there - only ssh works.
But we are old engineers and not used to retreat! If the mountain does not go to Mohammed, then we will move to it - we will set up a separate instance with ububtu in the topology itself, since there is a possibility for this.
How to deploy in KVM image downloaded from ubuntu.com I will not bring. I did it on a separate machine, set it up and poured it into EVE-NG. After installation, we will need packages with a telnet server and a static IP address setting.
Configure a telnet server
I didn’t manage to force EVE-NG to show me the server console in the standard way by clicking on the device. In order not to dig deep, I went around - set up a telnet server. SSH v2, of course, is also available and works with CSR, but very slowly for interactive work, and it is useless - we have a laboratory stand, and not production.
Then the need for the server disappeared, but the record in the cheat sheet remained, so I will bring it.
So let's get started:
sudo apt-get install xinetd telnetd After the automatic launch of xinetd , of course, nothing happened, as we were promised on the Internet.
The following telnet file should be added to /etc/xinetd.d :
service telnet { disable = no flags = REUSE socket_type = stream wait = no user = root server = /usr/sbin/in.telnetd } and restart xinetd server:
sudo service xinetd restart Check telnet locally:
@ansible-server:~$ telnet 127.0.0.1 Trying 127.0.0.1... Connected to 127.0.0.1. Escape character is '^]'. Ubuntu 16.04.2 LTS ansible-server login: Works!
We upload the resulting image to the EVE-NG virtual machine and try to compile the topology.
Now we can, having set up the address from the server’s subnetwork on the neighboring cysk in the topology, can reach it via telnet. Everything works fast, not like SSH.
Topology collection
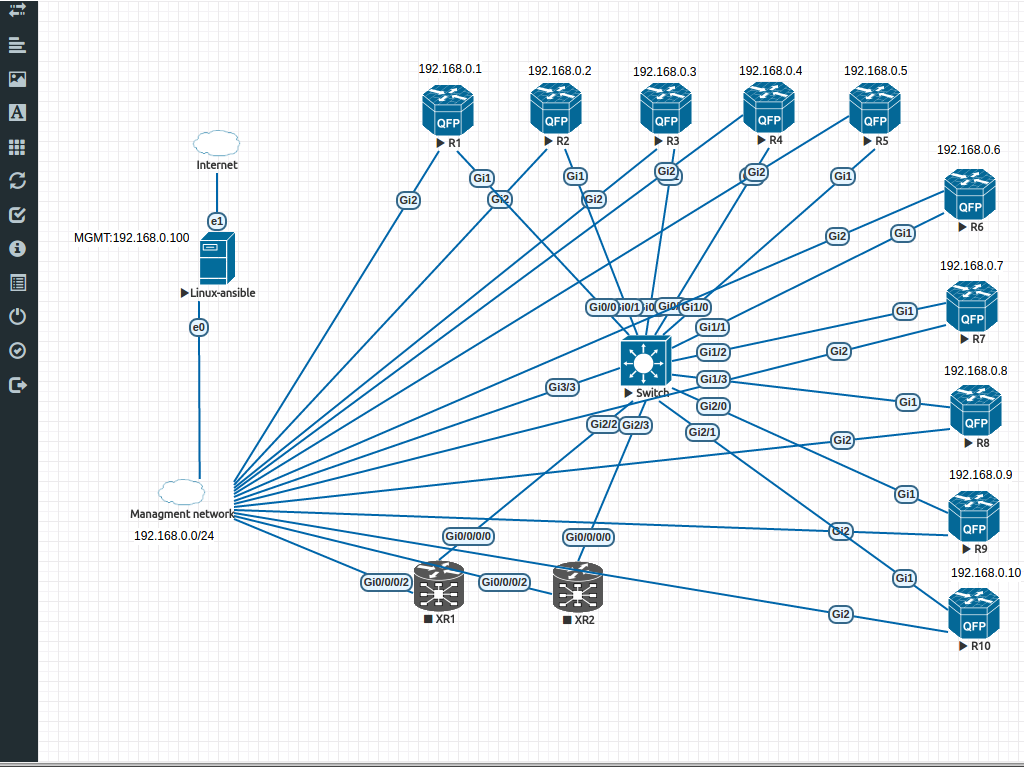
Everything is extremely simple here. My topology is as follows:
Deploying the annsible subsystem
Setting up CSR to work with ansible
We select a separate port for control on each router and connect it to a common hub with the server ansible ports Gi2 . We choose a subnet for management, I have it 192.168.0.0/24. And assign the IP addresses on the ports according to the router number.
Add the same information to the / etc / hosts server:
192.168.0.1 R1 192.168.0.2 R2 192.168.0.3 R3 192.168.0.4 R4 192.168.0.5 R5 192.168.0.6 R6 192.168.0.7 R7 192.168.0.8 R8 192.168.0.9 R9 192.168.0.10 R10 192.168.0.11 XR1 192.168.0.12 XR2 192.168.0.20 SW1 On each router we configure SSH v2 according to the link . Everything is trivial, I will only say that in order to run the SSHv2 we need to generate a key of more than 768 bits, I chose the size of 2048.
We check access from the server to routers via SSH, at the same time collecting keys in the storage.
Save the configuration on the router:
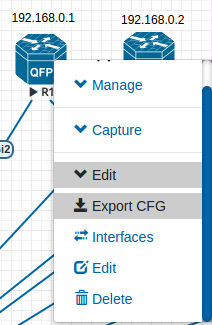
R1#wr Building configuration... [OK] And we export the configuration to EVE-NG in order not to reconfigure the device when rebooting:
This feature in EVE-NG, like Unetlab before it, works with varying success. But let's hope.
Creating the first workbook
As we remember , the structure of ansible consists of two main parts - the description of devices (inventory), and the workbook, with the actual logic of the system.
In our case, inventory is quite primitive and its containing file ( / etc / ansible / hosts ) takes the form:
[ios] R[1:10] What is revealed in the list of hostnames from R1 to R10 (remember that we have already registered / etc / hosts for name resolution).
But with the Vorbuk will have to tinker.
The first step, in order to fill the configuration of laboratory interest for us, to the IOS virtual router, we need to roll back to the initial zero, which contains only IP management and VTY settings.
For this, we will try to use the ios_command module .
The basis of all the work on changing configurations in IOS devices for us will be the functionality of the privileged mode command of the router:
configure replace scp://[PATH] force Zero configurations will be stored on the server in the home directory of the new user under the name router in the / home / router / default_configs / directory. Looking ahead, I will say that the files will have the same names as in inventory, i.e. in our case it is R1, R2, etc.
Create in / opt / ansible a rollback.yml file of the form:
- name: rollback hosts: ios serial: 1 connection: local gather_facts: false remote_user: cisco tasks: - name: Performing rollback to default configuration. ios_command: commands: configure replace scp://router:cisco@192.168.0.101:~/default_configs/{{ inventory_hostname }} force timeout: 30 So, in order:
Playbook name:
- name: rollback Name of inventory used:
hosts: ios Number of parallel configurable devices from inventory. An important part of the subsequent performance optimization.
serial: 1 As I understand it, this indicates a connection with a local task processor. I can be wrong.
connection: local Disabling host information collection:
gather_facts: false Username for connecting to devices:
remote_user: cisco Module call:
ios_command: Sending a command to the device from the inventory:
commands: configure replace scp://router:cisco@192.168.0.101:~/default_configs/{{ inventory_hostname }} force Response time in seconds:
timeout: 30 Nothing too complicated, as we see, but there is one thing but!
Try to run ...
ansible-playbook ./rollover.yml -k -vvvv We get an error!
"msg": "ios_command does not support running config mode commands. Please use ios_config instead" Google will not tell us much about this, so we arm ourselves with savvy and try to find out who told us so. And we find the file of the module we are using: /usr/local/lib/python2.7/dist-packages/ansible-2.3.0-py2.7.egg/ansible/modules/network/ios/ios_command.py , containing this code:
if module.check_mode and not item['command'].startswith('show'): warnings.append( 'only show commands are supported when using check mode, not ' 'executing `%s`' % item['command'] ) elif item['command'].startswith('conf'): module.fail_json( msg='ios_command does not support running config mode ' 'commands. Please use ios_config instead' ) It is obvious that the developers have bent a little bit by putting all the configure parameters to the configuration mode, so we add to the appropriate line:
elif item['command'].startswith('configure terminal'): Earned!
root@ansible-server:/opt/ansible# ansible-playbook ./rollback.yml -k SSH password: PLAY RECAP ****************************************************** R1 : ok=1 changed=0 unreachable=0 failed=0 R10 : ok=1 changed=0 unreachable=0 failed=0 R2 : ok=1 changed=0 unreachable=0 failed=0 R3 : ok=1 changed=0 unreachable=0 failed=0 R4 : ok=1 changed=0 unreachable=0 failed=0 R5 : ok=1 changed=0 unreachable=0 failed=0 R6 : ok=1 changed=0 unreachable=0 failed=0 R7 : ok=1 changed=0 unreachable=0 failed=0 R8 : ok=1 changed=0 unreachable=0 failed=0 R9 : ok=1 changed=0 unreachable=0 failed= Creating a second workbook
I will not describe in the same way as in the previous stage, I’ll just give an example of a workbook that fills the thematic initial configuration of laboratory works of one well-known brand with three letters in the title:
/ etc / ansible / hosts
[ios] R[1:10] [ios.base.ipv4] R[1:6] /opt/ansible/base.ipv4.yml
- name: base.ipv4 hosts: ios.base.ipv4 connection: local gather_facts: false remote_user: cisco serial: 1 tasks: - name: base.ipv4 configuration load ios_config: src: ./IOS-XE-initials/base.ipv4/{{ inventory_hostname }} The initial configuration files are in /opt/ansible/IOS-XE-initials/base.ipv4 , respectively. The main difference of this scenario is the use of the functional of the ios_config module and the transfer of the right to it to interpret the commands that need to be executed on the devices.
That's all, thank you for your attention. If the article is worthy of continuation, the next topic will be setting up the interaction of IOS XR and ansible.
')
Source: https://habr.com/ru/post/323014/
All Articles