3 steps to an interactive prototype
The idea of the second article arose spontaneously and became firmly established thanks to our readers. After the first article we were asked questions and we talked about the process of creating sites. The term "prototype" sounded several times. Indeed, this is an important step that should not be missed. In this article we will talk about our experience in creating interactive prototypes on the PIXLI platform.

When the idea of creating a site has arisen, its goals are formulated. At this point, the direction of development becomes clear. And the process begins, which includes three stages:
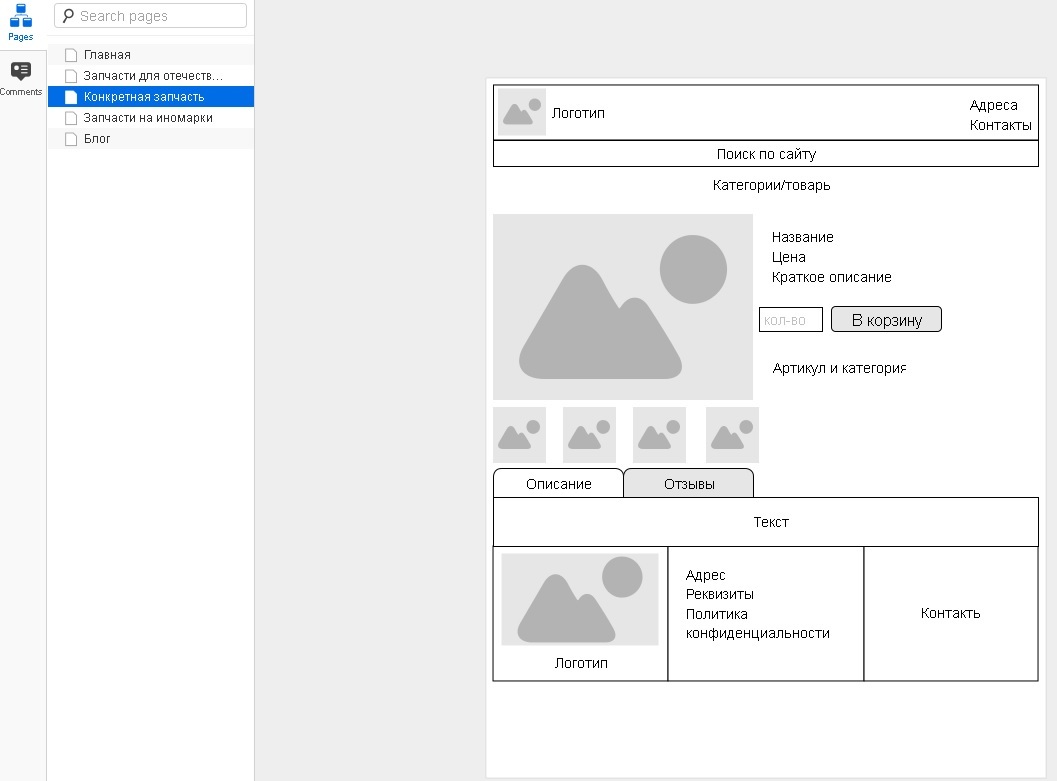
The frame is a scheme. It consists of abstract graphic elements showing the basic location of future sections of the site. As a radio scheme, this is not yet radio, but already a step towards its creation.
')
Mock-up is a static image of the site pages. Most of all, he needs to demonstrate to the customer to convince him to buy your services. Then he goes to the coder to implement.
Prototype from ancient Greek πρῶτος - the first and τύπος - imprint, imprint; prototype sample. The creation of a prototype is a necessary step in the development of the site. Prototypes allow you to build the logic of the site interface.
They should not include all the animation and small interactions, but should demonstrate the usability of your site.

Answer the questions:
Once you get the answers, ask them:
Test the site to achieve each of your goals. This will help you figure out where usability is not convenient or attractive. The user is invaluable in verifying functionality, information architecture, and general convenience. Only a fresh look can reveal many problems. Sometimes we don’t even imagine how users will behave, what kind of dead ends and mistakes they will find.
The prototype can take these problems into account at an early stage, saving time, money and a headache in front of the coding and design stage.
A prototype is much more than a frame or layout. But it should not be the full version of the site. The prototype may contain a design, or be schematic, but it must demonstrate the main interactive features of the future site.
In the design process, you must use real content. It is not necessary to have all the text - enough headings and a brief description. Content should be enough to give an idea of what the page is about.
Prototypes can be drawn in any way - on paper or using software. Someone uses Axure, etc., someone draws in Visio, it doesn't matter.
The main thing is that without a prototype, a good UX cannot be created. Rather, he finally appears by reworking the finished product. And this time and money. That we are trying to save with all our might. In this article we will describe how to create prototypes on the PIXLI platform. It is not intended solely for prototyping, and does not contain any special tools, but allows you to create interactive prototypes on the basis of which in the future the site is built.
The century of static frames is inexorably coming to an end. The interactive prototype is more convenient for coordination, it is used for preliminary usability testing and generally has a lot of advantages. The prototype user interface is a hypothesis. This is a candidate for design solutions, which will later be used for design. The hypothesis is tested empirically.
Nielsen Norman Group in 2015 conducted a study on the use of various types of materials for the development of usability and submitting it for approval.

As can be seen from the diagram, static frames and interactive prototypes confidently occupy the first place. They are used in their work by 88% and 83% of UX developers, respectively.
The study was conducted for different target audiences. It was proposed to choose the most effective tools.
These data demonstrate UX design trends: interactive prototypes are the most popular in different target audiences. Most usability professionals consider them an effective communication tool for convincing representatives of the target audience. In the same study, a distinction was made between static and interactive prototypes and the authors point out one fact: static frameworks are called as the most frequently used (71% of respondents often create them), but they were not selected in the TOP-4 of the most effective materials for any audience. . This means that more often they are made “for themselves”.
The ease of use of the platform is due to the creation of a prototype as a site - it automatically receives a second-level domain. You can give the address to the customer, and he tests the prototype on his own, with or without the involvement of Central Asia.
If you have a mock-up ready, you can include design elements in the prototype. Or you can focus only on functionality.
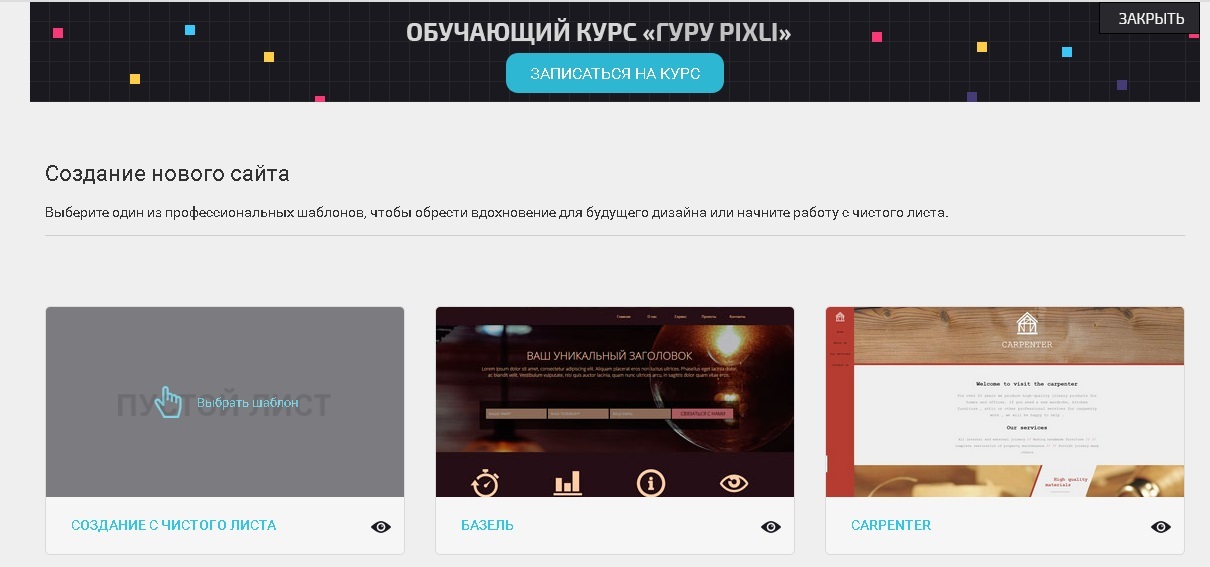
We will show the steps of creating a prototype of the affiliate program website partner.pixli.ru. We already had a general idea of the structure and content.
The frame will consist of blocks. It will allow you to estimate the location of elements on the page. We take the blank sheet as a basis.
The main element of the page - the container for the remaining blocks, is the area. The area is embedded menu (navbar) or blocks. Let's start with the menu.
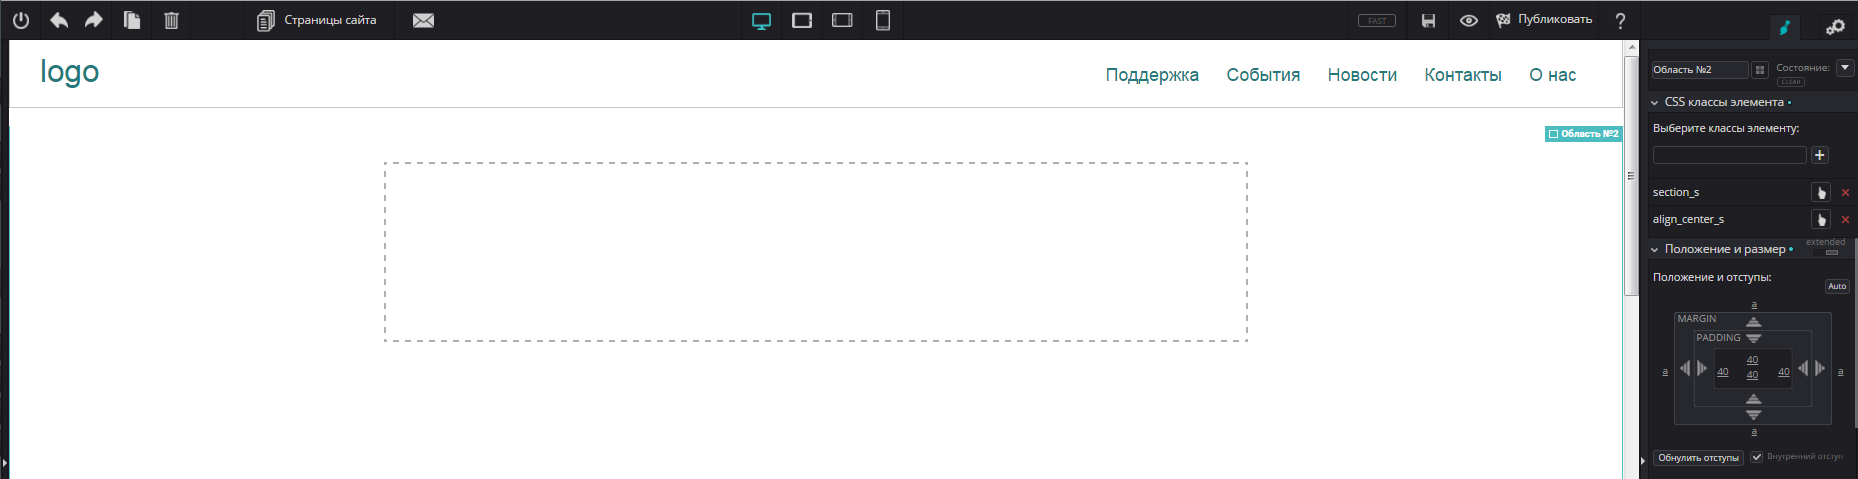
The navigation bar already offers us a group of buttons and a place for a logo. Add the required number of buttons by copying, write the text in them. Using the right panel, customize the appearance of the buttons.

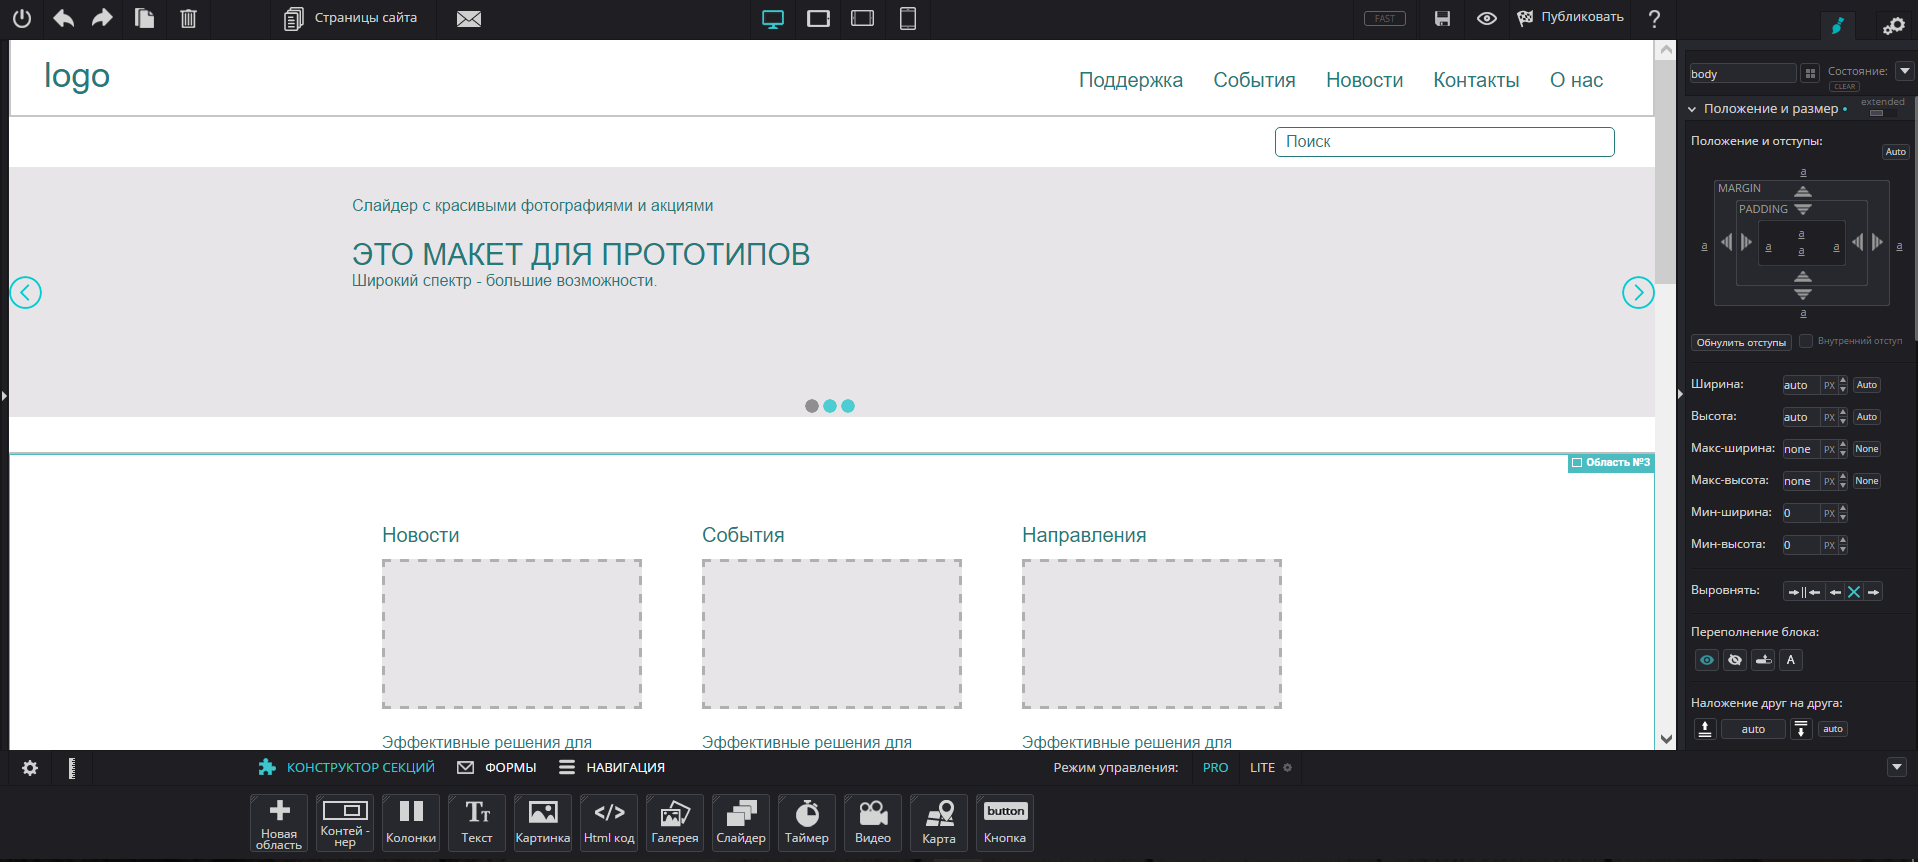
Next, we add areas and place the slider, columns, blocks and texts in them. A little tweak doesn't hurt either. That's what happened in the end. The whole work took 20 minutes.
On the mobile device, we need to display the menu, text and CTA-button of the connection in the affiliate program, the list of benefits and the CTA-button "Ask a question". Most of the blocks are slider, speakers, etc. do not need to be customized and take the necessary form themselves. It only remains for us to decide which part of the information we leave and which part we remove as non-essential. This is how the mobile version of the prototype looks like without any changes, so to say “on the machine”.

The editor allows for each area, block or element to customize the display on different types of devices. For example, set the “Gift” pop-up window to display only on a PC.
Thus, we will adjust the available elements and remove unnecessary ones.
In the last step, we need to add interactivity to all the elements that we want to animate. For a large site, these are active links, highlighting the advantages, highlighting menus and buttons, showing drop-down windows. Animation on the prototype will be unnecessary, so we will not implement it. The backlight is set by changing parameters in different states.
The popup window in the editor can only be an area - this is indicated in the settings.
The next step is to specify the action for the button and the window is ready.
Links are specified in the text editor for hyperlinks and in the window settings window for buttons.

Our test site consists of one page. All links to it lead either to the pages of the main site or to the internal area. However, the platform allows you to work with several pages, so you can create a prototype of the entire resource.
So, our interactive prototype has been created and has its own domain name. It can be handed over to the customer for testing and approval.
Website creation is a process of not one day and not one stage. Prototyping is an important step to optimize time and cost. The faster it will be completed, the sooner the usability testing and coordination with the customer will pass. Therefore, the quality and interactivity of the prototype plays an important role. Do not necessarily use specialized tools. We are doing great with the PIXLI platform, thereby accelerating the design process itself in the future.
When the idea of creating a site has arisen, its goals are formulated. At this point, the direction of development becomes clear. And the process begins, which includes three stages:
- Frame
- Prototype
- Mock-up
The frame is a scheme. It consists of abstract graphic elements showing the basic location of future sections of the site. As a radio scheme, this is not yet radio, but already a step towards its creation.
')
Mock-up is a static image of the site pages. Most of all, he needs to demonstrate to the customer to convince him to buy your services. Then he goes to the coder to implement.
Prototype from ancient Greek πρῶτος - the first and τύπος - imprint, imprint; prototype sample. The creation of a prototype is a necessary step in the development of the site. Prototypes allow you to build the logic of the site interface.
They should not include all the animation and small interactions, but should demonstrate the usability of your site.
2 rules for creating prototypes
- Make sure your prototype has those features that are relevant to your audience. Provide demonstration opportunities for all interested parties. The copywriter is interested in how the text will fit into the block, the marketer - how the arrangement of the blocks corresponds to the chosen sales model, etc.
- Focus on the final audience of the site. It is one thing to demonstrate a prototype to people who participated in the generation of ideas for a site and know all the goals. You need to get a look from the side of someone who will use the site. You need to know the target audience, to understand their expectations and user experience. Ideally, usability testing should be performed on a prototype.
Answer the questions:
- What sites do they visit on a regular basis, and what makes them come back?
- What features and functionality make these sites enjoyable?
Once you get the answers, ask them:
- What do they hope to find out?
- What tasks do they want to achieve?
- What features are expected?
Test the site to achieve each of your goals. This will help you figure out where usability is not convenient or attractive. The user is invaluable in verifying functionality, information architecture, and general convenience. Only a fresh look can reveal many problems. Sometimes we don’t even imagine how users will behave, what kind of dead ends and mistakes they will find.
The prototype can take these problems into account at an early stage, saving time, money and a headache in front of the coding and design stage.
What does the prototype contain?
A prototype is much more than a frame or layout. But it should not be the full version of the site. The prototype may contain a design, or be schematic, but it must demonstrate the main interactive features of the future site.
In the design process, you must use real content. It is not necessary to have all the text - enough headings and a brief description. Content should be enough to give an idea of what the page is about.
How to create a prototype?
Prototypes can be drawn in any way - on paper or using software. Someone uses Axure, etc., someone draws in Visio, it doesn't matter.
The main thing is that without a prototype, a good UX cannot be created. Rather, he finally appears by reworking the finished product. And this time and money. That we are trying to save with all our might. In this article we will describe how to create prototypes on the PIXLI platform. It is not intended solely for prototyping, and does not contain any special tools, but allows you to create interactive prototypes on the basis of which in the future the site is built.
What prototypes prefer to use?
The century of static frames is inexorably coming to an end. The interactive prototype is more convenient for coordination, it is used for preliminary usability testing and generally has a lot of advantages. The prototype user interface is a hypothesis. This is a candidate for design solutions, which will later be used for design. The hypothesis is tested empirically.
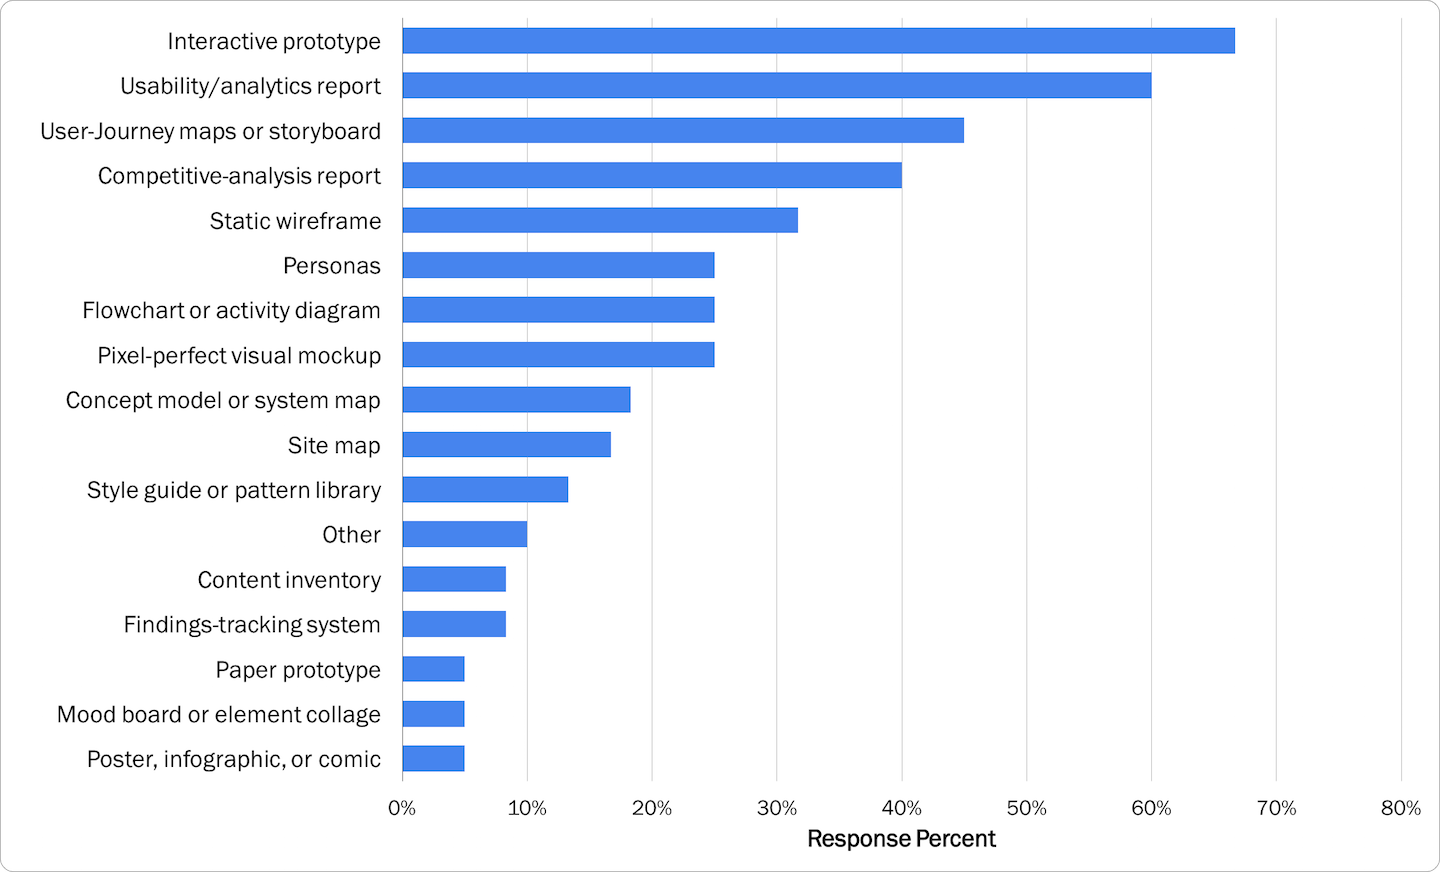
Nielsen Norman Group in 2015 conducted a study on the use of various types of materials for the development of usability and submitting it for approval.
As can be seen from the diagram, static frames and interactive prototypes confidently occupy the first place. They are used in their work by 88% and 83% of UX developers, respectively.
The study was conducted for different target audiences. It was proposed to choose the most effective tools.
- Managing staff. More than 60% prefer interactive prototypes. Static frameworks take only the fifth place.
- Customers 67% prefer interactive prototypes. In second place are visual mokapy.
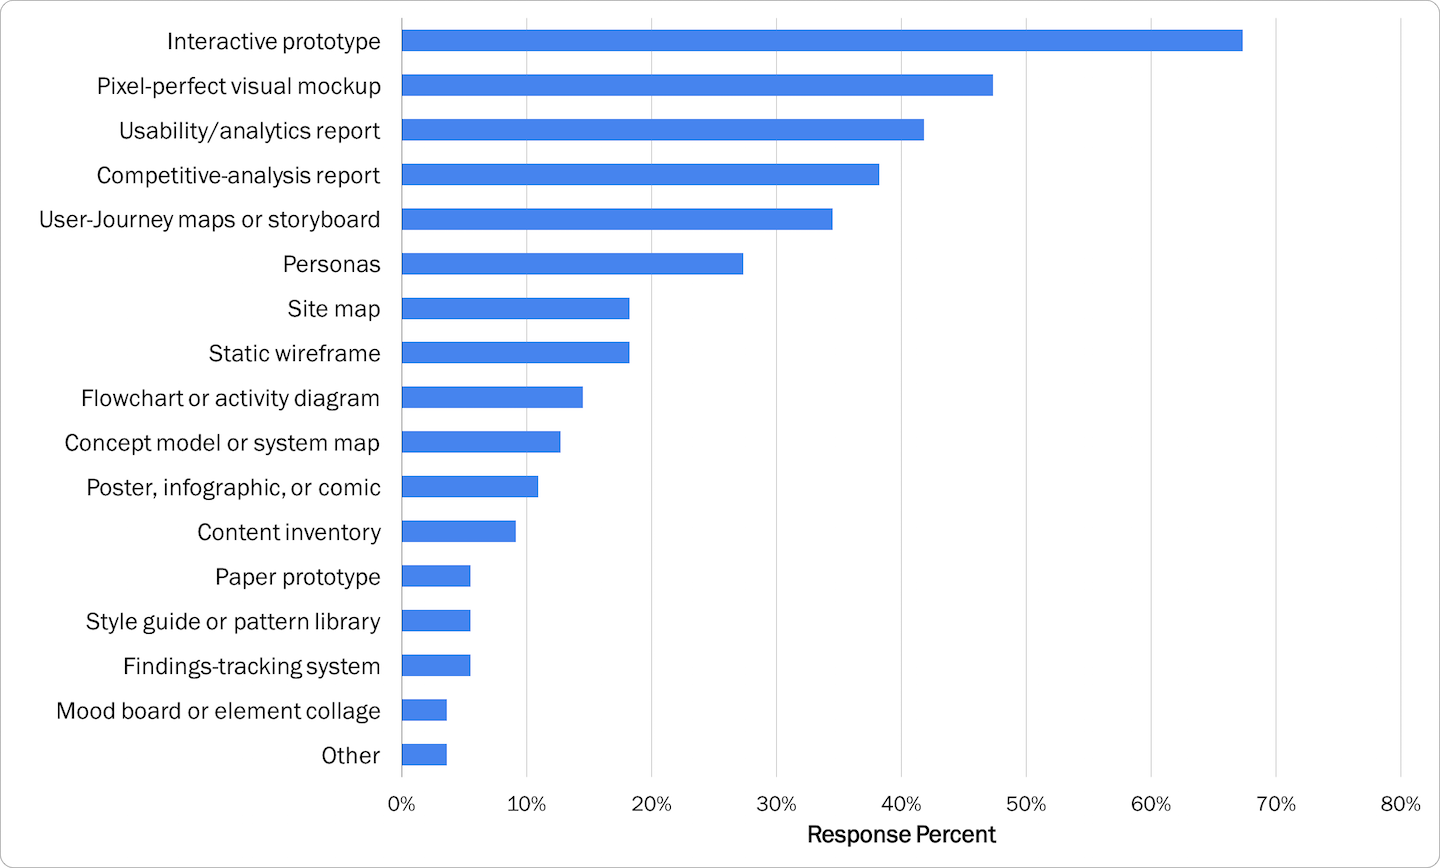
- Developers and engineers. 62% opt for interactive prototypes to work together and submit specifications. Static frames again in fifth place.
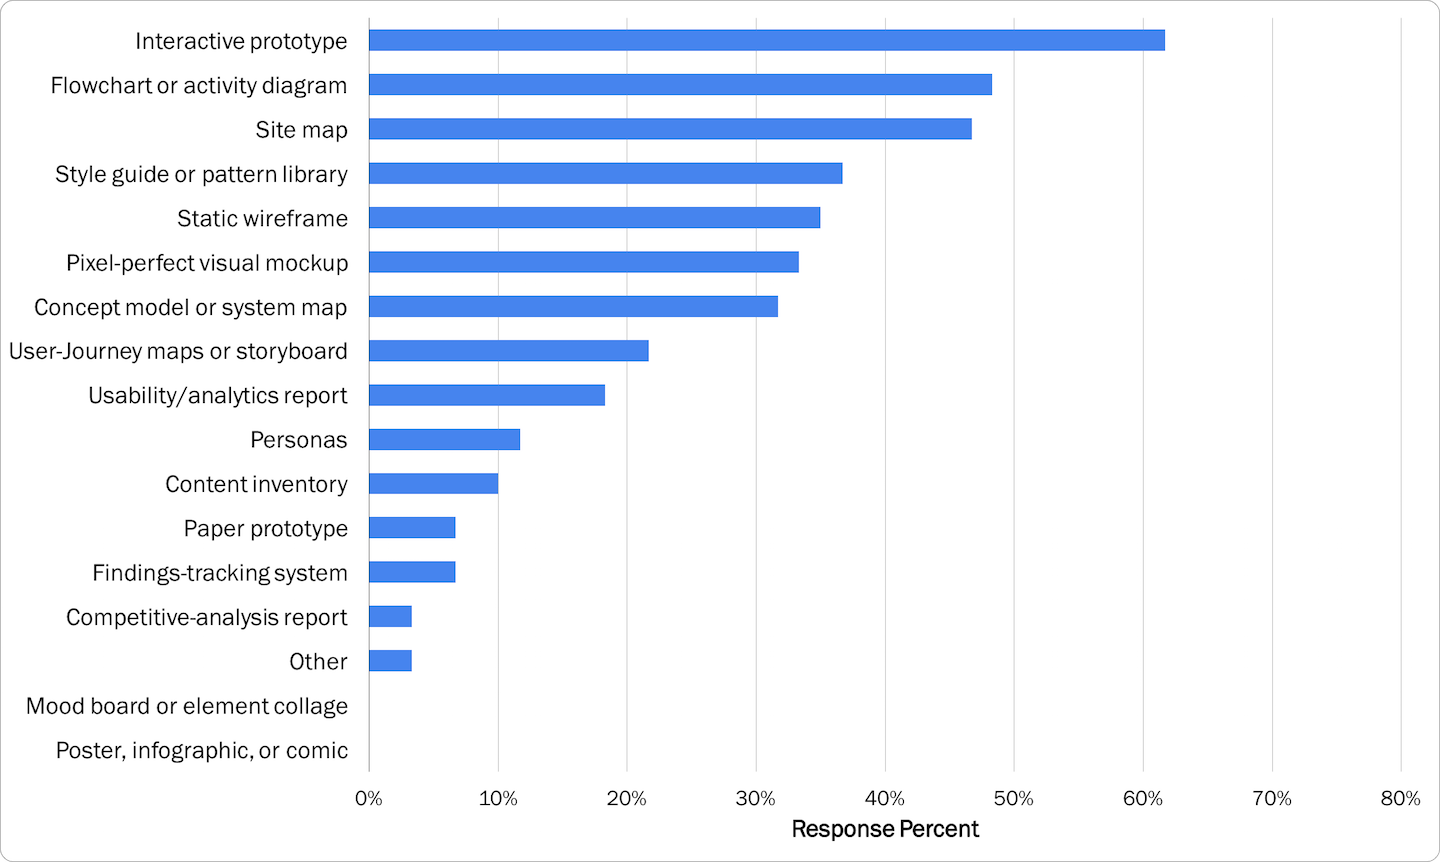
These data demonstrate UX design trends: interactive prototypes are the most popular in different target audiences. Most usability professionals consider them an effective communication tool for convincing representatives of the target audience. In the same study, a distinction was made between static and interactive prototypes and the authors point out one fact: static frameworks are called as the most frequently used (71% of respondents often create them), but they were not selected in the TOP-4 of the most effective materials for any audience. . This means that more often they are made “for themselves”.
Interactive prototypes on PIXLI
The ease of use of the platform is due to the creation of a prototype as a site - it automatically receives a second-level domain. You can give the address to the customer, and he tests the prototype on his own, with or without the involvement of Central Asia.
If you have a mock-up ready, you can include design elements in the prototype. Or you can focus only on functionality.
We will show the steps of creating a prototype of the affiliate program website partner.pixli.ru. We already had a general idea of the structure and content.
Step 1. Create a frame
The frame will consist of blocks. It will allow you to estimate the location of elements on the page. We take the blank sheet as a basis.
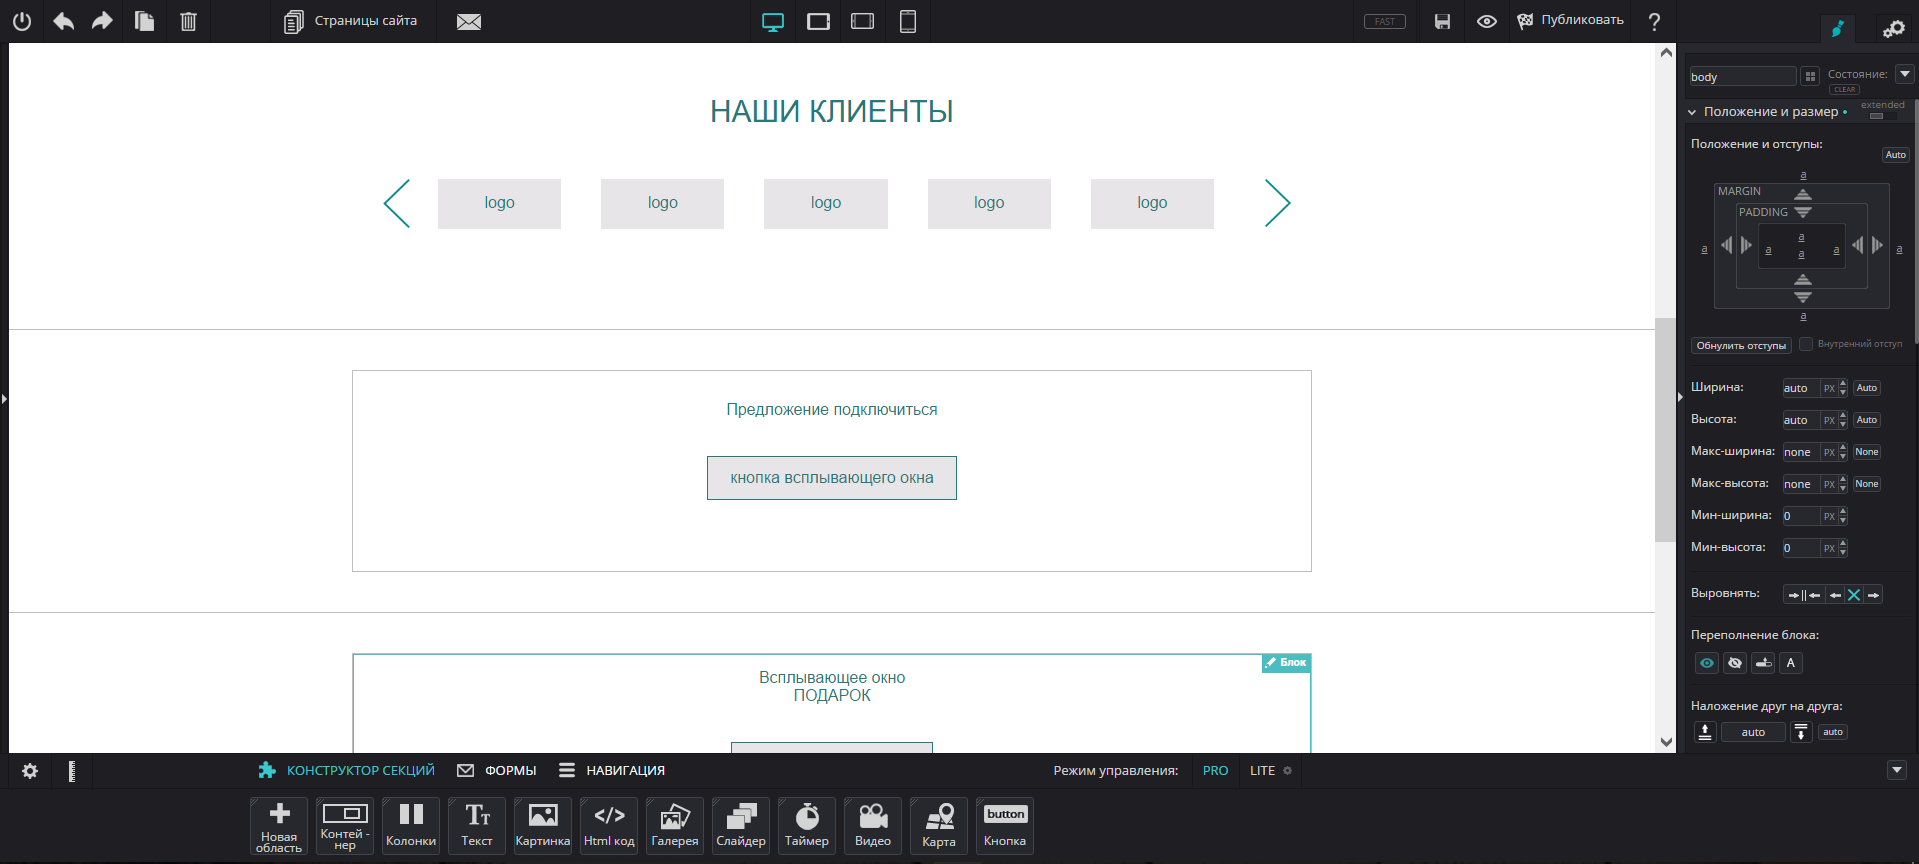
The main element of the page - the container for the remaining blocks, is the area. The area is embedded menu (navbar) or blocks. Let's start with the menu.
The navigation bar already offers us a group of buttons and a place for a logo. Add the required number of buttons by copying, write the text in them. Using the right panel, customize the appearance of the buttons.
Next, we add areas and place the slider, columns, blocks and texts in them. A little tweak doesn't hurt either. That's what happened in the end. The whole work took 20 minutes.
Step 2. Adjusting the adaptability
On the mobile device, we need to display the menu, text and CTA-button of the connection in the affiliate program, the list of benefits and the CTA-button "Ask a question". Most of the blocks are slider, speakers, etc. do not need to be customized and take the necessary form themselves. It only remains for us to decide which part of the information we leave and which part we remove as non-essential. This is how the mobile version of the prototype looks like without any changes, so to say “on the machine”.
The editor allows for each area, block or element to customize the display on different types of devices. For example, set the “Gift” pop-up window to display only on a PC.
Thus, we will adjust the available elements and remove unnecessary ones.
Step 3. Interactive
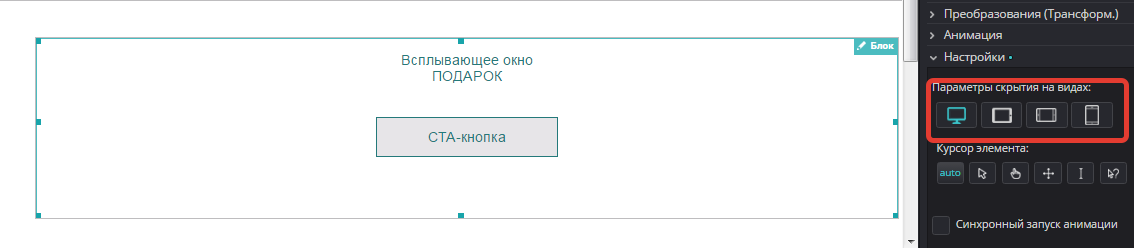
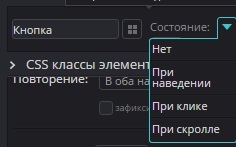
In the last step, we need to add interactivity to all the elements that we want to animate. For a large site, these are active links, highlighting the advantages, highlighting menus and buttons, showing drop-down windows. Animation on the prototype will be unnecessary, so we will not implement it. The backlight is set by changing parameters in different states.
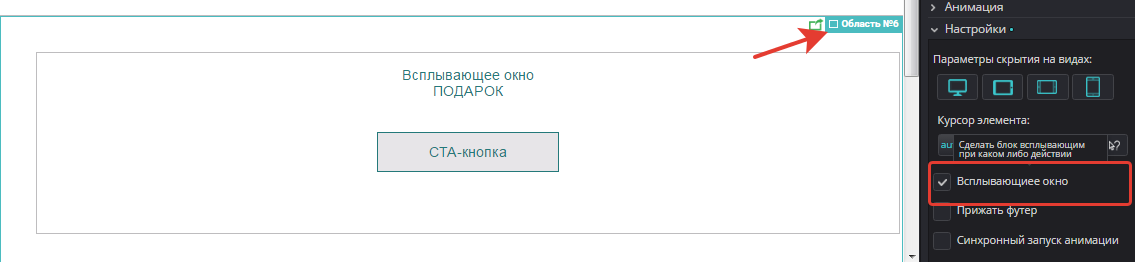
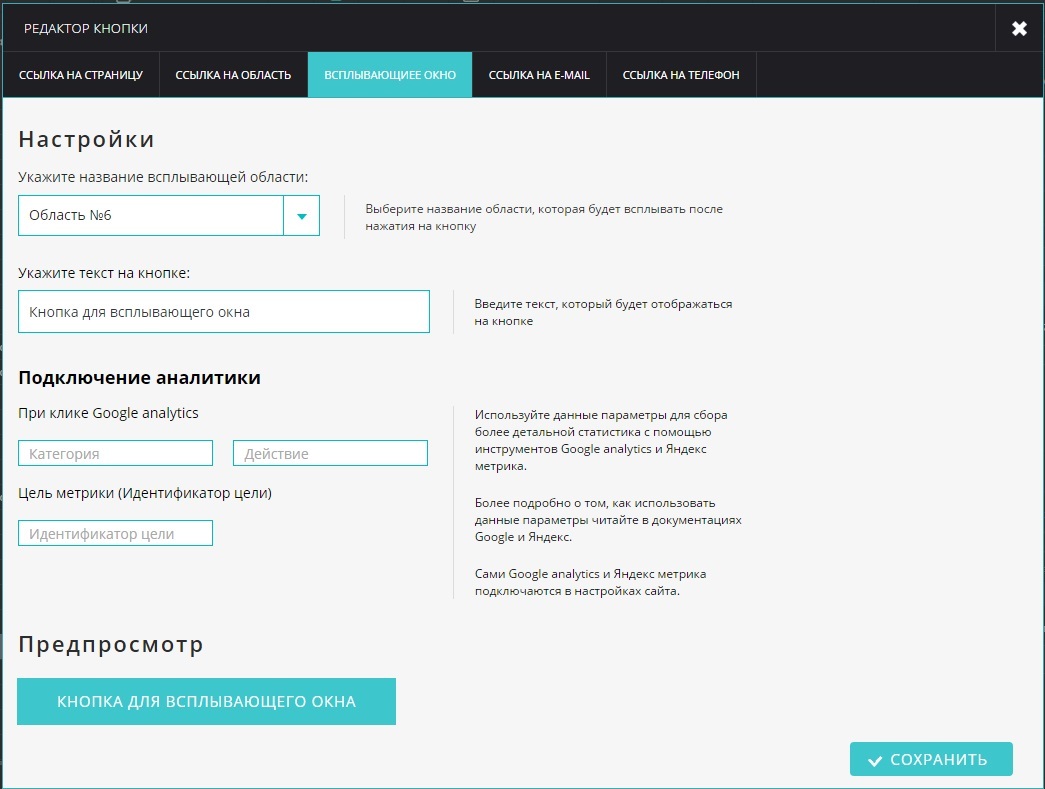
The popup window in the editor can only be an area - this is indicated in the settings.
The next step is to specify the action for the button and the window is ready.
Links are specified in the text editor for hyperlinks and in the window settings window for buttons.
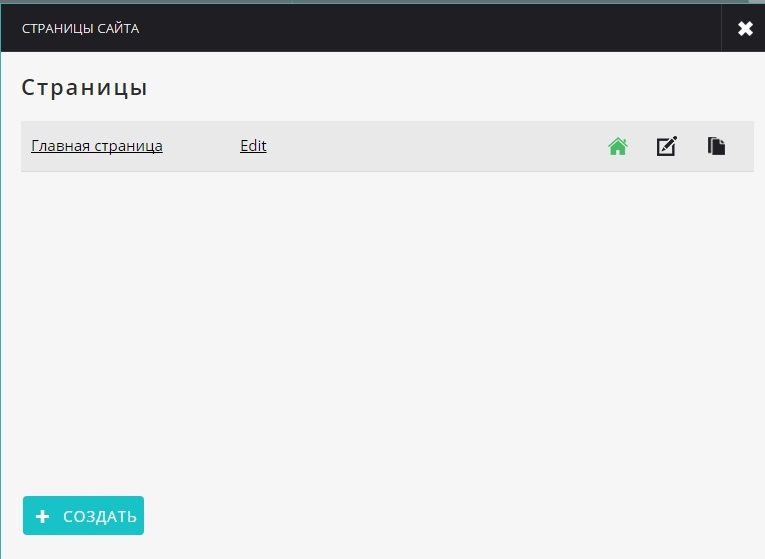
Our test site consists of one page. All links to it lead either to the pages of the main site or to the internal area. However, the platform allows you to work with several pages, so you can create a prototype of the entire resource.
So, our interactive prototype has been created and has its own domain name. It can be handed over to the customer for testing and approval.
Conclusion
Website creation is a process of not one day and not one stage. Prototyping is an important step to optimize time and cost. The faster it will be completed, the sooner the usability testing and coordination with the customer will pass. Therefore, the quality and interactivity of the prototype plays an important role. Do not necessarily use specialized tools. We are doing great with the PIXLI platform, thereby accelerating the design process itself in the future.
Source: https://habr.com/ru/post/322420/
All Articles