Warm up before the weekend: Raspberry Pi, Arduino and free evening
The week is smoothly approaching the weekend, so it's time to come up with a lesson for long holidays. For example, you can assemble a thermal imager from Raspberry Pi to answer the eternal questions “how much to warm the engine” and “what is the temperature of the programmer’s head”. Or your own Google Glass based on Arduino , albeit highly specialized.
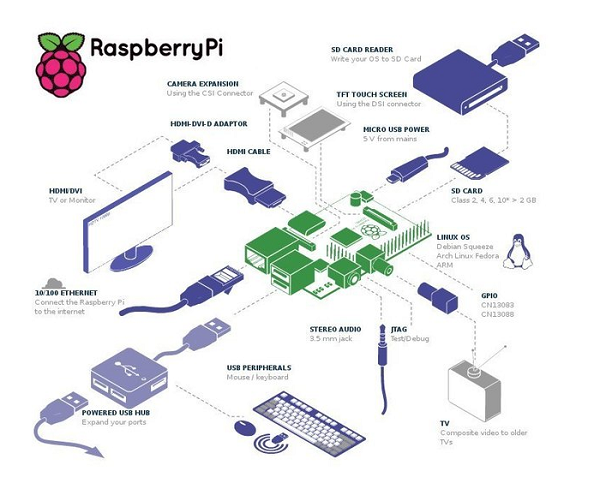
Arduino and Raspberry are mini PCs on the same PCB, designed for "home" projects and small automation. There are several fundamental differences between the boards:
The clock frequency of the Raspberry Pi is much faster than the Arduino, and the Pi has more RAM at times;
An operating system may be running on the Raspberry Pi;
Unlike the Arduino, you can connect peripherals to the Raspberry Pi USB ports — for example, network adapters and modems;
- Arduino is perfect for hardware projects where you just need to respond to various sensor signals and manual input.
Arduino can be entrusted with sensor control, and Raspberry Pi with more complex computational operations.
Buy Arduino or Raspberry can be on sites like AliExpress , so let's go straight to the interesting. Below you will find the TOP 5 projects that not only take time, but also have real benefits. Or at least interesting from the cognitive point of view.
Magnetic field measurement using a manipulator
A movable magnetometer on the "hand" with three degrees of freedom, will finally satisfy your curiosity about the magnitude of the magnetic radiation of the system unit with the lid open. Or it helps to get interesting information about the magnetic background of the hard disk under load. The robot will accurately measure the values at selected points and make a map of the magnetic field.

For the manipulator, you will need the Arduino Pro Micro on an ATmega32u4 microcontroller. When retrieving information, the sensors generate a large amount of data that should be quickly processed, therefore, in addition, you need a laptop and a LUFA USB library. The results of the sensors can be built in MATLAB, or use its free alternative - Octave .
For the actual "hands" need a servo and several fittings. “Revive” the manipulator will allow the code , kindly laid out by the author of this interesting project . Thanks to this automation, the author was able to create a three-dimensional map of the magnetic field of the object under study, which takes into account the previously measured total magnetic background.
The map resolution reaches 51 x 51 = 2601 data points, which makes it possible to track even the influence of steel bolts in the “hand” on the measured field.
FLIR Lepton and Raspberry Pi heat chamber

A thermal imager can be useful in order to find a leak in the office, or a cat. Or it can be adapted as an element of the security system. In extreme cases, you can spend a fascinating half an hour for measuring the thermal signature of disk shelves.
The basis of the imager is a FLIR Lepton heat chamber with a microbolometric matrix with a resolution of 80 × 60 pixels.
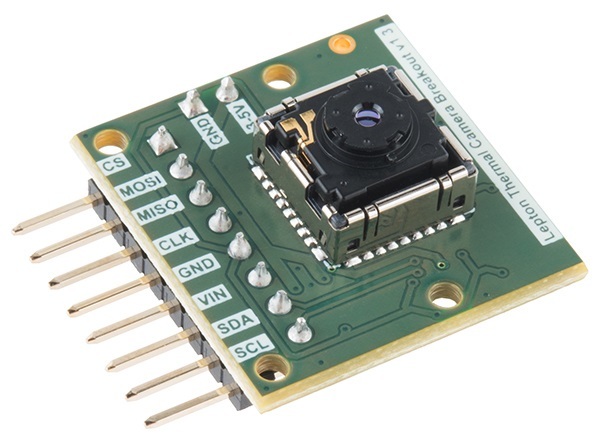
The camera connects to the Raspberry Pi controller. It is necessary to activate the SPI and I2C interfaces in the board and install the software for viewing the video stream. It remains to add a pair of 18650 batteries, a UBEC type voltage regulator, and place all the components in the case.

By itself, the imager, today, the thing is quite affordable, but the cost of the shop option is several times higher than the self-made one, and it is not always possible to adapt it for its own purposes. And the goals can be the broadest, for example, as the author of the project - hybrid systems of machine vision of the robot.
Augmented Reality Glasses on Arduino for Voltmeter
Augmented reality is not only catching Pokemon - today it is actively used by the military, and now engineers. The author of the project decided once to measure the voltage of open contacts in the panel and, it seems, he was tired of turning his neck to view the voltmeter readings. As a result, he came up with the idea of how to simplify the process and reduce the likelihood of a short circuit.
And the idea is simple - information from a voltmeter comes through a bluetooth module into a device, making simple glasses "smart . "
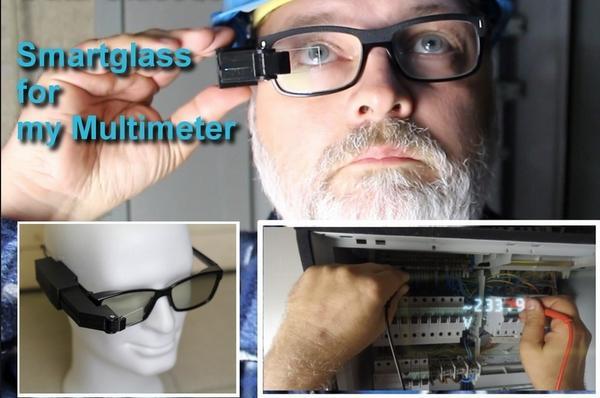
To implement this device, you need an Arduino Pro micro microcontroller, a V4.0 HM-11 BLE Module Bluetooth module, a 280mA Lipo battery, a Micro OLED 0.66 64x48 pixel display, a lens, and a plastic box where all this can be placed. The author of the project claims that the total cost of such "smart" glasses (not counting the multimeter) does not exceed 70 Euro.
The project has already been appreciated by other geeks who wished to use it in a variety of situations where attention and high concentration on the process are required. For example, you can read telemetry data while flying on a sports plane.
Data center monitoring robot
In one of the data centers in India collected a whole robot to monitor the temperature of the server. The center's staff initially planned to place a multitude of sensors so that they could then form a heat map of the entire room. But the implementation was too expensive for the local budget. As a compromise solution, a robot appeared, which goes around the server racks and sends temperature data via Wi-Fi.
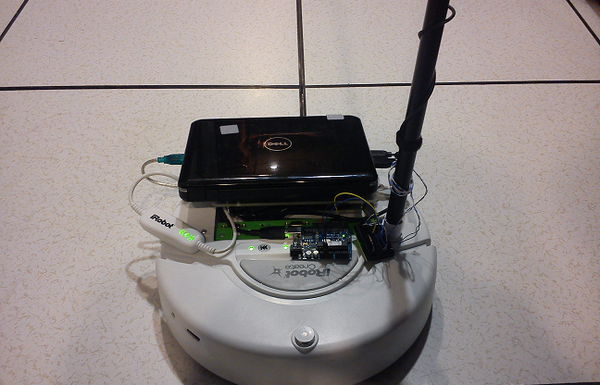
The robot consists of a fashionable iRobot Create vacuum cleaner, a netbook, an Arduino UNO microcontroller, a PVC mast with three temperature sensors on it, and a webcam. The data transmitted from the sensors is converted into a heat map. The source code and detailed instructions are not publicly available, but are available on request from the authors of the project.
As a "homework", you can connect other sensors for more complete monitoring of the server - for example, humidity sensors, which will increase the chances of saving iron from an unplanned flood.
Combination lock on Arduino
In order to be able to safely leave drinks and other valuables in the server room, an electronic lock is useful - a great addition for an inconvenient and not modern key. The implementation of one of the variants of such a lock is offered by the user nikitosk .
On the outside of the door is a keyboard for entering a password, and the inside is fixed to the main structure. The door opens after entering the four-digit password and pressing the "lattice".
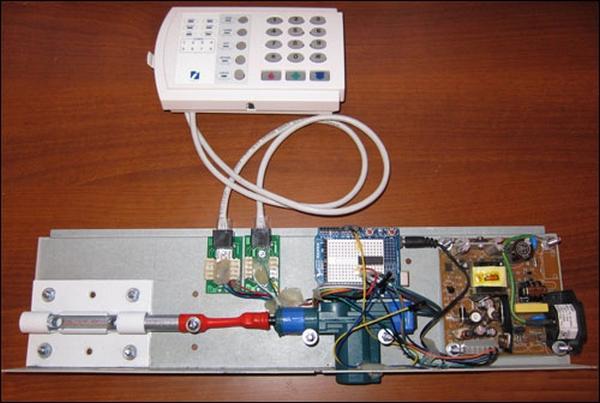
For the castle will need:
- Arduino UNO ;
- Arduino protoshield + breadboard;
- L293D driver;
- Power supply and housing from the hub D-LINK;
- Remote from security alarm.
The code for the Arduino and a list of additional components can be found in the article about the project .
Conclusion
As the development of microcontroller technology and single-board computers, the number of ideas and interesting projects will only increase. But you shouldn’t definitively write off the old iron - it can also be used, as we have already told you before . It would be even more correct to use computer junk with Arduino or Raspberry - you give effective profitability!
Maybe you have already implemented something like this yourself, or can you even share your own unique project?
')
Source: https://habr.com/ru/post/322378/
All Articles