As I made the fastest resize of images. Part 1, general optimizations
In the pilot part, I talked about the task in as much detail as possible. The story turned out long and pointless - there was not a single line of code in it. But without an understanding of the problem it is very difficult to do optimization. Of course, some techniques can be used with only the code. For example, cache calculations, reduce branching. But it seems to me that some things simply never do without an understanding of the task. This is what distinguishes a person from an optimizing compiler. Therefore, manual optimization still plays a huge role: the compiler has only code, and the person has an understanding of the problem. The compiler can not decide that the value "4" is quite random, but a person can.
Let me remind you that we will discuss the optimization of the image resize operation using the convolution method in the actually existing Pillow library. I will talk about the changes that I did a few years ago. But it will not be a word-for-word repetition: the optimization will be described in a convenient way for the narration. For these articles, I made a separate thread in the repository from version 2.6.2 - from this point on, the story will follow.
Testing
If you want to not only read, but also experiment on your own, you need the pillow-perf test package.
# $ sudo apt-get install -y build-essential ccache \ python-dev libjpeg-dev $ git clone -b opt/scalar https://github.com/uploadcare/pillow-simd.git $ git clone --depth 10 https://github.com/python-pillow/pillow-perf.git $ cd ./pillow-simd/ # , $ git checkout bf1df9a # Pillow $ CC="ccache cc" python ./setup.py develop # - $ ../pillow-perf/testsuite/run.py scale -n 3 Since Pillow consists of multiple modules and does not know how to compile incrementally, the ccache utility is used to significantly accelerate repeated builds. With pillow-perf you can test many operations, but we are interested in scale . -n 3 sets the number of operation starts. As long as the code is slow, you can take a smaller number in order not to fall asleep. At the start, the performance is as follows:
Scale 2560×1600 RGB image to 320x200 bil 0.08927 s 45.88 Mpx/s to 320x200 bic 0.13073 s 31.33 Mpx/s to 320x200 lzs 0.16436 s 24.92 Mpx/s to 2048x1280 bil 0.40833 s 10.03 Mpx/s to 2048x1280 bic 0.45507 s 9.00 Mpx/s to 2048x1280 lzs 0.52855 s 7.75 Mpx/s to 5478x3424 bil 1.49024 s 2.75 Mpx/s to 5478x3424 bic 1.84503 s 2.22 Mpx/s to 5478x3424 lzs 2.04901 s 2.00 Mpx/s Result for commit bf1df9a .
These results are slightly different from those obtained in the official benchmark for version 2.6. There are several reasons for this:
- The official benchmark uses 64-bit Ubuntu 16.04 with GCC 5.3. I will use 32-bit Ubuntu 14.04 with GCC 4.8, on which I did all these optimizations for the first time. At the end of the article it becomes clear why.
- In the articles, I start the story with a commit in which a bug is fixed that is not related to optimization, but affects performance.
Code structure
Most of the code that interests us is in the Antialias.c file , in the ImagingStretch function. The code for this function can be divided into three parts:
// if (imIn->xsize == imOut->xsize) { // } else { // } As I said earlier, resize images with convolutions can be done in two passes: on the first one, only the width of the image changes, on the second one - the height, or vice versa. The ImagingStretch function can do either one or the other in one call. Here you can see that it is actually called twice during each resize. In the function, a general prolog is performed, and further, depending on the parameters, this or that operation. A rather unusual approach to getting rid of repetitive code, which in this case is the prologue.
Inside, both aisles look about the same, adjusted for the changing direction of processing. For brevity, I will give only one:
for (yy = 0; yy < imOut->ysize; yy++) { // if (imIn->image8) { // 8 } else { switch(imIn->type) { case IMAGING_TYPE_UINT8: // 8 case IMAGING_TYPE_INT32: // 32 case IMAGING_TYPE_FLOAT32: // float } } There is branching into several pixel formats supported by Pillow: single-channel 8 bits (shades of gray), multi-channel 8 bits (RGB, RGBA, LA, CMYK, some others), single-channel 32 bits and float. We will be interested in the loop body for several channels of 8 bits each, since this is the most common image format.
Optimization 1: effectively use the cache
Although I said above that the two passes are similar, there is an obvious difference between them. Look at the vertical passage:
for (yy = 0; yy < imOut->ysize; yy++) { // for (xx = 0; xx < imOut->xsize*4; xx++) { // // imOut->image8[yy][xx] } } To horizontal pass:
for (xx = 0; xx < imOut->xsize; xx++) { // for (yy = 0; yy < imOut->ysize; yy++) { // // imOut->image8[yy][xx] } } At the vertical passage in the inner loop, the columns of the final image are iterated, and at the horizontal - the rows. Horizontal pass is a serious problem for the processor cache. At each step of the inner loop, one line is addressed below, which means that a value is requested from the memory, which lies far away from the value needed at the previous step. This is bad with a small amount of convolution. The fact is that on modern processors, the cache line, which the processor can request from RAM, is always 64 bytes. This means that if less than 16 pixels are involved in the convolution, then part of the data is being chased from memory to cache. Now imagine that the cycles are reversed and the next pixel collapses not the line below, but the next one in the same line. Then most of the required pixels would already be in the cache.
The second negative factor of such an organization of the code is manifested with a long line for convolution (i.e., with a strong decrease). The fact is that for neighboring convolutions, the original pixels intersect quite significantly, and it would be nice if this data remained in the cache. But when we move from top to bottom, the data for the old bundles gradually begin to be crowded out of the cache with the data for the new ones. As a result, when the full internal cycle passes and the next external step begins, the upper lines are no longer in the cache, they are all pushed out by the lower lines, they need to be recalled again from memory. And when it comes to the lower ones, everything is already superseded by the upper ones in the cache. It turns out the cycle, as a result of which the necessary data is never in the cache.
Why is the detour done this way? In the pseudocode above, it can be seen that the second line in both cases is the calculation of the coefficients for convolution. For a vertical pass, the coefficients depend only on the row of the final image (on the yy value), and for the horizontal one on the current column (on the xx value). That is, in the horizontal passage one cannot simply interchange two cycles - the calculation of the coefficients must be inside the cycle of xx. If we start counting the coefficients inside the inner loop, it will kill all the performance. Especially when the Lanczos filter is used to calculate the coefficients, in which there are trigonometric functions.
It is impossible to calculate the coefficients at each step, but nevertheless they are the same for all pixels of one column. So you can calculate all the coefficients in advance for all columns, and in the inner loop you can take the already calculated ones. Let's do it.
The code has a memory allocation for the coefficients:
k = malloc(kmax * sizeof(float)); Now we need an array of such arrays. But you can simplify - select a flat piece of memory and emulate a two-dimensional addressing.
kk = malloc(imOut->xsize * kmax * sizeof(float)); You also need to store somewhere xmin and xmax , which also depend on xx. We will also make an array for them so as not to recalculate.
xbounds = malloc(imOut->xsize * 2 * sizeof(float)); Also inside the loop, some ww value is used, which is needed to normalize the value of convolution. ww = 1 / ∑k [x]. It is possible not to store it at all, and to normalize the coefficients themselves, and not the result of the convolution. That is, after we calculated the coefficients, we need to go over them once again and divide them by their sum, as a result of which the sum of all the coefficients will be equal to 1:
k = &kk[xx * kmax]; for (x = (int) xmin; x < (int) xmax; x++) { float w = filterp->filter((x - center + 0.5) * ss); k[x - (int) xmin] = w; ww = ww + w; } for (x = (int) xmin; x < (int) xmax; x++) { k[x - (int) xmin] /= ww; } Now you can finally deploy a 90 ° pixel bypass:
// for (yy = 0; yy < imOut->ysize; yy++) { for (xx = 0; xx < imOut->xsize; xx++) { k = &kk[xx * kmax]; xmin = xbounds[xx * 2 + 0]; xmax = xbounds[xx * 2 + 1]; // // imOut->image8[yy][xx] } } Scale 2560×1600 RGB image to 320x200 bil 0.04759 s 86.08 Mpx/s 87.6 % to 320x200 bic 0.08970 s 45.66 Mpx/s 45.7 % to 320x200 lzs 0.11604 s 35.30 Mpx/s 41.6 % to 2048x1280 bil 0.24501 s 16.72 Mpx/s 66.7 % to 2048x1280 bic 0.30398 s 13.47 Mpx/s 49.7 % to 2048x1280 lzs 0.37300 s 10.98 Mpx/s 41.7 % to 5478x3424 bil 1.06362 s 3.85 Mpx/s 40.1 % to 5478x3424 bic 1.32330 s 3.10 Mpx/s 39.4 % to 5478x3424 lzs 1.56232 s 2.62 Mpx/s 31.2 % Result for commit d35755c .
The fourth column shows the acceleration relative to the previous version, and under the table there is a link to a commit where the changes made are clearly visible.
Optimization 2: Output Limitations
In the code, we see the following structure in several places:
if (ss < 0.5) imOut->image[yy][xx*4+b] = (UINT8) 0; else if (ss >= 255.0) imOut->image[yy][xx*4+b] = (UINT8) 255; else imOut->image[yy][xx*4+b] = (UINT8) ss; This is the limitation of the pixel value within [0, 255], if the result of the calculation goes beyond 8 bits. Indeed, the sum of all positive convolution factors can be greater than one, and the sum of all negative ones can be less than zero. So with a certain original image we can get an overflow. This overflow is the result of compensating for sudden changes in brightness and is not an error.
Take a look at the code. It has one input variable ss and exactly one output imOut->image[yy] , the value of which is assigned in several places. The bad thing here is that floating point numbers are compared. It would be faster to convert everything into integers and then compare, since all the same in the end we need a whole result. The result is such a function:
static inline UINT8 clip8(float in) { int out = (int) in; if (out >= 255) return 255; if (out <= 0) return 0; return (UINT8) out; } Using:
imOut->image[yy][xx*4+b] = clip8(ss); This also gives a performance boost, albeit small.
Scale 2560×1600 RGB image to 320x200 bil 0.04644 s 88.20 Mpx/s 2.5 % to 320x200 bic 0.08157 s 50.21 Mpx/s 10.0 % to 320x200 lzs 0.11131 s 36.80 Mpx/s 4.2 % to 2048x1280 bil 0.22348 s 18.33 Mpx/s 9.6 % to 2048x1280 bic 0.28599 s 14.32 Mpx/s 6.3 % to 2048x1280 lzs 0.35462 s 11.55 Mpx/s 5.2 % to 5478x3424 bil 0.94587 s 4.33 Mpx/s 12.4 % to 5478x3424 bic 1.18599 s 3.45 Mpx/s 11.6 % to 5478x3424 lzs 1.45088 s 2.82 Mpx/s 7.7 % Result for commit 54d3b9d .
As you can see, this optimization has a greater effect for filters with a smaller window and with a large output resolution (the only exception is 320x200 Bilinear, but I don’t presume to say why). Indeed, the smaller the filter window and the greater the final resolution, the greater the contribution to performance is made by trimming the values, which we optimized.
Optimization 3: Cycle reversal with a constant number of iterations
If you look at the horizontal step again, you can count as many as 4 nested loops:
for (yy = 0; yy < imOut->ysize; yy++) { // ... for (xx = 0; xx < imOut->xsize; xx++) { // ... for (b = 0; b < imIn->bands; b++) { // ... for (x = (int) xmin; x < (int) xmax; x++) { ss = ss + (UINT8) imIn->image[yy][x*4+b] * k[x - (int) xmin]; } } } } Each row and each column of the output image is iterated (that is, each pixel), and each pixel of the original image that needs to be minimized inside. But what is b ? b is an iteration over image channels. Obviously, the number of channels during the operation of the function does not change and never exceeds 4 (due to the method of storing the image in Pillow). Therefore, there may be only 4 possible cases. And given the fact that single-channel 8-bit images are stored in a different way, there are three cases. Accordingly, three separate internal cycles can be made: for two, three and four channels. And make a branch on the desired number of channels. I will show only the code of the three-channel case in order not to take up too much space.
for (xx = 0; xx < imOut->xsize; xx++) { if (imIn->bands == 4) { // 4 } else if (imIn->bands == 3) { ss0 = 0.0; ss1 = 0.0; ss2 = 0.0; for (x = (int) xmin; x < (int) xmax; x++) { ss0 = ss0 + (UINT8) imIn->image[yy][x*4+0] * k[x - (int) xmin]; ss1 = ss1 + (UINT8) imIn->image[yy][x*4+1] * k[x - (int) xmin]; ss2 = ss2 + (UINT8) imIn->image[yy][x*4+2] * k[x - (int) xmin]; } ss0 = ss0 * ww + 0.5; ss1 = ss1 * ww + 0.5; ss2 = ss2 * ww + 0.5; imOut->image[yy][xx*4+0] = clip8(ss0); imOut->image[yy][xx*4+1] = clip8(ss1); imOut->image[yy][xx*4+2] = clip8(ss2); } else { // } } You can not stop there and move the branch one more level up to the xx loop:
if (imIn->bands == 4) { for (xx = 0; xx < imOut->xsize; xx++) { // 4 } } else if (imIn->bands == 3) { for (xx = 0; xx < imOut->xsize; xx++) { // 3 } } else { for (xx = 0; xx < imOut->xsize; xx++) { // } } Scale 2560×1600 RGB image to 320x200 bil 0.03885 s 105.43 Mpx/s 19.5 % to 320x200 bic 0.05923 s 69.15 Mpx/s 37.7 % to 320x200 lzs 0.09176 s 44.64 Mpx/s 21.3 % to 2048x1280 bil 0.19679 s 20.81 Mpx/s 13.6 % to 2048x1280 bic 0.24257 s 16.89 Mpx/s 17.9 % to 2048x1280 lzs 0.30501 s 13.43 Mpx/s 16.3 % to 5478x3424 bil 0.88552 s 4.63 Mpx/s 6.8 % to 5478x3424 bic 1.08753 s 3.77 Mpx/s 9.1 % to 5478x3424 lzs 1.32788 s 3.08 Mpx/s 9.3 % Result for commit 95a9e30 .
Something similar can be done for a vertical passage. There is now such a code:
for (xx = 0; xx < imOut->xsize*4; xx++) { /* FIXME: skip over unused pixels */ ss = 0.0; for (y = (int) ymin; y < (int) ymax; y++) ss = ss + (UINT8) imIn->image[y][xx] * k[y-(int) ymin]; ss = ss * ww + 0.5; imOut->image[yy][xx] = clip8(ss); } There is no separate iteration over the channels; instead, xx iterated along the width multiplied by 4. That is, xx passes through each channel regardless of their number in the image. FIXME in the comment just says that it needs to be fixed. It is fixed in the same way - by branching the code for a different number of channels in the original image. I will not give the code here, a link to the commit below.
Scale 2560×1600 RGB image to 320x200 bil 0.03336 s 122.80 Mpx/s 16.5 % to 320x200 bic 0.05439 s 75.31 Mpx/s 8.9 % to 320x200 lzs 0.08317 s 49.25 Mpx/s 10.3 % to 2048x1280 bil 0.16310 s 25.11 Mpx/s 20.7 % to 2048x1280 bic 0.19669 s 20.82 Mpx/s 23.3 % to 2048x1280 lzs 0.24614 s 16.64 Mpx/s 23.9 % to 5478x3424 bil 0.65588 s 6.25 Mpx/s 35.0 % to 5478x3424 bic 0.80276 s 5.10 Mpx/s 35.5 % to 5478x3424 lzs 0.96007 s 4.27 Mpx/s 38.3 % Result for commit f227c35 .
As you can see, the horizontal passage gave more performance to reduce the picture, while the vertical - to increase.
Optimization 4: Integer Counters
for (y = (int) ymin; y < (int) ymax; y++) { ss0 = ss0 + (UINT8) imIn->image[y][xx*4+0] * k[y-(int) ymin]; ss1 = ss1 + (UINT8) imIn->image[y][xx*4+1] * k[y-(int) ymin]; ss2 = ss2 + (UINT8) imIn->image[y][xx*4+2] * k[y-(int) ymin]; } If you look at the innermost loop, you can see that the variables ymax and ymax declared as float, but are ymax to the integer at each step. Moreover, outside the loop, floor and ceil functions are used to assign values to them. That is, in fact, variables always store integers, but for some reason they are declared as float. The same goes for xmin and xmax . We change and measure.
Scale 2560×1600 RGB image to 320x200 bil 0.03009 s 136.10 Mpx/s 10.9 % to 320x200 bic 0.05187 s 78.97 Mpx/s 4.9 % to 320x200 lzs 0.08113 s 50.49 Mpx/s 2.5 % to 2048x1280 bil 0.14017 s 29.22 Mpx/s 16.4 % to 2048x1280 bic 0.17750 s 23.08 Mpx/s 10.8 % to 2048x1280 lzs 0.22597 s 18.13 Mpx/s 8.9 % to 5478x3424 bil 0.58726 s 6.97 Mpx/s 11.7 % to 5478x3424 bic 0.74648 s 5.49 Mpx/s 7.5 % to 5478x3424 lzs 0.90867 s 4.51 Mpx/s 5.7 % Result for commit 57e8925 .
The finale of the first act and the boss
I admit, I was very pleased with the results. It was possible to overclock the code by an average of 2.5 times. Moreover, to obtain this acceleration, the library user did not need to install additional equipment, resizing, as before, runs on the same core of the same processor as before. It was necessary only to update the Pillow version to version 2.7.
But until release 2.7 there was still some time left, but I was eager to check the new code on the server on which it was supposed to work. I moved the code, compiled it, and at first thought that I had messed up something:
Scale 2560×1600 RGB image 320x200 bil 0.08056 s 50.84 Mpx/s 320x200 bic 0.16054 s 25.51 Mpx/s 320x200 lzs 0.24116 s 16.98 Mpx/s 2048x1280 bil 0.18300 s 22.38 Mpx/s 2048x1280 bic 0.31103 s 13.17 Mpx/s 2048x1280 lzs 0.43999 s 9.31 Mpx/s 5478x3424 bil 0.75046 s 5.46 Mpx/s 5478x3424 bic 1.22468 s 3.34 Mpx/s 5478x3424 lzs 1.70451 s 2.40 Mpx/s Result for commit 57e8925 . Received on another machine and is not involved in the comparison.
LOL what? The results are almost the same as before the optimization. I have rechecked everything 10 times, put the prints to make sure that the necessary code works. It was not some side effect from Pillow or the environment, the difference was reproduced even in the minimal example of 30 lines. I asked a question on the Stack Overflow , and in the end I managed to find an obvious regularity: the code was executed slowly if it was compiled with GCC for a 64-bit platform. And that was exactly the difference between local Ubuntu and on the server: it was locally 32-bit.
Well, thank Moore, I'm not crazy, this is a real bug in the compiler. Moreover, the bug was fixed in GCC 4.9, but GCC 4.8 was included in the current at that time Ubuntu 14.04 LTS, i.e., it was most likely installed by the majority of library users. It was impossible to ignore this: what is the point of optimization if it does not work for the majority, including the production for which it was made. I updated the question on SO and threw a cry on tweeter. Vyacheslav Egorov came to him, one of the developers of the V8 engine and the genius of optimization, who helped to get to the bottom of the essence and found a solution.
To understand the essence of the problem, you need to delve into the history of processors and their current architecture. Once upon a time, x86 processors did not know how to work with floating point numbers, a co-processor with the x87 instruction set was invented for them. He executed instructions from the same thread as the central processor, but was installed on the motherboard as a separate device. Pretty quickly, the coprocessor was built into the central one, and physically it became one device. How long is it short? In the third Pentium there appeared a set of instructions SSE (Streaming SIMD Extensions). By the way, about SIMD instructions will be the second part of the series of articles. Despite the name, SSE contained not only SIMD commands for working with floating-point numbers, but also their equivalents for scalar calculations. That is, SSE contained a set of instructions, a duplicate set of x87, but encoded differently and with slightly different behavior.
However, the compilers were in no hurry to generate SSE code for floating-point calculations, but continued to use the obsolete x87 set. After all, the presence of SSE in the processor, no one guaranteed, unlike x87, which has been built since time immemorial. Everything changed with the arrival of the 64-bit mode of the processor. In the 64-bit mode, the SSE2 instruction set was required. That is, if you are writing a 64-bit program for x86, at least SSE2 instructions are available to you. This is what compilers use, generating SSE instructions for floating-point calculations in 64-bit mode. Let me remind you that this has nothing to do with vectorization, it’s about ordinary scalar calculations.
This is exactly what happens in our case: different sets of instructions for 32-bit and 64-bit mode are used. But so far this does not explain why the more modern SSE-code is several times slower than the outdated x87 set. To explain this phenomenon, you need to figure out exactly how the processor executes instructions.
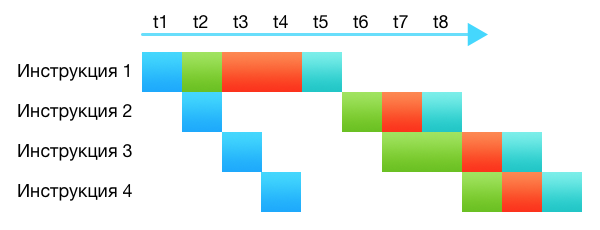
Once the processors really "carried out" instructions. They took the instruction, decoded it, executed it completely, put the result where it was said. The processors were pretty dumb. Modern processors are much smarter and more complex, they consist of dozens of different subsystems. Even on one core, without any parallel processing, the processor executes several instructions at one time, in one clock cycle. It simply happens at different stages: some instruction is just being decoded, some is requesting something from the cache, some is being passed to the arithmetic unit. Each processor subsystem does its part. This is called the conveyor.

In the picture, different subsystems are marked with different colors. It can be seen that although the command requires from 4 to 5 cycles for execution, thanks to the pipeline, each cycle selects one new command and one completes its execution.
The conveyor works the more efficiently, the more evenly it is filled and the less subsystems are idle. The processor even has subsystems that plan for optimal filling of the conveyor: swap instructions, split up one instruction into several, combine several into one.
, — . - , .
, 2 1. . .
Instruction: cvtsi2ss xmm, r32 dst[31:0] := Convert_Int32_To_FP32(b[31:0]) dst[127:32] := a[127:32] 32 . , dst - a , , xmm , dst a — , 96 , . . , , , . , 32- float. , , . .
, . cvtsi2ss , xorps . . , , , , xorps + cvtsi2ss - :
dst[31:0] := Convert_Int32_To_FP32(b[31:0]) dst[127:32] := 0 , GCC 4.8 , , . , , , . 64- .
Scale 2560×1600 RGB image 320x200 bil 0.02447 s 167.42 Mpx/s 320x200 bic 0.04624 s 88.58 Mpx/s 320x200 lzs 0.07142 s 57.35 Mpx/s 2048x1280 bil 0.08656 s 47.32 Mpx/s 2048x1280 bic 0.12079 s 33.91 Mpx/s 2048x1280 lzs 0.16484 s 24.85 Mpx/s 5478x3424 bil 0.38566 s 10.62 Mpx/s 5478x3424 bic 0.52408 s 7.82 Mpx/s 5478x3424 lzs 0.65726 s 6.23 Mpx/s 81fc88e . .
, , . , , , . ImageMagick : 64- , GCC 4.9 40% . , SSE.
: 2, SIMD
')
Source: https://habr.com/ru/post/322352/
All Articles