Determine the best place to live in the United States with your own application on IBM Bluemix

The IBM Bluemix platform allows you to work with various IBM services to create cognitive applications. An example is the IBM Watson Tradeoff Analytics Service. With the help of mathematical filtering methods, it allows you to determine the best options for a large number of criteria. As a result, specialists (in the case of a professional application) can make difficult decisions from the best options offered.
Today we offer to get acquainted with the process of creating one such application, with which you can choose the best place to live in the United States. It is clear that the possibilities of the application are not limited to this country alone - if you wish, you can create any similar program and choose the optimal place to live in another country - Russia, Great Britain, Ecuador or another region. Let's see how it all works.
The application itself can be called iDecide - its original developer did just that. The program uses a large amount of demographic data based on the results of the 2010 US Census. This data is freely available on the Web, and Watson Tradeoff Analytics provides users with a choice of solutions based on the processing of this data.
')
Tools for work
- Bluemix account ;
- Cloud Foundry CLI toolkit with GitHub ;
- Eclipse Kepler development environment with Tomcat 7.0 server;
- EGit plugin installed in Eclipse Kepler. For information on how to set up a local client to work with Git, see the documentation for Bluemix DevOps Services .
Step 1: Add the Tradeoff Analytics service to the Bluemix application.
- Sign in to Bluemix with your account (or register for a free trial ).
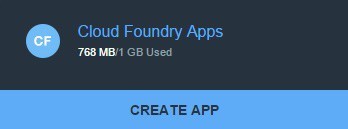
- Click Create App in the Cloud Foundry Apps window.
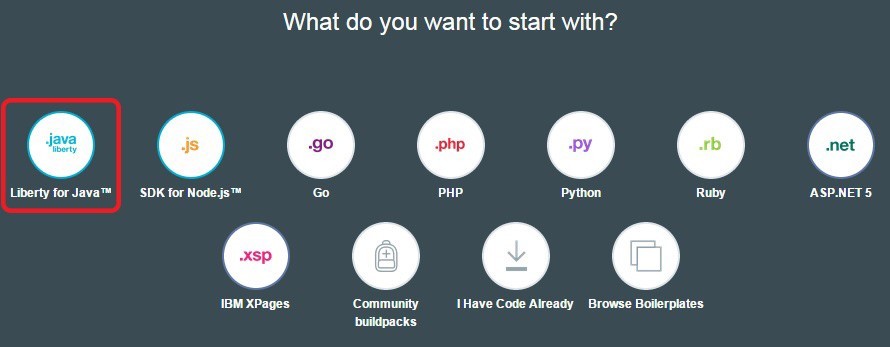
- We select WEB as an application type.
- Choose Liberty for Java. This is a lightweight IBM Web Sphere Application Server profile designed for cloud environments. Click CONTINUE.
5. On the next screen, click on the words APP NAME, then you need to enter the name of the application and click Finish. This unique name becomes part of the route URL for the application. After that, the application is prepared for some time for further work.
6. Click on the Overview item in the left navigation bar of your application. His route will be displayed under the name of the offer. After that click on the button ADD A SERVICE OR API.
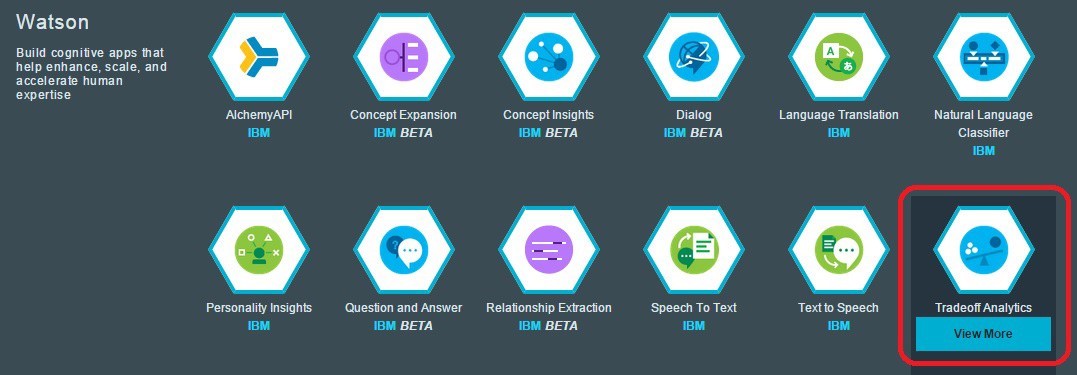
7. In the Services area of the Watson section, select the Tradeoff Analytics service.
8. The application name appears on the selected screen of the Tradeoff Analytics application. It will link the application itself with the name of the Tradeoff Analytics Service. Click the Create button. Everything that we did before connected the application with the service. The application pane displays the Java runtime for the application, as well as the associated Tradeoff Analythics service.
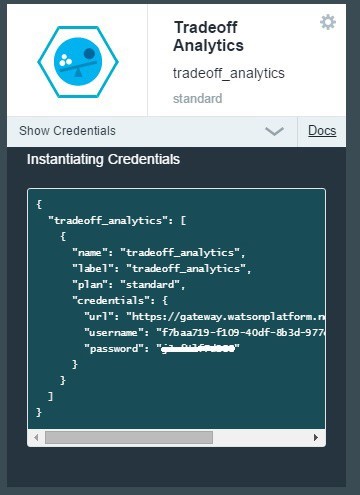
9. In the Tradeoff Analythics section, click on the Show Credinetials button.
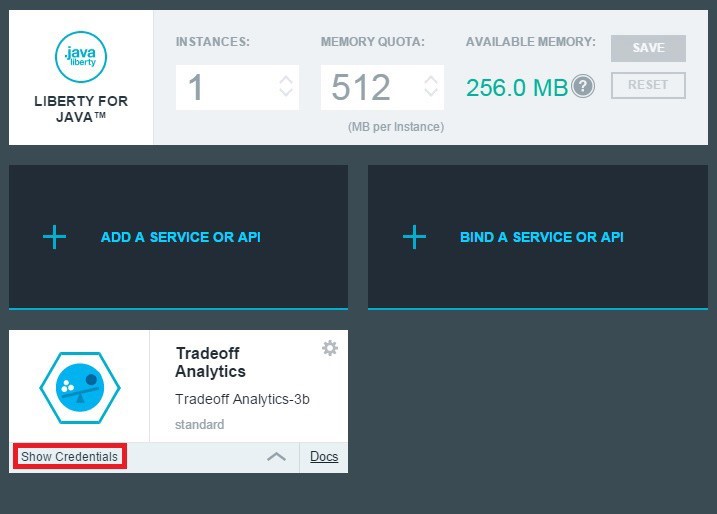
At this stage it is necessary to record the values of the URL, Username and Password fields. Later, these credentials of the IBM Watson Tradeoff Analytics Service will be needed to configure a new Java application.
Step 2. Create an application instance
1. Go to the source code and click on the FORK PROJECT button to create a copy of the project.
2. When prompted, enter the name of your new project and click CREATE to create a copy of the code in your project and in the Git repository.
Stage 3. Connecting to a DevOps project using EGit in Eclipse
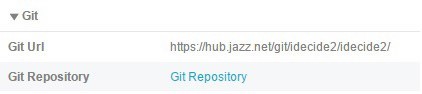
1. On the project's main page in IBM BluemixDevOpsServices in the Git section, copy the URL specified in the GitUrl field.
2. In Eclipse, select File> Import. In the Import window, select Git> ProjectsfromGit and click on the Next button.
3. Select Clone URI and click Next. Paste the copied Git URL into the URI field.
4. In the Authentication section, enter a Jazz.net user ID and IBM ID password. Click Next.
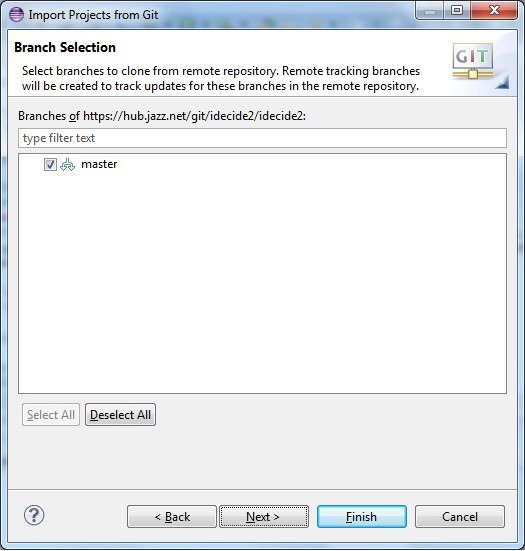
5. Select the master branch and click Next.
8. If necessary, update the LocalDestination section of the cloned repository, then click Next.
9. Select Importasgeneralproject and click Next.
10. Now click Finish to complete the creation of the project in Eclipse.
Step 4: Develop the application in Eclipse
1. In Eclipse, right-click on the project, choosing Properies;
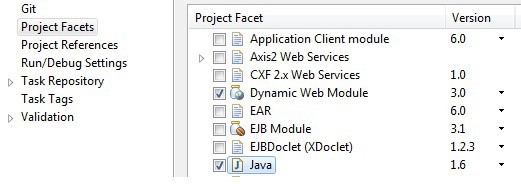
2. In the Properties dialog box, select ProjectFacets and mark Java and DynamicWebModule.
3. Click the Apple button and then the OK button.
This step allows you to add the necessary libraries to work, and the application is compiled. After the compilation process is complete, SystemLibrary JRE files are added to the application.

4. Modify the application, specifying the credentials of the IBM WatsonTradeoffAnalyticsService, which you copied in step 1 .
1. Open the idecide2 \ src \ com.watson.idecide directory.

We edit the file AnalyticsServlet.java, namely, we change the values of baseURL, username and password, specifying the data copied in step 1.

5. Here we create an application project in Eclipse. To do this, right-click on the project, and then select BuildProject in the menu. Of course, you need to make sure that the project is compiled without errors.
6. We deploy and run the application on the local Tomcat server, and then test it.
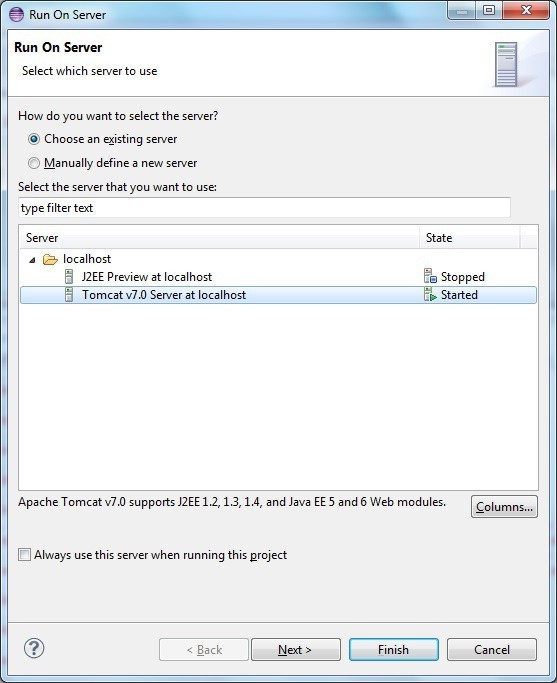
a. To do this, right-click on the project, choosing Run As> Run On Server in the menu.
b. Choose Tomcat v7.0 Server at localhost.
3. Click on Next, then Finish.
4. We test the application.
a. Export the application WAR file and save it to a directory. To export a WAR file, right-click the project and select Export. Specify the export options and click Finish.

The next step is to deploy the application WAR file to Bluemix using the CloudFoundry command line tool (cf).
Step 5: Deploy and run the application in Bluemix
Using the command line interface, we deploy the application to Bluemix (you can also start, stop, and administer applications running on Bluemix). You must first install the CloudFoundry CLI toolkit from GitHub.
a. In the CloudFoundry CLI interface, run the cflogin command to log in to Bluemix at api.ng.bluemix.net . When prompted, enter your IBM ID and password.
b. Transfer the application files from the local environment to the selected Bluemix application. In the CloudFoundry CLI interface, run the cfpush command to transfer the generated WAR file from the Eclipse project to Bluemix. In this case, <application_name> is the unique name of your application that you specified in step 1 .
cf push <application_name> -p C:\idecide2.war 3. When you receive a success message, open the Bluemix panel .
4. Test the new application by clicking on the displayed link.
That's all, we hope that your trial application is working. In fact, there are a lot of opportunities in developing this type, so after the test program, try to create another one - already the one that is suitable for solving your problems.
Source: https://habr.com/ru/post/322340/
All Articles