We write game logic in C #. Part 1/2
 Hello. In connection with the release of my SpaceLab game at GreenLight, I decided to start a series of articles on game development in C # / Unity. It will be based on the actual experience of its development and slightly different from the standard guides for beginners:
First, I will not repeat the documentation in other words.
Secondly, you need programming knowledge to understand what I am writing about.
')
Unfortunately, this article will not be able to help you if you want to create your casual game using just a mouse.
But then, step by step, I will talk about the creation of an engine, on which the game logic of our economic strategy will work.
For those who love spoilers or just want to read the code - at the end there is a link not a repository, where each item is added by a separate commit.
Anyone interested to know what the game is - at the bottom there is a video and a link to a free download.
I’ll warn you right away that I don’t have a goal to ideally apply a huge number of patterns or describe an approach to TTD methodology. In the article I try to write a readable, maintainable, and reckless code, as it would have been written in life. Perhaps people with a huge skill in C # and writing games will find this article obvious. Nevertheless, the question of how to write game logic I heard quite often and this article is perfect for those who are interested in writing a server and those who are interested in writing a client on Unity.
A brief description of the GD we want to achieve
1. The player controls the ship. In the ship, you can build rooms, in the rooms you can add modules to the slots.
2. To build something you need to spend resources and wait for time.
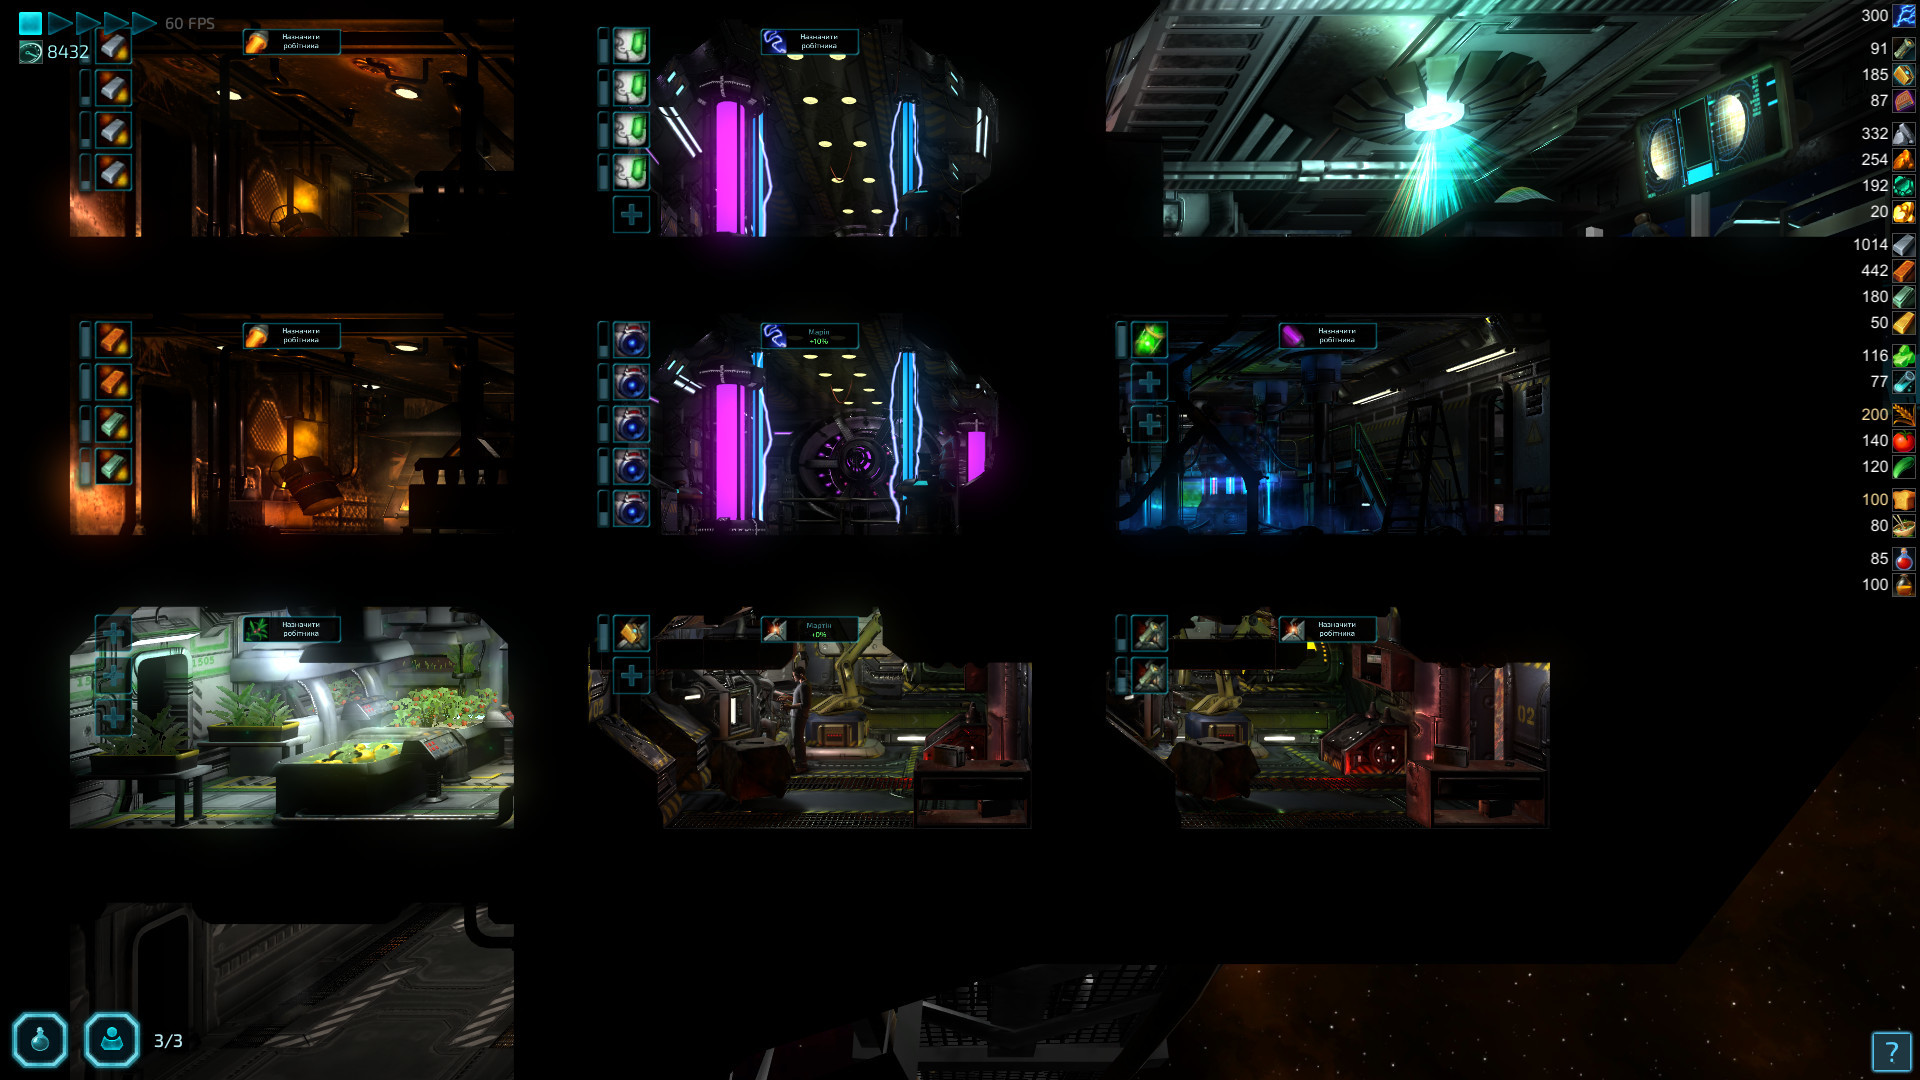
After six months of development, the result should look something like this)
Work plan
1. Set up projects
2. Create a core - basic facilities
3. Add and test the first commands - build the structure and module
4. We take out the settings of buildings and modules in a separate file.
5. Add the flow of time
6. Add Constructible, buildings are now under construction for some time.
7. Add resources, for the construction of the necessary resources
8. Add a production cycle - the module consumes and issues resources.
The article was very voluminous, so I had to divide it into two parts. In this part we will do the first five points, and in the second part we’ll finish
1. Set up projects
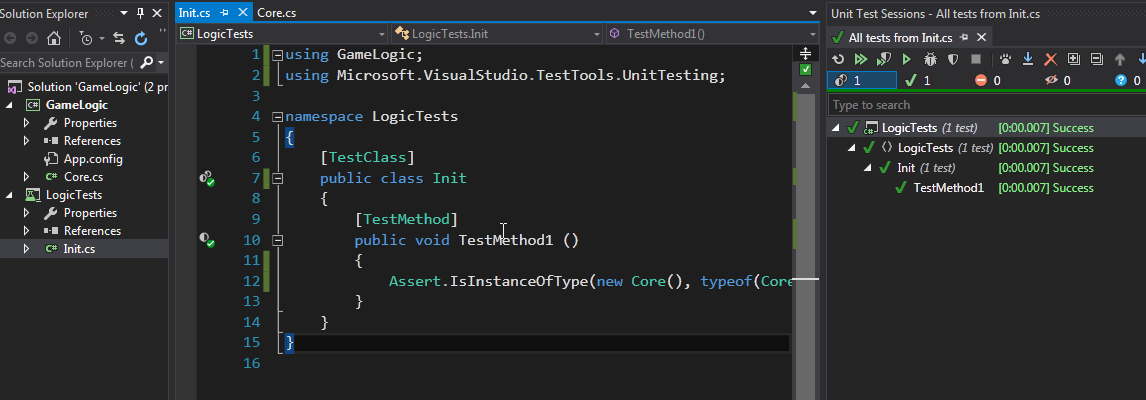
At the beginning, we will not need the Unity Editor - we write Game Logic. We open VS and we create two projects:
GameLogic and LogicTests (Unit Tests Project). In the first, we will write the actual logic of the game on pure C # without using the Unity namespace, the second will test our logic with the built-in test tool. Let's add the first Core class to GameLogic and write the first test to check our bundle:public class Core { public static void Main () {} public Core () {} }[TestClass] public class Init { [TestMethod] public void TestMethod1 () { Assert.IsInstanceOfType(new Core(), typeof(Core)); } }
2. Create a core - basic facilities
Well, this indicates that we have set up correctly and you can proceed to programming logic.
So, let's deal with our game design. We have a ship (Ship), there are rooms (Room) in it, a Building can be built into each room, and there can be modules (Module) in each building. Of course, Room and Building could be merged into one entity, but further such separation will only help us.
For all these structures, I will create a separate namespace Architecture and base classes. And also enum for indices of rooms. Many things we are doing now are temporary and necessary to run the first test of game logic.
public enum BuildingType { Empty, PowerPlant }public enum ModuleType { Generator }public class Core { public static void Main () {} public readonly Ship Ship = new Ship(); public Core () { Ship.CreateEmptyRooms(); } }public class Ship { // public readonly int RoomsLimit = 10; private readonly List<Room> rooms = new List<Room>(); public IEnumerable<Room> Rooms { get { return rooms; } } public void CreateEmptyRooms () { for (var i = 0; i < RoomsLimit; i++) { rooms.Add(new Room(i)); } } public Room GetRoom (int index) { return rooms[index]; } }public class Room { public readonly int Index; // public Building Building { get; set; } public Room (int index) { Index = index; // - - Building = new Building(BuildingType.Empty); } }public class Building { // , public readonly int ModulesLimit = 10; public readonly BuildingType Type; // private readonly Dictionary<int, Module> modules = new Dictionary<int, Module>(); public IEnumerable<Module> Modules { get { return modules.Values; } } public Building (BuildingType type) { Type = type; } public Module GetModule (int position) { return modules.ContainsKey(position) ? modules[position] : null; } public void SetModule (int position, Module module) { if (position < 0 || position >= ModulesLimit) { throw new IndexOutOfRangeException( "Position " + position + " is out of range [0:" + ModulesLimit + "]" ); } modules[position] = module; } }public class Module { public readonly ModuleType Type; public Module (ModuleType type) { Type = type; } }
3. Add and test the first commands - build the structure and module
Now we can write the first “feature” - the construction of the building and the construction of the module in it. I will describe all such actions as a separate class that will inherit from the Command class:
public abstract class Command { public Core Core { get; private set; } public bool IsValid { get; private set; } public Command Execute (Core core) { Core = core; IsValid = Run(); return this; } protected abstract bool Run (); } And although now even such a small structure is unnecessary - a little later, thanks to it, we will fix the events we need. And the existence of each atomic action in a separate team will allow us to combine them. Let's write our first two steps:
public class BuildingConstruct : Command { public readonly Room Room; public readonly Building Building; public BuildingConstruct (Room room, Building building) { Room = room; Building = building; } protected override bool Run () { // , - if (Room.Building.Type != BuildingType.Empty) { return false; } // if (Building.Type == BuildingType.Empty) { return false; } Room.Building = Building; return true; } }public class ModuleConstruct : Command { public readonly Building Building; public readonly Module Module; public readonly int Position; public ModuleConstruct (Building building, Module module, int position) { Building = building; Module = module; Position = position; } protected override bool Run () { if (Building.Type == BuildingType.Empty) { return false; } if (Position < 0 || Position >= Building.ModulesLimit) { return false; } if (Building.GetModule(Position) != null) { return false; } Building.SetModule(Position, Module); return true; } }
It's time to see if our engine works. In tests we create a kernel, try to build a room, and in it we try to build a module. In addition, it is worth adding a check that it is impossible to build something that the game logic should not allow to build:
[TestClass] public class Architecture { [TestMethod] public void CorrectConstruction () { var core = new Core(); var room = core.Ship.GetRoom(0); Assert.AreEqual(BuildingType.Empty, room.Building.Type); Assert.AreEqual(0, room.Building.Modules.Count()); Assert.IsTrue( new BuildingConstruct( room, new Building(BuildingType.PowerPlant) ) .Execute(core) .IsValid ); Assert.AreEqual(BuildingType.PowerPlant, room.Building.Type); Assert.AreEqual(0, room.Building.Modules.Count()); Assert.IsTrue( new ModuleConstruct( room.Building, new Module(ModuleType.Generator), 2 ) .Execute(core) .IsValid ); Assert.AreEqual(BuildingType.PowerPlant, room.Building.Type); Assert.AreEqual(ModuleType.Generator, room.Building.GetModule(2).Type); Assert.AreEqual(1, room.Building.Modules.Count()); } [TestMethod] public void IncorrectConstruction () { var core = new Core(); var room = core.Ship.GetRoom(0); Assert.IsFalse( new BuildingConstruct( room, new Building(BuildingType.Empty) ) .Execute(core) .IsValid ); Assert.IsFalse( new ModuleConstruct( room.Building, new Module(ModuleType.Generator), 2 ) .Execute(core) .IsValid ); new BuildingConstruct( room, new Building(BuildingType.PowerPlant) ) .Execute(core); Assert.IsFalse( new BuildingConstruct( room, new Building(BuildingType.PowerPlant) ) .Execute(core) .IsValid ); Assert.IsFalse( new ModuleConstruct( room.Building, new Module(ModuleType.Generator), 666 ) .Execute(core) .IsValid ); } } 
4. We take out the settings of buildings and modules in a separate file.
Fortunately, our tests are perfectly passed. Now we need the ability to linearly expand the number of buildings and modules - for this we need to do the following:
- Create a configuration for buildings and modules - "
class BuildingConfig" and "class ModuleConfig", they will keep all the settings of our facilities. - Building and Module should take appropriate settings upon creation.
- Make a factory to create modules and buildings
- Add settings for multiple buildings and modules
- Adapt existing code to new input.
// public class BuildingConfig { public BuildingType Type; // public int ModulesLimit; // public ModuleType[] AvailableModules; }public class ModuleConfig { public ModuleType Type; }public class Building { // ... public readonly BuildingConfig Config; // ... // , public Building (BuildingConfig config) { Type = config.Type; ModulesLimit = config.ModulesLimit; Config = config; } }public class Module { // ... public readonly ModuleConfig Config; // , public Module (ModuleConfig config) { // ... Type = config.Type; Config = config; } }
As you can see, now our code is non-working. In order not to carry configs every time with us, we will create a factory that will manufacture our buildings knowing only their type. I know that the name is still too general, but we can always easily rename it thanks to the IDE, as well as divide it into two factories:
public class Factory { public Building ProduceBuilding (BuildingType type) { throw new Exception("Not implemented yet"); } public Module ProduceModule (ModuleType type) { throw new Exception("Not implemented yet"); } }// : public class Core { // ... public readonly Factory Factory = new Factory(); public Core () { // Ship.CreateEmptyRooms(Factory); } }// : public class Ship { // ... public void CreateEmptyRooms (Factory factory) { for (var i = 0; i < RoomsLimit; i++) { rooms.Add(new Room(i, factory.ProduceBuilding(BuildingType.Empty))); } }// - -: public class Room { // ... public Room (int index, Building building) { Index = index; Building = building; } }
Now the IDE indicates where we have errors - we replace the constructor’s call for using the factory.
// new Building(Type); // core.Factory.ProduceBuilding(Type);// new Module(Type); // core.Factory.ProduceModule(Type);
And although the code is now correct - when we run our tests, we say
"Not implemented yet" . To do this, go back to our factory and implement several buildings and modules. public class Factory { private readonly Dictionary<BuildingType, BuildingConfig> buildings = new Dictionary<BuildingType, BuildingConfig>() { { BuildingType.Empty, new BuildingConfig() { Type = BuildingType.Empty }}, { BuildingType.PowerPlant, new BuildingConfig() { Type = BuildingType.PowerPlant, ModulesLimit = 5, AvailableModules = new[]{ ModuleType.Generator } }}, { BuildingType.Smeltery, new BuildingConfig() { Type = BuildingType.Smeltery, ModulesLimit = 4, AvailableModules = new[]{ ModuleType.Furnace } }}, { BuildingType.Roboport, new BuildingConfig() { Type = BuildingType.Roboport, ModulesLimit = 3, AvailableModules = new[]{ ModuleType.Digger, ModuleType.Miner } }} }; private readonly Dictionary<ModuleType, ModuleConfig> modules = new Dictionary<ModuleType, ModuleConfig>() { { ModuleType.Generator, new ModuleConfig() { Type = ModuleType.Generator }}, { ModuleType.Furnace, new ModuleConfig() { Type = ModuleType.Furnace }}, { ModuleType.Digger, new ModuleConfig() { Type = ModuleType.Digger }}, { ModuleType.Miner, new ModuleConfig() { Type = ModuleType.Miner }} }; public Building ProduceBuilding (BuildingType type) { if (!buildings.ContainsKey(type)) { throw new ArgumentException("Unknown building type: " + type); } return new Building(buildings[type]); } public Module ProduceModule (ModuleType type) { if (!modules.ContainsKey(type)) { throw new ArgumentException("Unknown module type: " + type); } return new Module(modules[type]); } } I immediately added several buildings and modules so that it could be covered with tests. And I will immediately say - yes, there is no point in storing all these settings in the factory. They will be stored separately in JSON files, one per structure, parsed and transferred to the factory. Fortunately, our engine will not even notice this change. In the meantime, we are not so critical to bring them to HSON, how to run tests and check whether everything works correctly. Fortunately, yes. At the same time, let's add tests that it is impossible to build a module in the wrong room, for example, Furnace in PowerPlant.
[TestMethod] public void CantConstructInWrongBuilding () { var core = new GameLogic.Core(); var room = core.Ship.GetRoom(0); new BuildingConstruct( room, core.Factory.ProduceBuilding(BuildingType.PowerPlant) ) .Execute(core); Assert.IsFalse( new ModuleConstruct( room.Building, core.Factory.ProduceModule(ModuleType.Furnace), 2 ) .Execute(core) .IsValid ); Assert.AreEqual(null, room.Building.GetModule(2)); } Alas, as you can guess, no one has written the verification logic. Add a validation condition to the module construction team and after that successfully pass the test:
public class ModuleConstruct : Command { // ... protected override bool Run () { // ... if (!Building.Config.AvailableModules.Contains(Module.Type)) { return false; } // ... Well, now everything is correct. At the same time, we add tests for the correct operation of the limits and move on.
[TestMethod] public void ModulesLimits () { var core = new GameLogic.Core(); var roomRoboport = core.Ship.GetRoom(0); var roomPowerPlant = core.Ship.GetRoom(1); Assert.IsTrue( new BuildingConstruct( roomRoboport, core.Factory.ProduceBuilding(BuildingType.Roboport) ) .Execute(core) .IsValid ); Assert.IsTrue( new BuildingConstruct( roomPowerPlant, core.Factory.ProduceBuilding(BuildingType.PowerPlant) ) .Execute(core) .IsValid ); Assert.IsFalse( new ModuleConstruct( roomRoboport.Building, core.Factory.ProduceModule(ModuleType.Miner), 3 ) .Execute(core) .IsValid ); Assert.IsTrue( new ModuleConstruct( roomPowerPlant.Building, core.Factory.ProduceModule(ModuleType.Generator), 3 ) .Execute(core) .IsValid ); } 
5. Add the flow of time
Computers are discrete. And all games are discrete. Simply put, let's imagine that all games are step by step. Most games skip steps automatically and 60 times per second. Such games are called realtime. I understand that this is very rough, but for the implementation of game logic it is quite convenient to imagine that your game is turn-based and to think in such categories. And then already on the client, you can run tween between two states and the user will be beautiful and the game will work quickly. To begin with, we introduce the concept of a move:
public class Turns { public int CurrentTurn { get; private set; } internal void NextTurn () { CurrentTurn++; } }public class Core { public readonly Turns Turns = new Turns(); }
And also we will enter command which allows to switch the course. I immediately added a command that allows you to switch several moves - it will be quite convenient during testing. In tests, we will cut two birds with one stone at a time.
public class NextTurn : Command { protected override bool Run () { // Core.Turns.NextTurn(); return true; } }public class NextTurnCount : Command { public const int Max = 32; public readonly int Count; public NextTurnCount (int count) { Count = count; } protected override bool Run () { if (Count < 0 || Count > Max) { return false; } for (var i = 0; i < Count; i++) { var nextTurn = new NextTurn().Execute(Core); if (!nextTurn.IsValid) return false; } return true; } }[TestClass] public class Turns { [TestMethod] public void NextTurnsCommand () { var core = new Core(); Assert.AreEqual(0, core.Turns.CurrentTurn); Assert.IsTrue( new NextTurnCount(4) .Execute(core) .IsValid ); Assert.AreEqual(4, core.Turns.CurrentTurn); } }
Running far ahead I will write how to make a speed switch in the game, which will allow us to run at different speeds:
public class TimeWarp { public readonly int Speed_Stop = 0; public readonly int Speed_X1 = 1000; public readonly int Speed_X2 = 500; public readonly int Speed_X5 = 200; public readonly Core Core; private int currentSpeed; public int currentTime { get; private set; } public TimeWarp (Core core) { currentSpeed = Speed_Stop; Core = core; } public void SetSpeed (int speed) { currentSpeed = speed; currentTime = Math.Min(speed, currentTime); } public int GetSpeed () { return currentSpeed; } public bool IsStopped () { return currentSpeed == Speed_Stop; } public void AddTime (int ms) { if (IsStopped()) return; currentTime += ms; // // while (currentTime >= currentSpeed) NextTurn // ? // 20 if (currentTime < currentSpeed) return; currentTime -= currentSpeed; new NextTurn().Execute(ore); } }[TestMethod] public void TimeWarp () { var core = new Core(); var time = new TimeWarp(core); Assert.AreEqual(0, core.Turns.CurrentTurn); time.SetSpeed(time.Speed_X5); time.AddTime(50); time.AddTime(50); time.AddTime(50); time.AddTime(50); Assert.AreEqual(1, core.Turns.CurrentTurn); time.AddTime(199); Assert.AreEqual(1, core.Turns.CurrentTurn); time.AddTime(1); Assert.AreEqual(2, core.Turns.CurrentTurn); }
Now in Unity it will be enough to hang on any Update and transfer the delta time to our TimeWarp:
public TimeComponent : MonoBehaviour { public TimeWarp timeWarp; public void Awake () { timeWarp = ...; // } public void Update () { timeWarp.AddTime( Time.deltaTime ); } } 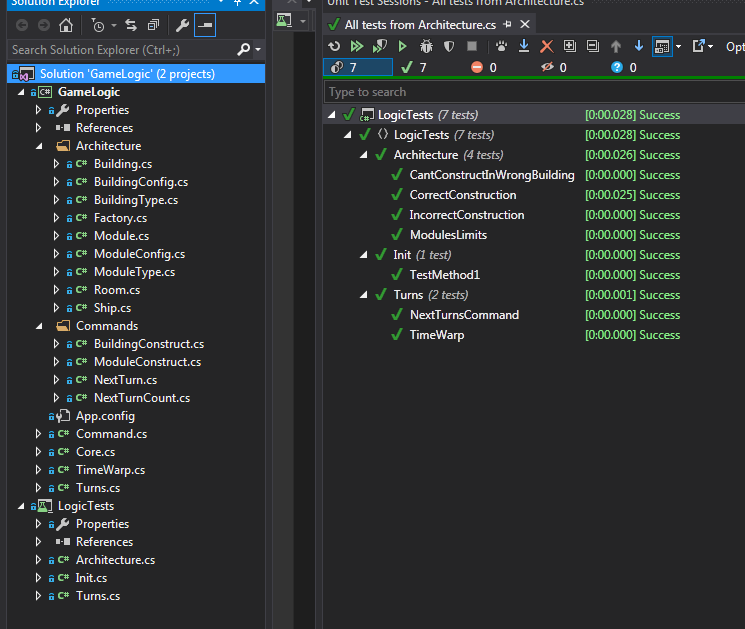
To be continued...
In the next article we will complete the creation of a workable basis for our engine by implementing the following points:
6. Add Constructible, buildings are now under construction for some time.
7. Add resources, for the construction of the necessary resources
8. Add a production cycle - the module consumes and issues resources.
For those who just love the code - there is a separate repository on GitHub.
In addition, if you are interested in questions on the development of SpaceLab - ask, I will answer them in the comments or in a separate article
Download for Windows, Linux, Mac for free and without SMS can be from the SpaceLab page on GreenLight
Source: https://habr.com/ru/post/322258/
All Articles