Using Tarantool in a .NET project on Windows
Recently, on Habré, there are quite a few articles about Tarantool - a database and application server, which is used in Mail.Ru Group, Avito, Yota on various high-load projects. And so, when in a small startup, which I sometimes advise, it became necessary to divide the beautiful, but, unfortunately, monolithic application into microservices, I thought: why are we worse than other companies? - and decided to look towards Tarantool. However, unlike most companies where Tarantool is used, in our case the project is developed in Visual Studio on Windows. It is assumed that even with the transition to microservice architecture, most microservices will be written in C #. And Tarantool ... It is worth visiting the official website - and you immediately understand: it is even problematic to install Tarantool on Windows, since it is not ported to this operating system. How I struggled with such difficulties, for which microservice I chose Tarantool and how you can use Tarantool in my .NET projects, I will tell in this article. In the meantime, a spoiler - almost all difficulties are surmountable, and my experience can without a doubt be called positive. For example, it took me less than ten minutes to download and run Tarantool, and then make a request to it from the C # code. And I will show you how to do it!
This article is a tutorial that describes how to work with Tarantool as such. There is no description of a project built on Tarantool, or a comparison of Tarantool with other products (there are already quite a lot of articles on this topic). The material was born as an attempt to answer the question: what would I like to read when I first started working with Tarantool. But first I’ll tell you a little about why we, in fact, use Tarantool in real life.
Plan
- Using Tarantool
- We work with Tarantool on Windows
- Tarantool on Windows Subsystem for Linux
- Tarantool in Docker on Windows
- Creating an initialization script
- Working with Tarantool in .NET / C #
- Data retrieval
- Adding data
- Update data
- Data retrieval by secondary key
- Calling Lua Functions - Impressions of ProGaudi / tarantool-csharp
- Creating REST services in Tarantool
- Results
Using Tarantool
One of the microservices that is most important for almost any project (and the creation of which worried me the most) is the microservice of authentication and authorization. And first of all it was necessary to determine what requirements are placed on the system / database, where information about users will be stored. There are not so many requirements, but in fact they are satisfied with a very small number of products available on the market. In addition, you always want to get by with a minimal amount of these products in order to simplify configuration and support. Therefore, the combination of MySQL + Redis + RabbitMQ or something like that would obviously be a brute force. So here are our basic requirements:
- User data must be securely stored on disk.
- Data replication to multiple nodes should be supported. With one virtual machine, there is no reason to talk about any acceptable uptime and reliability. Therefore, we must take for granted the fact that we have been living in the world of distributed systems for many years, and it’s impossible to get rid of one server with MS SQL Server back in 2005.
- Since every request in the system (including requests from users and requests to API) is checked for access rights, we need maximum data reading performance. Therefore, it is desirable to have all the data in memory.
- Support for secondary indexes is needed, with which it will be possible to make complex queries on a list of users. For example, quickly get all users with a rating from 10 to 25 points - or something like that.
- It is highly desirable for the system to provide support for queues, since in most projects there is a need for such a mechanism.
It should be noted that according to its characteristics, Tarantool is a very successful combination of in-memory databases for caching and a full-fledged NoSQL DBMS for permanent reliable data storage. And besides, it fits all our requirements, providing decent performance. Therefore, after comparing these and other characteristics, we made a choice in his favor. Well, and besides, it is always nice to do away with the task with the help of one good solution, and not to set up a whole zoo of various systems.
An important point relating to microservice authorization and authentication. Please note that you can not store data about users and groups in any disk DBMS, and then just take and put this data in the in-memory cache. Since the cache in this case must have a fast and reliable synchronization mechanism with the main database. After all, we do not want a blocked user to continue working only because the cache and the main database have not yet been synchronized. A new user would not be able to log in for the same reason. In addition, as a developer, I really do not want to write the logic of such synchronization myself: the reliability of the solution is questionable, and the probability of synchronization errors, on the contrary, is high. Therefore, the fact that in Tarantool there is WAL (write-ahead log) and the data on the disk and in memory are always synchronized is just a huge advantage. This is probably one of the most important reasons for choosing Tarantool. Well, performance, of course, is another important reason.
So, the time has come, in fact, to share with you the story itself about how I ran Tarantool on Windows. After that, I will tell you about working with Tarantool from a .NET application in a tutorial format.
We work with Tarantool on Windows
When Node.js only gained popularity, its Windows version simply did not exist. And we, the developers sitting on Windows, had to just wait and bite your elbows, well, or switch to a Mac, which many did in time. Now, Microsoft understands that developers are used to the macOS and Linux environment, and it's almost impossible to lure them back to Windows. In addition, even if it succeeds, developers will miss a lot. I don’t know if Microsoft argued this way or not, but in Windows 10 it was possible to run unchanged executable files from different Linux distributions (at first only Ubuntu was supported, and now SuSe is also available) without emulation or virtualization - Windows Subsystem for Linux (WSL). The new Windows kernel subsystem implements calls to the Linux kernel, and the minimal / pico-processes mechanism allows not to load ntdll and not to do other Windows-specific things. This functionality appeared in Windows 10 Anniversary Update in the summer of 2016. But in this version too much did not work, therefore, if you want to run Tarantool in this way, it is better to use the latest builds from the Fast Insider Preview or Windows 10 Creators Update when it becomes available. What I did when writing this article (I used build 15031). In the 15031 build, Tarantool works with some errors, but the errors are not critical and, in general, it is stable. In earlier builds of Windows, there were problems even with the launch.
Naturally, when we talk about Windows Subsystem for Linux, we consider it solely for development purposes. Since this solution will not work on Windows Server in production. There can not do without native support. Therefore, in production we use Tarantool, which works in Docker containers. Containers, in turn, function in Azure Container Service. Actually, our ASP.NET Core microservices also work there, so no new entities were implemented in the project. Working with Docker is perfectly supported in Visual Studio 2017, which helps a lot when developing. But the Docker is so beautiful that we can transfer everything without any problems even to the Digital Ocean, or even to Amazon Lightsail. There is no binding to the cloud provider.
Since production still uses Docker, it is also better to use Docker when developing. According to my impressions, Docker on Windows is no worse than Docker on macOS. Naturally, virtualization will be used (as on macOS), but in this way we will get rid of many compatibility issues when deploying a project. Well, and besides, for the full work with Docker you do not need the latest build of Insider Preview or the latest version of Windows.
Therefore, we will consider launching Tarantool in Windows Subsystem for Linux simply as a demonstration that this is generally possible (for learning how to work with Tarantool, this solution will also be interesting, besides, it is useful if you cannot use Docker for some reason or not want), but for real development, I still recommend Docker.
Tarantool on Windows Subsystem for Linux
Well, it's time for five simple steps to run Tarantool on Windows 10 using Windows Subsystem for Linux. My whole process took about 15 minutes. But a lot depends on your hardware and Internet connection speed. I also want to remind once again that I did all these manipulations on Windows 10 Insider Preview build 15031.
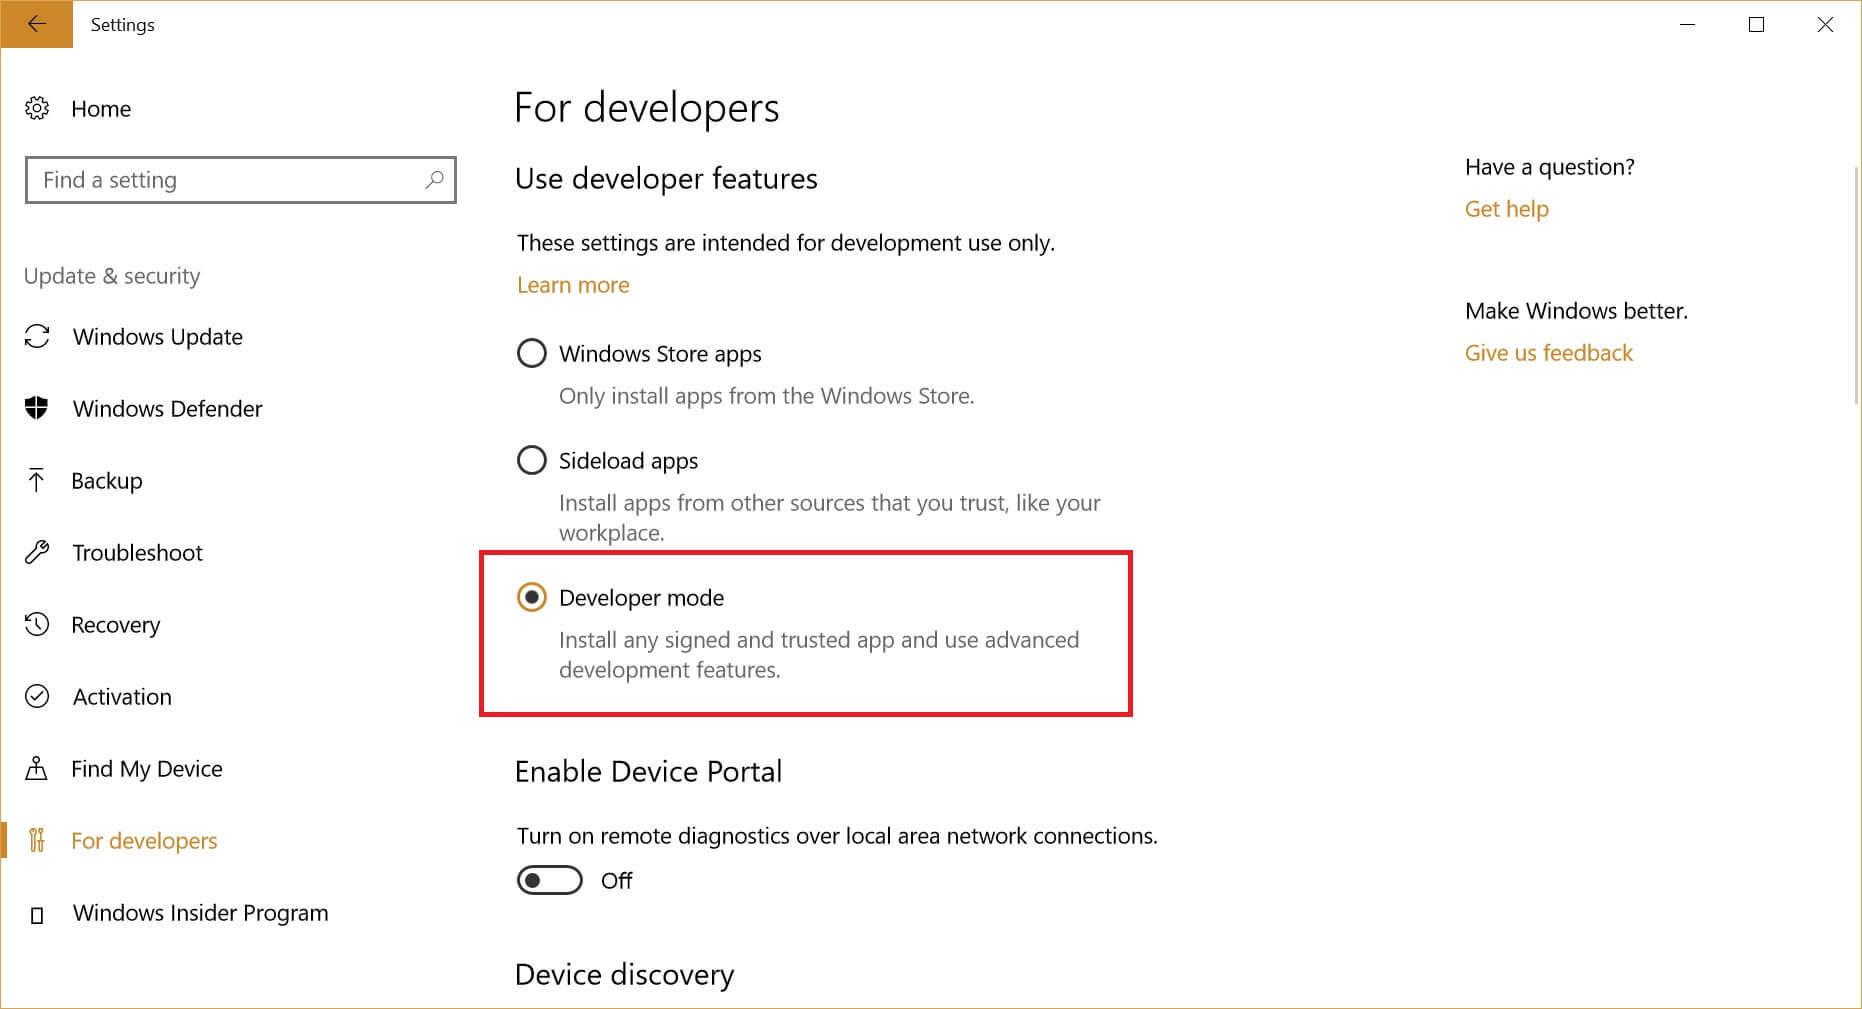
1. From the Start menu, select Settings -> Update and Security -> For developers and enable Developer mode, if you haven't enabled it yet.
2. After that, start PowerShell and run a simple command to turn on Windows Subsystem for Linux ( > - you don't need to enter the command line prompt, of course):
> Enable-WindowsOptionalFeature -Online -FeatureName Microsoft-Windows-Subsystem-Linux 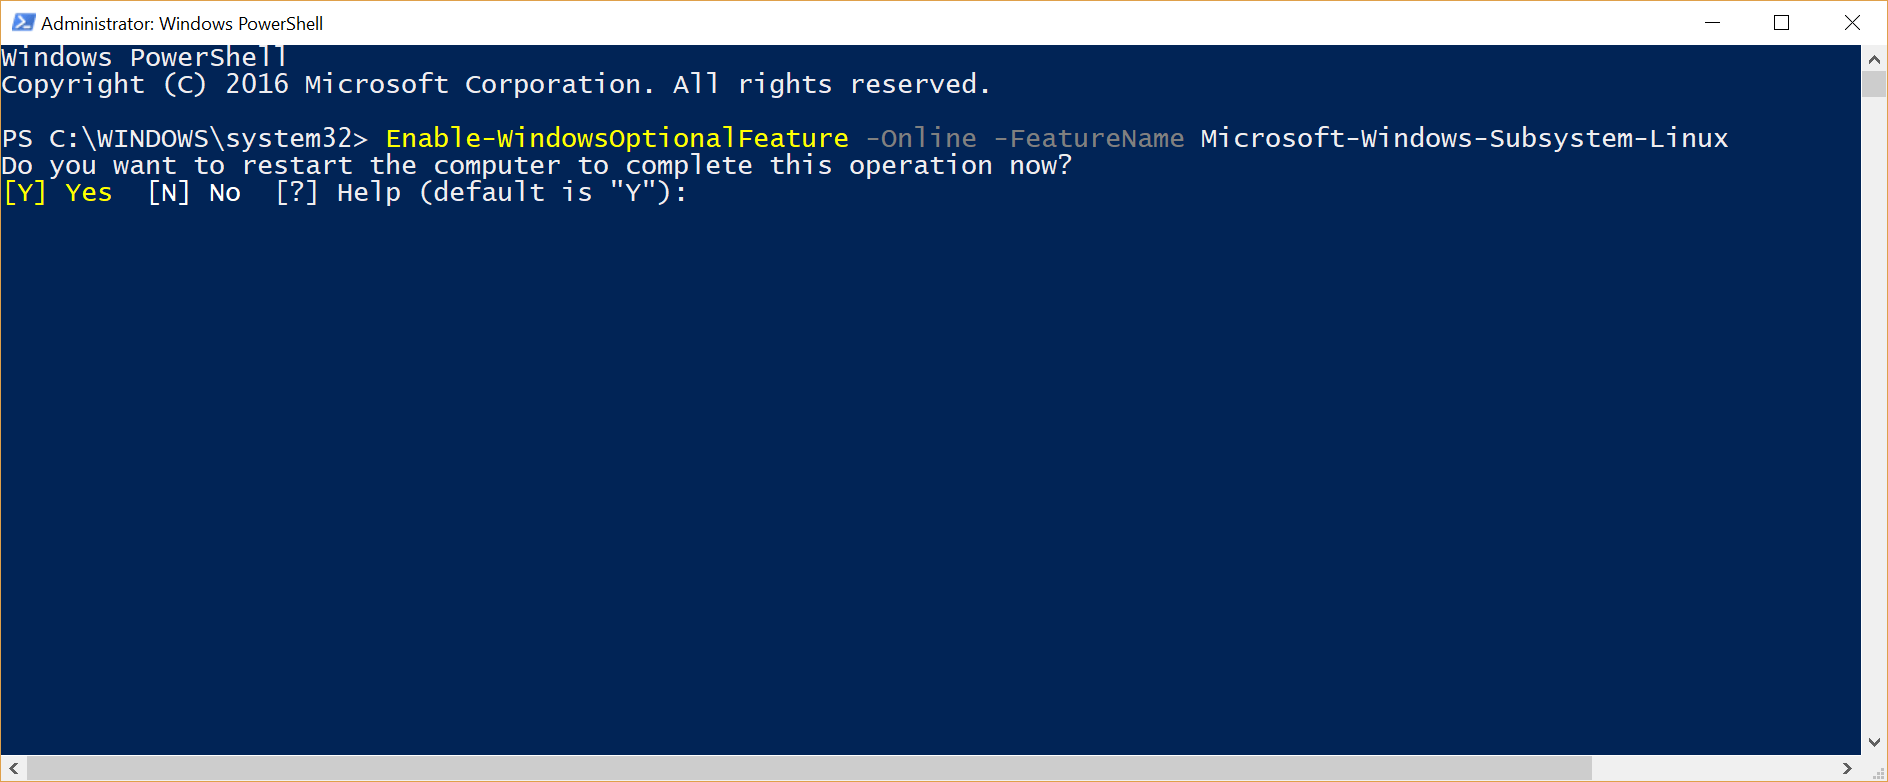
As in the previous step, a reboot is required.
3. Open a command prompt and run bash . You will be prompted to download the Ubuntu user-mode distribution, create a Linux user and set a password for it. After installing and configuring Ubuntu, a Start Tile will appear in the Start menu to launch Bash on Ubuntu on Windows directly.
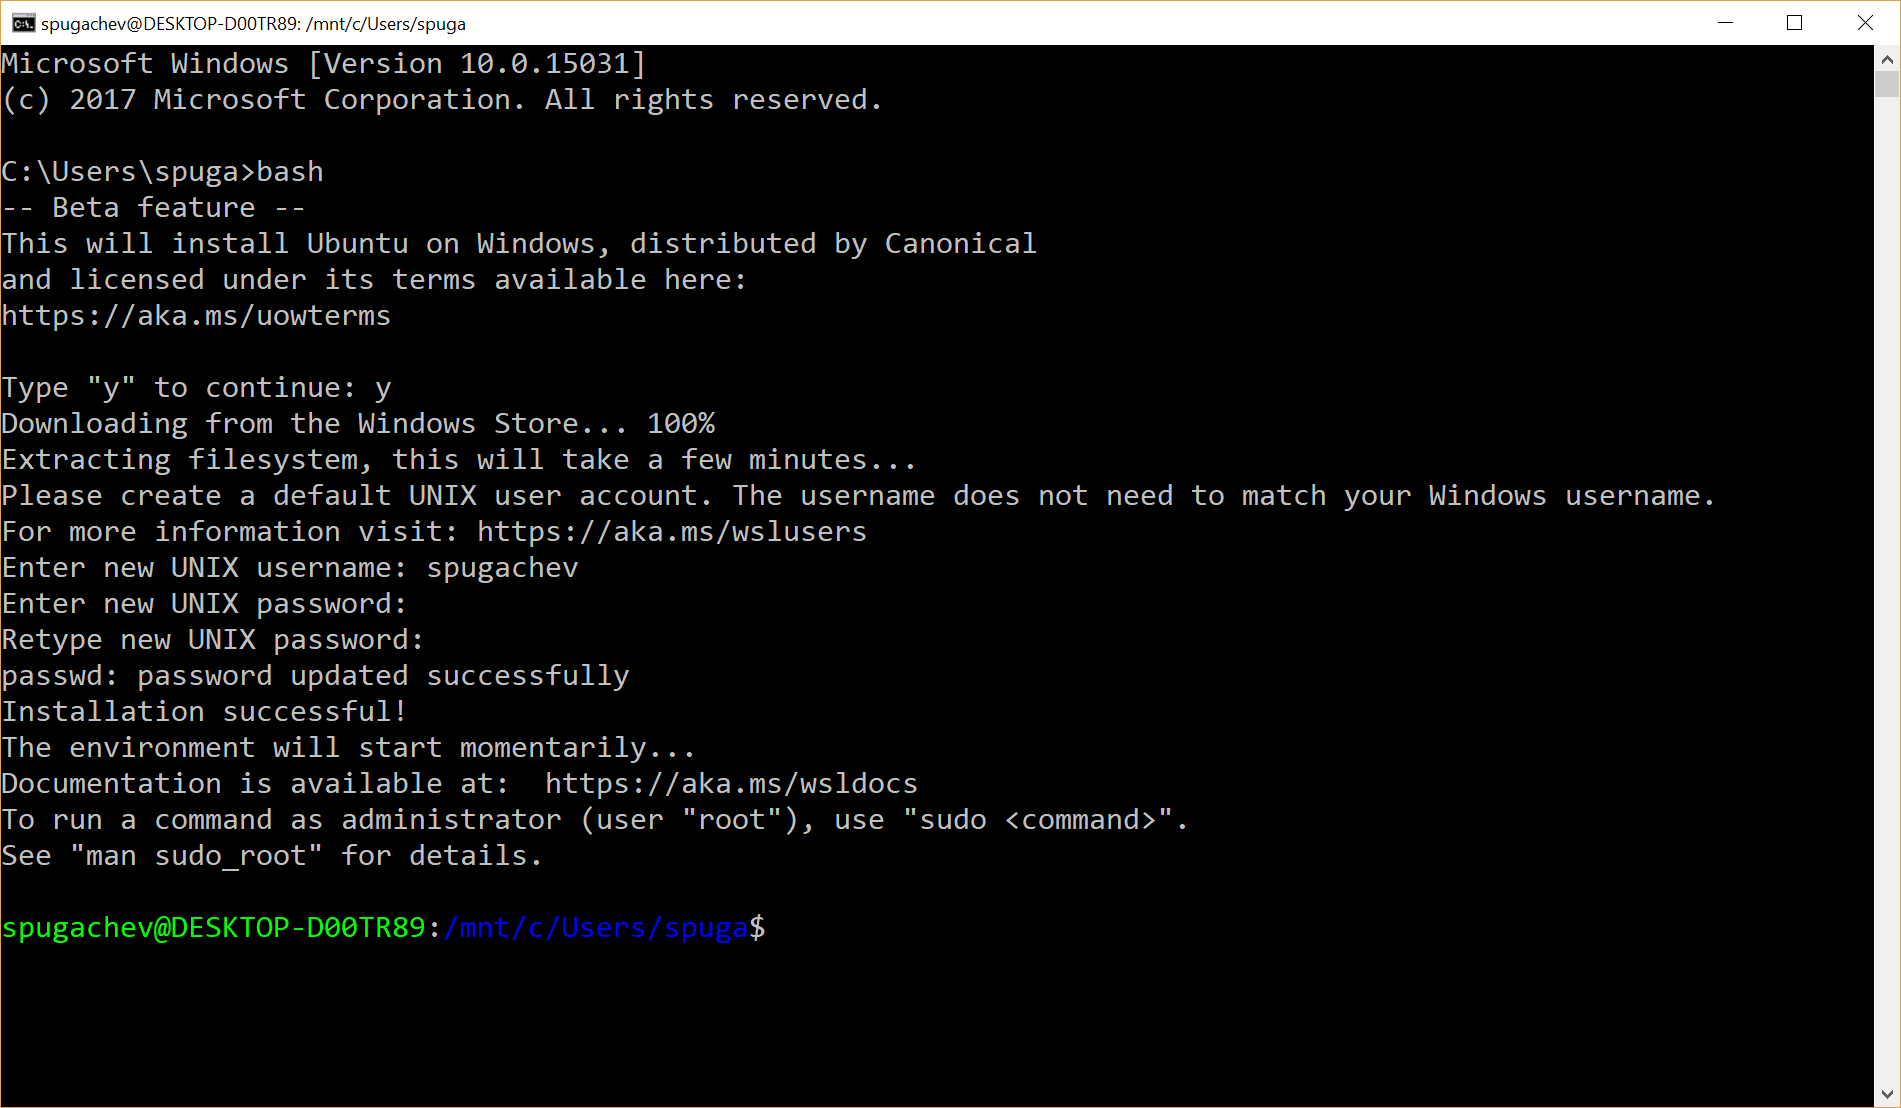
Hooray! Now we have a full-fledged Bash, and we can run almost any software available on Ubuntu, and most importantly, the apt-get command is supported. Sin does not take advantage of this, let's install Tarantool.
4. Use the installation instructions for Ubuntu, which is located on the official website:
https://tarantool.org/download.html
curl http://download.tarantool.org/tarantool/1.7/gpgkey | sudo apt-key add - release=`lsb_release -c -s` # install https download transport for APT sudo apt-get -y install apt-transport-https # append two lines to a list of source repositories sudo rm -f /etc/apt/sources.list.d/*tarantool*.list sudo tee /etc/apt/sources.list.d/tarantool_1_7.list <<- EOF deb http://download.tarantool.org/tarantool/1.7/ubuntu/ $release main deb-src http://download.tarantool.org/tarantool/1.7/ubuntu/ $release main EOF # install sudo apt-get update sudo apt-get -y install tarantool Run these commands in bash. Everything, Tarantool is installed. Now you can run it.
5. Run Tarantool using the same command:
> tarantool Tarantool uses Lua as an embedded language. And you will see an interpreter prompt:
tarantool> A distinctive feature of Lua: it is a very simple language, literally 15 minutes is enough to learn its basic features. From my own experience, I can say that to understand almost all of the code found in the examples in Tarantool, a 15-minute tutorial is really enough.
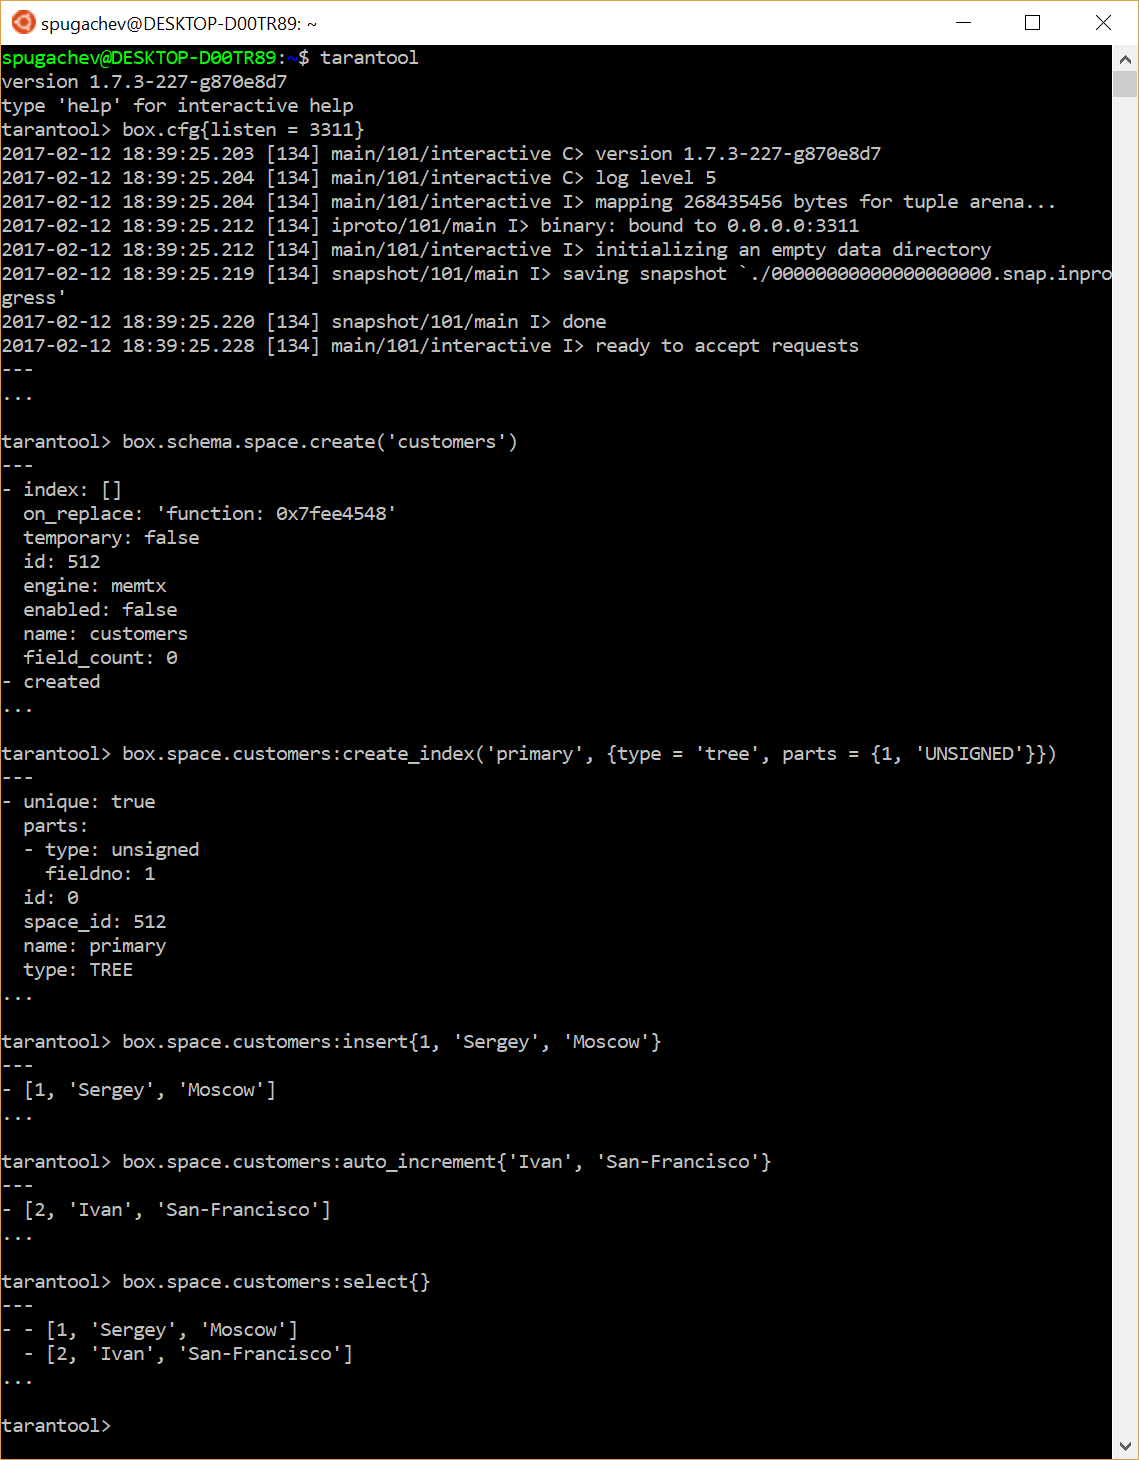
So, run the tarantool command, and a Lua interpreter will open before you. Now we will configure Tarantool and run it on port 3311 using the main Tarantool library called box .
tarantool> box.cfg({listen = 3311}) In this case, since the only parameter of the cfg function is a table with parameters (tables in Lua are very similar to objects in JavaScript and have nothing to do with tables in relational DBMS), you can omit the parentheses and write the code as follows:
tarantool> box.cfg{listen = 3311} Now create a space for data storage. Spaces in Tarantool is an analogue of collections in MongoDB, well, or tables in other DBMS:
tarantool> box.schema.space.create('customers') And also create a primary index on the first field (we can also create secondary and composite indices):
tarantool> box.space.customers:create_index('primary', {type = 'tree', parts = {1, 'UNSIGNED'}}) The colon in the customers:create_index necessary to emulate object orientation and correctly pass the self parameter. The following two calls will be equivalent (note the dot in one case and the colon in the other):
tarantool> box.space.customers:select({}) and
tarantool> box.space.customers.select(box.space.customers,{}) Now we insert some entries into space customers . One with an explicit indication of the primary key, and the other with an automatic increment:
tarantool> box.space.customers:insert{1, 'Sergey', 'Moscow'} tarantool> box.space.customers:auto_increment{'Ivan', 'San-Francisco'} Now we will request all entries:
tarantool> box.space.customers:select{} Before us, in the console, in the YAML format, two newly added entries were displayed.
If you are just starting to work with Tarantool, then I recommend to go through the tutorial. Tutorial starts a simple command:
tarantool> tutorial() Also on Habré you can find excellent articles describing the architecture of Tarantool , its capabilities and how you can quickly start working with it .
So, in just five simple steps, we got Tarantool running using Windows Subsystem for Linux. Tarantool works as a process in Windows without using virtualization. Now it's time to figure out how we can achieve a similar result with Docker.
Tarantool in Docker on Windows
It seems to me that in terms of Docker infrastructure, the best thing that has happened in the industry over the past decade. Now you can try almost any product without a long setup using the simple docker run . And Tarantool is no exception. Therefore, install Docker for Windows , if it is not installed, go to the console and enter the following command:
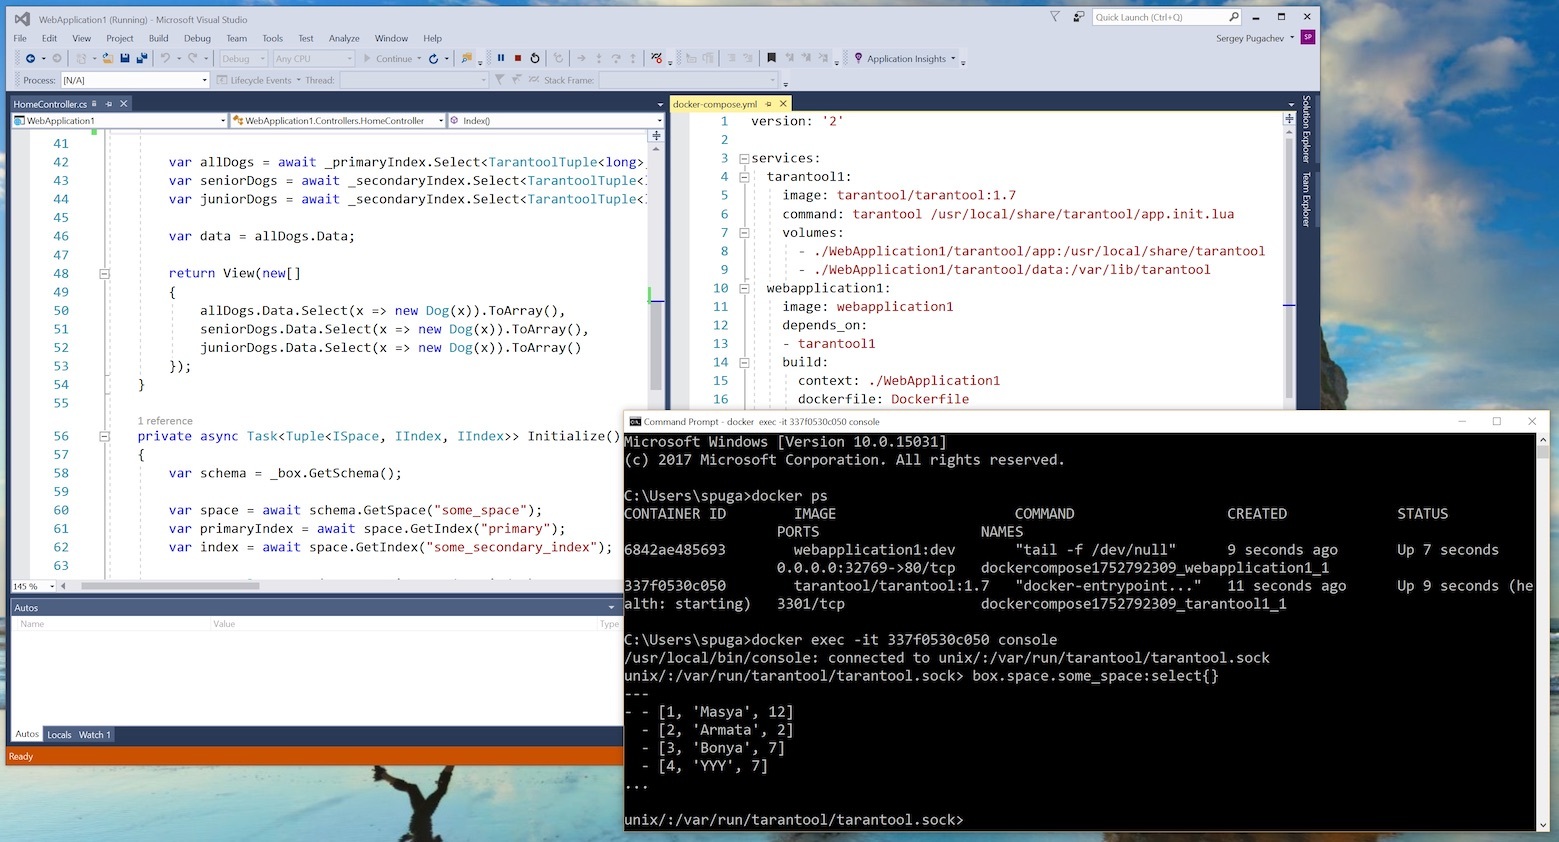
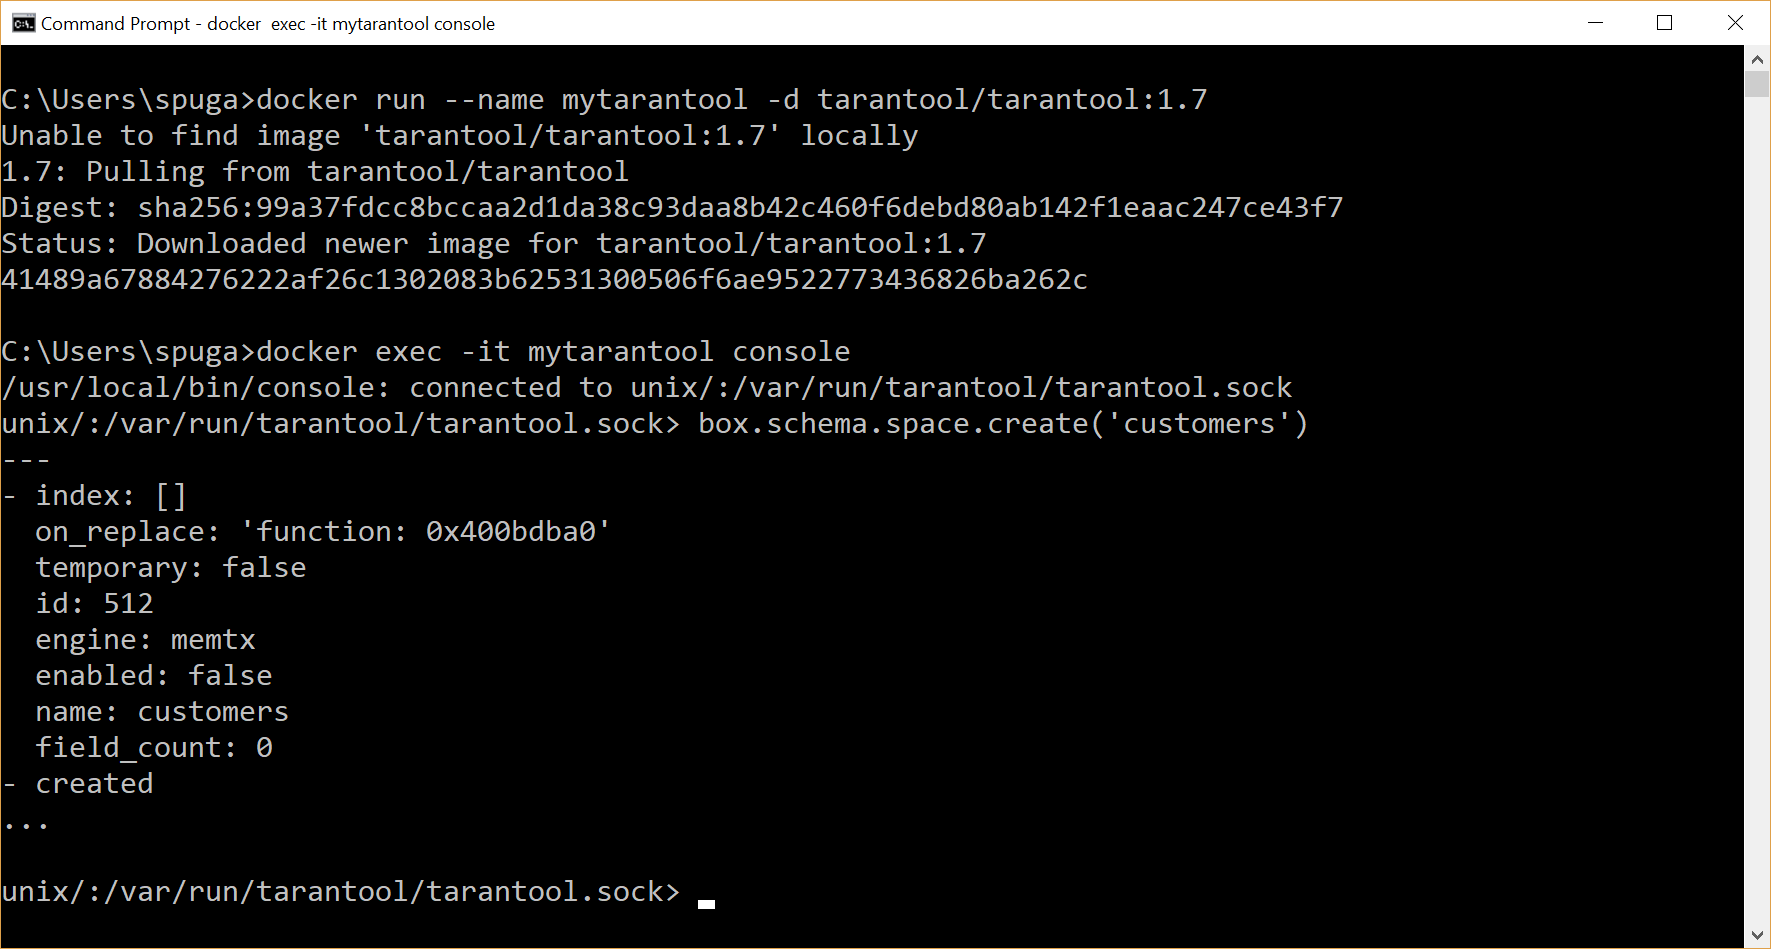
> docker run --name mytarantool -d tarantool/tarantool:1.7 If the image of Tarantool 1.7 has not yet been downloaded, it will automatically download, and the new container created from this image will be launched. Everything. We launched Tarantool! The -d (detached) -d says that the container should be run in the background. Therefore, all that you see in the console after the command is executed is the container ID.
Now it's time to connect to our new instance of Tarantool through its own console:
> docker exec -it mytarantool console We connect to a container called mytarantool and execute the console command in it interactively. After that, the Tarantool console opens, and you can execute any commands in it.
As you can see, after installing Docker, in order to run Tarantool, it took one action, another command is needed to connect to Tarantool. This is even easier than in the previous example with Windows Subsystem for Linux. That's why I like the Docker version much more. Well and besides, Tarantool in Docker works in the same environment in which it will work in production.
Now the Tarantool instance is up and running in Docker. And he even stores data somewhere, which is not bad. The only problem is that we do not know where exactly the data is stored. You need to specify a place on the Windows host where Tarantool would save logs and snap shots. You also need to make Tarantool accessible from Windows on a specific port, for example, 3301. All this is required so that you can connect to it from our .NET application via localhost:3301 .
But before doing this, stop and delete our existing container:
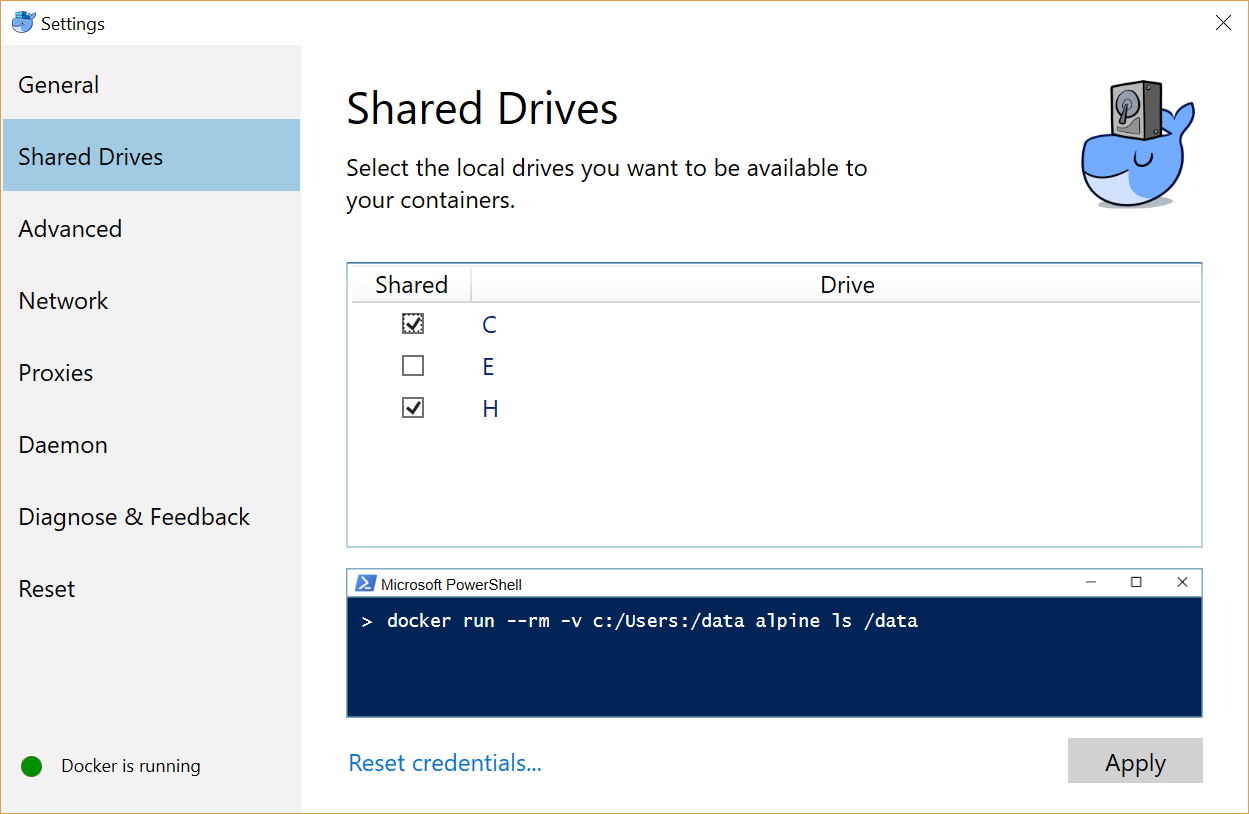
> docker stop mytarantool && docker rm mytarantool Create a folder C:\tarantool\data , which will be placed logs and snaphot'y our copy of Tarantool. The name and location of the folder is arbitrary. Do not forget to only make the disk where the folder is located available for Docker: click on the Docker icon in the system tray and select the Settings… item from the context menu Settings… In the dialog that opens, in the Shared Drives section, you need to specify the necessary disks.
Now launch the new Docker container with Tarantool:
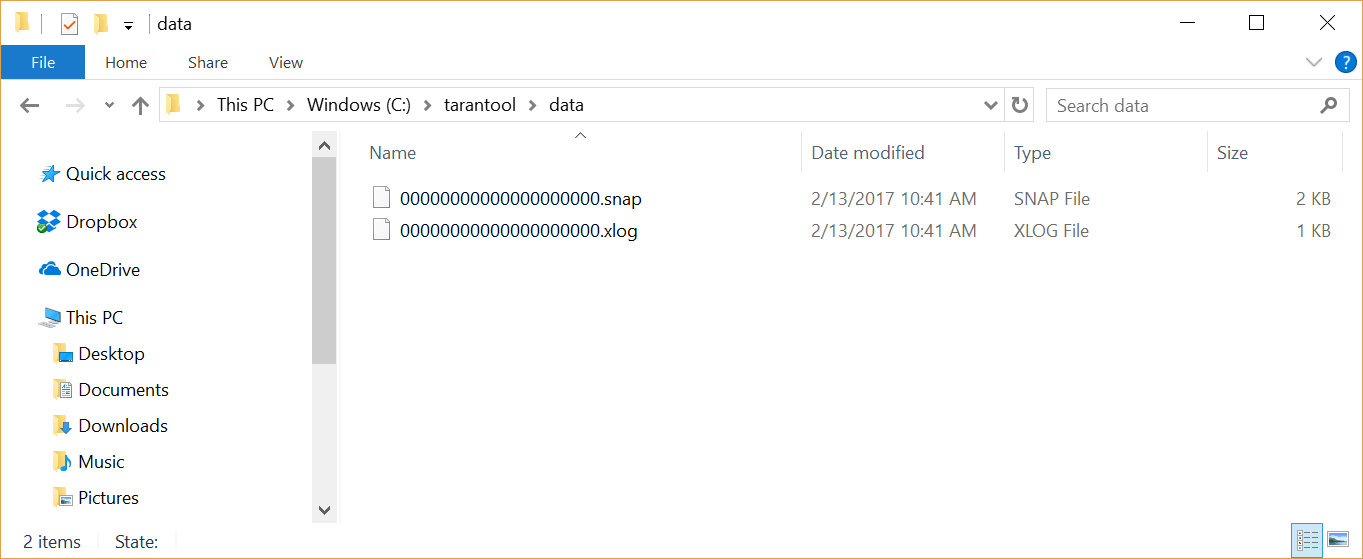
> docker run --name mytarantool -d -p 3301:3301 -vc:/tarantool/data:/var/lib/tarantool tarantool/tarantool:1.7 We linked the C:\tarantool\data folder on Windows with the /var/lib/tarantool container - the place where (according to the container settings) the data is stored. After starting the container, you can see that in the folder C:\tarantool\data there is a log file and a snapshot.
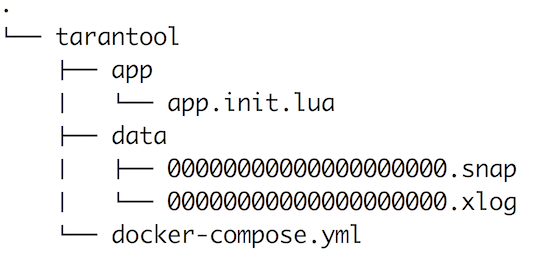
Tarantool is now available from Windows at localhost:3301 . We can access it from our .NET application (or any other). The only problem is that Tarantool is currently empty. Create spaces and add some data to them, if necessary. We will also create users and assign them rights. Manually doing this in the console is not the best idea, so let's write an initialization script for Lua for this purpose. We will look at the creation of a full-fledged Lua-script for initialization in detail in the next section, but for now let's make a minimal script that will be further improved. To do this, create a folder C:\tarantool\app and app.init.lua in it. Configuration details are not very important now. Here is the minimum Lua script you need to create:
app.init.lua
#!/usr/bin/env tarantool box.cfg { pid_file = nil, background = false, log_level = 5 } Also, to launch the Docker container, you do not want to enter complex commands every time. So let's use Docker Compose and write the entire configuration in the YAML docker-compose.yml , which we put in C:\tarantool\ .
docker-compose.yml
version: '2' services: tarantool: container_name: mytarantool image: tarantool/tarantool:1.7 command: tarantool /usr/local/share/tarantool/app.init.lua ports: - 3301:3301 volumes: - c:/tarantool/app:/usr/local/share/tarantool - c:/tarantool/data:/var/lib/tarantool Here we create a tarantool service called mytarantool from the tarantool/tarantool:1.7 . At the same time, as an argument, we launch our app.init.lua configuration file, and also make Tarantool available from Windows on port 3301. In addition, we connect the Windows app and data folders to the Docker container.
Now you can run Tarantool using Docker Compose with one simple command:
> docker-compose -f C:/tarantool/docker-compose.yml up -d You can stop and delete a container with Tarantool with the command:
> docker-compose -f C:/tarantool/docker-compose.yml down If you are already in the folder with the docker-compose.yml , then the path to the file can be omitted:
> cd C:/tarantool/ > docker-compose up -d Well then. We configured the launch of Tarantool with a single docker-compose and created a simple initialization script. Now the folder structure is as follows:
It's time to write a more advanced initialization script that will create a user space and load test data.
Creating an initialization script
Our initialization script will do the following. First, create an operator user with the password 123123 . This user is granted read, write, and execute permissions. Second, create space users . And also three indexes: a unique index on the first field (fields are counted from one, not from zero), where the user ID will be stored as a GUID string, a unique index on the third field, where the login will be stored, and a non-unique index on the fifth field where the user's rating will be stored as a number. Creation of users, space and indexes occurs in the function init . And in the load_data function we will add three entries in the space of users. The box.once function allows box.once to execute the function once for the current database, which seems to me a very useful feature. The following is the complete app.init.lua code:
app.init.lua
#!/usr/bin/env tarantool local log = require('log') local uuid = require('uuid') local function init() box.schema.user.create('operator', { password = '123123', if_not_exists = true }) box.schema.user.grant('operator', 'read,write,execute', 'universe', nil, { if_not_exists = true }) local users_space = box.schema.space.create('users', { if_not_exists = true }) users_space:create_index('primary_id', { if_not_exists = true, type = 'HASH', unique = true, parts = {1, 'STRING'} }) users_space:create_index('secondary_login', { if_not_exists = true, type = 'HASH', unique = true, parts = {3, 'STRING'} }) users_space:create_index('secondary_rating', { if_not_exists = true, type = 'TREE', unique = false, parts = {5, 'INT'} }) end local function load_data() local users_space = box.space.users users_space:insert{uuid.str(), 'Ivan Ivanov', 'ivanov', 'iivanov@domain.com', 10} users_space:insert{uuid.str(), 'Petr Petrov', 'petrov', 'ppetrov@domain.com', 15} users_space:insert{uuid.str(), 'Vasily Sidorov', 'sidorov', 'vsidorov@domain.com', 20} end box.cfg { pid_file = nil, background = false, log_level = 5 } box.once('init', init) box.once('load_data', load_data) Make changes to the app.init.lua file and restart the Docker container with the Tarantool command:
> docker-compose restart Now we have a fully working Tarantool with data with which we can work from a .NET application.
Working with Tarantool in .NET / C#
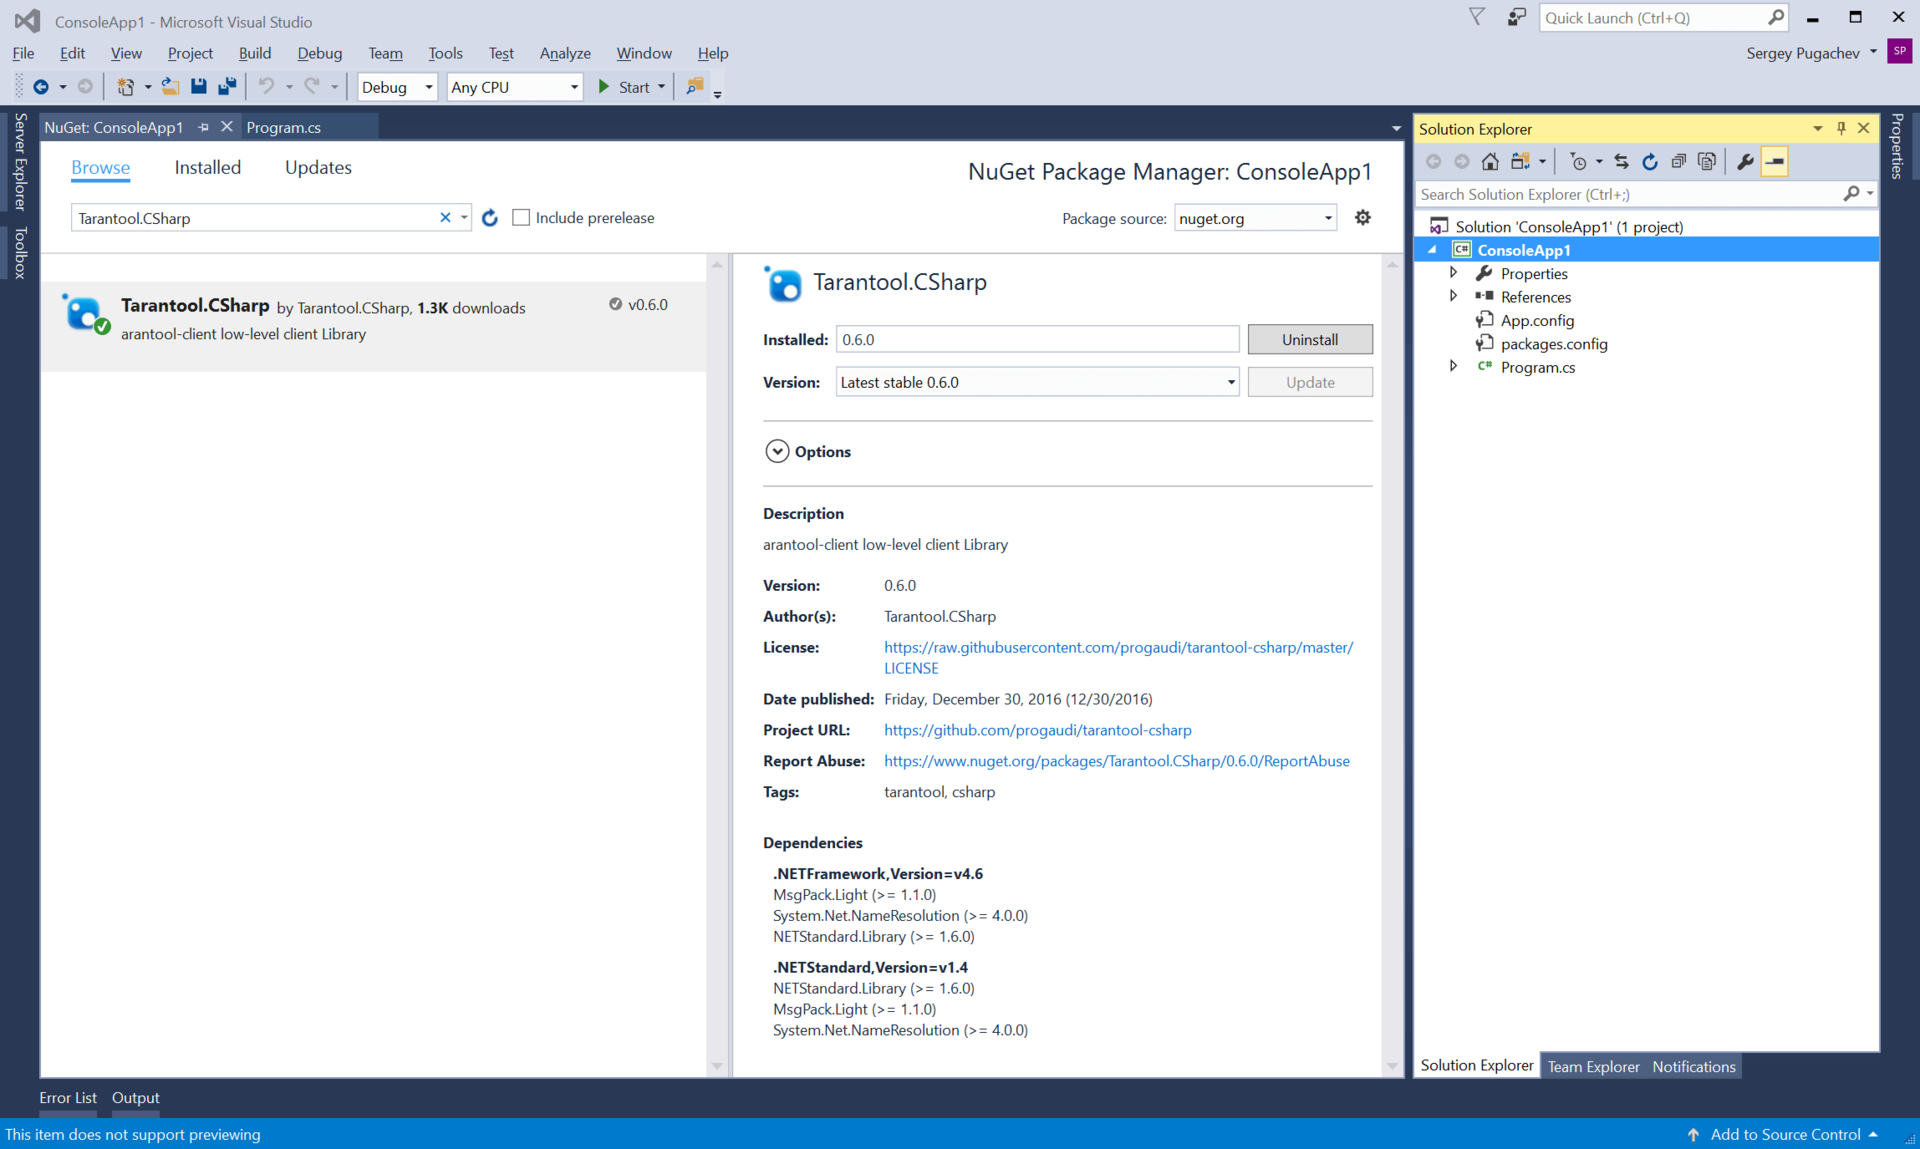
The most popular library for working with Tarantool in .NET applications is the ProGaudi / tarantool-csharp library ; we will work with it in this section.
In the repository of this library on GitHub there is a great example of an ASP.NET Core application that uses Docker and works with Tarantool. In this example, you will see the Tarantool setting already familiar to us with the help of Docker Compose. I recommend to download and see an example, but now we will look at a simpler console application.
All code and projects covered in this article can be found on GitHub .
Create a new console application in Visual Studio and connect tarantool-csharp using NuGet. To do this, in the context menu of the project in the Solution Explorer window, select Manage NuGet packages… Next, find and install the Tarantool.CSharp package.
Data retrieval
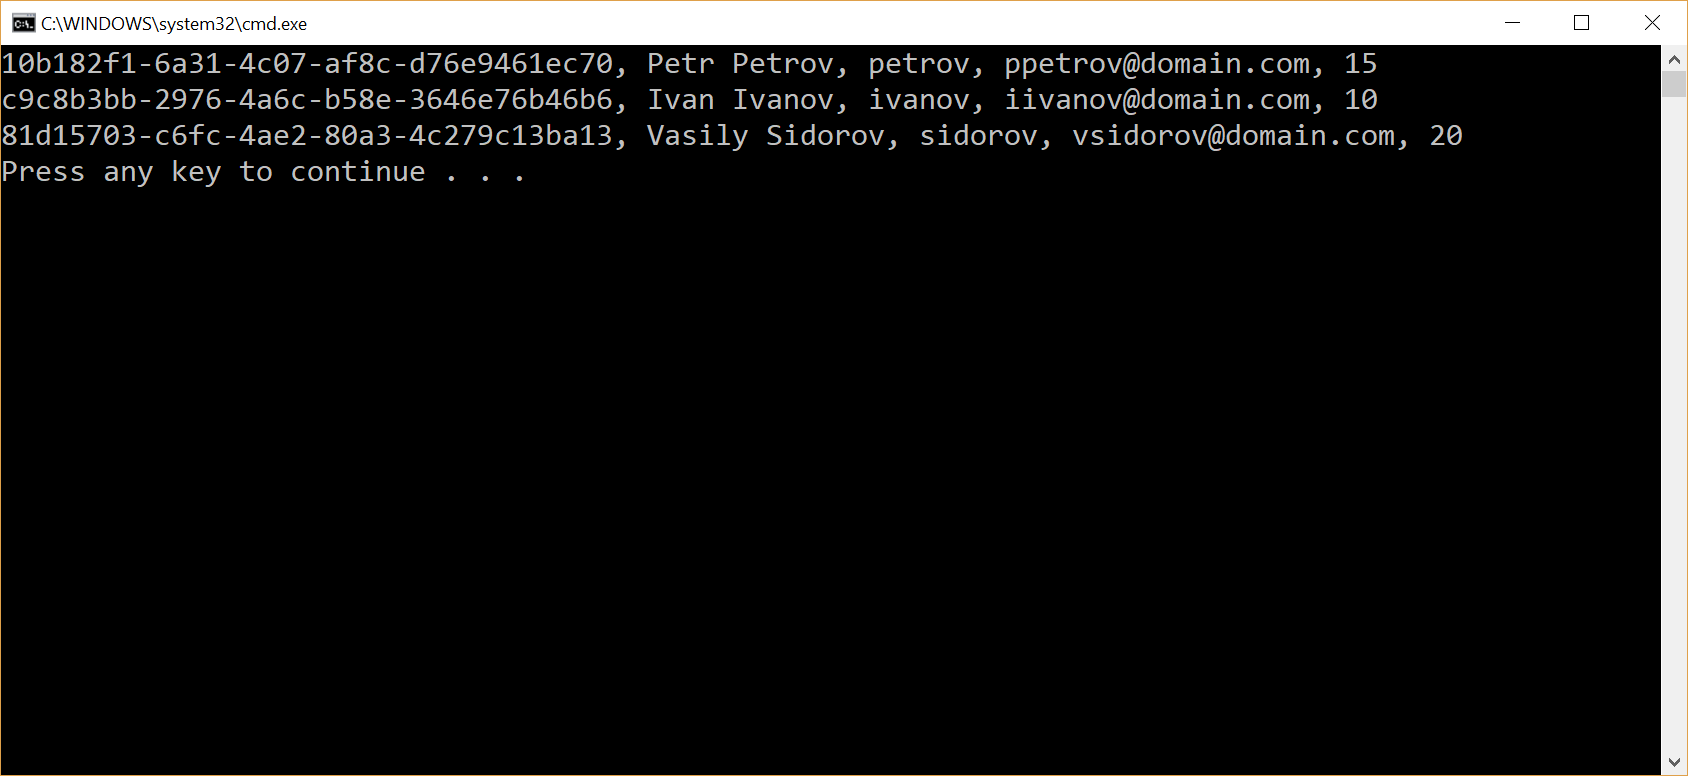
Now it's time for the first request to Tarantool from C # code. We will make the request to Tarantool, which we launched in the Docker container in the previous section and configured using the app.init.lua script. In the script, we created an operator user with the password 123123 . Below is the code to connect to Tarantool, get the space of users and the primary index primary_id , as well as a selection of all entries for this index.
using System; using System.Threading.Tasks; using ProGaudi.Tarantool.Client; using ProGaudi.Tarantool.Client.Model; using ProGaudi.Tarantool.Client.Model.Enums; namespace ConsoleApp { class Program { static void Main(string[] args) { DoWork().Wait(); } static async Task DoWork() { using (var box = await Box.Connect( "operator:123123@localhost:3301")) { var schema = box.GetSchema(); var space = await schema.GetSpace("users"); var primaryIndex = await space.GetIndex("primary_id"); var data = await primaryIndex.Select<TarantoolTuple<string>, TarantoolTuple<string, string, string, string, long>>( TarantoolTuple.Create(String.Empty), new SelectOptions { Iterator = Iterator.All }); foreach (var item in data.Data) { Console.WriteLine(item); } } } } } The code for the most part speaks for itself. I would just like to dwell on the Select function. For this function, it is necessary to specify the type of key by which the selection will occur, as well as the type of the return value. Since our identifiers are GUIDs stored in strings, you must specify TarantoolTuple<string> as the key type.
User data contains his ID, name, login, email and rating: four text fields and one numeric. Therefore, TarantoolTuple<string, string, string, string, long> specified as the return type.
With the indication of the necessary types, the Select function looks like this:
primaryIndex.Select<TarantoolTuple<string>, TarantoolTuple<string, string, string, string, long>>(...) Next, the Select function is passed arguments. The first argument is a stupid containing an empty string: TarantoolTuple.Create(String.Empty) . Here we could pass the ID of a particular user, if we were to make a selection by user. But with a blank line as a key, we can get all the records at once. The fact that we need to get all the records, we also specify using a parameter of the type SelectOptions , in which we specify Iterator.All as an iterator.
In this example, a new connection is created to Tarantool each time the DoWork function is DoWork . In fact, it is not necessary to create a new connection for each request; one connection may well be reused.
Run the application and verify that all users from space are displayed.
Adding data
Now add a new entry to space users . To add a record, we will create a stupa consisting of five fields. As the value of the first field, we generate a new GUID.
await space.Insert(TarantoolTuple.Create(Guid.NewGuid().ToString(), "Vladimir Vladimirov", "vvladimirov", "vvladimirov@domsin.com", 10L)); Data update
The update looks almost the same as the sample. Moreover, Update returns the updated value, which makes it even more similar to the sample. In the code below, we assign a new rating value to the user with the specified ID.
var updatedData = await space.Update<TarantoolTuple<string>, TarantoolTuple<string, string, string, string, long>>( TarantoolTuple.Create("4e574d2f-1c82-4e14-aba8-95c6412e357c"), new UpdateOperation[]{ UpdateOperation.CreateAssign<long>(4, 47L) }); Sampling data by secondary key
In addition to the primary key, we can make requests for secondary keys. The example below shows a search for a record with the value petrov (that is, the search in this case occurs across the login field) on the secondary index secondary_login :
var loginIndex = await space.GetIndex("secondary_login"); var users = await loginIndex.Select<TarantoolTuple<string>, TarantoolTuple<string, string, string, string, long>>( TarantoolTuple.Create("petrov")); var petrov = users.Data; Search for all users whose rating is greater than or equal to ( Ge - Greater or Equal) fifteen:
var ratingIndex = await space.GetIndex("secondary_rating"); var ratingUsers = await ratingIndex.Select<TarantoolTuple<long>, TarantoolTuple<string, string, string, string, long>>( TarantoolTuple.Create(15L), new SelectOptions { Iterator = Iterator.Ge }); Calling Lua Functions
In addition to manipulating data from C # code using the functions Select , Insert , Update and others, it is often necessary to perform data processing as close as possible to them. The closest place to the data is the Tarantool server. Let's write a function on Lua, which will increment the rating of all users directly on the server. Let's call it update_rating . This function consists of only a few lines. First, it gets an iterator on space users by calling the function pairs() . And then it iterates around the iterator. Each entry is updated with an increase in the rating value by one. The following is the function code. Add it to the end of the app.init.lua file and restart the Docker container with Tarantool. Of course, restarting the container is not the best solution for production, but when developing and debugging it is the fastest option.
app.init.lua
function update_rating() for k,v in box.space.users:pairs() do box.space.users:update(v[1], {{'+', 5, 1}}) end end Now let's call the update_rating Lua-function from C #:
Program.cs
await box.Call("update_rating"); Add a function call to the application and run it. Make sure the rating is updated.
The ability to write functions on Lua is one of the significant advantages of Tarantool. Such functions can perform complex data processing without the need to transfer them between Tarantool and the client application. In addition, since Tarantool is also an application server itself, you can write microservices that work exclusively in Tarantool without the need for third-party code in C #, Java, Go, PHP or other languages. Such microservices usually provide a REST API, which can also be implemented exclusively with Lua code.
We reviewed the main ways of interacting with Tarantool from a .NET application, then I will tell you about the impressions of using ProGaudi / tarantool-csharp.
Impressions of ProGaudi / tarantool-csharp
I had a double impression of using ProGaudi / tarantool-csharp. On the one hand, the library allows you to perform almost all the necessary queries that are required for a regular application. And when something is not supported, you can write a function on Lua, which is then easy to call from the C # code. On the other hand, the library is, of course, too low-level. It is required to write a lot of sample auxiliary code. And there is an obvious lack of a good ORM (Object-relational mapper), so that you can write code not in terms of classes, but in terms of domain classes. Therefore, I myself decided to think about how such an ORM for Tarantool could look. The idea is still in its infancy, suggestions and suggestions are welcome. And I would really like to do something like this:
public class User { public string Id { get; set; } public string Name { get; set; } public string Login { get; set; } public string Email { get; set; } public long Rating { get; set; } } private static async Task DoWork() { var box = (await Box.Connect( "operator:123123@localhost:3301")).Wrap(); var space = box.Space("users"); var primaryIndex = space.Index("primary_id"); var ratingIndex = space.Index("secondary_rating"); var all = await primaryIndex.Select<User>(); var user = await primaryIndex.Select<User>("f73ee542-7d3e-4dec-b7c6-ce5dc7a02920"); var top = await ratingIndex.Select<User>(20, Iterator.Ge); var low = await ratingIndex.Select<User>(20, Iterator.Lt); } The code that allows you to write in this way can be found by reference . Only I warn you that it is made on the knee as a prototype in order to show what the API might look like. Therefore, I strongly recommend not using code in real projects. In the foreseeable future, I hope to post the ORM prototype in a full repository on GitHub.
Creating REST services in Tarantool
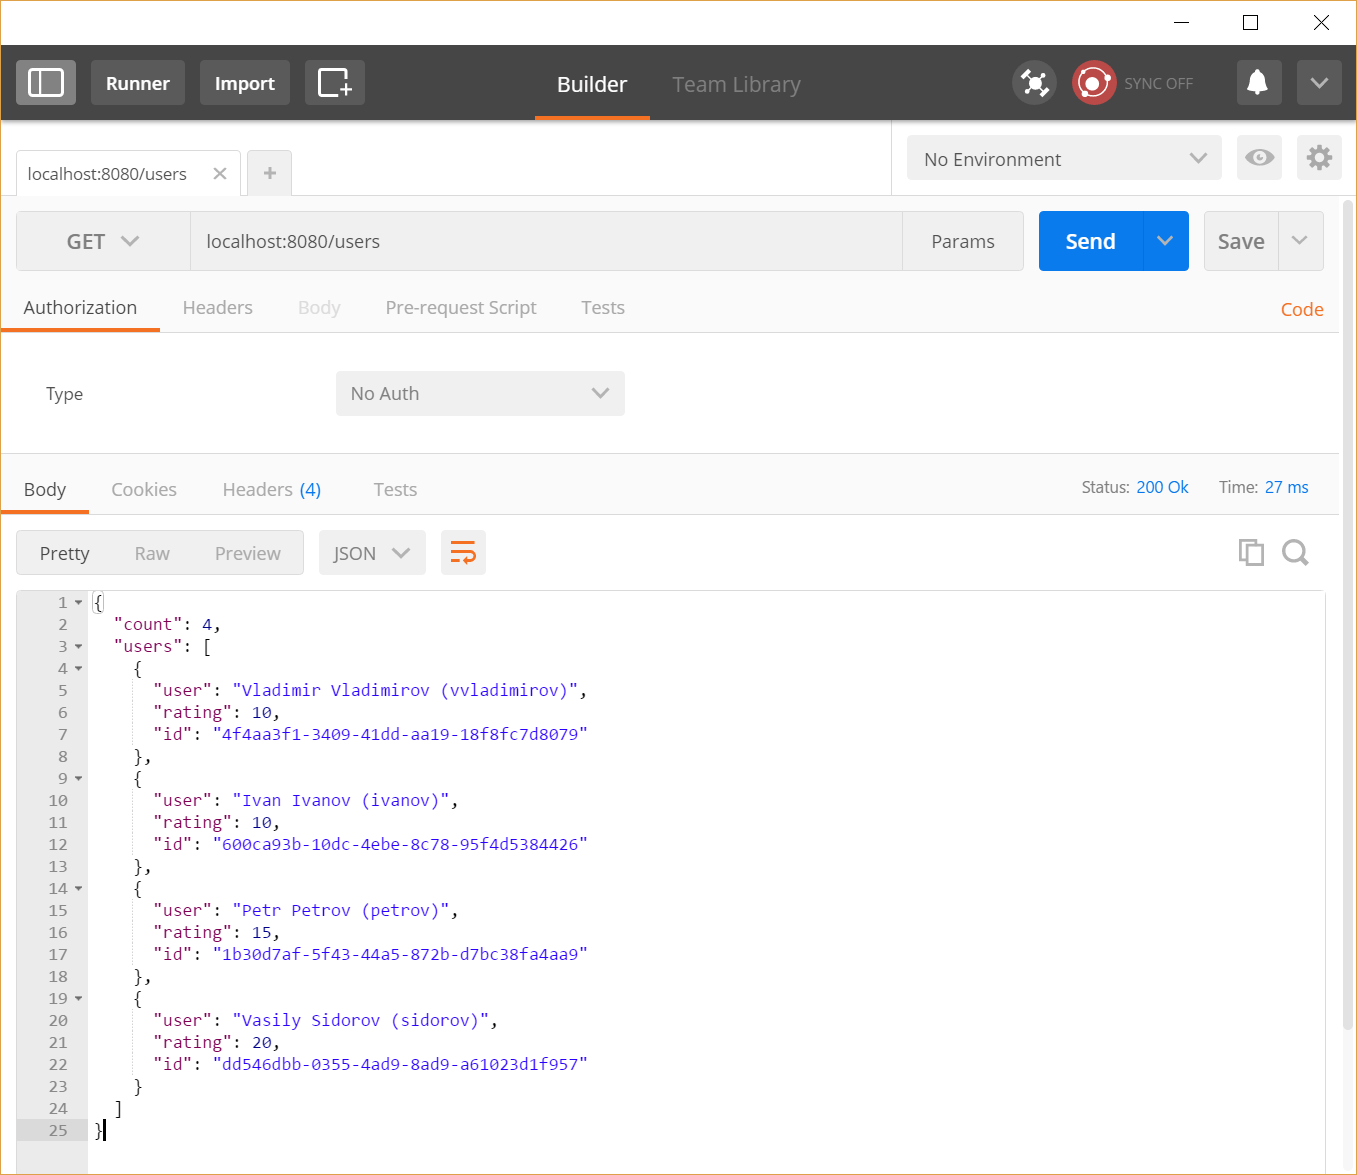
When working with Tarantool, there is often a feeling that for solving many tasks, Tarantool itself is sufficient and there is no need, for example, in additional C # code. Take at least microservice described in this article. It is required that it provide a REST API that other microservices will invoke. Initially it was assumed that ASP.NET Core application using the features of ASP.NET Web API should act as a microservice. And already the code of the application itself will apply to Tarantool. But, as it turned out, the ASP.NET Core application does almost nothing but transferring data between microservice users and Tarantool. , Tarantool REST API . , .
REST- GET - — /users . , . , Tarantool .
REST- 8080. Windows 8080 Docker-. docker-compose.yml :
docker-compose.yml
ports: - 3301:3301 - 8080:8080 Tarantool http.server , Docker-, . app.init.lua :
app.init.lua
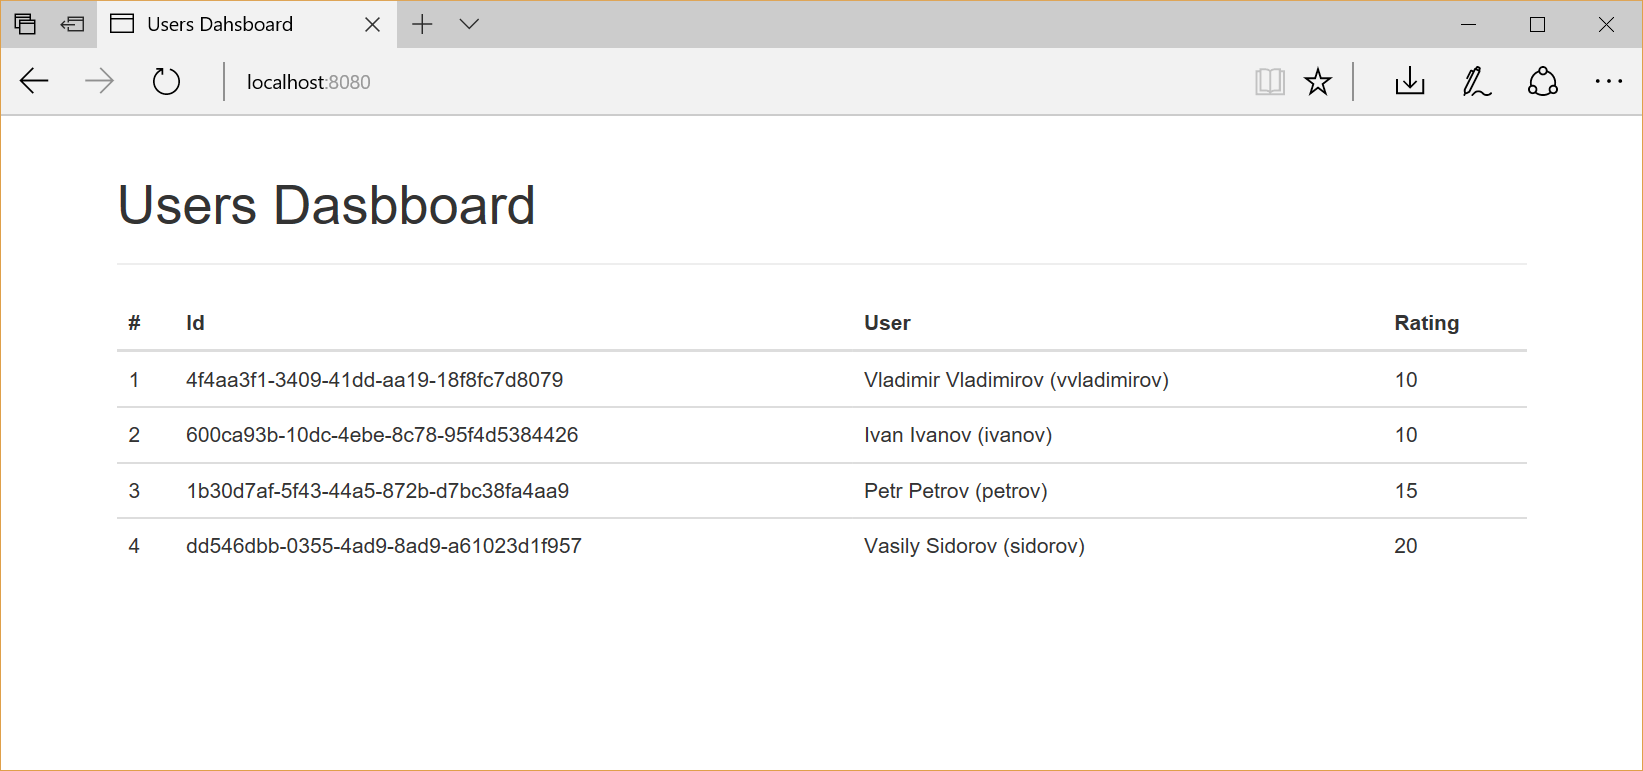
local function users_handler(self) local data = { users = {}, count = box.space.users:len() } for k, v in box.space.users:pairs{} do table.insert(data.users, { id = v[1], user = v[2] .. ' (' .. v[3] .. ')' , rating = v[5] }) end return self:render{ json = data } end local httpd = require('http.server') local server = httpd.new(nil, 8080, { app_dir = '/usr/local/share/tarantool/' }) server:route({ path = '/', file = 'index.html.el' }) server:route({ path = '/users' }, users_handler) server:start() : /users . index.html.el (el — embedded Lua.), /users users_handler . — space users , ID , , . JSON. JSON :
{ "count":3, "users":[ { "user":"Ivan Ivanov (ivanov)", "rating":10, "id":"c371b2b1-5090-450b-8a5d-7dba87ad5116" }, { "user":"Petr Petrov (petrov)", "rating":15, "id":"b4f80aad-f3c2-42b0-8088-84846aef9997" }, { "user":"Vasily Sidorov (sidorov)", "rating":20, "id":"07c82a50-4d8c-489a-9cc1-b4fdd95afbd8" } ] } index.html.el C:\tarantool\app\templates . :
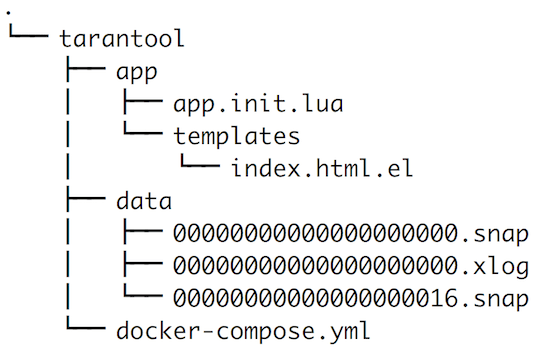
index.html.el REST API .
index.html.el
<!DOCTYPE html> <html lang="en"> <head> <title>Users Dahsboard</title> <link rel="stylesheet" href="https://maxcdn.bootstrapcdn.com/bootstrap/3.3.7/css/bootstrap.min.css"> </head> <body> <div class="container"> <div class="page-header"> <h1>Users Dasbboard</h1> </div> <table class="table" id="tblUsers"> <thead> <tr> <th>#</th> <th>Id</th> <th>User</th> <th>Rating</th> </tr> </thead> </table> </div> <script> fetch('/users').then(resp => { resp.json().then(data => { function createCell(tr, txt){ tr.insertCell().appendChild( document.createTextNode(txt)); } let tblUsers = document.getElementById('tblUsers'); for(let i=0;i<data.users.length;i++){ var tr = tblUsers.insertRow(); createCell(tr, i + 1); createCell(tr, data.users[i].id); createCell(tr, data.users[i].user); createCell(tr, data.users[i].rating); } }); }); </script> </body> </html> JavaScript- , . , Fetch API .
, REST API . JSON . , Postman .
. .
Results
, Tarantool . Tarantool — , , Windows-. , Tarantool . , , . .
, C# Tarantool , . ORM.
, , GitHub .
Thank!
')
Source: https://habr.com/ru/post/321998/
All Articles