Why you can use your own Twitter-bot and how to create it in half an hour
Twitter bots can do much more than just spam popular hashtags and tirelessly subscribe to users.
Get at least an alert from the Twisst ISS bot , which sends you a message every time the International Space Station (ISS) is visible from your location.

')
Or bots of public services like Earthquake Robot , which sends a tweet about tremors more than 5 on the Richter scale as they happen.
And of course, poem.exe , a robot that posts poems, as well as Accidental Haiku , which retweets posts randomly written in haiku form.
Personally, I use the bot to develop my @ScottDevTweets account - it likes and retweets posts on topics I’m interested in.
Community # 100DaysOfCode sends you a message of congratulations when you start the # 100DaysOfCode Challenge, and a few more - as you progress through the stages.

Bot congratulates user
He also leaves encouraging responses to tweets with the hashtag # 100DaysOfCode, if he recognizes negative emotions in them (for example, annoyance).

Bot reads emotions
During interviews, I often get asked: “What does IT work give you?” I always answer: “I like to automate repetitive tasks to save time, to give myself the opportunity to focus on other things. I am pleased to realize that I have saved for a while. ”
If we talk about my @ScottDevTweets bot, I mostly use it to start a conversation with my subscribers. Thus, the bot can start a conversation, and I pick up.
Bearing in mind everything said, the bot is ethical exactly to the extent that the person who programmed it.
If you have any doubts about the ethics of the bot that you created, look at the appropriate section on botwiki .
So ready to start? Then let's go!
How to create a Twitter bot in half an hour
We will create a Twitter bot using the twit library. After completing the work, he will like and retweet what you specify, and will also be able to respond to your readers by selecting the answers from the prepared templates.
But wait to note the time. First you need to create several accounts - if you, of course, do not have them yet.
You will need:
Create a new Twitter account or use an existing one to create a new Twitter application .
As an example, I will set up my old @DroidScott account, and you repeat after me.
Be sure to link the phone number to your account before clicking the button Create your Twitter application .

After that, you will find yourself in the Application Management section, where you will need to remember your keys. Your Consumer Key (API Key) and Consumer Secret (API Secret) should already be available.
You will need to go to the bottom of the page and click on the button Create my access token to get Access Token and Access Token Secret. Remember them - when setting up the bot, you will need all four.
Then I will say one thing: use Cloud9 - the whole process will take several minutes from one of the ready-made Node.js environments.
Keep in mind that if you decide to use Heroku and / or Cloud9 IDE (as I do below) when creating a bot, depending on the region of residence, you may be asked for a credit card number.

Bot setup
In the project tree, delete the sample project files: client, package.json, README.md, and server.js. You do not need them, but you can leave them if you wish.
In the new Node.js c9 environment, go to the terminal and enter:
Project structure
The project environment tree should look something like this:

Node dependencies
Before setting up the bot, we need to establish dependencies. Moving to the project folder with the cd tw * command, it will take you to ~ / workspace / twitter-bot-bootstrap (master) $.
From the terminal enter:
This will install all the dependencies listed in the package.json file. If any errors are issued, I advise you to install dependencies from the package.json file for one and the same command, adding the package name at the end.
Here is an example of dependencies in the package.json file:
And here is the command to install them all:
If you receive warning messages, for example, npm WARN package.json twitter-bot@1.0.0 No repository field - do not worry, the bot will not break it, you can not pay attention.
Now you can customize the bot. Enter from the terminal:
This will allow you to customize the package.json file with the details you want. If the default settings suit you, just press return.
Now you need to add the Twitter keys to the .env file. Just enter them in the appropriate fields and save the file.
If you can't find the .env file among the files of your c9 project, then you need to enable the Show Hidden Files option. In the file browser, go to the settings and check the box next to the Show Hidden Files line if it is not there.
As for SENTIMENT_KEY, you can get a new API key by the link: market.mashape.com/vivekn/sentiment-3 The key is in the REQUEST EXAMPLE field.
Look at the gif, click on the link, log in or create a new account in mashape, click on node in the right pane and select your key with the mouse. It must be in the place where on the gif is the highlighted required.
Add this key to the .env file along with everything else.
Now you need to enter the name of the Twitter bot and set the interval in minutes with which it should leave likes and repost.
Note: no values in the .env file are enclosed in quotes.
Then you can add keywords to the strings.js file that you want to search for, as well as subqueries.

Add lists of queries and subqueries. You can also update blocked requests if you want to add something to the blacklist.
When entering a list of subqueries, be sure to leave a space in front of it. What for? So that mating with 'node.js' the query 'handy tip' would take the form node.js handy tip, not node.jshandy tip.
On this, in theory, everything. Go to the terminal and enter npm start. You should get this output:

Check Twitter account:

Great, now we have a bot that we can test in our development environment. But you can't leave it there - you need to make it on Heroku.
If you have not done so already, create an account on Heroku , then select Create a new app from the drop-down list above and to the right of the dashboard. On the next screen, type in the name of the application, if you want, and then click the Create app button.

You will be presented with a dashboard application and instructions for the deployment method.

The name of your application should appear at the top of the dashboard - this is what you need when you log in to Heroku using the Heroku command line interface, which we will use to deploy the application.

Heroku CLI
First we will deploy through the Heroku Command Line Interface (CLI). Log in to Heroku using the c9 terminal (it should be installed by default).
Enter credentials:

Generate your application with the application:
Here is the build output you should receive in the terminal:

Now check the output with the command:
Everything worked out? Cool!
Setting Heroku Variables
Now that our bot is on Heroku, we need to add environment variables for storing Twitter keys. The fact is that the .env file in which they are written is listed among others in the .gitignore file, which sends to git the command not to upload the listed files to Heroku.
Thus, if in the future we want to put the code on GitHub, we will not have to worry that our keys will be publicly available along with the .env file - it will automatically be excluded.
All you have to do is to go to the console of your application on Heroku, select the Settings section and add your Twitter keys from the .env file. Then click on the Reveal Config Vars button and add variables with the appropriate values.
After setting the variables in Heroku, go to the config.js file in the current project. You will need to delete this line:
Now everything is ready to deploy Heroku again. Commands in the console should look something like this:
Then you can check the logs in Heroku with the command
Done: you have a bot that will perform its functions forever. Well, or until you decide to change your search criteria.
Deploy Heroku with GitHub
You can also deploy your application by connecting to GitHub and automatically deploying to Heroku each time your “master” branch is updated on GitHub. It's all pretty transparent.
Go to the Deploy panel on Heroku, select GitHub as the deployment method, if your GitHub account is linked to a Heroku account, you can search the repository, so if you copy this repository, you can simply enter twitter-bot-bootstrap and click on Search , then click on the Connect button - and that's it, you can automatically deploy from GitHub.

Heroku troubleshooting
What does it mean "broke"?

In general, I found that sometimes a worker is defined as a web, which leads to crash. Try changing the settings of the worker like this:
If it does not help, go to the Resources tab and play around with the settings there. As I found out, if you move the sliders from the web, the heroku and worker, as a rule, everything returns to normal. The bottom line is that you need to activate the Dyno worker - Error R10 (Boot timeout) error occurs because the system tries to use some other resource instead.
Here is another useful command for Heroku:
By default, you can only push your main branch when working with a development branch (for example, dev). If you want to test on Heroku, you can use the command:
Helpful advice
If you want to add all this to your repository on GitHub, but do not feel like wanting to share your keys with the world, simply turn off the tracking of the .env file. Enter the following command from the terminal:
I used the commands I used the most here in gist .
Now your Twitter bot is running. In the future, you can continue to work with him and change the settings.
Here is a link to my repository , in case you want to download a copy and contribute with the help of pull requests. Any contributions, large or small - additional functions, error correction, integration tests - are welcome, but will be carefully considered and discussed.
For inspiration, I have to thank @amanhimself and his posts about creating your own Twitter bot.
→ Create-a-simple-twitter-bot-with-node-js
→ how-to-make-a-twitter-bot-with-nodejs
→ twitter-mctwitbot
→ awesome-twitter-bots
And other posts about useful Twitter bots:
→ www.brit.co/twitter-bots-to-follow
→ www.hongkiat.com/using-twitter-bots
Get at least an alert from the Twisst ISS bot , which sends you a message every time the International Space Station (ISS) is visible from your location.
')
Or bots of public services like Earthquake Robot , which sends a tweet about tremors more than 5 on the Richter scale as they happen.
And of course, poem.exe , a robot that posts poems, as well as Accidental Haiku , which retweets posts randomly written in haiku form.
Personally, I use the bot to develop my @ScottDevTweets account - it likes and retweets posts on topics I’m interested in.
Community # 100DaysOfCode sends you a message of congratulations when you start the # 100DaysOfCode Challenge, and a few more - as you progress through the stages.
Bot congratulates user
He also leaves encouraging responses to tweets with the hashtag # 100DaysOfCode, if he recognizes negative emotions in them (for example, annoyance).
Bot reads emotions
During interviews, I often get asked: “What does IT work give you?” I always answer: “I like to automate repetitive tasks to save time, to give myself the opportunity to focus on other things. I am pleased to realize that I have saved for a while. ”
If we talk about my @ScottDevTweets bot, I mostly use it to start a conversation with my subscribers. Thus, the bot can start a conversation, and I pick up.
Bearing in mind everything said, the bot is ethical exactly to the extent that the person who programmed it.
If you have any doubts about the ethics of the bot that you created, look at the appropriate section on botwiki .
So ready to start? Then let's go!
How to create a Twitter bot in half an hour
We will create a Twitter bot using the twit library. After completing the work, he will like and retweet what you specify, and will also be able to respond to your readers by selecting the answers from the prepared templates.
But wait to note the time. First you need to create several accounts - if you, of course, do not have them yet.
You will need:
Step # 1: Configure Twitter Application
Create a new Twitter account or use an existing one to create a new Twitter application .
As an example, I will set up my old @DroidScott account, and you repeat after me.
Be sure to link the phone number to your account before clicking the button Create your Twitter application .
After that, you will find yourself in the Application Management section, where you will need to remember your keys. Your Consumer Key (API Key) and Consumer Secret (API Secret) should already be available.
You will need to go to the bottom of the page and click on the button Create my access token to get Access Token and Access Token Secret. Remember them - when setting up the bot, you will need all four.
Step # 2: Set up the development environment
Then I will say one thing: use Cloud9 - the whole process will take several minutes from one of the ready-made Node.js environments.
Keep in mind that if you decide to use Heroku and / or Cloud9 IDE (as I do below) when creating a bot, depending on the region of residence, you may be asked for a credit card number.
Bot setup
In the project tree, delete the sample project files: client, package.json, README.md, and server.js. You do not need them, but you can leave them if you wish.
In the new Node.js c9 environment, go to the terminal and enter:
git clone https://github.com/spences10/twitter-bot-bootstrap Project structure
The project environment tree should look something like this:
Node dependencies
Before setting up the bot, we need to establish dependencies. Moving to the project folder with the cd tw * command, it will take you to ~ / workspace / twitter-bot-bootstrap (master) $.
From the terminal enter:
npm install This will install all the dependencies listed in the package.json file. If any errors are issued, I advise you to install dependencies from the package.json file for one and the same command, adding the package name at the end.
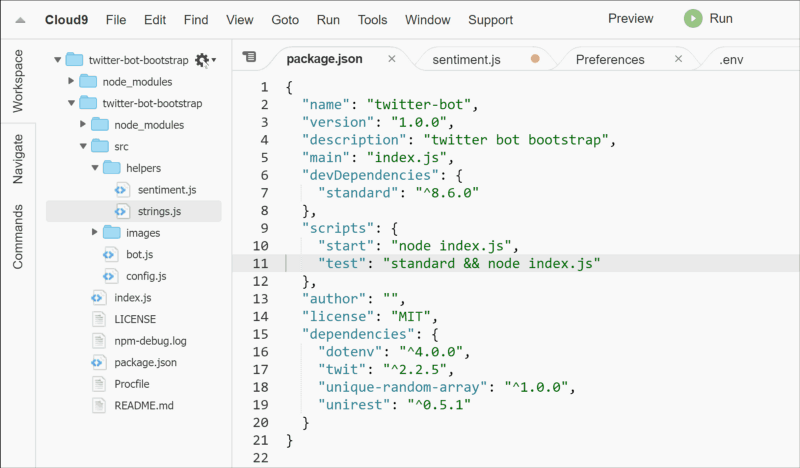
Here is an example of dependencies in the package.json file:
"dependencies": { "dotenv": "^4.0.0", "twit": "^2.2.5", "unique-random-array": "^1.0.0", "unirest": "^0.5.1" } And here is the command to install them all:
npm install --save dotenv twit unique-random-array unirest If you receive warning messages, for example, npm WARN package.json twitter-bot@1.0.0 No repository field - do not worry, the bot will not break it, you can not pay attention.
Now you can customize the bot. Enter from the terminal:
npm init This will allow you to customize the package.json file with the details you want. If the default settings suit you, just press return.
Now you need to add the Twitter keys to the .env file. Just enter them in the appropriate fields and save the file.
If you can't find the .env file among the files of your c9 project, then you need to enable the Show Hidden Files option. In the file browser, go to the settings and check the box next to the Show Hidden Files line if it is not there.
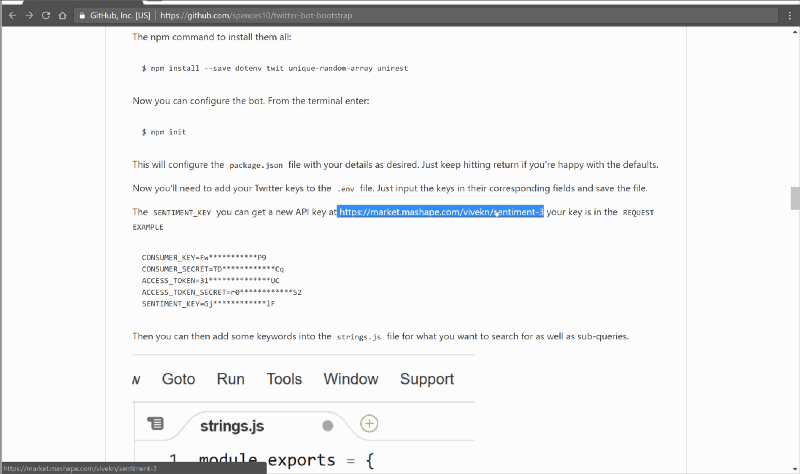
As for SENTIMENT_KEY, you can get a new API key by the link: market.mashape.com/vivekn/sentiment-3 The key is in the REQUEST EXAMPLE field.
Look at the gif, click on the link, log in or create a new account in mashape, click on node in the right pane and select your key with the mouse. It must be in the place where on the gif is the highlighted required.
Add this key to the .env file along with everything else.
Now you need to enter the name of the Twitter bot and set the interval in minutes with which it should leave likes and repost.
Note: no values in the .env file are enclosed in quotes.
CONSUMER_KEY=Fw***********P9 CONSUMER_SECRET=TD************Cq ACCESS_TOKEN=31**************UC ACCESS_TOKEN_SECRET=r0************S2 SENTIMENT_KEY=Gj************lF TWITTER_USERNAME=DroidScott TWITTER_RETWEET_RATE=5 TWITTER_FAVORITE_RATE=5 Then you can add keywords to the strings.js file that you want to search for, as well as subqueries.
Add lists of queries and subqueries. You can also update blocked requests if you want to add something to the blacklist.
When entering a list of subqueries, be sure to leave a space in front of it. What for? So that mating with 'node.js' the query 'handy tip' would take the form node.js handy tip, not node.jshandy tip.
On this, in theory, everything. Go to the terminal and enter npm start. You should get this output:
Check Twitter account:
Step # 3: Configure Heroku
Great, now we have a bot that we can test in our development environment. But you can't leave it there - you need to make it on Heroku.
If you have not done so already, create an account on Heroku , then select Create a new app from the drop-down list above and to the right of the dashboard. On the next screen, type in the name of the application, if you want, and then click the Create app button.
You will be presented with a dashboard application and instructions for the deployment method.
The name of your application should appear at the top of the dashboard - this is what you need when you log in to Heroku using the Heroku command line interface, which we will use to deploy the application.
Heroku CLI
First we will deploy through the Heroku Command Line Interface (CLI). Log in to Heroku using the c9 terminal (it should be installed by default).
heroku login Enter credentials:
cd twitter-bot-bootstrap git init heroku git:remote -a your-heroku-app-name Generate your application with the application:
git add . git commit -am 'make it better' git push heroku master Here is the build output you should receive in the terminal:
Now check the output with the command:
heroku logs -t Everything worked out? Cool!
Setting Heroku Variables
Now that our bot is on Heroku, we need to add environment variables for storing Twitter keys. The fact is that the .env file in which they are written is listed among others in the .gitignore file, which sends to git the command not to upload the listed files to Heroku.
Thus, if in the future we want to put the code on GitHub, we will not have to worry that our keys will be publicly available along with the .env file - it will automatically be excluded.
All you have to do is to go to the console of your application on Heroku, select the Settings section and add your Twitter keys from the .env file. Then click on the Reveal Config Vars button and add variables with the appropriate values.
CONSUMER_KEY CONSUMER_SECRET ACCESS_TOKEN ACCESS_TOKEN_SECRET After setting the variables in Heroku, go to the config.js file in the current project. You will need to delete this line:
require('dotenv').config(); Now everything is ready to deploy Heroku again. Commands in the console should look something like this:
$ git add . $ git commit -m 'add environment variables' $ git push heroku master Then you can check the logs in Heroku with the command
$ heroku logs -t Done: you have a bot that will perform its functions forever. Well, or until you decide to change your search criteria.
Deploy Heroku with GitHub
You can also deploy your application by connecting to GitHub and automatically deploying to Heroku each time your “master” branch is updated on GitHub. It's all pretty transparent.
Go to the Deploy panel on Heroku, select GitHub as the deployment method, if your GitHub account is linked to a Heroku account, you can search the repository, so if you copy this repository, you can simply enter twitter-bot-bootstrap and click on Search , then click on the Connect button - and that's it, you can automatically deploy from GitHub.
Heroku troubleshooting
What does it mean "broke"?
In general, I found that sometimes a worker is defined as a web, which leads to crash. Try changing the settings of the worker like this:
heroku ps:scale worker=0 heroku ps:scale worker=1 If it does not help, go to the Resources tab and play around with the settings there. As I found out, if you move the sliders from the web, the heroku and worker, as a rule, everything returns to normal. The bottom line is that you need to activate the Dyno worker - Error R10 (Boot timeout) error occurs because the system tries to use some other resource instead.
Here is another useful command for Heroku:
heroku restart By default, you can only push your main branch when working with a development branch (for example, dev). If you want to test on Heroku, you can use the command:
git push heroku dev:master Helpful advice
If you want to add all this to your repository on GitHub, but do not feel like wanting to share your keys with the world, simply turn off the tracking of the .env file. Enter the following command from the terminal:
$ git update-index --assume-unchanged .env I used the commands I used the most here in gist .
Conclusion
Now your Twitter bot is running. In the future, you can continue to work with him and change the settings.
Here is a link to my repository , in case you want to download a copy and contribute with the help of pull requests. Any contributions, large or small - additional functions, error correction, integration tests - are welcome, but will be carefully considered and discussed.
Thanks
For inspiration, I have to thank @amanhimself and his posts about creating your own Twitter bot.
→ Create-a-simple-twitter-bot-with-node-js
→ how-to-make-a-twitter-bot-with-nodejs
→ twitter-mctwitbot
→ awesome-twitter-bots
And other posts about useful Twitter bots:
→ www.brit.co/twitter-bots-to-follow
→ www.hongkiat.com/using-twitter-bots
Source: https://habr.com/ru/post/321968/
All Articles