Web push notifications quick and easy
Good day. In this small article I want to tell you how to quickly and easily set up push notifications on your site. This article does not in any way claim to be an exhaustive guide, but I hope that it will give a starting point for further study.
Information on this topic on the Internet is complete, but it is fragmented, scattered across various resources and mixed with mobile notifications with examples in Java, C ++ and Python. We, as web developers, are interested in JavaScript. In this article I will try to accumulate all the necessary and useful information.
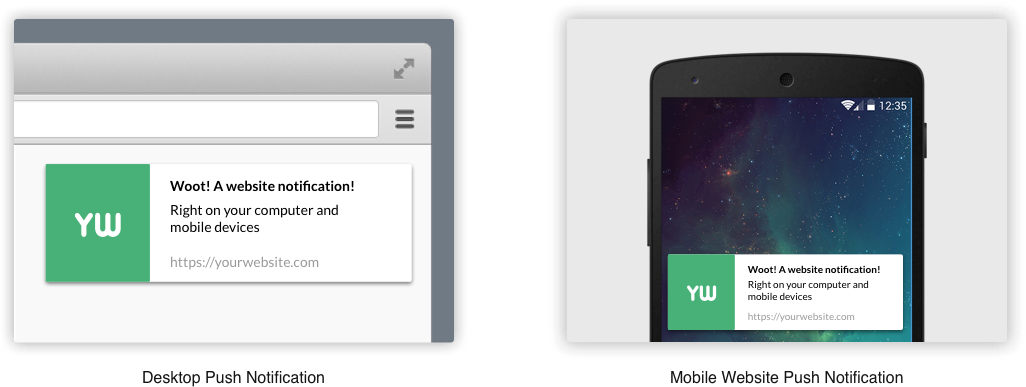
I think you already know what push notifications are , but I will still write briefly about the main thing.
The user, entering the site, pulls out (pull) data from it. This is convenient and secure, but with the development of Internet resources, there is a need to promptly deliver information to users without waiting for them to make a request. And the technology of forced delivery (push) of data from the server to the client appeared.
Important
Push notifications only work if you have HTTPS on your site.
Without a valid SSL certificate, it will not work. So if you don’t have HTTPS support yet, then it’s time to do it. I recommend to use Let's Encrypt .
To run on localhost you need to resort to tricks . I tested the scripts on Github Pages .
Table of contents
Good notices
Just want to make a reservation that the push-notifications are not for promotional mailings. You only need to send what the specific user really needs and to which he really should respond promptly.
Good example:
- Sending a notification about the change in the status of the user's call to the technical support service;
- Sending notification of changes in the status of the order;
- The appearance in the warehouse of goods that the user was waiting for;
- Answered a user comment on the article;
- New task in bug tracker with Bug or Critical status.
Bad example:
- New arrivals to the warehouse;
- Discounts and promotions for goods;
- New article on the site;
- Answered a user comment on an article he wrote a year ago.
Bad examples also require notification, but they do not need to respond quickly. These notifications can be sent by mail. In general, it is recommended to duplicate all important notifications to the mail, since push notifications may not reach the user for various reasons beyond your control. Also important is the relevance of the event. I will talk about this a little later. I recommend reading:
Let's return to our sheep. So how does all this work? First, a little theory.
Theory
Among the uninitiated, there is a perception that push notifications are a simple technology that does not require special resources to implement. In fact, this is a whole pool of technologies.
First, a small diagram of how it all works ( animated diagram ):

- The server gives the page to the user;
- The client connects to the message server, registers and receives an ID;
- The client sends the received ID to the server and the server binds a specific user to a specific device using the device ID;
- The server sends the message to the client via the message server using the previously received ID.
Unfortunately, I was not able to figure out who and how creates the device ID and how the message server is tied to a specific device. I used Google's Firebase Cloud Messaging message server and its library. Unfortunately, I could not find out whether it is possible to replace it with my server and how to do it.
Funny fact
Initially used to send messages:
Cloud to Device Messaging
')
Then it was replaced by:
Google Cloud Messaging
And then again changed to:
Firebase cloud messaging
I wonder what's next.
What happens on the client side?
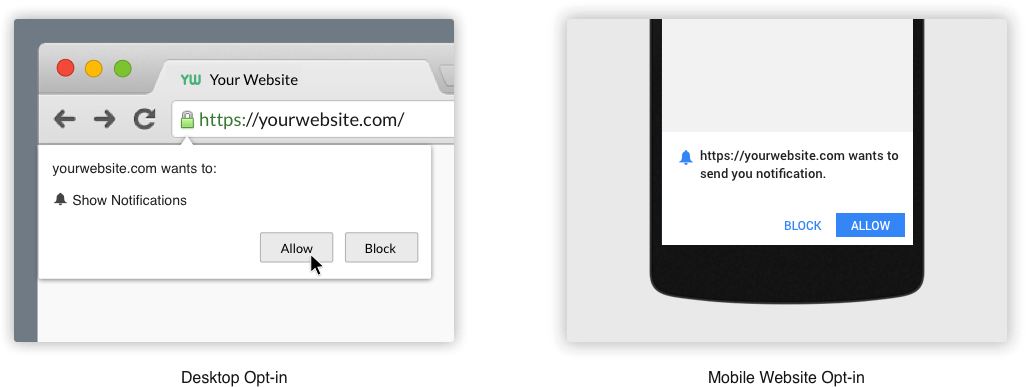
- JavaScript prompts the user for permission to display notifications;
- If the user has approved, then connect to the message server and get the device ID;
- We send the identifier to our server so that we identify the user;
- We initialize a JavaScript worker who will work in the background, receive messages from the message server and show them to the user;
- Connect to the message server and wait for new arrivals.
The note
Google recommends using the switch to subscribe and unsubscribe from notifications. Thus, the initiation of the notification subscription procedure comes from the user, and not from the site. Signing up for notifications for every incoming user is a bad practice.
It all looks very difficult, but everything is not easier on the server.
Difficulties on the server side
- It is clear that the device ID, sent by the user, we save in the database;
- A device identifier would be good to link to the user in order to send personalized messages;
- It is worth remembering that we have one user, but he can have several devices, and several users can use one device;
- Sending notifications to users is not the cheapest operation and therefore the event initiating the sending of a notification must be queued for sending;
- Only small projects with a small number of recipients can afford to send notifications on the event, during the same HTTP request;
- So we have a queue system on RabbitMQ, Redis, etc .;
- Demons / workers appear that parse the queue and other queue support tools;
- To increase the speed of sending, you can parallelize the process and spread it across several nodes.
Practice
Finally, we have moved to the most important thing. As I said earlier, we’ll use Firebase Cloud Messaging as a messaging server, so we start by registering and creating a project on Firebase.
Everything is simple:
- We go to the site ;
- Register;
- We press the button Create new project or Import Google project , if you already have a project;
- When creating, specify the project name and country;
- After creating the project, we get to its dashboard;
- In the menu, we point at the wheel next to Overview and select Project settings ;
- On the page that opens, go to the Cloud Messaging tab;
- We are interested in the Server key , which will be used to send messages from the server and the Sender ID that will be used to receive messages on the client side.
You can still delve into the settings and play with the separation of access rights, but, in general, the work with the Firebase site is over.
Start writing client
Let's start by creating a Service Worker to receive push notifications.
Create a firebase-messaging-sw.js file with the following contents.
// firebase-messaging-sw.js importScripts('https://www.gstatic.com/firebasejs/3.6.8/firebase-app.js'); importScripts('https://www.gstatic.com/firebasejs/3.6.8/firebase-messaging.js'); firebase.initializeApp({ messagingSenderId: '<SENDER_ID>' }); const messaging = firebase.messaging(); Where,
<SENDER_ID>is the Sender ID we received after registering with Firebase.
Important note
The Service Worker file must be called firebase-messaging-sw.js and must be in the project root, that is, available at https://example.com/firebase-messaging-sw.js . The path to this file is fixed in the Firebase library .
Writing code is enough to show notifications. We'll talk about additional features later. Now add the Firebase library and the subscription script to our page template.
<script type="text/javascript" src="//www.gstatic.com/firebasejs/3.6.8/firebase.js"></script> <script type="text/javascript" src="/firebase_subscribe.js"></script> Add a button to subscribe to notifications on the page.
<button type="button" id="subscribe"> </button> Subscribe to notifications
// firebase_subscribe.js firebase.initializeApp({ messagingSenderId: '<SENDER_ID>' }); // // , Firebase, if ('Notification' in window) { var messaging = firebase.messaging(); // // if (Notification.permission === 'granted') { subscribe(); } // , // $('#subscribe').on('click', function () { subscribe(); }); } function subscribe() { // messaging.requestPermission() .then(function () { // ID messaging.getToken() .then(function (currentToken) { console.log(currentToken); if (currentToken) { sendTokenToServer(currentToken); } else { console.warn(' .'); setTokenSentToServer(false); } }) .catch(function (err) { console.warn(' .', err); setTokenSentToServer(false); }); }) .catch(function (err) { console.warn(' .', err); }); } // ID function sendTokenToServer(currentToken) { if (!isTokenSentToServer(currentToken)) { console.log(' ...'); var url = ''; // ID $.post(url, { token: currentToken }); setTokenSentToServer(currentToken); } else { console.log(' .'); } } // localStorage , // function isTokenSentToServer(currentToken) { return window.localStorage.getItem('sentFirebaseMessagingToken') == currentToken; } function setTokenSentToServer(currentToken) { window.localStorage.setItem( 'sentFirebaseMessagingToken', currentToken ? currentToken : '' ); } That's all. This is all the code that is required to receive push notifications.
Sending notifications from the server
In general, sending a notification looks like this:
POST /fcm/send HTTP/1.1 Host: fcm.googleapis.com Authorization: key=YOUR-SERVER-KEY Content-Type: application/json { "notification": { "title": "", "body": " 21:00", "icon": "https://eralash.ru.rsz.io/sites/all/themes/eralash_v5/logo.png?width=40&height=40", "click_action": "http://eralash.ru/" }, "to": "YOUR-TOKEN-ID" } Where,
YOUR-SERVER-KEYis the Server key that we received when registering with Firebase;YOUR-TOKEN-IDis the device ID of a specific user.
All fields in order:
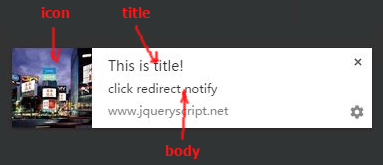
notification-notificationparameters;title- the title of the notification. 30 character limit;body- text notification. 120 characters limit;icon- notification icon. There are some standards for icon sizes, but I use 192x192. Smaller icons do not look good on mobile devices;click_action- URL address of the page to which the user will click on the notification;to- device ID of the notification recipient;- Full list of options here .
This is an example of sending one notification to one recipient. You can send one notification to multiple recipients at once. Up to 1000 recipients at a time.
{ "notification": { "title": "", "body": " 21:00", "icon": "https://eralash.ru.rsz.io/sites/all/themes/eralash_v5/logo.png?width=192&height=192", "click_action": "http://eralash.ru/" }, "registration_ids": [ "YOUR-TOKEN-ID-1", "YOUR-TOKEN-ID-2" "YOUR-TOKEN-ID-3" ] } Sample responses from the message server:
{ "multicast_id": 6407277574671070000, "success": 1, "failure": 0, "canonical_ids": 0, "results": [ { "message_id": "0:1489072146895227%e609af1cf9fd7ecd" } ] } { "multicast_id": 7867877497742898000, "success": 1, "failure": 0, "canonical_ids": 0, "results": [ { "message_id": "https://updates.push.services.mozilla.com/m/gAAAAABYwWmlTCKje5OLwedhNUQr9LbOCmZ0evAF9HJBnR-v7DF2KEkZY3zsT8AbrqB6JfJO6Z6vsotLJMmiIvJs9Pt1Q9oc980BRX2IU1-jlzRLIhSVVBLo2i80kBvTMYadVAMIlSIyFkWm-qg_DfLbenlO9z1S4TGMJl0XbN5gKMUlfaIjnX2FBG4XsQjDKasiw8-1L38v" } ] } { "multicast_id": 8165639692561075000, "success": 0, "failure": 1, "canonical_ids": 0, "results": [ { "error": "InvalidRegistration" } ] } Full list of error codes .
We are not tied to any specific programming language and for simplicity of example we will use PHP with the cURL extension. The script to send a notification to run from the console.
#!/usr/bin/env php <?php $url = 'https://fcm.googleapis.com/fcm/send'; $YOUR_API_KEY = ''; // Server key $YOUR_TOKEN_ID = ''; // Client token id $request_body = [ 'to' => $YOUR_TOKEN_ID, 'notification' => [ 'title' => '', 'body' => sprintf(' %s.', date('H:i')), 'icon' => 'https://eralash.ru.rsz.io/sites/all/themes/eralash_v5/logo.png?width=192&height=192', 'click_action' => 'http://eralash.ru/', ], ]; $fields = json_encode($request_body); $request_headers = [ 'Content-Type: application/json', 'Authorization: key=' . $YOUR_API_KEY, ]; $ch = curl_init(); curl_setopt($ch, CURLOPT_URL, $url); curl_setopt($ch, CURLOPT_CUSTOMREQUEST, 'POST'); curl_setopt($ch, CURLOPT_HTTPHEADER, $request_headers); curl_setopt($ch, CURLOPT_POSTFIELDS, $fields); curl_setopt($ch, CURLOPT_RETURNTRANSFER, true); curl_setopt($ch, CURLOPT_FOLLOWLOCATION, true); $response = curl_exec($ch); curl_close($ch); echo $response; messaging.onMessage
The messaging.onMessage handler is worth a separate mention, as it falls into the category of pitfalls. In the examples from Firebase, I did not see an example using this handler. FluorescentHallucinogen told me about it, for which a special thanks to him, but he did not mention some features of its use.
What is this handler and how does it work. From the documentation, we know that this handler is called if we receive a push notification and are at that moment on the page the site from which the notification was sent (those who want to use the native solution can see the implementation example ) . This functionality is very useful in that we can display a notification on the page by making a beautiful modalke or something else. I have no such need, because I just display the standard notification .
if ('Notification' in window) { var messaging = firebase.messaging(); messaging.onMessage(function(payload) { console.log('Message received. ', payload); new Notification(payload.notification.title, payload.notification); }); // ... } // ... It seems simple, but there is a pitfall. The thing is that on mobile devices it is forbidden to use the Notification constructor. And to solve this problem, you need to use ServiceWorkerRegistration.showNotification() and the handler in this case will have the form:
// ... messaging.onMessage(function(payload) { console.log('Message received. ', payload); // ServiceWorker navigator.serviceWorker.register('messaging-sw.js'); // Notification.requestPermission(function(result) { if (result === 'granted') { navigator.serviceWorker.ready.then(function(registration) { // return registration.showNotification(payload.notification.title, payload.notification); }).catch(function(error) { console.log('ServiceWorker registration failed', error); }); } }); }); // ... Now notifications work on mobile devices. It would seem that everything, but no. Despite the assurances of some , ServiceWorker should not be empty. We want the user to click on the page we need on click. To do this, we need to add a click handler for the notification to the ServiceWorker.
click_action notification settings for access to the click_action property in ServiceWorker.
// ... navigator.serviceWorker.ready.then(function(registration) { payload.notification.data = payload.notification; // registration.showNotification(payload.notification.title, payload.notification); }).catch(function(error) { console.log('ServiceWorker registration failed', error); }); // ... We process click on the notification in ServiceWorker.
// messaging-sw.js self.addEventListener('notificationclick', function(event) { const target = event.notification.data.click_action || '/'; event.notification.close(); // // , event.waitUntil(clients.matchAll({ type: 'window', includeUncontrolled: true }).then(function(clientList) { // clientList - !? for (var i = 0; i < clientList.length; i++) { var client = clientList[i]; if (client.url == target && 'focus' in client) { return client.focus(); } } // return clients.openWindow(target); })); }); TTL and additional notification control
An important property for notification may be the time of its relevance. It depends on your business processes. By default, the notification lifetime is 4 weeks. This is a lot of notifications of this nature. For example, the notice "Your favorite show starts in 15 minutes" is relevant for 15 minutes. After that, the message is no longer relevant and should not be shown. The time_to_live property with a value from 0 to 2419200 seconds is responsible for controlling the lifetime. Read more in the documentation . The message with the specified TTL will be:
{ "notification": { "title": "", "body": " 15 ", "icon": "https://eralash.ru.rsz.io/sites/all/themes/eralash_v5/logo.png?width=192&height=192", "click_action": "http://eralash.ru/" }, "time_to_live": 900, "to": "YOUR-TOKEN-ID" } The message of the form "Your favorite program starts in 15 minutes" is relevant within 15 minutes, but within a minute after sending it will not be correct. Because the transfer will not begin after 15 minutes, but after 14. It is necessary to control such situations on the client side.
To do this, we will change the message sent from the server:
{ "data": { "title": "", "time": 1489006800, "icon": "https://eralash.ru.rsz.io/sites/all/themes/eralash_v5/logo.png?width=192&height=192", "click_action": "http://eralash.ru/" }, "time_to_live": 900, "to": "YOUR-TOKEN-ID" } Please note that the notification field has changed to data . Now the Firebase default handler will not be called and we need to do it ourselves. Add the following lines to the end of the firebase-messaging-sw.js :
// messaging.setBackgroundMessageHandler(function(payload) { if (typeof payload.data.time != 'undefined') { var time = new Date(payload.data.time * 1000); var now = new Date(); if (time < now) { // return null; } var diff = Math.round((time.getTime() - now.getTime()) / 1000); // // : " 14 , 21:00" payload.data.body = ' ' + Math.round(diff / 60) + ' , ' + time.getHours() + ':' + (time.getMinutes() > 9 ? time.getMinutes() : '0' + time.getMinutes()) ; } // data payload.data.data = payload.data; // return self.registration.showNotification(payload.data.title, payload.data); }); // self.addEventListener('notificationclick', function(event) { // const target = event.notification.data.click_action || '/'; event.notification.close(); // // , event.waitUntil(clients.matchAll({ type: 'window', includeUncontrolled: true }).then(function(clientList) { // clientList - !? for (var i = 0; i < clientList.length; i++) { var client = clientList[i]; if (client.url == target && 'focus' in client) { return client.focus(); } } // return clients.openWindow(target); })); }); It is in this uncomplicated way that we have full control over the notification. What is most interesting, we show the user a notification time in his time zone. This is true for services that work around the world or regions with a wide variation of time zones as in Mother Russia.
Conclusion
Now let's talk about sad things. Despite all the delights of technology, it has several disadvantages:
- The main problem is, as always, support in browsers . Full support is in Chrome, Firefox and Opera latest versions. IE, Safari, Opera Mini, UC Browser, Dolphin and other brethren remain behind. But it works in mobile versions of Chrome, Firefox and Opera browsers.
- The open site and the working Service Worker do not guarantee the delivery of the message. Although notifications can be reached with the browser closed.
The Firebase library hides many secrets and its research could provide answers to some questions, but this is beyond the scope of this article.
Play around
Project on GitHub Pages
Since HTTPS is needed to start the Service Worker, the simplest solution was to place the project on GitHub Pages , which I did.
The project is available at: https://github.com/peter-gribanov/serviceworker
Project sources: https://peter-gribanov.imtqy.com/serviceworker/
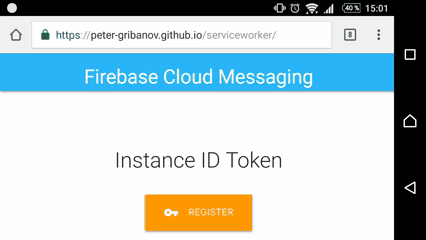
The project is a complete application for sending and receiving notifications. In order to get the notification you need:
- Go to the page ;
- Click the Register button;
- The browser will request permission to display notifications;
- We confirm the permission;
- Your device’s ID and page will be printed on the browser page and console;
- The Delete Token button will appear to delete the existing token and re-register;
- A form will appear with the parameters of the notification that can be sent by clicking on the Send button;
- We change parameters at our discretion and receive different notifications.
You can send a notification through any tool to send HTTP requests. Can be used with CURL, I prefer the Postman app for Chrome.
The request is the same as described earlier:
POST /fcm/send HTTP/1.1 Host: fcm.googleapis.com Authorization: key=AAAAaGQ_q2M:APA91bGCEOduj8HM6gP24w2LEnesqM2zkL_qx2PJUSBjjeGSdJhCrDoJf_WbT7wpQZrynHlESAoZ1VHX9Nro6W_tqpJ3Aw-A292SVe_4Ho7tJQCQxSezDCoJsnqXjoaouMYIwr34vZTs Content-Type: application/json { "data": { "title": "", "body": " 21:00", "icon": "https://eralash.ru.rsz.io/sites/all/themes/eralash_v5/logo.png?width=192&height=192", "click_action": "http://eralash.ru/" }, "to": "YOUR-TOKEN-ID" } Where,
YOUR-TOKEN-IDis the device ID that you received on the application page.
That's all. Receive notification and enjoy life.
Links
- Pro PUSH
- SSL
- Ui
- Javascript api
- Sending Notifications
- Play around
Updated at 2018-06-09
Found some "features" in the work of notifications.
Duplicate Notifications
I was asked several times with the question: "How to fix duplicate notifications?"
This problem manifests itself if you open the site sending notifications simultaneously in several tabs. In this case, the Service Worker sends a notification to both tabs and in both tabs the method of messaging.onMessage works. You can watch this problem on my Demo project .
To solve this problem, you need to know in the messaging.onMessage method that the notification has already been shown in another tab. localStorage can be used as a single repository, and you can identify notifications by hash sum of the notification or assign a unique id. Only it is worth remembering that localStorage not rubber and the id of the already shown notifications should be cleared after a while.
I can recommend for this purpose the pamelafox / lscache library .
If you have another method of solving the problem, write in the comments.
Pictures in notifications
Today a CTterorist user addressed me, noticing that images (image) are not displayed in notifications.
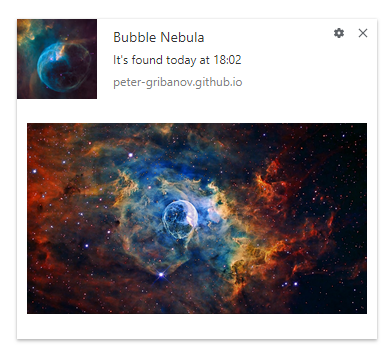
Having tested a little bit, I managed to figure it out. Although the image field is sent to Firebase, along with other notification options, the image field does not come back from Firebase. The problem is solved very simply. You can send a card in the data field, and in the handler for displaying a notification, draw a picture from data and insert it into place in the notification.
That is, if you send a message in this form, then Firebase will lose the picture.
{ "notification": { "title": "Bubble Nebula", "body": "It's found today at 21:00", "icon": "https://peter-gribanov.imtqy.com/serviceworker/Bubble-Nebula.jpg", "image": "https://peter-gribanov.imtqy.com/serviceworker/Bubble-Nebula_big.jpg", "click_action": "https://www.nasa.gov/feature/goddard/2016/hubble-sees-a-star-inflating-a-giant-bubble" }, "to": "YOUR-TOKEN-ID" } But if to transfer the picture in data , then it will reach.
{ "data": { "title": "Bubble Nebula", "body": "It's found today at 21:00", "icon": "https://peter-gribanov.imtqy.com/serviceworker/Bubble-Nebula.jpg", "image": "https://peter-gribanov.imtqy.com/serviceworker/Bubble-Nebula_big.jpg", "click_action": "https://www.nasa.gov/feature/goddard/2016/hubble-sees-a-star-inflating-a-giant-bubble" }, "to": "YOUR-TOKEN-ID" } Handlers for displaying notifications are the same as in the examples above.
messaging.onMessage(function(payload) { console.log('Message received. ', payload); // ServiceWorker navigator.serviceWorker.register('firebase-messaging-sw.js'); // Notification.requestPermission(function(result) { if (result === 'granted') { navigator.serviceWorker.ready.then(function(registration) { // TTL .. // data payload.data.data = JSON.parse(JSON.stringify(payload.data)); registration.showNotification(payload.data.title, payload.data); }).catch(function(error) { console.log('ServiceWorker registration failed', error); }); } }); }); Similarly in the Service Worker ( firebase-messaging-sw.js )
messaging.setBackgroundMessageHandler(function(payload) { console.log('Handling background message', payload); // TTL .. // data payload.data.data = JSON.parse(JSON.stringify(payload.data)); registration.showNotification(payload.data.title, payload.data); }); Source: https://habr.com/ru/post/321924/
All Articles