Upgrading a Home Stand or “How to Overcome Realtek 8168 Gigabit Ethernet” in vSphere 6.5
Many of us / you, be it network administrators, virtualization specialists, developers, or people just interested in virtualization, have their own home stand with virtualization. And most often the hypervisor of this stand is VMware ESXi.
Last year, a new version of the hypervisor was introduced - ESXi 6.5, which brought us many interesting new products that I would like to “touch” (more here and here , for example).
What to do if our “home stand” is built on the usual “desktop” hardware that uses Realtek 8168 Gigabit Ethernet?
')
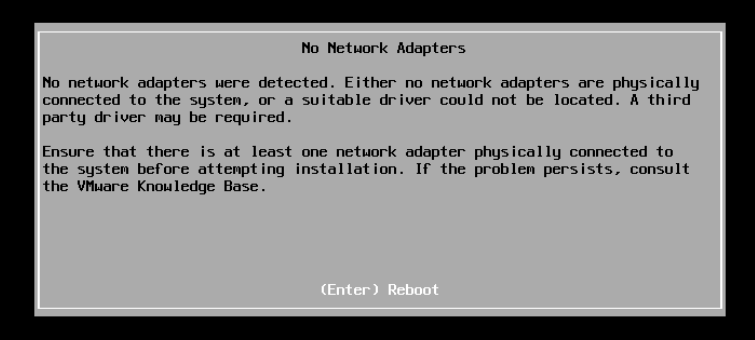
Regardless of whether you are updating from the previous version or installing the system from scratch, you will most likely see the following picture:

This picture is due to the fact that, starting from version 5.5, there are no drivers in the hypervisor for devices of the 8168 family ... Moreover! )
To “ get around” such an injustice, the vibsdepot.v-front.de/wiki/index.php/Welcome enthusiasts create their own vSphere ESXi driver sets.
We then use them!
Requirements:
• ESXi hypervisor, version 5.5 or higher.
• ESXi host access to the Internet (temporary) or downloaded driver packages
• DEPOT files for updating the hypervisor (available on the vendor's website)
• SSH or ESXi Shell server access
Note: when upgrading from version 5.1 it is necessary to take into account that vCenter 6.5 can connect to itself ESXi version not lower than 5.5. The upgrade sequence should include intermediate version 5.5 or 6.0
Let's get started!
1) Check which network cards we have installed at the moment:
2) Let's translate the level of trust of the host to the installed packages to the level of CommunitySupported:
3) Allow Http connections from our server:
4) Check the availability of the Internet (if not available - I recommend turning off IPv6 on the management interface and restarting the host):
5) Install the driver version we need:
6) ALWAYS RESTART THE HOST
7) Fill the DEPOT file on the datastore (in my case datastore1). After uploading, we launch the update (in my case before the release of 4564106).
8) Reboot and ... profit!
Knock on HOST_FQDN_or_IP / ui and enjoy the HTML5 interface.
Last year, a new version of the hypervisor was introduced - ESXi 6.5, which brought us many interesting new products that I would like to “touch” (more here and here , for example).
What to do if our “home stand” is built on the usual “desktop” hardware that uses Realtek 8168 Gigabit Ethernet?
')
Regardless of whether you are updating from the previous version or installing the system from scratch, you will most likely see the following picture:

This picture is due to the fact that, starting from version 5.5, there are no drivers in the hypervisor for devices of the 8168 family ... Moreover! )
To “ get around” such an injustice, the vibsdepot.v-front.de/wiki/index.php/Welcome enthusiasts create their own vSphere ESXi driver sets.
We then use them!
Requirements:
• ESXi hypervisor, version 5.5 or higher.
• ESXi host access to the Internet (temporary) or downloaded driver packages
• DEPOT files for updating the hypervisor (available on the vendor's website)
• SSH or ESXi Shell server access
Note: when upgrading from version 5.1 it is necessary to take into account that vCenter 6.5 can connect to itself ESXi version not lower than 5.5. The upgrade sequence should include intermediate version 5.5 or 6.0
Let's get started!
1) Check which network cards we have installed at the moment:
~ # esxcli network nic list Name PCI Device Driver Link Speed Duplex MAC Address MTU Description ------ ------------- ------ ---- ----- ------ ----------------- ---- ------------------------------------- vmnic0 0000:003:00.0 r8168 Up 1000 Full 1c:6f:65:43:fb:8a 1500 Realtek Realtek 8168 Gigabit Ethernet vmnic1 0000:006:00.0 r8168 Down 0 Full 00:1f:1f:72:21:32 1500 Realtek Realtek 8168 Gigabit Ethernet 2) Let's translate the level of trust of the host to the installed packages to the level of CommunitySupported:
~ # esxcli software acceptance set --level=CommunitySupported Host acceptance level changed to 'CommunitySupported'. 3) Allow Http connections from our server:
~ # esxcli network firewall ruleset set -e true -r httpClient 4) Check the availability of the Internet (if not available - I recommend turning off IPv6 on the management interface and restarting the host):
~ # ping ya.ru PING ya.ru (2a02:6b8::3): 56 data bytes sendto() failed (No route to host) ~ # ping ya.ru PING ya.ru (213.180.193.3): 56 data bytes 64 bytes from 213.180.193.3: icmp_seq=0 ttl=56 time=21.050 ms 5) Install the driver version we need:
~ # esxcli software vib install -d https://vibsdepot.v-front.de -n net55-r8168 Installation Result Message: The update completed successfully, but the system needs to be rebooted for the changes to be effective. Reboot Required: true VIBs Installed: Realtek_bootbank_net55-r8168_8.039.01-napi VIBs Removed: VMware_bootbank_net-r8168_8.013.00-3vmw.510.0.0.799733 VIBs Skipped: 6) ALWAYS RESTART THE HOST
7) Fill the DEPOT file on the datastore (in my case datastore1). After uploading, we launch the update (in my case before the release of 4564106).
~ # esxcli software profile update -d /vmfs/volumes/datastore1/VMware-ESXi-6.5.0-4564106-depot.zip -p ESXi-6.5.0-4564106-standard Update Result Message: The update completed successfully, but the system needs to be rebooted for the changes to be effective. Reboot Required: true 8) Reboot and ... profit!
Knock on HOST_FQDN_or_IP / ui and enjoy the HTML5 interface.
Source: https://habr.com/ru/post/321910/
All Articles