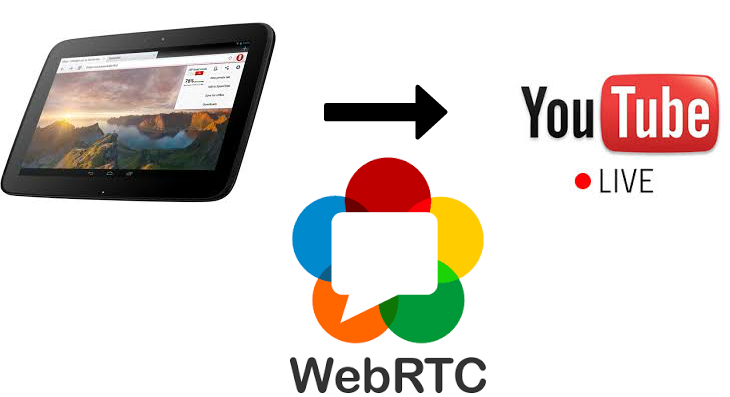
Stream WebRTC video stream from browser to YouTube Live in 65 lines of JavaScript / HTML code
In this article, we will describe how Youtube Live broadcast works and show how a person with basic JavaScript knowledge can code a Youtube Live broadcast from an HTML page using WebRTC technology.
The work will categorically require the following knowledge and skills:
')
1) Basic knowledge of javascript / html
2) Ability to work on the Linux command line.
3) Straight arms.
Youtube Live Broadcasts
Youtube gives you the opportunity to broadcast in real time. Those. not just upload a video, but create a full-fledged live broadcast of yourself, your cat Murzik or another responsible event.
Youtube TV studio is located on this page and in Google Chrome browser looks like this:

In order to make the broadcasts accessible, you need to click the Enable live streaming button and go through a verification in two steps. Next, the button turns into a Create live event and you can start broadcasting.
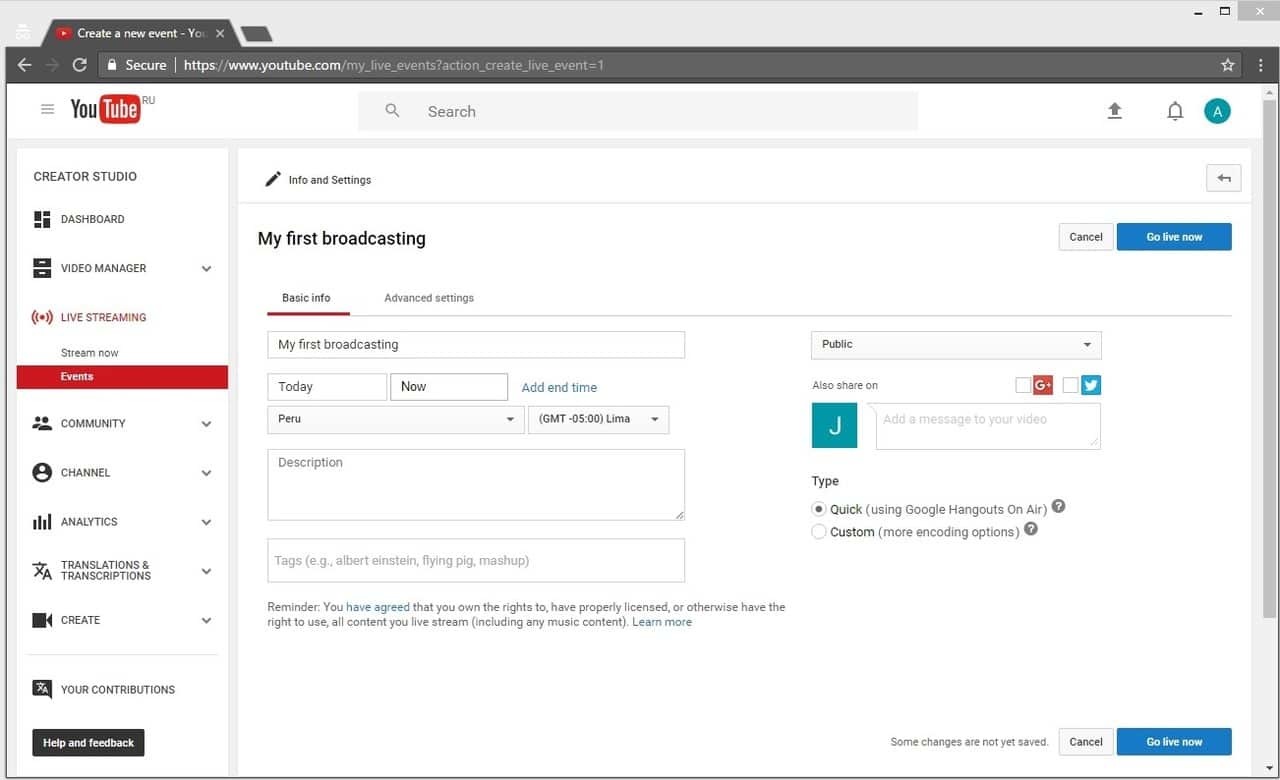
Click Go live now to go directly to the broadcast.
Youtube opens Google Hangouts window through which all manipulations with the video stream.
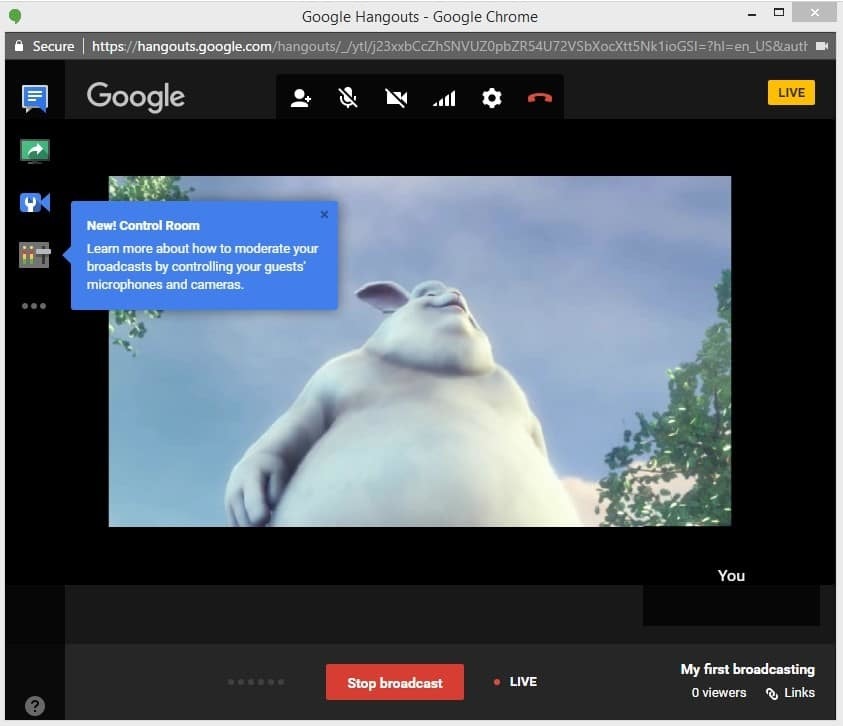
Thus, we created a live broadcast on Youtube Live, started broadcasting, stopped broadcasting. Received a video recording on Youtube. Broadcast held by Google Hangouts.
Everything is great, but judging by IT news , Google closes the Hangouts API for developing video applications from April 25, 2017. For developers, this means that using the Hangouts API, it will no longer be possible to create your own custom application that streams the video, including on Youtube.
Broadcast from RTMP live encoder
Next, we consider an alternative to creating a broadcast that is not tied to Google Hangouts and allows you to stream a video stream from a specialized video capture device (RTMP Live Encoder).
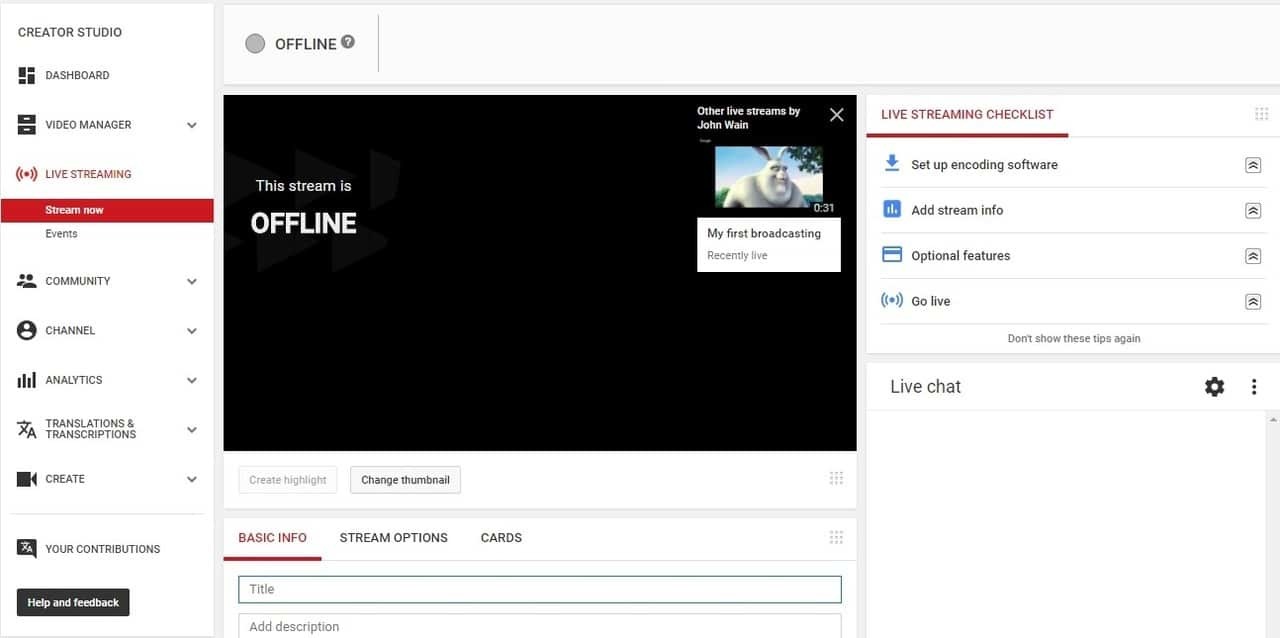
If you click on the Stream Now button, you will be taken to the familiar translation creation interface.
The most important part is the encoder settings:
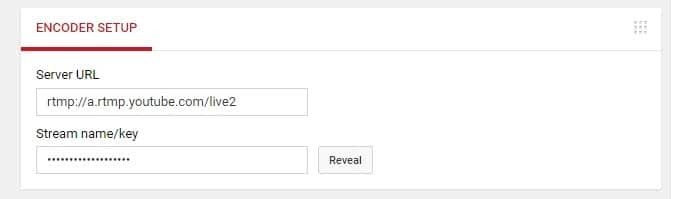
As you can see, there are only two fields:
1) Server URL
2) Stream name / key
If you click the Reveal button, the name of your stream will be displayed and will be available for copying.
This data is enough to send a video stream from the RTMP Live Encoder to Youtube Live from any location and any computer, without using Google Hangouts. RTMP Live Encoder (also known as an encoder) is a device or software that captures stream from a webcam or a professional video camera, encodes video in the RTMP protocol and sends it to a specified address (Encoder setup).
To get high-quality audio and video stream, you need to use standard Live Encoders codecs, namely H.264 video codec and AAC audio codec. This combination of codecs is the most common and reliable and is the de facto standard of use in RTMP when using autonomous encoders.
For example, the plug-in for the browser Adobe Flash Player is also an encoder and can stream video directly from the browser's web page, but it does not support AAC audio codec for streaming and therefore problems may occur with broadcasting, namely, there may be no sound.
Therefore, we immediately take in testing only those encoders that explicitly support the H.264 and AAC codecs. Currently, we know two candidates for testing that use these codecs:
Adobe Flash Media Live Encoder for Mac OS is a free software encoder from Adobe that can encode RTMP streams in H.264 and AAC. Please note that AAC audio codec is supported only in the FMLE version for Mac OS. If you use the same software on Windows, AAC codec will be unavailable. Instead, it will be mp3.
Wirecast is a paid encoder that has a free trial version in which a logo is inserted on top of the broadcast video and sound is superimposed every 30 seconds. Wirecast has a Windows distribution.
Let's start with Adobe FMLE. Install FMLE on a Mac and hook up to a computer (Mac Mini was used in the tests) webcam. With virtual cameras, FMLE does not seem to work, so you need an honest USB webcam or built-in (if you have a macbook).
We set up H.264 as a video codec with a resolution of 640x480. As the audio codec, we leave what is set by default AAC 22050 Hz mono. Other H.264 and AAC configurations and settings should also work without problems.
In the FMS URL field, enter the RTMP broadcast address that was received on Youtube.
In the Stream field we put down the name of the stream, which again was received on Youtube.
* The field has such a strange name FMS URL because FMLE thinks that there is only one server in the world capable of receiving an RTMP video stream - Flash Media Server from Adobe (now Adobe Media Server), but as we see it is not so, and with this task perfectly copes, for example Youtube and another hundred other servers and services.
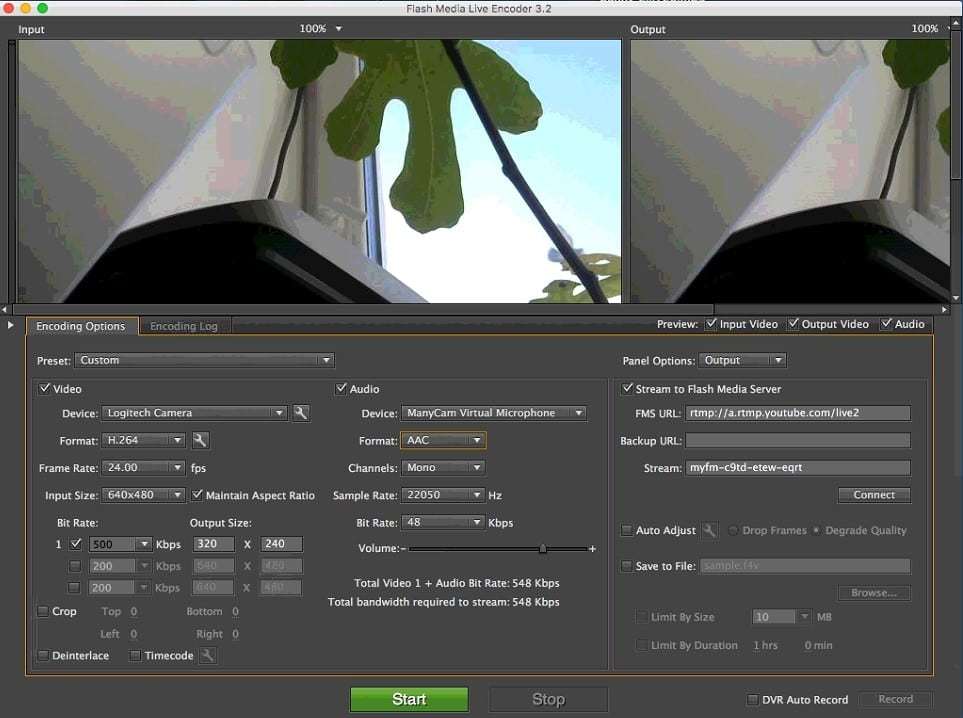
After all the settings have been set, click the green Start button to start the broadcast and the video is sent to Youtube. The picture is a bit dull, but my Mac is overloaded and I take screenshots through Teamviewer, so you cannot count on a special quality. To get a high-quality stream, take care of a high-quality high-resolution webcam and a powerful CPU, such as a Core i7 processor and SSD drive, would be useful for smooth and high-quality encoding of the RTMP video stream.

Since we have achieved some success in using FMLE, there is not much point in testing Wirecast. If you have problems with FMLE or not at hand Mac OS, try to do the same with Wirecast. For example, in this article you can find several screenshots with a description of how to broadcast the video stream in Wirecast. Wirecast encoder is interesting because it can be used even without a webcam. You can broadcast and encode in RTMP a regular video.
Convert from WebRTC to RTMP
Above, we conducted a test showing how to create a broadcast on Youtube Live and how to send an RTMP video stream encoded in H.264 + AAC to Youtube.
The next task is to do the same with WebRTC . WebRTC is a browser-based technology that allows the browser to capture video from the camera and audio from a microphone and send it to the network. Thus, a browser that supports WebRTC can work exactly like a Live Encoder - do capture and send. WebRTC is supported in the following browsers:
- Chrome
- Firefox
- Opera
- Chrome for Android
- Firefox for Android
Those. WebRTC video streams can be sent from Chrome desktop browsers, FF and the same browsers running Android.
As a result, our task is to broadcast on Youtube from the Google Chrome browser from a regular HTML page, without using Google Hangouts or RTMP Live Encoder.
Three problems:
- WebRTC does not support the RTMP protocol, which requires Youtube.
- WebRTC does not support AAC audio codec, which requires Youtube.
- WebRTC in Chrome does not support the H.264 codec on mobile devices, it uses the VP8 codec.
For these three reasons, WebRTC cannot directly send audio + video to Youtube Live.
If we talk about Adobe Flash Player, it has another problem.
- Does not encode audio in AAC
Therefore, regardless of whether you use a browser that supports WebRTC (Chrome) or a browser that supports Flash Player (IE or Safari), you cannot send an H.264 + AAC RTMP video stream directly from the browser.
The solution is to convert the video stream on the server side, which is shown in the diagram below.

Thus, an intermediary server appears in the broadcast, which receives the WebRTC video stream and converts it into a format that YouTube accepts.
For testing we will use Web Call Server 5 . This is a media server with support for WebRTC technology and an RTMP protocol with a trial version.
Our task is to install Web Call Server 5 on a Linux server and send a WebRTC video stream to it that will be redirected to Youtube. This will require a local iron server on a 64-bit Linux system or a VPS server at the hoster. Minimum requirements: 1 processor core and 1 gigabyte RAM, Linux x86_64.
An old dual-core Athlon 64-bit, 1.8 GHz with CentOS 6 installed on it and 2 gigabytes of RAM was found on the local network. For experiments, decided to use it.
The installation process is described on the developer's site.
1. Download the archive
wget https://flashphoner.com/download-wcs5-server.tar.gz When downloading wget swears at the certificates. I have to add a flag:
wget --no-check-certificate https://flashphoner.com/download-wcs5-server.tar.gz 2. Unpack
tar -xzf download-wcs5-server.tar.gz 3. Run the installer
./install.sh When installing, it gives an error and indicates the absence of Java.
4. Install java using the package manager, and then run the installer again.
yum install java ./install.sh During installation, the installer asks if the server is on the local network. We answer in the affirmative with 'yes', after which the installer enters the local IP address of the server 192.168.1.59 into the settings.
5. Next, run the server.
service webcallserver start Starting the server takes about a minute.
6. Open the dashboard at 192.168.1.59 : 8888 in Chrome

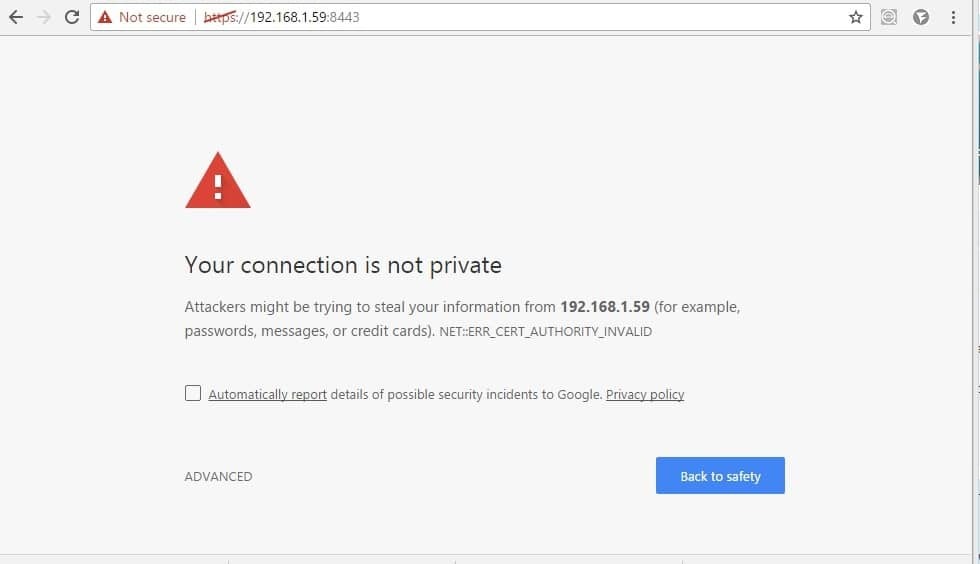
The browser is expected to complain about the lack of normal SSL certificates. Later they can be imported, for example, take free on letsencrypt .
Now just click on Advanced / Proceed and confirm the security exception.
7. According to the developer documentation, there is one more thing to do regarding certificates. You need to do the same on page: 192.168.1.59 : 8443
This is to ensure that the signal websocket connections also pass. Without them, WebRTC will not work, because For his work requires the exchange of SDP through a separate connection.
After these two manipulations with certificates, the Dashboard page should open with demo examples. The demo example we need is called WebRTC as RTMP re-publishing and it looks like this:
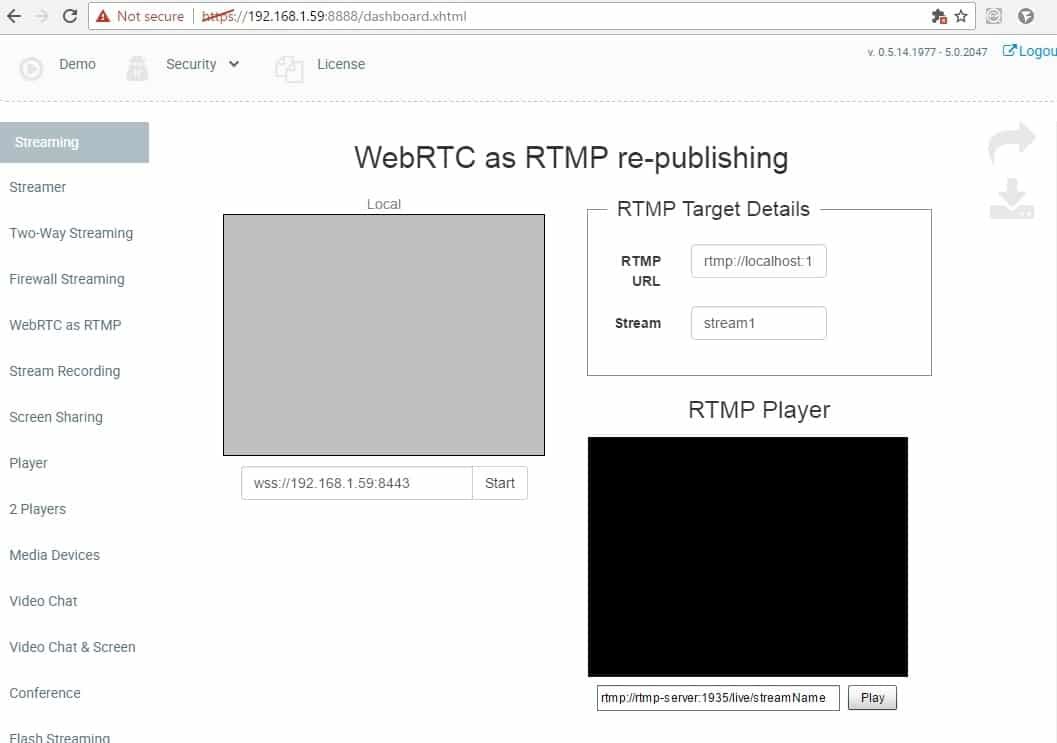
Let's test it in Google Chrome browser. The task of this example is to send WebRTC audio + video stream to Web Call Server 5, convert it to RTMP and redirect to a given direction.
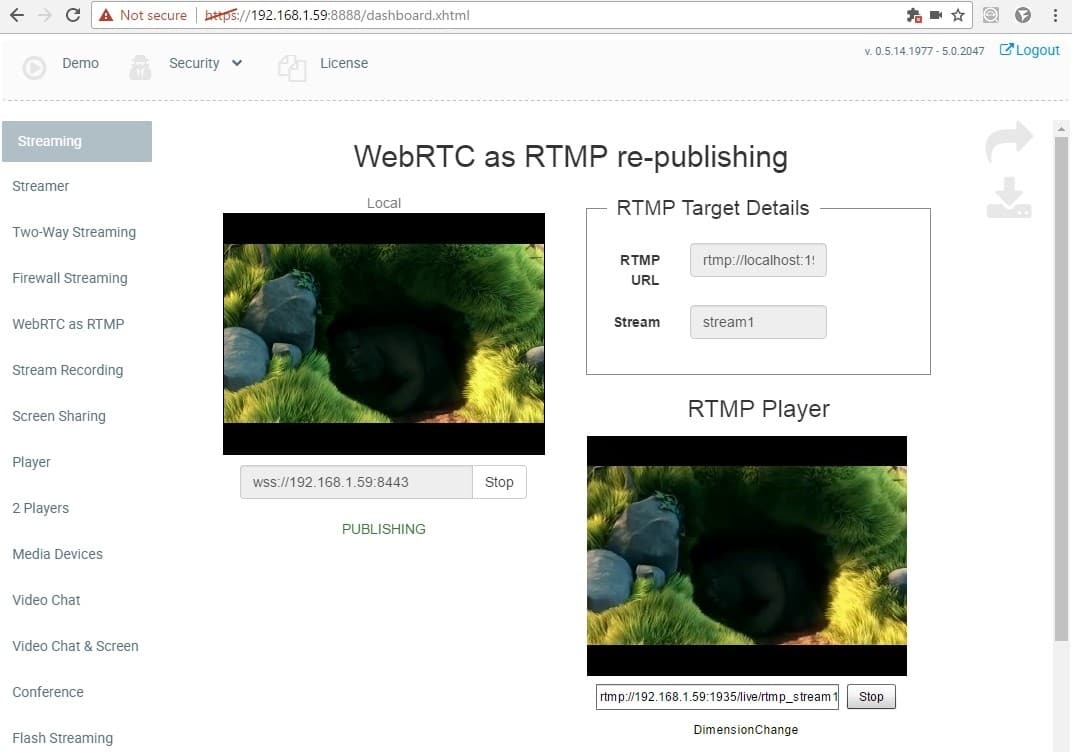
To start testing, just click the Start button and allow the use of the camera and microphone at the request of the browser.
In the screenshot above, the following happens:
1. A connection is established between the Google Chrome browser and Web Call Server 5 via the websocket protocol via a secure connection: wss: //192.168.1.59: 8443
2. WebRTC audio + video stream is sent to the server and the status PUBLISHING is displayed, which indicates the successful sending of the video stream to the server.
3. Web Call Server forwards the received WebRTC audio + video stream to the specified RTMP address:
- rtmp: // localhost: 1935 / live
- stream1
Thus, the RTMP video stream is redirected to localhost, i.e. On the same server 192.168.1.59 in our case. Those. It can be said that the Web Call Server accepted the WebRTC stream and wrapped it on itself as RTMP.
Notice how this correlates with Youtube Live. There we specified the Server URL and Stream name / key
4. Next, it remains to play the video stream in the built-in player. There the address is automatically generated and the name of the stream is entered.
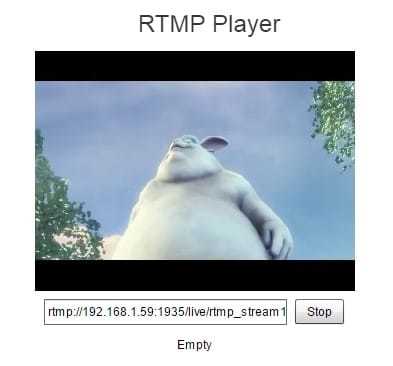
The built-in RTMP player is very simple and allows you to make sure that the stream is in place and reproduced correctly.
The full stream address looks like this: rtmp: //192.168.1.59: 1935 / live / rtmp_stream1
Here you need to pay attention to an important detail - Web Call Server 5 substitutes the prefix rtmp_ in the name of the stream. Those. receives a stream called stream1, and redirects it as rtmp_stream1. This is important for testing on localhost so that the names of the streams are different.
Local testing was successful and it was time to send stream to Youtube Live.
Recall that for testing Youtube Live with the RTMP live video encoder we used
Server URL: rtmp: //a.rtmp.youtube.com/live2
Stream name / key: myfm-c9td-etew-eqdf
Those. Youtube expects from us the name of the video stream just this and no other: myfm-c9td-etew-eqdf. And if the Web Call Server prefixes rtmp_, then the resulting name will be rtmp_myfm-c9td-etew-eqdf and Youtube will not accept the stream.
In order to get around this, edit the config /usr/local/FlashphonerWebCallServer/conf/flashphoner.properties on the server side.
Comment or remove the config line:
#rtmp_transponder_stream_name_prefix =rtmp_ Thus, we tell the server not to affix the prefix and redirect the received stream with the same name.

Changing this setting requires a reboot. Run the command to restart the server and wait 1 minute.
service webcallserver restart After the reboot, we proceed to the final stage of testing. Again open the dashboard and WebRTC as RTMP re-publishing demo example, but this time we enter the RTMP address exactly as for the Live Encoder.

Finally, open Youtube Live and see the result:
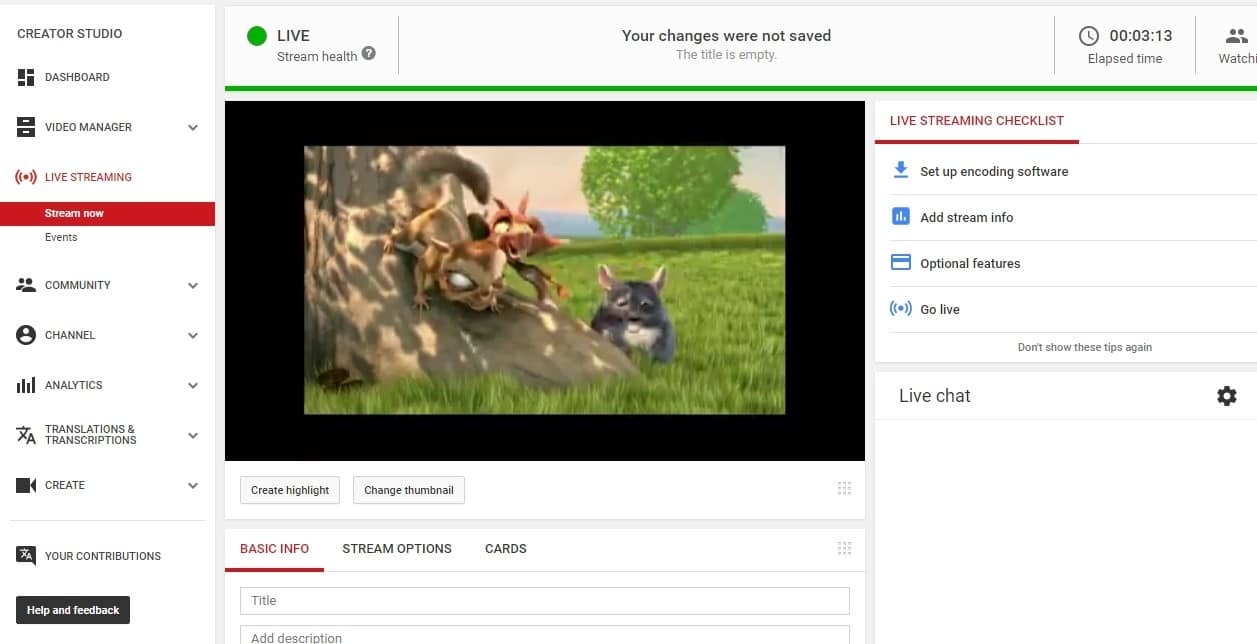
This time we managed to forward the WebRTC video stream on Youtube as RTMP and get a picture.
In the Google Chrome browser, in the chrome: // webrtc-internals tab, you can see graphs describing the WebRTC delivery of the video stream to the server:

On the Youtube side, incoming traffic looks like this:
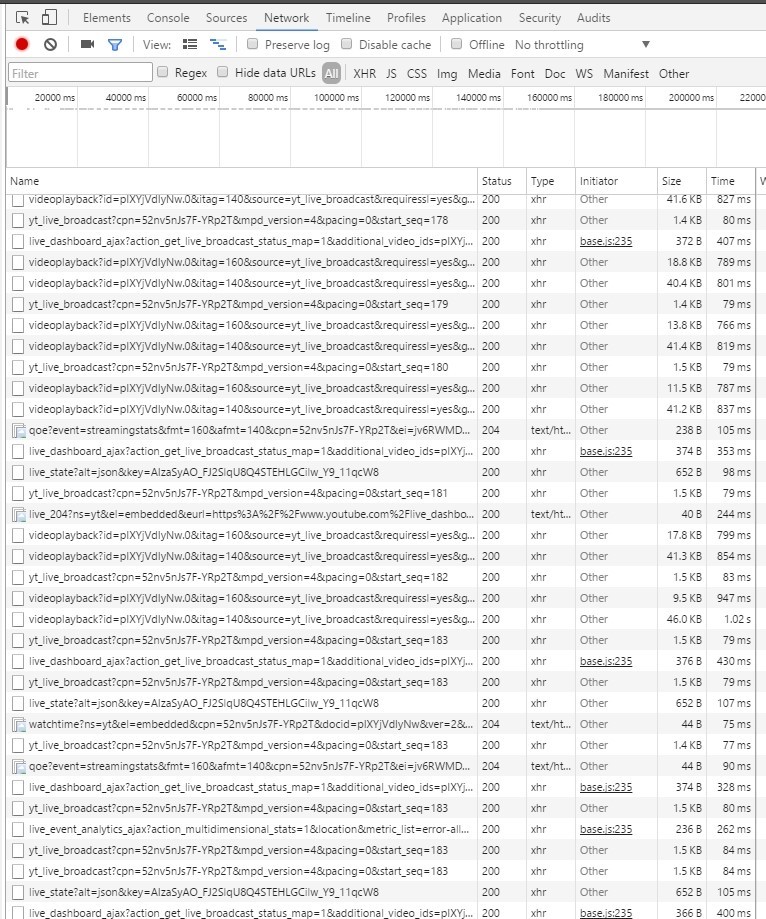
Very similar to HTTP Live streaming (HLS) with uploading video segments via HTTP (HTTPS).
Great, we managed to test and make sure that it really works. There is a picture, there is a sound, the video stream goes straight from the browser and goes to Youtube.
Now you can proceed to programming. Namely, we would like to be able to do the same from a simple HTML page and in perspective from our website or web application.
Programming an HTML page that sends WebRTC to Youtube
The easiest way would be to figure out the example by downloading three source files: HTML, JavaScript, CSS. But we are not looking for easy ways and want to create a minimal page from scratch (so to speak from scratch).
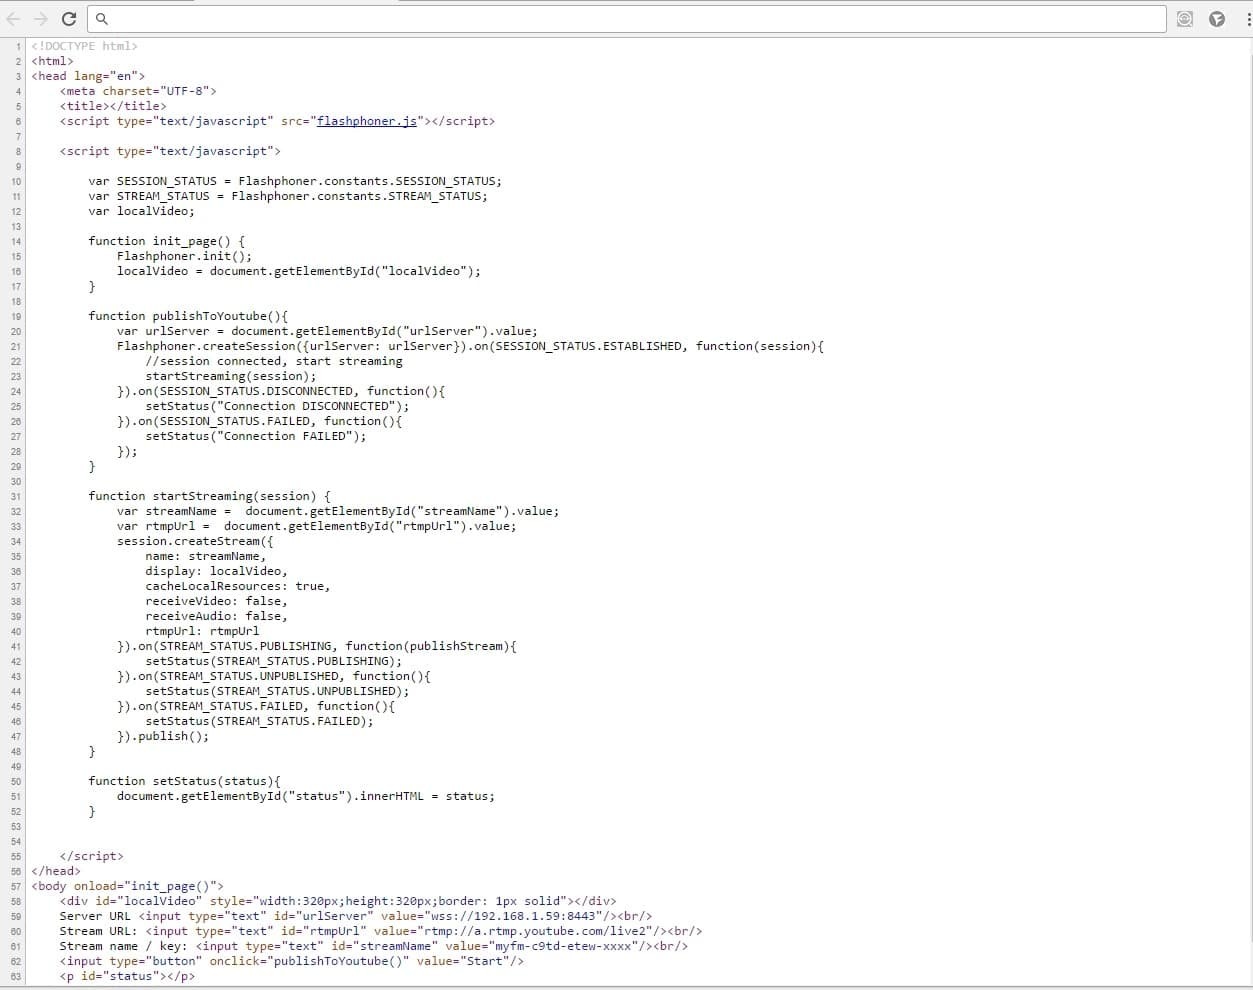
We start by creating a test-webrtc-youtube.html blank
<!DOCTYPE html> <html> <head lang="en"> <meta charset="UTF-8"> <title></title> </head> <body> </body> </html> Now you need to download the flashphoner.js script, which does all the work related to WebRTC and the transfer of the video stream to the server. This script is included in the Web SDK, which is available for download at this link .
We download and unpack the Web SDK on a separate server where Apache is installed (someone has Nginx).
wget https://flashphoner.com/downloads/builds/flashphoner_client/wcs_api-2.0/flashphoner-api-0.5.14.1977-48448b99eddb0da1248519290dba2d4d00d4a505.tar.gz Create a folder / var / www / html / test-webrtc-youtube which will contain the html page and copy the files to this html and js folder:
- test-webrtc-youtube.html
- flashphoner.js
It turns out this structure:
test-webrtc-youtube -- flashphoner.js -- test-webrtc-youtube.html 1. Add the following elements to the page:
<body onload="init_page()"> <div id="localVideo" style="width:320px;height:320px;border: 1px solid"></div> Server URL <input type="text" id="urlServer" value="wss://192.168.1.59:8443"/><br/> Stream URL: <input type="text" id="rtmpUrl" value="rtmp://a.rtmp.youtube.com/live2"/><br/> Stream name / key: <input type="text" id="streamName" value="myfm-c9td-etew-xxxx"/><br/> <input type="button" onclick="publishToYoutube()" value="Start"/> <p id="status"></p> </body> 1) localVideo - this is just a div-block, which will be placed video from a webcam
2) urlServer, rtmpUrl, streamName - already familiar fields from previous testing
3) status - this field displays the status of the connection or stream
2. Add three variables:
var SESSION_STATUS = Flashphoner.constants.SESSION_STATUS; var STREAM_STATUS = Flashphoner.constants.STREAM_STATUS; var localVideo; The first two are just abbreviations. The localVideo variable will store the reference to the div element.
3. Initialize the API
function init_page() { Flashphoner.init(); localVideo = document.getElementById("localVideo"); } 4. Connect to WCS server and start streaming.
function publishToYoutube(){ var urlServer = document.getElementById("urlServer").value; Flashphoner.createSession({urlServer: urlServer}).on(SESSION_STATUS.ESTABLISHED, function(session){ //session connected, start streaming startStreaming(session); }).on(SESSION_STATUS.DISCONNECTED, function(){ setStatus("Connection DISCONNECTED"); }).on(SESSION_STATUS.FAILED, function(){ setStatus("Connection FAILED"); }); } Upon successful connection via the ESTABLISHED event, it starts streaming by calling the startStreaming function
5. Sending a video stream.
function startStreaming(session) { var streamName = document.getElementById("streamName").value; var rtmpUrl = document.getElementById("rtmpUrl").value; session.createStream({ name: streamName, display: localVideo, cacheLocalResources: true, receiveVideo: false, receiveAudio: false, rtmpUrl: rtmpUrl }).on(STREAM_STATUS.PUBLISHING, function(publishStream){ setStatus(STREAM_STATUS.PUBLISHING); }).on(STREAM_STATUS.UNPUBLISHED, function(){ setStatus(STREAM_STATUS.UNPUBLISHED); }).on(STREAM_STATUS.FAILED, function(){ setStatus(STREAM_STATUS.FAILED); }).publish(); } Here we created a stream and called the function publish for it.
6. All statuses are displayed as a separate function.
function setStatus(status){ document.getElementById("status").innerHTML = status; } In the end, they got about the same as when using the demo out of the box.
The result looks like this:
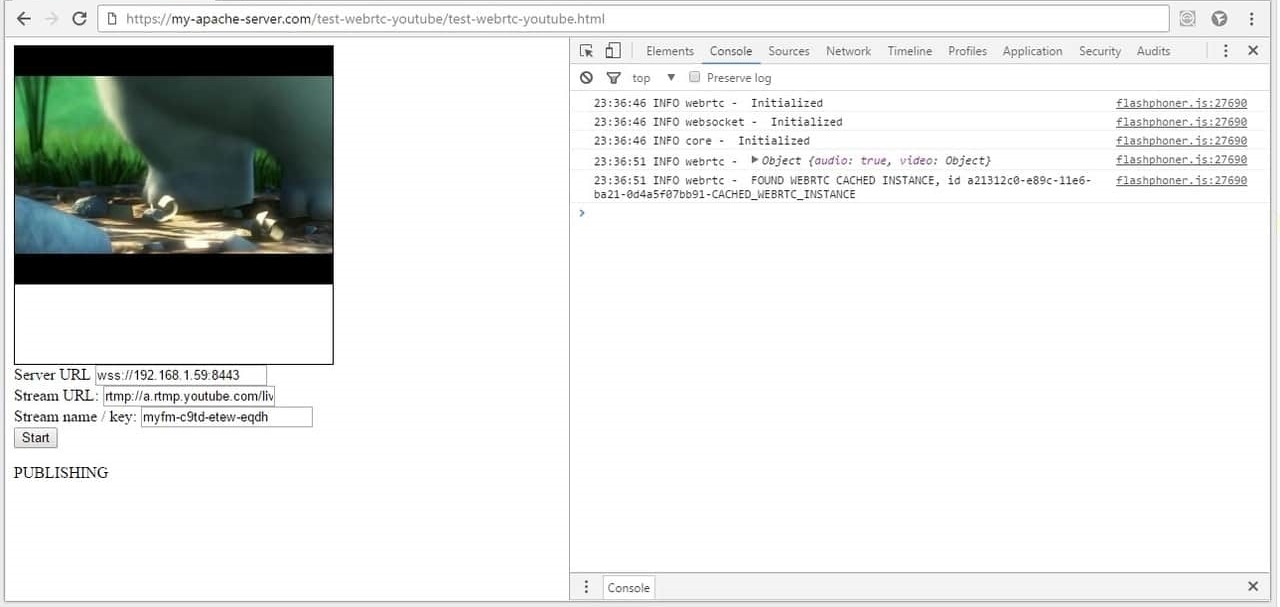
Note that the https protocol is again used. Your web server must be configured to use https. This is usually done quite simply by installing mod_ssl:
yum install mod_ssl The HTML code for the page took exactly 65 lines and looks like this:
And you can download the source here.
As a result, we created an HTML page with a size of 65 lines, including scripts, which, using the flashphoner.js API file, sends WebRTC video to a Web Call Server, which in turn redirects this video stream to the Youtube Live service.
That's all. For those who want to repeat, I cite the references and materials used in the article.
References:
1) Youtube Live
2) Adobe Flash Media Live Encoder
3) Wirecast
4) Web Call Server (used version 2047)
5) WebRTC
6) HTML + Javascript Sources
7) Google is closing the Hangouts API
Source: https://habr.com/ru/post/321700/
All Articles