Automatic 3CX configuration using the setupconfig.xml answer file
Introduction
You can automatically install and configure the 3CX server using the prepared answer file. The answer file is an XML file that contains the same parameters that you specify on the command line or the 3CX Configuration Wizard web interface. You can create such a file and place it directly on the server or the cloud.init cloud configuration package. To all the “questions” that are usually asked in the 3CX Setup Wizard, the system receives pre-set “answers” from the file. As a result, in a few minutes you get a fully configured and ready-to-work system, configured according to your typical template. You can also include in the answer file the parameters of extension numbers, SIP trunks and DID lines that will be automatically created during the configuration process.
Technology Overview

Prepare an XML file and place it on the server before starting to install 3CX:
- Download sample XML answer file setupconfig.xml
- Specify the parameters in it that match your configuration.
- Save setupconfig.xml on the server in the appropriate folder:
- For Linux 3CX version: /etc/3cxpbx/setupconfig.xml .
- For Windows version 3CX: C: \ ProgramData \ 3CX \ Data \ setupconfig.xml
- When installing 3CX, the Initial Configuration Wizard checks for the presence of the setupconfig.xml file.
Instead of copying the file to the server, you can use cloud.init. Copy the contents of setupconfig.xml into the Advanced> User data section. Below is an example Amazon AWS cloud.init image.
')

Sample cloud.init file
Enable setupconfig.xml in cloud.init .

→ Download the sample cloud.init file
The structure of the file Setupconfig.xml
The setupconfig.xml file is divided into 4 sections:
- tcxinit - describes the initial stage of the PBX Configuration Wizard. Here are answers to such questions: license key or backup file path, network parameters, public IP address, FQDN name (issued by 3CX or user), host name, DNS type (local or from 3CX), HTTP / S ports and similar options.
- mcwizard - describes the next stage of the PBX Configuration Wizard. Here you can find answers to such questions: extension number, mail server settings, time zone, country, and information about the owner of the 3CX system.
- extensions - in this section parameters of extensions (users) are specified.
- siptrunk — This section specifies the parameters of SIP trunks and DID numbers. The inboundrules subsections describe the inbound rules associated with the DID numbers of a specific trunk.
- OutboundRules — This section describes the outgoing rule parameters.
Example: 3CX Initial Configuration Wizard Answers
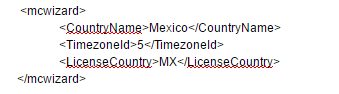
The response block of the 3CX Initial Configuration Wizard is located in the mcwizard section :

To correctly fill in the CountryName , TimezoneId, and LicenseCountry parameters, refer to this table and select the desired value. For example, for Mexico, specify the following parameters:
Example: Adding Extensions, SIP Trunks, DID and Outbound Rules
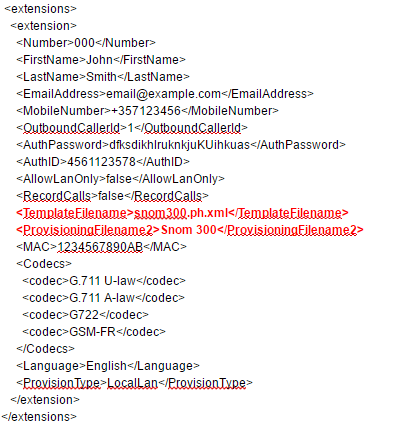
In the extension , siptrunk , InboundRules, and OutboundRules response blocks, extensions , trunks, incoming and outgoing rules are defined, respectively. When describing an extension number, you can assign an IP phone to it. To do this, specify the information about the auto-configuration patterns of IP phones in this table . For example, if you want to bind the phone snom 720 , find this model in the table and the corresponding auto- configuration template file (in this case snom.ph.xml ). Specify this information in the corresponding xml tag.
Creating an extension
Creating SIP trunks, DID and incoming rules

Creating outbound rules with indication of backup routes (trunks)

Example: automatic installation of SSL certificates
We show how you can include an SSL certificate data in the answer file setupconfig.xml. In this example, we are talking only about the SSL certificate of the web server. For other certificates used by the system, add a description of the certificate in the other sections of the answer file. The CertificatePath path will be shared by everyone, but the password for each Certificate Certificate will be different.

3CX Downloads
Source: https://habr.com/ru/post/321646/
All Articles