Procedural level generation for MERC in Unity

Part two
In the first part of this article, I explained why we chose procedural level generation for the MERC game, and described the requirements for it. I also described the process of generating a procedural level structure and combining multiple fragments to create a complete level. In the second part of the article, we will discuss the solution to the problems of lighting and NavMesh in Unity and creating an NPC based on tempo.
Lighting
When creating a procedurally generated route, it is very likely that in each level one fragment will be loaded several times. Duplicate grids (meshes) of such fragments are stored in memory separately, but lighting maps can be shared by adding the code to merge all lighting maps by scene name into the level loader. Then the indexes of the lighting maps are reassigned when loading, saving memory and do not duplicate the lighting maps for these fragments.
To ensure that the coordinates of the level fragments match with baked lighting and shadows, we baked each scene in the same theme with the same lighting settings. We found that using the “skybox” ambient source setting resulted in a slightly different lighting of each fragment and when joining the fragments, the seams were clearly visible. Obviously, this did not suit us, so we experimented with different lighting parameters to find the best option. It turned out that the best results are obtained when changing “ambient source” to “gradient” . The joints were almost perfect and the seams were invisible. The image below shows the difference.
')

When generating the procedural level for MERC, we had one “parent” scene loaded in front of all the fragments. In this scene there was one directional light source used for real-time lighting, baked with the same parameters as the fragments. This scene also contained all the global objects and parameters needed for the final level. When loading fragments, we make this parent scene an “active” scene in the Unity Scene Manager, so that its parameters are used for the entire scene.
Navmesh
We use the NavMesh Unity system to route all mercenaries and NPCs. When we developed this procedural system, the Unity engine did not yet support the dynamic bonding of several NavMeshs during the execution of the game. In Unity, this feature has been added in the new beta since version 5.6, but at the time of this writing, it is not yet ready. Therefore, we had to solve the problem by loading several random fragments of levels and applying them together with one NavMesh. According to reviews from the developers of Unity, the only way to achieve this was to create a single large NavMesh area and cut it into each level fragment. Therefore, in the parent scene, we created one large flat NavMesh, covering the entire game area. Then we used Unity's “NavMeshObstacle” component and forced it to cut all the walls and prefabs. Then, when they are loaded and placed on NavMesh, they are cut out of it, leaving only the main route for movement.
This system works quite well and almost does not affect the loading time of the levels. The main limitation is that it is impossible to vary the NavMesh lifts in level fragments, because they cut out parts of one flat NavMesh that is in the parent scene. There is no way to know in advance which fragment will load, so we cannot embed lifts into NavMesh, because the structure of each level is random and dynamic. After upgrading to Unity 5.6 in the future, we want to improve our system so that it supports the bonding of several NavMesh with different elevations.
After loading each fragment and laying the paths, we wanted to add variations to the fragments so that the duplicate fragments did not look the same. To do this, we created Procedural Obstacle Volumes (procedural volumes of obstacles) that generate random objects of design and shelter in each level fragment.
Procedural Obstacle Volumes
Procedural Obstacle Volume is the amount of space in which randomly selected prefabs of shelter objects are generated. They allow us to add variability to level fragments, even when loading duplicate fragments.
First we created the “ProceduralObstacle” component added to each prefab, which can be downloaded through the system. The component tracks the size of the boundaries of the prefab, labels and other settings. Each time the prefab is updated in the editor, it is automatically updated in the global manifest ScriptableObject . This manifest is then used to check prefabs when loading into procedural scope.

Then we place the Procedural Obstacle Volume game objects inside the level fragments. These volumes have settings that allow you to select prefabs that can be generated based on labels and directions. For example, we may need to fill the area only with prefabs designed for open spaces that are destructible and are shelters only in a certain direction. When loading levels, these volumes are processed and randomly select the appropriate prefabs. All this processing is based on the initial number (seed), which generates the level (therefore, the process is deterministic and suitable for playing together on a network). Then we use the standard container packing (bin packing) to place the prefabs in a volume as tightly as possible with a small buffer around so that the mercenaries can make a path between them.
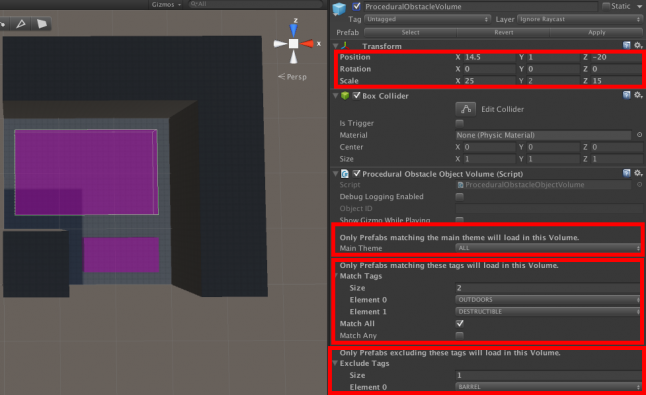
Over time, we added other functions to the system that simplify the work of level designers. For example, it is enough to press a button in the editor in order not even to start the game to find out which prefabs can be loaded into the volume. So you can quickly test what you can load into the volume based on its settings.

Now that we’ve finished with route generation at levels, obstacles, lighting settings, and NavMesh, we need to populate the levels with enemies!
NPC and tempo curves
When creating each level fragment for MERC, we strategically located the NPC creation points within each fragment. However, we did not want all the enemies to be created during the game, it would be a real meat grinder. Instead, when loading the procedural level, we determine which point to include based on the tempo curve ( Tempo Curve ).
The tempo curve is a simple concept that we came up with to reflect the “pulse” of the level tempo. Using the graphs of Unity animation curves, we can control how simple or difficult the level will be. An example is shown below.
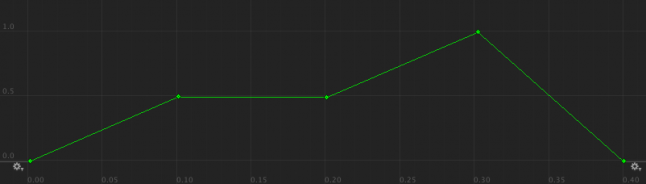
When loading a procedural mission, it has the basic complexity of the mission. We randomly select a tempo curve from the list and estimate the points of the curve relative to each other. This means that no matter where the points are on the graph, our code finds the lowest one and considers it to be zero or the “Do not create enemies” level. Then he finds the highest point and considers it the “Most Difficult” level. It then distributes intermediate complexity modifiers with the same increment between the lowest and highest points as follows:
- Do not create enemies (lowest point)
- The easiest (create the lightest NPC)
- Simple (create light npc)
- Basic (corresponds to the complexity of the mission)
- Difficult (create serious NPC)
- The most difficult (highest point)
For example, if the main route consists of 9 fragments, the points of the tempo curve shown above are distributed from beginning to end of the level. The first fragment is assigned the “Do not create enemies” modifier, the fourth point (or the seventh fragment) is assigned the “Most difficult” modifier, and the last point (or last fragment) is assigned “Do not create enemies”. All other fragments are distributed along the points of the curve and determine the pace of NPC creation in these fragments. The result is a "pulse" of passing the level in relation to the complexity of the NPC. The above graph slowly grows and gradually reaches a major battle before the end of the main path. Almost in every fragment of this example, NPCs are created, with the exception of the first and last fragment, therefore there will always be enemies on the level.
NPCs in MERC are created using a points system. We have a complete table of points based on the current squad level and mission difficulty rating. From it we determine how many points you need to spend when creating an NPC. If the complexity modifier is “Basic”, then NPCs are created that correspond to the level of the squad for the selected mission complexity. If the modifier is equal to “Simple” or “Most Simple”, then part of the points when creating an NPC is subtracted. Likewise, "Complicated" and "Most Complicated" add points to create enemies. At the points of creation, these points are used to determine the number and level of NPCs created.
The main route is filled by the NPC based on the tempo curve, but we also randomly select tempo curves to control the paths to the dead ends. Therefore, the passage of the level may vary depending on the path chosen by the player. Such a mixture provides greater variability and replayability of the system of procedural levels.
Total
MERC is a recurring game. Therefore, it greatly benefits from the use of a procedural level generation system.
Starting with the creation of the main route and imposing layers taking into account the subsequent requirements, we built a reliable system that can be adjusted and built upon during the development process, as well as add new gameplay mechanics. By using a single seed for all calculations of random values, we guarantee the deterministic generation of all the data that can be replicated for playing together on a network. I will be happy to tell you more about the different aspects of this system and will gladly accept any suggestions and feedback. You can contact me on Twitter .
Now MERC is at the stage of early access to Steam, and we will appreciate your feedback and support.
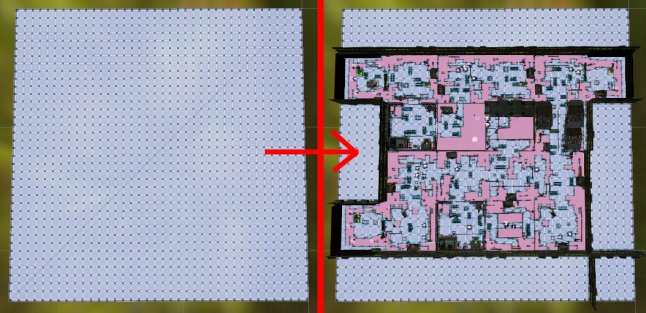
Example of loading the procedural level MERC, top view:

Source: https://habr.com/ru/post/321602/
All Articles