The first application on Spring Boot + ReactJS
In the life of every Java developer, there may come a time when nothing remains, how to use it in your ReactJS application. Unless, of course, AngularJS. You resisted for a long time, but this moment has come and we need to do something. You have heard that there is Node.JS, that it can be a web-server, but this is already a sham. You will have a kosher Spring Boot. Unfortunately, Google search is very confusing. Many different guides, all operate with different versions of the reactor and related tools. This guide describes the process of creating the simplest Spring Boot + ReactJS application, simple and enjoyable.
First you need to download and install Node.js. During installation (requires administrative rights) it is important to ensure that npm is installed and system paths are written. In the case of Windows, the “Node.js command prompt” appears, in other OSs probably something like that also appears. Run it. If you work without access to the Internet (this is very inconvenient, but it happens), you can specify the local npm repository; they may well be your corporate Nexus. To do this, at the command prompt, run
Next we will make the classic maven application. Since the article is primarily intended for Java programmers, I will not tell you how to do this and what to specify in pom.xml to make the Spring Boot application. Create a folder src \ main \ resources \ static (hereinafter simply static). Go to the console in it, and initialize the node-application by running the npm init command. In interactive mode, you will be prompted to enter the main parameters of your application (name, author, etc.). Upon completion, the file static \ package.json will appear, you can always change it manually. Before performing further steps, it is highly desirable to upgrade the npm package manager to the current version. To do this, run the command in the console
Connect the dependencies you need. They are divided into two categories, main and development - the latter will not fall into the supplied assembly. The minimum set for our example is:
')
As a result, the static \ package.json file will be updated and the static \ node_modules folder will be created. This folder must be added to .gitignore. It should also be excluded from the maven resource collection:
How to write applications on ReacJS is readily written in the authentic Facebook manual . Speaking quite briefly, programming on ReacJS boils down to the fact that you write handlers that render custom tags to html code.
First, create a static \ app folder with the app.jsx file in it - there will be the main class of the application. Add the following content to it:
Here the following is important: in our small class, JSX syntax is used, ES2015 syntax is used in the JavaScript language. It is assumed that on the html page where this script will be added, there is an element with id = "react", and it will be replaced by the <App /> tag, which, in turn, will be rendered into a sacramental inscription. Next, create a static \ index.js file with the following contents:
This will be the entry point to our application. If you use Idea, and it then swears that the current version of JavaScript does not support imports, press Alt-Enter and turn on ES6.
Finally, create the src \ mail \ resources \ templates \ greeting.html file with the following contents:
Actually, this is all about programming. If you use Spring MVC, you will not be difficult to make an application that will show this html. It remains only to convert our JSX script into valid JavaScript, and everything will take off. For this we will use a webpack.
Using Webpack with ReactJS is common practice. Roughly speaking, the process boils down to the fact that Webpack, using various babel libraries, translates our code into one that browser understands. At the same time, we would be very pleased that it was possible to put breakpoints in it, and not in some generation, do not understand what, but in the original clear JSX script. Fortunately, this task is solvable. In order to successfully complete the next steps, it is assumed that the mandatory recommended and developer dependencies recommended above were connected, and your package.json file in this part looks like this:
It is important that we use Webpack2, with the first one everything is different. Create a static \ .babelrc file with the following contents (as it is not difficult to guess, this is the Babel configuration):
Create a static \ webpack.config.js file with the following contents:
Note that:
The key "-d" means "development", if you use -p "production", the result will be minified. In principle, this is not significant, it does not affect the possibility of debugging. Compile by running the npm run build command at the Node.js command line. Add in .gitignore npm - *. Log and generated /.
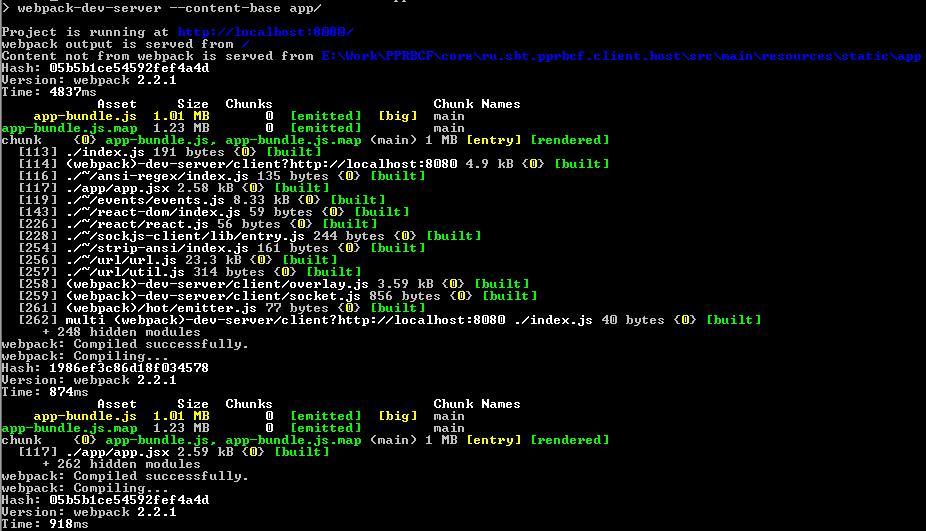
Please note that even in such a minimal example, the compilation of a webpack takes a few seconds (I have up to 8s). It's a lot. It makes sense to configure automatic recompilation. For this purpose, the webpack-dev-server package was previously installed, and its configuration parameters were added in the devServer section. This task is implemented as a background process launched by the script. To run this script, you need to add the element "dev" to the scripts section of the package.json file : "webpack-dev-server - content-base app /" " (here," dev "is the script alias, you can use any one). By this we set up the process of monitoring changes in the app / folder, in which our JSX script resides.
Then run the npm run dev command. As a result, the Node.js Express server will start, which will first perform the usual compilation of the webpack, cache everything that is needed, and then recompile incrementally with each change. This server has quite a few options, refer to the original documentation (link below). If you need to perform some other actions in the npm command line, you will have to start a new one, this one is now busy.
And now absolutely everything. Run the application and it is happy world.
For completeness, it should be mentioned that you can do without the console. To work with npm there is a rather convenient maven-plugin frontend-maven-plugin. A fragment of the pom-file with his participation is shown below:
Preparing the development environment
First you need to download and install Node.js. During installation (requires administrative rights) it is important to ensure that npm is installed and system paths are written. In the case of Windows, the “Node.js command prompt” appears, in other OSs probably something like that also appears. Run it. If you work without access to the Internet (this is very inconvenient, but it happens), you can specify the local npm repository; they may well be your corporate Nexus. To do this, at the command prompt, run
npm config set registry http://_npm_ Next we will make the classic maven application. Since the article is primarily intended for Java programmers, I will not tell you how to do this and what to specify in pom.xml to make the Spring Boot application. Create a folder src \ main \ resources \ static (hereinafter simply static). Go to the console in it, and initialize the node-application by running the npm init command. In interactive mode, you will be prompted to enter the main parameters of your application (name, author, etc.). Upon completion, the file static \ package.json will appear, you can always change it manually. Before performing further steps, it is highly desirable to upgrade the npm package manager to the current version. To do this, run the command in the console
npm install npm@latest -g Connect the dependencies you need. They are divided into two categories, main and development - the latter will not fall into the supplied assembly. The minimum set for our example is:
')
- Major:
npm install react requirejs react-dom rest --save - Development:
npm install babel-loader babel-core webpack webpack-dev-server babel-preset-stage-0 babel-plugin-transform-regenerator babel-preset-es2015 babel-preset-react --save-dev
As a result, the static \ package.json file will be updated and the static \ node_modules folder will be created. This folder must be added to .gitignore. It should also be excluded from the maven resource collection:
<build> <resources> <resource> <directory>src/main/resources</directory> <excludes> <exclude>static/node_modules/**/*.*</exclude> </excludes> </resource> </resources> </build> Creating an application framework
How to write applications on ReacJS is readily written in the authentic Facebook manual . Speaking quite briefly, programming on ReacJS boils down to the fact that you write handlers that render custom tags to html code.
First, create a static \ app folder with the app.jsx file in it - there will be the main class of the application. Add the following content to it:
import React from "react"; import ReactDom from "react-dom"; class App extends React.Component { render() { return <p>Hello, World!</p> } } ReactDom.render(<App />, document.getElementById('react')); Here the following is important: in our small class, JSX syntax is used, ES2015 syntax is used in the JavaScript language. It is assumed that on the html page where this script will be added, there is an element with id = "react", and it will be replaced by the <App /> tag, which, in turn, will be rendered into a sacramental inscription. Next, create a static \ index.js file with the following contents:
import App from './app/app.jsx'; This will be the entry point to our application. If you use Idea, and it then swears that the current version of JavaScript does not support imports, press Alt-Enter and turn on ES6.
Finally, create the src \ mail \ resources \ templates \ greeting.html file with the following contents:
<!DOCTYPE html> <html xmlns:th="http://www.thymeleaf.org"> <head> <meta charset="UTF-8" http-equiv="CONTENT-TYPE" content="text/html; charset=UTF-8"/> <title>Hello demo</title> </head> <body> <div id="react"/> <script src="/generated/app-bundle.js"/> </body> </html> Actually, this is all about programming. If you use Spring MVC, you will not be difficult to make an application that will show this html. It remains only to convert our JSX script into valid JavaScript, and everything will take off. For this we will use a webpack.
Setting up a compilation with Webpack
Using Webpack with ReactJS is common practice. Roughly speaking, the process boils down to the fact that Webpack, using various babel libraries, translates our code into one that browser understands. At the same time, we would be very pleased that it was possible to put breakpoints in it, and not in some generation, do not understand what, but in the original clear JSX script. Fortunately, this task is solvable. In order to successfully complete the next steps, it is assumed that the mandatory recommended and developer dependencies recommended above were connected, and your package.json file in this part looks like this:
"dependencies": { "react": "^15.4.2", "react-dom": "^15.4.2", "requirejs": "^2.3.2", }, "devDependencies": { "babel-core": "^6.22.1", "babel-loader": "^6.2.10", "babel-plugin-transform-regenerator": "^6.22.0", "babel-preset-es2015": "^6.22.0", "babel-preset-react": "^6.22.0", "babel-preset-stage-0": "^6.22.0", "react-frame-component": "^0.6.6", "webpack": "^2.2.1", "webpack-dev-server": "^2.3.0" } It is important that we use Webpack2, with the first one everything is different. Create a static \ .babelrc file with the following contents (as it is not difficult to guess, this is the Babel configuration):
{ "presets": ["react", "es2015", "stage-0"], "plugins": ["transform-regenerator"] } Create a static \ webpack.config.js file with the following contents:
var packageJSON = require('./package.json'); var path = require('path'); var webpack = require('webpack'); module.exports = { devtool: 'source-map', entry: './index.js', output: { path: path.join(__dirname, 'generated'), filename: 'app-bundle.js'}, resolve: {extensions: ['.js', '.jsx']}, plugins: [ new webpack.LoaderOptionsPlugin({ debug: true}), new webpack.DefinePlugin({ "process.env": { NODE_ENV: JSON.stringify("development") } }) ], module: { rules: [ { test: /\.jsx?$/, loader: 'babel-loader', exclude: /node_modules/ } ] }, devServer: { noInfo: false, quiet: false, lazy: false, watchOptions: { poll: true } } } Note that:
- The entry point is the previously defined script index.js
- The result of the compilation will be placed in the folder static \ generated
- The settings are set to development. In the future, it makes sense to use webpack profiles, dividing configurations into dev \ test \ prod environments. For details, refer to the documentation (link below)
- The resulting script will be called "/generated/app-bundle.js". That is what we specified in greeting.html.
package.json : "scripts": { "build": "webpack -d" }, The key "-d" means "development", if you use -p "production", the result will be minified. In principle, this is not significant, it does not affect the possibility of debugging. Compile by running the npm run build command at the Node.js command line. Add in .gitignore npm - *. Log and generated /.
Please note that even in such a minimal example, the compilation of a webpack takes a few seconds (I have up to 8s). It's a lot. It makes sense to configure automatic recompilation. For this purpose, the webpack-dev-server package was previously installed, and its configuration parameters were added in the devServer section. This task is implemented as a background process launched by the script. To run this script, you need to add the element "dev" to the scripts section of the package.json file : "webpack-dev-server - content-base app /" " (here," dev "is the script alias, you can use any one). By this we set up the process of monitoring changes in the app / folder, in which our JSX script resides.
Then run the npm run dev command. As a result, the Node.js Express server will start, which will first perform the usual compilation of the webpack, cache everything that is needed, and then recompile incrementally with each change. This server has quite a few options, refer to the original documentation (link below). If you need to perform some other actions in the npm command line, you will have to start a new one, this one is now busy.
And now absolutely everything. Run the application and it is happy world.
And something else
For completeness, it should be mentioned that you can do without the console. To work with npm there is a rather convenient maven-plugin frontend-maven-plugin. A fragment of the pom-file with his participation is shown below:
Connecting maven plugins
<plugins> <plugin> <groupId>org.springframework.boot</groupId> <artifactId>spring-boot-maven-plugin</artifactId> <version>1.4.2.RELEASE</version> </plugin> <plugin> <groupId>com.github.eirslett</groupId> <artifactId>frontend-maven-plugin</artifactId> <version>1.0</version> <configuration> <workingDirectory>src/main/resources/static</workingDirectory> </configuration> <executions> <execution> <id>install node and npm</id> <goals> <goal>install-node-and-npm</goal> </goals> <configuration> <nodeVersion>v6.9.4</nodeVersion> <npmVersion>4.1.1</npmVersion> </configuration> </execution> <execution> <id>npm install</id> <goals> <goal>npm</goal> </goals> <configuration> <arguments>install</arguments> <npmRegistryURL>http://some_url> </configuration> </execution> <execution> <id>npm run build</id> <goals> <goal>npm</goal> </goals> <configuration> <arguments>run build</arguments> </configuration> </execution> </executions> </plugin> </plugins> useful links
Source: https://habr.com/ru/post/321552/
All Articles