How to create a Viber bot using PHP
In November 2016, Viber introduced public accounts ( Viber public account , or simply PA). With their release, api became available, which allows:
- chat with user
- check the status of subscribers (online, offline)
- get information about a specific subscriber
- make entries (posts) on your page
All this allows you to create a pretty good bot, or integrate a bot into an existing project, which may well improve the quality of user interaction. If you have already created bots for a telegram or slack, then creating a bot for Viber will not be difficult.
Introduction
Some time ago I had a need to interact with Viber users. I would like to introduce standard dialogs with users into my application, and also provide "button dialogs" (in those cases when the user sees several buttons under the chat). But at that time there was no open (public) API for this, and we had to either refuse or dodge with a rake.
With the release of public accounts (PA), the situation has changed, now we can create a more complete interaction with the "button dialogs" and the "conversions" we need. All this is great, if not one BUT - there is no SDK for PHP (for the sake of justice, there is sdk for nodejs and python ). I decided to fill this gap, and describe how you can create a simple bot in php, and create an SDK in one.
The first steps
Before creating a bot, you need to access a special account type. It may seem strange to you, but at the time of writing this post it is. To do this, go to https://www.viber.com/en/public-accounts and fill in the required form:
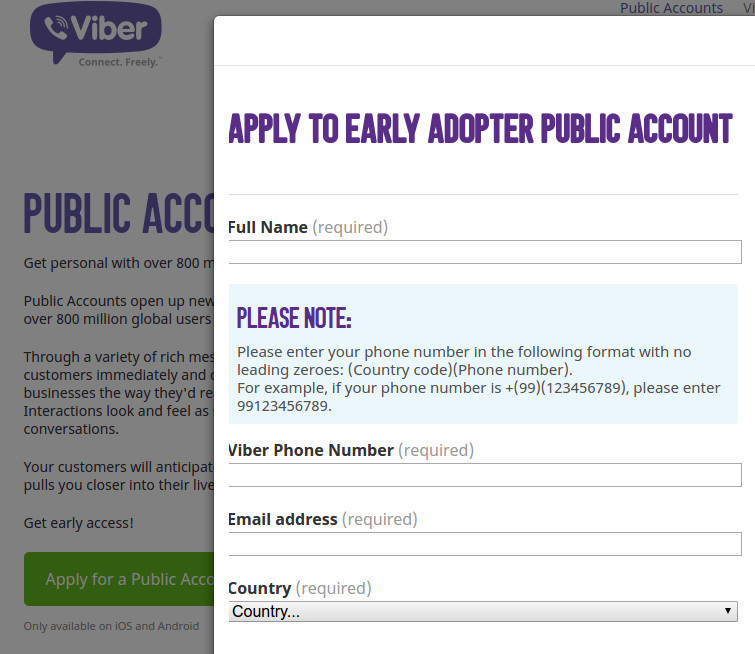
In the form you indicate the phone to which access to public accounts will be issued, and after a while you will receive messages of the format "... You will have access to Public Accounts! ...". After that, you need to restart the Viber client and go through the following steps:
Open the section "Public Accounts" (icon at the top right -
 )
)Click on "create an account" (the icon at the bottom right -
 )
)- Fill in the data for your bot (requires a background image, the specified category, name, description, etc.)
At the last step, the choice of how to work with messages will be available, select "api" and copy the key. (or you can just watch it on the "information editing" screen of PA):

For example, my key will be: 1111111111111111-2222222222222222-3333333333333333
Server part
To develop the bot and work with the Viber-API, I use a small SDK: https://github.com/Bogdaan/viber-bot-php . It will allow to omit some details of the interaction with REST-api and build some logic of our bot. Install it:
composer require bogdaan/viber-bot-php First we need to register the webhuk address - the address to which the vibe backend will deliver messages from users and some other events. The web server on which the bot will be located (and, accordingly, the webhost) must work via https with the correct SSL certificate. A self-signed certificate will not work here, if not, try using letsencrypt.org .
For example, my webhuk will be: https://viber.hcbogdan.com/bot.php . Create a file setup.php :
<?php require_once("../vendor/autoload.php"); use Viber\Client; $apiKey = '1111111111111111-2222222222222222-3333333333333333'; // <- PLACE-YOU-API-KEY-HERE $webhookUrl = 'https://viber.hcbogdan.com/bot.php'; // <- PLACE-YOU-HTTPS-URL try { $client = new Client([ 'token' => $apiKey ]); $result = $client->setWebhook($webhookUrl); echo "Success!\n"; } catch (Exception $e) { echo "Error: ". $e->getError() ."\n"; } And register the webbook by running the file:
$ php setup.php Success! Now, when the user sends a message, or enters the chat, requests will be sent to the webhuk address. Create a bot.php file:
<?php require_once("../vendor/autoload.php"); use Viber\Bot; use Viber\Api\Sender; $apiKey = '<PLACE-YOU-API-KEY-HERE>'; // ( - ) $botSender = new Sender([ 'name' => 'Whois bot', 'avatar' => 'https://developers.viber.com/img/favicon.ico', ]); try { $bot = new Bot(['token' => $apiKey]); $bot ->onConversation(function ($event) use ($bot, $botSender) { // , // "", return (new \Viber\Api\Message\Text()) ->setSender($botSender) ->setText("Can i help you?"); }) ->onText('|whois .*|si', function ($event) use ($bot, $botSender) { // // $bot->getClient()->sendMessage( (new \Viber\Api\Message\Text()) ->setSender($botSender) ->setReceiver($event->getSender()->getId()) ->setText("I do not know )") ); }) ->run(); } catch (Exception $e) { // todo - log exceptions } Next, it remains to place the bot.php file so that it is available at https://viber.hcbogdan.com/bot.php , and go to the chat with the bot from the client's viber. If you do not see the answers of the bot, then you should check your error_log and access_log for errors.
You can slightly improve the functionality of the bot and add logging. We do this with the monolog:
composer require monolog/monolog And add the exception logging:
<?php //... } catch (Exception $e) { // log exceptions $log = new \Monolog\Logger('bot'); $log->pushHandler(new \Monolog\Handler\StreamHandler('/tmp/bot.log')); $log->warning('Exception: '. $e->getMessage()); } All exceptions will be /tmp/bot.log to /tmp/bot.log .
The basic version of your bot is ready, you can add your own logic, add buttons to the chat, use deep links and html markup - all this is available in the SDK. I created several demos that you can see in the viber chat : // pa? ChatURI = viber-bot-php & context = habrahabr . If you do not already have a viber client, you can find the chat at this link: viber-bot-php .
useful links
')
Source: https://habr.com/ru/post/321246/
All Articles