Node.js, Express and MongoDB: API in half an hour
For a novice programmer, the development for Node.js may seem like a real nightmare. This is due to the flexibility of this platform and the lack of clear guidelines. But, in fact, everything is not so scary.

Here, for example, a typical task: development of the REST API, the server part of a certain application. The abundance of Node's own capabilities and many additional modules that can help in this task, can lead the novice into a dead end, caused by the wealth of choice. The main issues here are the selection of components and setting up their collaboration.
One way to create the server side of the application is to use a bundle from Node.js, the Express framework, and MongoDB. In fact, today I will talk about how to create a working API layout that can serve as the basis for almost any application. Here we implement the main REST routes, we will interact with the API via HTTP and use simple options for working with the database.
In order to successfully master this material, you need to understand what the REST API is, have an understanding of CRUD operations, and have a basic knowledge of JavaScript. Here I am using ES6, nothing particularly complicated, mostly switch functions.
')
We’ll develop a skeleton of the server side of the application for creating notes similar to Google Keep . In this case, you can perform all four CRUD actions with notes, namely, create (create), read (read), update (update), and delete (delete).
If you haven't got a Node yet, it's time to install it . After installation, create a folder and execute the command to initialize a new project:
During initialization, answer the questions, in particular, give the application the name "notable" (or, if you like, any other).
Now the file package.json should appear in the folder. This means that you can begin to install additional packages on which the project depends.
As a framework, we plan to use Express. The database management system will be MongoDB. In addition, as an aid to working with JSON, use the package body-parser. Install all this:
Also, I highly recommend installing Nodemon as a dev dependency. This is a simple little package that, when files change, automatically restarts the server.
To install this package run the command:
You can then add the following script to the package.json file:
The finished package.json will look something like this:
Now create the server.js file and get to work on the API.
Let's start with connecting dependencies in the server.js file.
MongoClient will be used to interact with the database. In addition, here we initialize the
Here we specify the port and start listening as follows:
Now, if you run the
So the server is working. But now he does absolutely nothing useful. Let's deal with this.
We are planning to create 4 routes. Namely:
Having mastered this scheme, you will be able to understand how, with the help of Node, to organize almost any necessary REST route.
In order to test the API, you need something that can simulate the requests of the client side of the application. An excellent program called Postman will help us to solve this problem. It allows you to perform simple HTTP requests with the specified body and parameters.
Install Postman. Now everything is ready for setting up routes.
In most Node.js tutorials (and in many real-world applications), all routes are placed in one large route.js file. I do not like this approach. If you decompose files in different folders, it will improve the readability of the code, the application will be easier to manage.
Our application cannot be called large, but I suggest that you do everything as it should, considering, nevertheless, its modest scale. Create the following folders: the app folder, and inside it the routes . In the routes folder, create the index.js and note_routes.js files . In other words, the project structure will look like this: root> app> routes> index.js and note_routes.js .
Such a structure, for a small application, may seem redundant, but it will be very useful in a larger system built on the basis of our example. In addition, any project is best to start using the best of the existing developments.
Let's start with the route CREATE. To do this, we answer the question: "How to create a note?".
Before we start creating notes, we need to expand the application infrastructure. In Express, routes are wrapped in a function that takes an Express instance and a database as arguments.
It may look like this:
Now you can export this function via index.js :
Importing what happened in server.js :
Please note that since we have not yet configured the database, an empty object is passed as the second argument.
Now create the CREATE route. The syntax here is pretty simple:
When an application receives a POST request using the path '/ notes', it will execute the code inside the callback function, passing it the request object (which contains the request parameters or JSON data) and the response object (which is understandably used for the response).
What we have already can be tested. Let's send, with the help of Postman, a POST request to the address localhost: 8000 / notes .
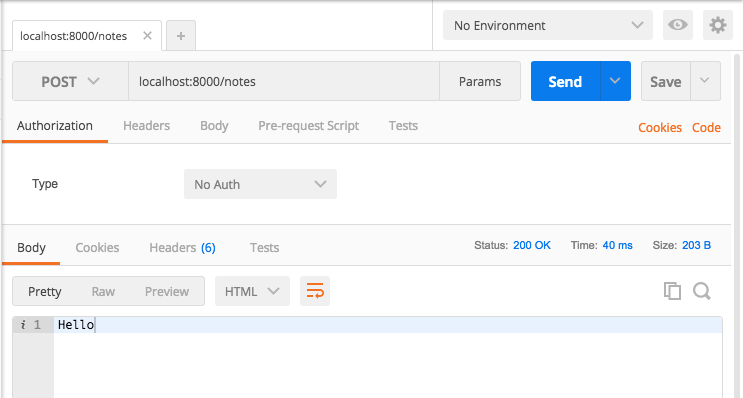
“Hello” should come in response to the request
Fine. The first route is created. The next step is to add parameters to the request, process them in the API, and finally, save the note in the database.
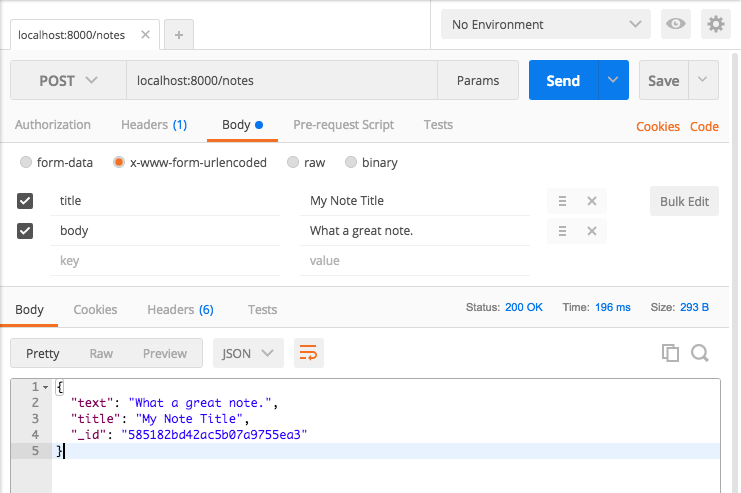
In Postman, go to the Body tab and add several key-value pairs by selecting the x-www-form-urlencoded radio button. Namely, the first key will be the title , its value is My Note Title . The second key is body , its value is What a great note .
This will add encoded data to the request that can be processed by the API.

The title of my note, and she herself is very simple, and here you can show imagination
In the note_route.js file, just output the body of the note to the console.
Try sending a request using Postman, and you will see ...
Unfortunately, Express cannot handle URL-encoded forms on its own. Here we will come to the aid of a previously installed package body-parser.
Now, after performing the POST request, its body can be seen in the terminal as an object.
In order for the first route to fully work, it remains only to configure the database and add a note to it.
To quickly create and configure a database, we use the mLab service. It is easy to work with him, for small amounts of information it is free.
Create an account on mLab and deploy the new MongoDB database. To do this, click on the Create New button in the MongoDB Deployments section, in the appeared window, in the Plan section, select Single-node . In the Standard Line list, select Sandbox and give the database a name. Next, in the database management window, go to the Users tab and add a database user, setting a name and password.

New database user
Copy the second URL from the same page - the database connection string.

URL to connect to the database
Add the config directory to the project root, create a db.js file in it.
Add the following to the db.js file:
Do not forget to add the username and password to the URL (not the ones from the account in mLab, but those that were created for the database). If you are posting a project on Github, don't forget to include a .gitignore file (like this ). So you will not make the public domain the name and password for working with the database.
Now, in server.js , you can use MongoClient to connect to the database and wrap it in a function that is passed to it when you create the application settings:
This completes the preparation of the infrastructure. From now on, we will deal exclusively with the ways.
MongoDB stores data in collections (collections), which fully justify their name. In our case, the notes will be stored in a collection, which, as it is easy to guess, will be called
During client setup, the database connection string was passed to it,
Creating a note in the database is equivalent to invoking the
After successful completion of the command (or after, for whatever reason, it cannot be executed), you need to either send back the newly created note object, or an error message. Here is the code note_routes.js , supplemented with these considerations:
Try what happened. Send a POST request from Postman (with the x-www-form-urlencoded flag), setting the Body and tab values on the Body tab.
The answer should look something like this:
Successful addition of a record to the database
If you now look at the base, logging in to mLab, you can find the newly created note in it.
The infrastructure we have prepared above is suitable for all routes, so now things will go faster.
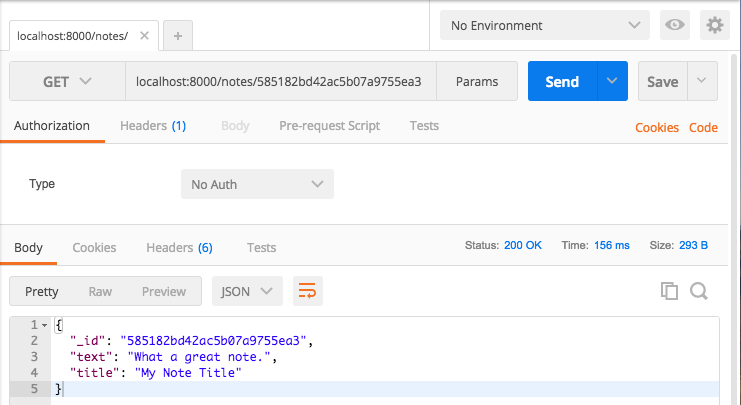
So, we are going to request the newly created note, passing along the path localhost: 8000 / notes / {id notes} . In our case, the path will look like this: localhost: 8000 / notes / 585182bd42ac5b07a9755ea3 .
If you do not have the ID of one of the already created notes, you can look into the mLab database and find it there, or create a new note and copy its identifier.
Here is how it looks in note_route.js :
Just as before, we are going to call a certain command for a collection of a database of notes. Use the
The identifier from the URL parameters can be pulled using the
MongoDB requires an ID not as a string, but as a special object. It is called ObjectID .
Here's what, after some minor changes, we did:
Test it with one of the identifiers of the notes available in the database. The answer in Postman should look like this:
Successful request for notes from the database
Deleting objects is practically the same thing as searching them in the database. Only instead of the
And here is the last route. Processing a PUT request is essentially a hybrid of READ and CREATE operations. First you need to find the object, then - update it in accordance with the data received in the request. Now, if you, while testing the previous code snippet, deleted your only note, create another one.
Here is the route code for updating the notes:
Now you can edit any note. Here is what it looks like:

Successful update notes
Pay attention to the lack of our example. If there is no body or note header in the PUT request, the corresponding fields in the database will simply be cleared.
I did not load the example with additional checks. If you want, you can modify the operation of updating the notes yourself, adding new data to the database only if the request is correct.
You now have a working Node API that supports four basic CRUD operations. The server part of the application is able, in response to HTTP client requests, to create notes in the database, find them, delete and edit them.
The main purpose of my story is to acquaint everyone with a bunch of Node + Express + MongoDB and with the methodology for developing server applications. Of course, if today you had your first acquaintance with these tools, in order to get a better understanding, you will need to read the documentation. However, understanding what is happening will allow you to quickly fill in the gaps in knowledge and begin to work on your own projects, using, as a starting point, the application that we have been working with here.
If you have experience with Node.js, Express and MongoDB in real projects, maybe you can advise something useful for beginners? And if you have just tried all this for the first time, we are waiting for your impressions.
Here, for example, a typical task: development of the REST API, the server part of a certain application. The abundance of Node's own capabilities and many additional modules that can help in this task, can lead the novice into a dead end, caused by the wealth of choice. The main issues here are the selection of components and setting up their collaboration.
One way to create the server side of the application is to use a bundle from Node.js, the Express framework, and MongoDB. In fact, today I will talk about how to create a working API layout that can serve as the basis for almost any application. Here we implement the main REST routes, we will interact with the API via HTTP and use simple options for working with the database.
In order to successfully master this material, you need to understand what the REST API is, have an understanding of CRUD operations, and have a basic knowledge of JavaScript. Here I am using ES6, nothing particularly complicated, mostly switch functions.
')
We’ll develop a skeleton of the server side of the application for creating notes similar to Google Keep . In this case, you can perform all four CRUD actions with notes, namely, create (create), read (read), update (update), and delete (delete).
Preliminary preparation
If you haven't got a Node yet, it's time to install it . After installation, create a folder and execute the command to initialize a new project:
npm init During initialization, answer the questions, in particular, give the application the name "notable" (or, if you like, any other).
Now the file package.json should appear in the folder. This means that you can begin to install additional packages on which the project depends.
As a framework, we plan to use Express. The database management system will be MongoDB. In addition, as an aid to working with JSON, use the package body-parser. Install all this:
npm install --save express mongodb body-parser Also, I highly recommend installing Nodemon as a dev dependency. This is a simple little package that, when files change, automatically restarts the server.
To install this package run the command:
npm install --save-dev nodemon You can then add the following script to the package.json file:
// package.json "scripts": { "dev": "nodemon server.js" }, The finished package.json will look something like this:
// package.json { "name": "notable", "version": "1.0.0", "description": "", "main": "server.js", "scripts": { "dev": "nodemon server.js" }, "author": "", "license": "ISC", "dependencies": { "body-parser": "^1.15.2", "express": "^4.14.0", "mongodb": "^2.2.16" }, "devDependencies": { "nodemon": "^1.11.0" } } Now create the server.js file and get to work on the API.
Server
Let's start with connecting dependencies in the server.js file.
// server.js const express = require('express'); const MongoClient = require('mongodb').MongoClient; const bodyParser = require('body-parser'); const app = express(); MongoClient will be used to interact with the database. In addition, here we initialize the
app constant, symbolizing our application, with an instance of the Express framework. For the server to work, all that remains is for the application to indicate that it starts listening to HTTP requests.Here we specify the port and start listening as follows:
// server.js const port = 8000; app.listen(port, () => { console.log('We are live on ' + port); }); Now, if you run the
npm run dev command (or - node server.js , if you did not install Nodemon), the following message should appear in the terminal: "We are live on port 8000".So the server is working. But now he does absolutely nothing useful. Let's deal with this.
Routes Oriented to CRUD Operations
We are planning to create 4 routes. Namely:
- CREATE - create notes.
- READ - reading notes.
- UPDATE - update notes.
- DELETE - delete notes.
Having mastered this scheme, you will be able to understand how, with the help of Node, to organize almost any necessary REST route.
In order to test the API, you need something that can simulate the requests of the client side of the application. An excellent program called Postman will help us to solve this problem. It allows you to perform simple HTTP requests with the specified body and parameters.
Install Postman. Now everything is ready for setting up routes.
About project structure
In most Node.js tutorials (and in many real-world applications), all routes are placed in one large route.js file. I do not like this approach. If you decompose files in different folders, it will improve the readability of the code, the application will be easier to manage.
Our application cannot be called large, but I suggest that you do everything as it should, considering, nevertheless, its modest scale. Create the following folders: the app folder, and inside it the routes . In the routes folder, create the index.js and note_routes.js files . In other words, the project structure will look like this: root> app> routes> index.js and note_routes.js .
mkdir app cd app mkdir routes cd routes touch index.js touch note_routes.js Such a structure, for a small application, may seem redundant, but it will be very useful in a larger system built on the basis of our example. In addition, any project is best to start using the best of the existing developments.
Creating Notes: CREATE Route
Let's start with the route CREATE. To do this, we answer the question: "How to create a note?".
Before we start creating notes, we need to expand the application infrastructure. In Express, routes are wrapped in a function that takes an Express instance and a database as arguments.
It may look like this:
// routes/note_routes.js module.exports = function(app, db) { }; Now you can export this function via index.js :
// routes/index.js const noteRoutes = require('./note_routes'); module.exports = function(app, db) { noteRoutes(app, db); // , , }; Importing what happened in server.js :
// server.js const express = require('express'); const MongoClient = require('mongodb').MongoClient; const bodyParser = require('body-parser'); const app = express(); const port = 8000; require('./app/routes')(app, {}); app.listen(port, () => { console.log('We are live on ' + port); }); Please note that since we have not yet configured the database, an empty object is passed as the second argument.
Now create the CREATE route. The syntax here is pretty simple:
module.exports = function(app, db) { app.post('/notes', (req, res) => { // . res.send('Hello') }); }; When an application receives a POST request using the path '/ notes', it will execute the code inside the callback function, passing it the request object (which contains the request parameters or JSON data) and the response object (which is understandably used for the response).
What we have already can be tested. Let's send, with the help of Postman, a POST request to the address localhost: 8000 / notes .
“Hello” should come in response to the request
Fine. The first route is created. The next step is to add parameters to the request, process them in the API, and finally, save the note in the database.
Request parameters
In Postman, go to the Body tab and add several key-value pairs by selecting the x-www-form-urlencoded radio button. Namely, the first key will be the title , its value is My Note Title . The second key is body , its value is What a great note .
This will add encoded data to the request that can be processed by the API.
The title of my note, and she herself is very simple, and here you can show imagination
In the note_route.js file, just output the body of the note to the console.
// note_routes.js module.exports = function(app, db) { app.post('/notes', (req, res) => { console.log(req.body) res.send('Hello') }); }; Try sending a request using Postman, and you will see ...
undefined .Unfortunately, Express cannot handle URL-encoded forms on its own. Here we will come to the aid of a previously installed package body-parser.
// server.js const express = require('express'); const MongoClient = require('mongodb').MongoClient; const bodyParser = require('body-parser'); const app = express(); const port = 8000; app.use(bodyParser.urlencoded({ extended: true })); require('./app/routes')(app, {}); app.listen(port, () => { console.log('We are live on ' + port); }); Now, after performing the POST request, its body can be seen in the terminal as an object.
{ title: 'My Note Title', body: 'What a great note.' } In order for the first route to fully work, it remains only to configure the database and add a note to it.
To quickly create and configure a database, we use the mLab service. It is easy to work with him, for small amounts of information it is free.
Create an account on mLab and deploy the new MongoDB database. To do this, click on the Create New button in the MongoDB Deployments section, in the appeared window, in the Plan section, select Single-node . In the Standard Line list, select Sandbox and give the database a name. Next, in the database management window, go to the Users tab and add a database user, setting a name and password.
New database user
Copy the second URL from the same page - the database connection string.
URL to connect to the database
Add the config directory to the project root, create a db.js file in it.
mkdir config cd config touch db.js Add the following to the db.js file:
module.exports = { url : URL }; Do not forget to add the username and password to the URL (not the ones from the account in mLab, but those that were created for the database). If you are posting a project on Github, don't forget to include a .gitignore file (like this ). So you will not make the public domain the name and password for working with the database.
Now, in server.js , you can use MongoClient to connect to the database and wrap it in a function that is passed to it when you create the application settings:
// server.js const express = require('express'); const MongoClient = require('mongodb').MongoClient; const bodyParser = require('body-parser'); const db = require('./config/db'); const app = express(); const port = 8000; app.use(bodyParser.urlencoded({ extended: true })); MongoClient.connect(db.url, (err, database) => { if (err) return console.log(err) require('./app/routes')(app, database); app.listen(port, () => { console.log('We are live on ' + port); }); }) This completes the preparation of the infrastructure. From now on, we will deal exclusively with the ways.
Adding records to the database
MongoDB stores data in collections (collections), which fully justify their name. In our case, the notes will be stored in a collection, which, as it is easy to guess, will be called
notes .During client setup, the database connection string was passed to it,
db argument. In the route code access to the database can be obtained as follows: db.collection('notes') Creating a note in the database is equivalent to invoking the
insert command for the notes collection: const note = { text: req.body.body, title: req.body.title} db.collection('notes').insert(note, (err, results) => { } After successful completion of the command (or after, for whatever reason, it cannot be executed), you need to either send back the newly created note object, or an error message. Here is the code note_routes.js , supplemented with these considerations:
// note_routes.js module.exports = function(app, db) { app.post('/notes', (req, res) => { const note = { text: req.body.body, title: req.body.title }; db.collection('notes').insert(note, (err, result) => { if (err) { res.send({ 'error': 'An error has occurred' }); } else { res.send(result.ops[0]); } }); }); }; Try what happened. Send a POST request from Postman (with the x-www-form-urlencoded flag), setting the Body and tab values on the Body tab.
The answer should look something like this:
Successful addition of a record to the database
If you now look at the base, logging in to mLab, you can find the newly created note in it.
Reading Notes: READ Route
The infrastructure we have prepared above is suitable for all routes, so now things will go faster.
So, we are going to request the newly created note, passing along the path localhost: 8000 / notes / {id notes} . In our case, the path will look like this: localhost: 8000 / notes / 585182bd42ac5b07a9755ea3 .
If you do not have the ID of one of the already created notes, you can look into the mLab database and find it there, or create a new note and copy its identifier.
Here is how it looks in note_route.js :
// note_routes.js module.exports = function(app, db) { app.get('/notes/:id', (req, res) => { }); app.post('/notes', (req, res) => { const note = { text: req.body.body, title: req.body.title }; db.collection('notes').insert(note, (err, result) => { if (err) { res.send({ 'error': 'An error has occurred' }); } else { res.send(result.ops[0]); } }); }); }; Just as before, we are going to call a certain command for a collection of a database of notes. Use the
findOne method for this. // note_routes.js module.exports = function(app, db) { app.get('/notes/:id', (req, res) => { const details = { '_id': < ID> }; db.collection('notes').findOne(details, (err, item) => { if (err) { res.send({'error':'An error has occurred'}); } else { res.send(item); } }); }); app.post('/notes', (req, res) => { const note = { text: req.body.body, title: req.body.title }; db.collection('notes').insert(note, (err, result) => { if (err) { res.send({ 'error': 'An error has occurred' }); } else { res.send(result.ops[0]); } }); }); }; The identifier from the URL parameters can be pulled using the
req.params.id construct. However, if you simply insert a string instead of << >> from the code above, it will not work.MongoDB requires an ID not as a string, but as a special object. It is called ObjectID .
Here's what, after some minor changes, we did:
// note_routes.js var ObjectID = require('mongodb').ObjectID; module.exports = function(app, db) { app.get('/notes/:id', (req, res) => { const id = req.params.id; const details = { '_id': new ObjectID(id) }; db.collection('notes').findOne(details, (err, item) => { if (err) { res.send({'error':'An error has occurred'}); } else { res.send(item); } }); }); app.post('/notes', (req, res) => { const note = { text: req.body.body, title: req.body.title }; db.collection('notes').insert(note, (err, result) => { if (err) { res.send({ 'error': 'An error has occurred' }); } else { res.send(result.ops[0]); } }); }); }; Test it with one of the identifiers of the notes available in the database. The answer in Postman should look like this:
Successful request for notes from the database
Deleting notes: DELETE route
Deleting objects is practically the same thing as searching them in the database. Only instead of the
findOne function findOne use the remove function. Here is the complete code for the corresponding path. It highlights what is different from the code of an already existing method that processes a GET request. // note_routes.js // ... app.delete('/notes/:id', (req, res) => { const id = req.params.id; const details = { '_id': new ObjectID(id) }; db.collection('notes').remove(details, (err, item) => { if (err) { res.send({'error':'An error has occurred'}); } else { res.send('Note ' + id + ' deleted!'); } }); }); // ... Update notes: route UPDATE
And here is the last route. Processing a PUT request is essentially a hybrid of READ and CREATE operations. First you need to find the object, then - update it in accordance with the data received in the request. Now, if you, while testing the previous code snippet, deleted your only note, create another one.
Here is the route code for updating the notes:
// note_routes.js // ... app.put ('/notes/:id', (req, res) => { const id = req.params.id; const details = { '_id': new ObjectID(id) }; const note = { text: req.body.body, title: req.body.title }; db.collection('notes').update(details, note, (err, result) => { if (err) { res.send({'error':'An error has occurred'}); } else { res.send(note); } }); }); // ... Now you can edit any note. Here is what it looks like:
Successful update notes
Pay attention to the lack of our example. If there is no body or note header in the PUT request, the corresponding fields in the database will simply be cleared.
I did not load the example with additional checks. If you want, you can modify the operation of updating the notes yourself, adding new data to the database only if the request is correct.
Results
You now have a working Node API that supports four basic CRUD operations. The server part of the application is able, in response to HTTP client requests, to create notes in the database, find them, delete and edit them.
The main purpose of my story is to acquaint everyone with a bunch of Node + Express + MongoDB and with the methodology for developing server applications. Of course, if today you had your first acquaintance with these tools, in order to get a better understanding, you will need to read the documentation. However, understanding what is happening will allow you to quickly fill in the gaps in knowledge and begin to work on your own projects, using, as a starting point, the application that we have been working with here.
If you have experience with Node.js, Express and MongoDB in real projects, maybe you can advise something useful for beginners? And if you have just tried all this for the first time, we are waiting for your impressions.
Source: https://habr.com/ru/post/321104/
All Articles