Bypass restrictions in Calabash-Android with UIAutomator

Appium and Calabash are one of the most popular frameworks for automating the testing of Android applications. Everyone, of course, has its advantages and disadvantages. Their main limitations are:
Calabash: can control only the user interface that is part of the test application, in particular, there is no support for testing notifications;
- Appium: cannot call backdoor methods in applications like Calabash (these methods are very useful for setting the state of the application under test).
We in Badoo used Calabash to automate testing when Appium was just beginning to develop. This is a very stable tool, and it still works faster than Appium, so we are not going to migrate. But in order to automate such a multifunctional application as Badoo, we had to bypass the restriction of Calabash to work only with the interface of the test application.
Once we came to this decision . And although it still works, its reliability decreases due to the many variations of devices with different diagonal, different versions of Android, and so on.
In this article, I will tell you how we solved the problem by adding UIAutomator2 support to Calabash. If you are too impatient, then I will tell you a secret that at the end there is a link to Ruby Gem, ready to use.
Awareness of the problem
Let's look at the high-level architecture of Calabash-Android:
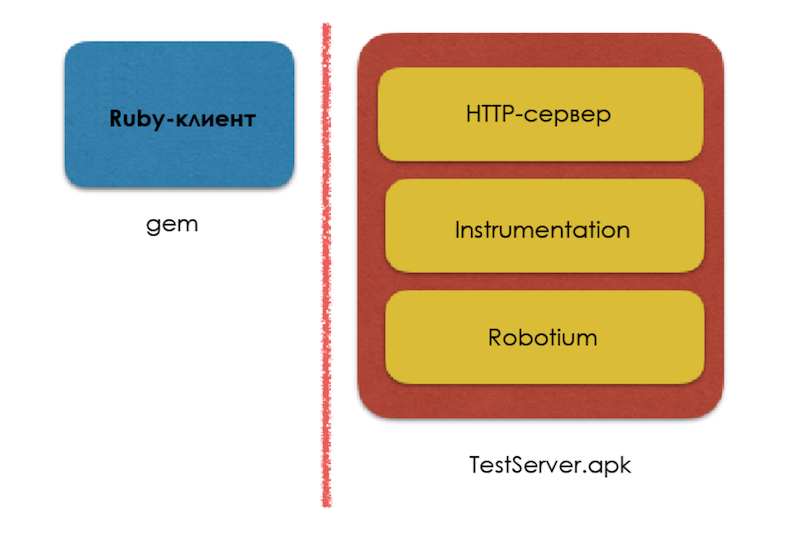
Calabash-Android-Server uses the Robotium framework, which in turn uses the Android-Instrumentation framework to control the application. Instrumentation gives Robotium (and therefore Calabash) access to the runtime environment, which allows it to control the application interface and call methods from the outside.
But it also means that Robotium can only manage the user interface that is part of the application code. There is no such limitation in Appium because it uses UIAutomator .
Solution to the problem
The Google Instrumentation Framework is part of the supporting Android library for testing . It works in the context of the application, shows all system interactions with the application and, therefore, can manage them. Instrumentation built on such popular testing frameworks as Robotium and Espresso.
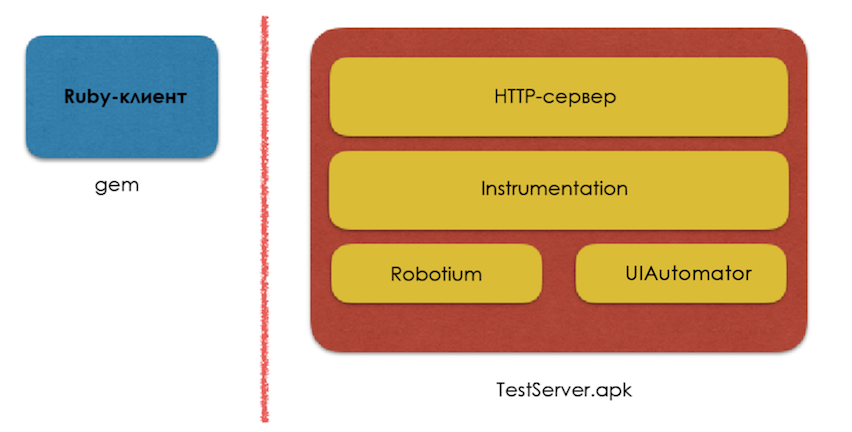
In addition, Robotium is used in the server-side Calabash-Android and therefore has access to Instrumentation information. UIAutomator 2.0 also became a part of Instrumentation at the time, which makes it possible to use it inside the Calabash-Android server.
With CalabashInstrumentationTestRunner, the Calabash Ruby Client launches Instrumentation via ADB. In the Calabash server, CalabashInstrumentationTestRunner is an extension of the Android Instrumentation class. This is the Instrumentation object passed to Robotium Solo. Thanks to UIAutomator 2, it can be used to create a new UIDevice object that can manage the entire device.
Here's how I came to solve the problem:
1) Added UIAutomator library to Calabash-Android server
I cloned the Calabash-Android-Server project and added the uiautomator2 JAR to the lib folder.
2) Instantiated the UIDevice object
In the InstrumentationBackend.java file, I created a method for instantiating a UIDevice object from a UIAutomator.
public static UiDevice getUiDevice() { if (instrumentation.getUiAutomation() == null) { throw new NullPointerException("uiAutomation==null: did you forget to set '-w' flag for 'am instrument'?"); } if(uiDevice == null) { uiDevice = UiDevice.getInstance(instrumentation); } return uiDevice; } 3) Added a new command using the UIAutomator2 API
It's not hard to add a new command to Calabash-Android-Server. All the commands you use in Ruby code are put into the Actions interface:
sh.calaba.instrumentationbackend.actions Let's implement the action to open the notification panel:
public class PullNotification implements Action { @Override public Result execute(String... args) { InstrumentationBackend.getUiDevice().openNotification(); return new Result(true); } @Override public String key() { return "pull_notification"; } } In this example, the key () method is used to name the command that will be used by the Calabash Ruby client. When the client calls this command, it runs the execute () method.
4) Run Instrumentation with -w flag
Cloned the Ruby client from https://github.com/calabash/calabash-android . I patched lib/calabash-android/operations.rb and added the -w flag to the start of the measurement using the ADB command. How to do this, you can see in this commit.
The above examples can be viewed in my fork:
A working example:
Let's see how you can pull out the notification panel and open one of them.
Clone both repositories from the aforementioned fork into a directory of the same level.
git clonehttps://github.com/rajdeepv/calabash-androidgit clonehttps://github.com/rajdeepv/calabash-android-serverSwitch to the
'uiautomator'branch in both repositories.Navigate to the ruby-gem folder in the calabash-android repository and
bundle exec rake buildRuby Gem using thebundle exec rake build.Include this gem in your project.
Change
start_test_server_in_backgroundtostart_test_server_in_background(with_uiautomator: true).The command to pull the notification bar:
perform_action('pull_notification').- To “touch” a notification with a known piece of text, use
perform_action('uiautomator_touch_partial_text', 'my partial text')
Ready to use Ruby Gem:
If you do not want to do all this, you can download the finished gem and just follow the last three points.
Conclusion
It took me some effort to go into the code of Calabash-Android-Server, understand how it works, and explore the possibility of solving the problem. From the first attempt it was not possible to do this, but in the process of work I learned some secrets of Instrumentation. Someday I will share them with you.
Although this example focuses on automating push notifications using Calabash, the same approach can be applied to any task that you encounter in Calabash-based automation frameworks:
testing your home screen widgets;
processing intentions (Intent) using the Complete action using dialog blocks in Android applications;
- testing interactions with third-party applications running from your application.
I hope this post will help you in testing situations that go beyond the interface with your application using Calabash. If you have questions or any other feedback, welcome to comments.
')
Source: https://habr.com/ru/post/321060/
All Articles