Configure Let's Encrypt on Microsoft Azure
I’ve been looking for a long time how to safely set up SSL certificate from Let's Encrypt on Microsoft Azure. There were problems with this in RuNet, but there was a very, very useful article in the vast Internet that I was able to set up this shaitanism. I think, for beginners who have problems with foreign languages (it happens this way, but we all learn), translation of the article is useful.
So, let's begin.
1. The service plan for servicing our web application on Azure should be no lower than “Standard” (in other words, anyone other than Basic - Basic).
')

2. Your domain. To configure an SSL certificate, you need a custom domain, which can be bolted into the “Custom Domains” menu in the settings panel of your application. You cannot configure an SSL certificate for a domain like .azurewebsites.net.

5. Set up access to our services.
Install and run PowerShell as administrator. Install AzurePowerShellModule
Login to Azure
Set the login and password for further authorization of the Let's Encrypt application:
We perform several magic commands)))
now we have
ClientSecret = $ password
ClientID = ApplicationID
Remember them.
Install Let's Encrypt
Go to the SCM console (https: // {your site name} .scm.azurewebsites.net), go to the Site Extentions section, select the Gallery item and look for the Let's Encrypt Azure module there. Install!
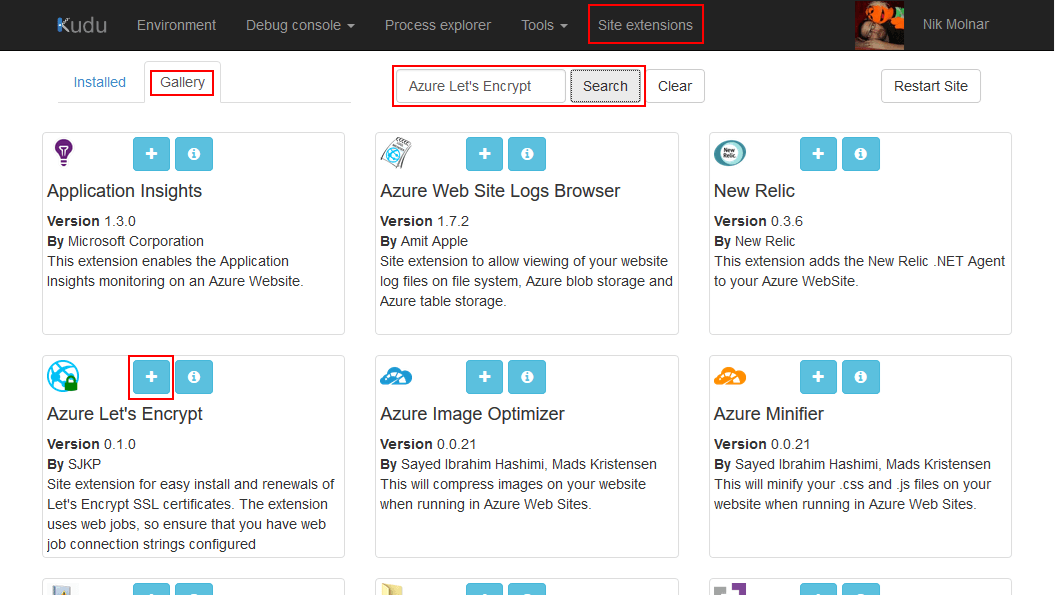
After installing the module, restart the site (the Restart Site button), and launch the module. Now we have to configure it.

Fill in the fields:
letsencrypt: Tenant
letsencrypt: SubscriptionId
letsencrypt: ClientId
letsencrypt: ClientSecret
letsencrypt: ResourceGroupName
In the following way:
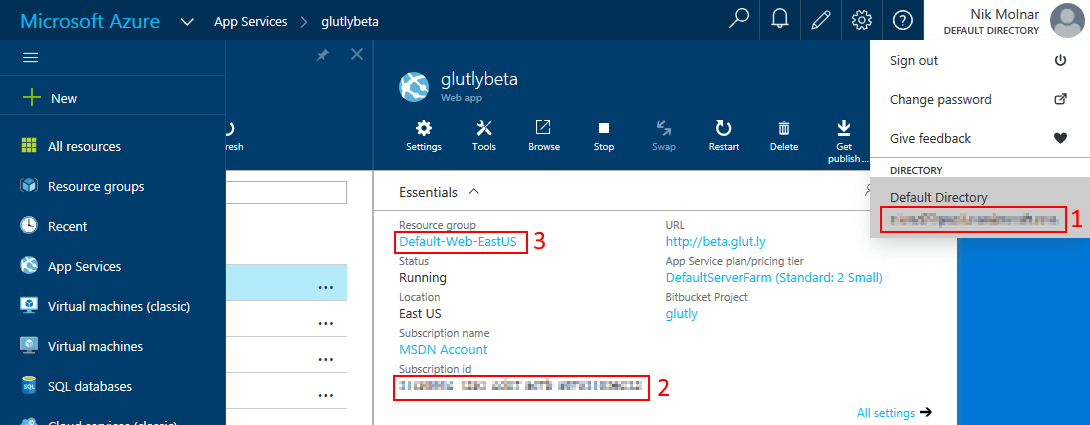
letsencrypt: Tenant with tag # 1.
letsencrypt: SubscriptionId of tag # 2
letsencrypt: ResourceGroupName from tag # 3
letsencrypt: ClientId = our ClientID, which we remember
letsencrypt: ClientSecret = our ClientSecret, which we remember and do not tell anyone
Now, in the settings of the application on the Azure portal, the settings of our extension should be visible:

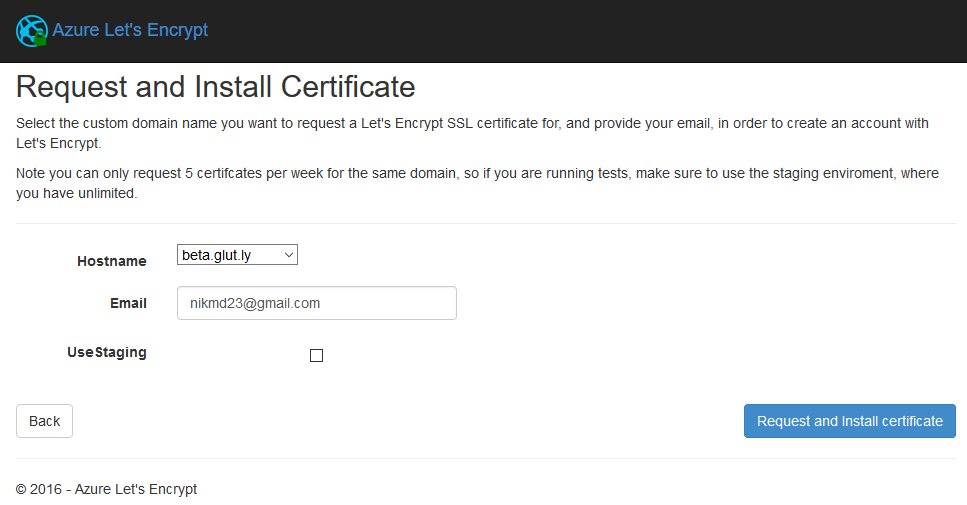
Satisfied with ourselves, in the SCM console, safely click Next and go to issue a certificate.
Everything is simple here - from the drop-down menu, select the domain for which we issue the certificate, and specify the mail we want.
Finishing the setup, just in case, we restart the site (it's Microsoft! Reinstallation often helps from freezes, bugs, sinusitis and a simple sneeze).
If everything went well, congratulations, you now have a free SSL certificate, quoted by almost all browsers.

And that is not all!
Unfortunately, it was not possible to verify this (since I set everything up the other day and the deadline for reissuing the domain has not yet come), but it is assumed that the certificate will automatically reissue when it expires. In any case, it is possible to enter and reissue a certificate literally at the touch of a button, but it is assumed (and I sincerely hope so) that the reissue of the certificate has already been configured.

PS I ask knowledgeable people to share the missing information to make the article more complete.
So, let's begin.
1. The service plan for servicing our web application on Azure should be no lower than “Standard” (in other words, anyone other than Basic - Basic).
')
2. Your domain. To configure an SSL certificate, you need a custom domain, which can be bolted into the “Custom Domains” menu in the settings panel of your application. You cannot configure an SSL certificate for a domain like .azurewebsites.net.
Magic
I don't understand the next two points, but it works great without them. But I have it, I don’t know how it will work for you, therefore, if anyone knows what it is and what it is eaten with, I will be glad and add to the article.
3. Create a data warehouse account. Described in detail in this article, but it is in English. language. In a simple way: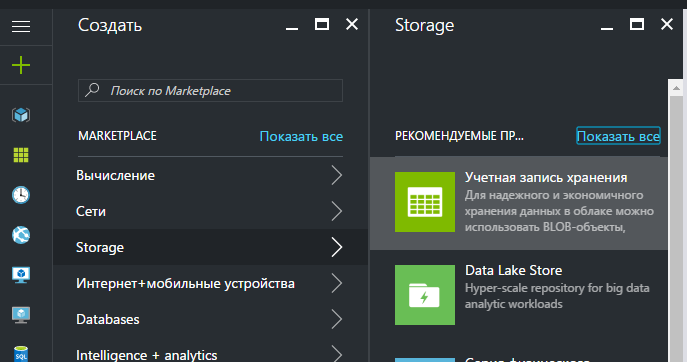 . We create.
4. Customize
3. Create a data warehouse account. Described in detail in this article, but it is in English. language. In a simple way:
. We create.4. Customize
5. Set up access to our services.
Install and run PowerShell as administrator. Install AzurePowerShellModule
# Install the Azure Resource Manager modules from the PowerShell Gallery Install-Module AzureRM # Install the Azure Service Management module from the PowerShell Gallery Install-Module Azure # To make sure the Azure PowerShell module is available after you install Get-Module -ListAvailable Azure* Import-Module "C:\Program Files\WindowsPowerShell\Modules\Azure\XXXX\azure.psd1" Import-Module "C:\Program Files\WindowsPowerShell\Modules\Azure\XXXX\expressroute\expressroute.psd1" Login to Azure
Login-AzureRmAccount Set the login and password for further authorization of the Let's Encrypt application:
$uri = 'http://{some random name}' $password = '{some strong password}' We perform several magic commands)))
$app = New-AzureRmADApplication -DisplayName {some display name} -HomePage $uri -IdentifierUris $uri -Password $password New-AzureRmADServicePrincipal -ApplicationId $app.ApplicationId New-AzureRmRoleAssignment -RoleDefinitionName Contributor -ServicePrincipalName $app.ApplicationId $app.ApplicationId now we have
ClientSecret = $ password
ClientID = ApplicationID
Remember them.
Install Let's Encrypt
Go to the SCM console (https: // {your site name} .scm.azurewebsites.net), go to the Site Extentions section, select the Gallery item and look for the Let's Encrypt Azure module there. Install!
After installing the module, restart the site (the Restart Site button), and launch the module. Now we have to configure it.
Fill in the fields:
letsencrypt: Tenant
letsencrypt: SubscriptionId
letsencrypt: ClientId
letsencrypt: ClientSecret
letsencrypt: ResourceGroupName
In the following way:
letsencrypt: Tenant with tag # 1.
letsencrypt: SubscriptionId of tag # 2
letsencrypt: ResourceGroupName from tag # 3
letsencrypt: ClientId = our ClientID, which we remember
letsencrypt: ClientSecret = our ClientSecret, which we remember and do not tell anyone
Now, in the settings of the application on the Azure portal, the settings of our extension should be visible:
Satisfied with ourselves, in the SCM console, safely click Next and go to issue a certificate.
Everything is simple here - from the drop-down menu, select the domain for which we issue the certificate, and specify the mail we want.
Finishing the setup, just in case, we restart the site (it's Microsoft! Reinstallation often helps from freezes, bugs, sinusitis and a simple sneeze).
If everything went well, congratulations, you now have a free SSL certificate, quoted by almost all browsers.
And that is not all!
Unfortunately, it was not possible to verify this (since I set everything up the other day and the deadline for reissuing the domain has not yet come), but it is assumed that the certificate will automatically reissue when it expires. In any case, it is possible to enter and reissue a certificate literally at the touch of a button, but it is assumed (and I sincerely hope so) that the reissue of the certificate has already been configured.
PS I ask knowledgeable people to share the missing information to make the article more complete.
Source: https://habr.com/ru/post/320918/
All Articles