Master-master replication and scaling of applications between all IoT devices and the cloud
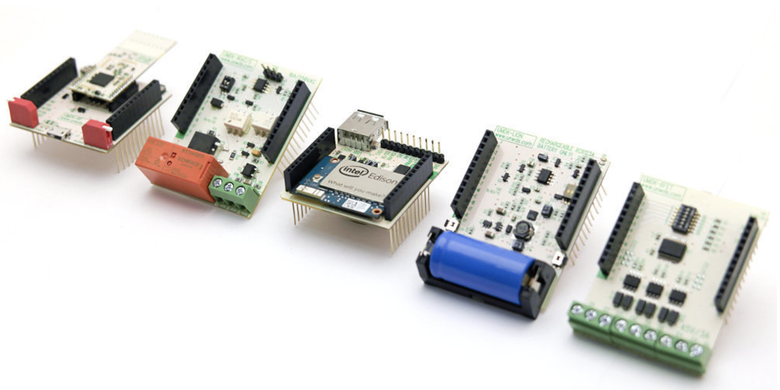
The photo shows the devices used for prototyping. As you can see, the x86 processor (Intel Edison) is taken as the basis
Hello. In this article, I would like to share the experience of solving one interesting problem related to data synchronization between IoT devices and a cloud application. First, I will talk about the main idea and goals of my project, and then I will describe in detail its technical side and implementation: I will discuss Contiki OS, databases, protocols, and similar aspects. In conclusion, I will briefly list the technologies used to build the system.
Briefly about the project
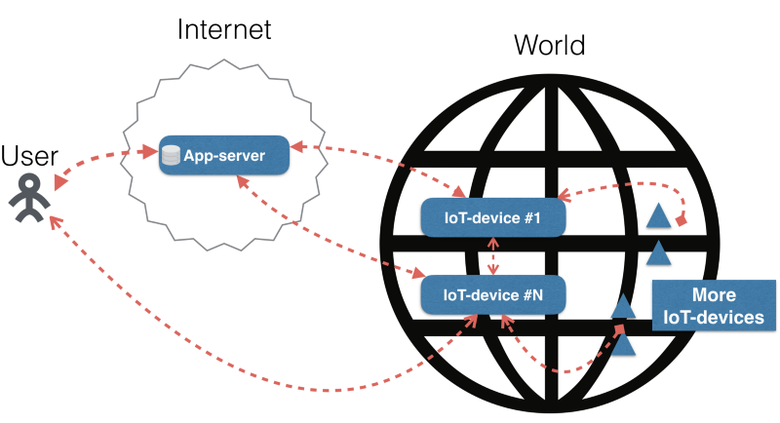
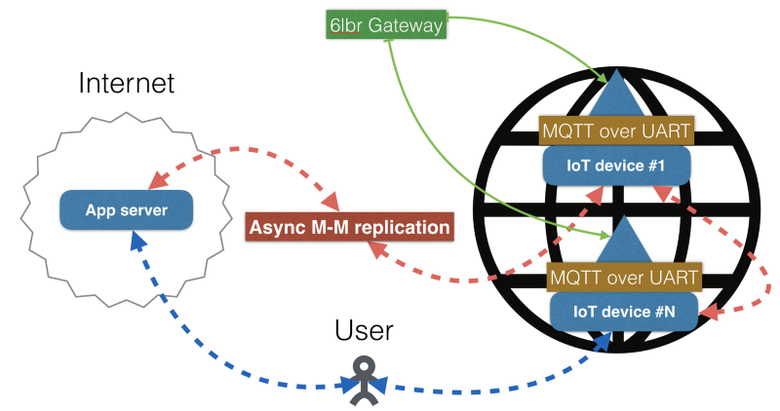
To begin, let's talk about the main idea of the project. Below is a schematic representation of the principle of the finished system:
')
There is a user who via a cloud service or directly (via Wi-Fi) connects to an IoT device. Also somewhere on the Internet there is a cloud application server. Anything can serve as a cloud: say, an AWS or Azure instance or a dedicated server. For data exchange between the application server and IoT devices, a connection is established by some protocol. IoT devices are somehow connected to each other (for example, via Ethernet or Wi-Fi). In addition, there is a separate group of IoT devices that generate telemetry data (such as illuminance or temperature).
In total, it can gain more than 100 or even more than 1000 devices. My main task was to provide data exchange between the cloud and these IoT devices. Before proceeding further, it is worth mentioning what requirements were placed on the system:
- It must synchronize data between IoT devices.
- It should collect data from IoT devices.
- It must synchronize data between IoT devices and the cloud.
Technical implementation

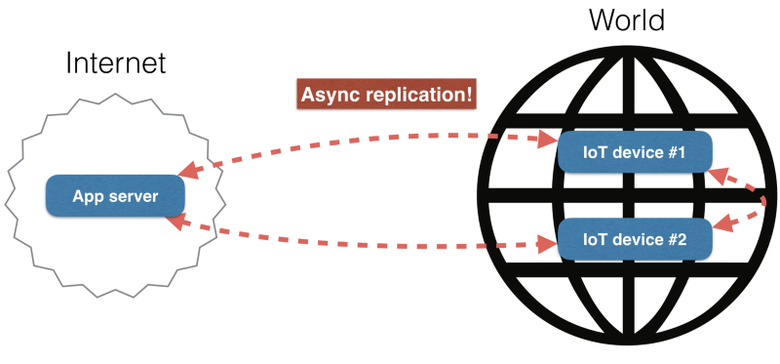
Everything is quite simple here: the user connects to the application server via HTTP (S), WebSocket, or a similar protocol. A small task for readers: what do you think can be used to connect between the application server and the IoT device?

If you thought about MQTT, you are definitely right! As well as those who chose HTTP (S). In fact, any protocol will do - choose to your taste! My choice fell on - drum roll - asynchronous replication! I mean the usual database replication.
You may ask why I need replication. The answer is simple: replication is used to synchronize data, so I can — everywhere — including the cloud and IoT devices — maintain one version of the database. However, replication is quite difficult to implement. If you want replication, get a database that supports it, because - I repeat - replication is naturally inherent in databases.
Here I would like to say a few words about those databases that I considered when working on a project: SQLite , Redis , MySQL , PostgreSQL and Tarantool .
I compared their characteristics and tried to run a few pieces - with the exception of MySQL and PostgreSQL - right on the IoT device. Below I will tell what came of it.
SQLite is definitely a good solution for storing data directly on an IoT device, but it does not have replication, and it does not support concurrent access from different processes.
Redis does not support master-master replication and therefore cannot solve my problem, since I need two-way replication.
MySQL and PostgreSQL are too heavy for an IoT device, so I didn’t even try to install them. But if you do decide to do it, feel free to share your experience in the comments.
Last on my list was the Tarantool database. I’ll say right away that I am a committer in the Tarantool project, so I know the project itself and the people who develop it. In addition, there is master-master replication in Tarantool. In general, for me it was definitely the best option. You can use another database in your project. The basic idea that I am trying to convey is that IoT devices can use databases with master-master replication to exchange data.
Until now, I only superficially introduced you to the project. Now let's dive a bit into its technical aspects.
I'll start with the problems that I encountered while using Tarantool. First, Tarantool did not run on the ARMv7 architecture. Secondly, Tarantool did not start in a 32-bit environment, which only aggravated the situation. In the end, I was able to solve these problems. Below are the development rules that helped me in this.
- Use toolchain files for CMake. Otherwise, you, like me, will spend a lot of time correcting CMake files.
- Do not use the unsigned type and other types for which no size is specified. In libc, there are special types for this, such as uint32_t. Otherwise, you can get undefined behavior. This rule applies only to C / C ++.
- Port your autotests.
It is expected that your autotests can be run on the IoT device. If this is not the case, there is a risk of killing a lot of time for debugging.
So, I have a working database with master-master replication. Wonderful! The next step is to connect the devices on which this database is installed, according to 6LoWPAN . Let me remind you, I have a network of many IoT devices connected to each other via 6LoWPAN, from which I need to collect all telemetry data.

Brief scheme of the finished system
Devices with sensors transmit telemetry data via radio waves. This standard is called 6LoWPAN (IPv6 over low-power wireless personal area networks). I note that I did not use in the LoRaWAN project. Perhaps I will find the use of this technology in the future, but in this article I will focus on 6LoWPAN. So, to collect telemetry data, I will use the gateway, which is an important part of the system. A gateway is a MIPS device (MIPS is a processor family) with a WAN antenna for collecting data transmitted via radio waves. In addition, a 6LBR application is installed on the gateway, which converts the received data into IPv6 packets.
Appendix 6LBR

The image above illustrates the principle of operation of the 6LBR. A gateway with a 6LBR installed on it serves as a converter between the wireless sensor network and any other. The picture shows the conversion from a wireless sensor network to an IP network only because 6LBR works by default. A little later, I will explain how to change this behavior.
More information can be found on page 6LBR on GitHub .
You may ask what gives me the use of 6LBR. First, I get an IP stack, so I can use the TCP and UDP stack functionality in my 6LBR applications. Secondly, I can use any I / O device with 6LBR. Let's say you can write raw data directly to bash. =) Unfortunately, 6LBR does not write directly to the MQTT. MQTT brokers know nothing about raw data, and we have to put up with it.
Why do I need a direct entry to the MQTT broker? The answer is simple: it's in the legacy code.
Here I would like to say a few words about the 6LBR applications. In general, a 6LBR application is a code written in C with an API that allows you to use the IP stack and do some other things. Developing such an application involves at least two difficulties: a complex threading model and a complex memory model. Therefore, be patient and prepare for frequent crashes of your program. Below is a small piece of the 6LBR application that I developed (I apologize in advance: I can upload only a picture with a deliberately confusing code, because the source code is closed):
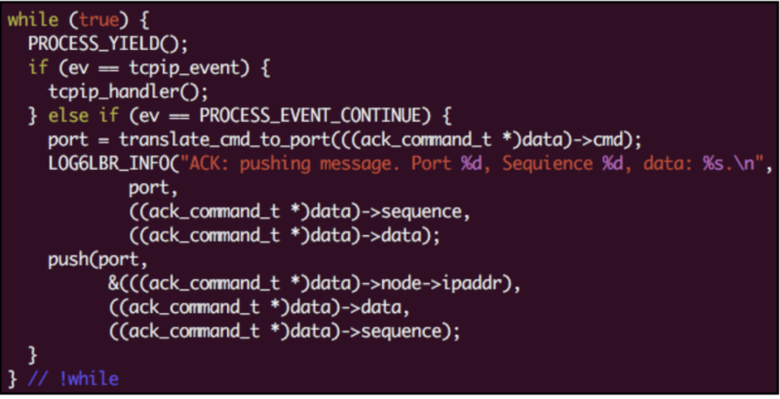
Pay attention to one interesting thing - PROCESS_YIELD (). In 6LBR there is cooperative multitasking, which means that 6LBR applications must return control in each iteration of the loop. The code should not run too long.
So let's look at what stage our project is at. Using the gateway and the 6LBR application installed on it, I created a mesh network to read and write data inside it. I also managed to wrap IP packets in MQTT messages, each of which contains information about the device, including telemetry data. In addition, I had the opportunity to manipulate I / O devices: for example, I can record MQTT messages on the UART. But then I ran into a new problem: Tarantool does not work with MQTT brokers. Below I will tell you how I managed to get around this limitation.
I decided to use libmosquitto , written on a pure C MQTT library, because it makes it quite easy to integrate MQTT into my application. Below is an example of using this library to work with MQTT messages ( link ):
static int mosq_poll_one_ctx(mosq_t *ctx, int revents, size_t timeout, int max_packets) { /** XXX * I'm confused: socket < 0 means MOSQ_ERR_NO_CONN */ int rc = MOSQ_ERR_NO_CONN; int fd = mosquitto_socket(ctx->mosq); if (fd >= 0) { /** Wait until event */ revents = coio_wait(fd, revents, timeout); if (revents != 0) { if (revents & COIO_READ) rc = mosquitto_loop_read(ctx->mosq, max_packets); if (revents & COIO_WRITE) rc = mosquitto_loop_write(ctx->mosq, max_packets); } /** * mosquitto_loop_miss * This function deals with handling PINGs and checking * whether messages need to be retried, * so should be called fairly _frequently_(!). * */ if (ctx->next_misc_timeout < fiber_time64()) { rc = mosquitto_loop_misc(ctx->mosq); ctx->next_misc_timeout = fiber_time64() + 1200; } } return rc; } I can take a reference to the socket descriptor and use my own event loop to handle some events. And this is great! I would like to draw your attention to the fact that in Tarantool, as well as in 6LBR, there is cooperative multitasking. To return control, Tarantool uses
coio_wait() .Oh yeah, I forgot to mention that Tarantool is also a Lua application server. Surprise! Therefore, I ported libmosquitto to Lua. Below is a piece of code in which the function that you already saw in the previous example is called:
__poll_forever = function(self) local mq = self.mqtt while true do self.connected, _ = mq:poll_one() if not self.connected then if self.auto_reconect then self:__try_reconnect() else log.error( "mqtt: the client is not currently connected, error %s", emsg) end end fiber.sleep(self.POLL_INTERVAL) end end, I also ported all the functions from the libmosquitto API. Look at the result here . The link is an example of use. All you need to do to collect data from all devices within the mesh network is to call the
subscribe() function from a specific place and publish the get() method!Conclusion
Let's look at what we did:
The connection to the application server is established through the replication provided by Tarantool master-master. Two useful properties follow from this:
- If the application server changes any data, this updated data is delivered to all IoT devices on the network.
- If the IoT device changes any data, this updated data is delivered to the application server.
These properties are the solution to my problems.
I can also connect my IoT devices through master-master replication. Thus, devices and the cloud are combined into a cluster, which can be used to synchronize all data. All IoT devices and the cloud are synchronized most of the time, except when the connection between them disappears. As soon as the connection is restored, all data is synchronized again. Just great!
The gateway with the 6LBR application installed on it allows you to exchange data between my IoT devices and other IoT devices. It wraps each message in an MQTT message and sends it to the UART channel.
IoT-device #N with MQTT-broker installed on it reads these messages from the UART channel. The MQTT broker forwards messages to Tarantool over an MQTT connection. Tarantool reads them, then for each message the Tarantool application server executes some code.
The #N IoT device is connected to all other devices through the replication provided by the Tarantool master-master. The same replication is used to connect all devices with the cloud.
That's all! I solved the task and really hope that my experience will help you in your own projects in the future. To summarize: I used Tarantool and as the main frontend on my dedicated servers, and as an application server. If you are interested in this topic, I recommend to look at my other article in English. Stay in touch and stay tuned!
Source: https://habr.com/ru/post/320878/
All Articles