Google Chrome Extensions: a quick do-it-yourself translator

Recently I noticed that even if my English is not so bad, I still often get distracted by the translation of certain unfamiliar words. And since I was tired of spending my time on it, I decided to write an extension-translator. Can say
But there are already!Yes, there is, but, firstly, I did not write browser extensions before and wanted to try, secondly, it’s always more fun to create something myself than to use ready-made ones. So to whom it is interesting as well as me - welcome under cat.
And I decided to write the article itself, because I had to collect a lot of information in parts from the far corners of the Internet and I decided to combine everything a little.
So,
')
1. Preparing the necessary files
We will need:
- Manifest.json - version of our extension, name, list of used files, permissions will be stored here.
- Popup.html is the face of our extension, here we will write a popup page that will be displayed when clicking on the icon of our extension
- Background.html are all background processes of our extension.
- 4 icons: 16x16, 36x36, 48x48, 128x128 - this is the icon of your application, chrome and can itself customize the icon to the desired size, but you can set different icons and depending on this they will be different in the context menu, near the address bar, in the menu extensions, etc.
Immediately a small footnote on how to upload extensions to google chrome:
- Save all extension files to a separate folder.
- Open Google Chrome -> Options -> Settings -> Extensions
- We tick the developer mode , click to load the unpacked extension .
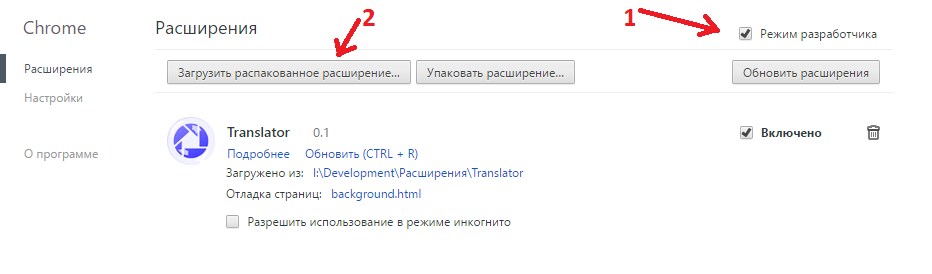
- Specify the path to the folder with the extension, click OK
2. Parable about the manifest and popup
And the programmer created a manifesto and the programmer saw that it was good.
Our manifest.json should look like
like that:
{ "manifest_version": 2, "name": "Translator", "version": "1.0", "icons": { "16": "16x16.png", "32": "32x32.png", "48": "48x48.png", "128": "128x128.png" }, "permissions": [ "http://translate.yandex.net/*", "contextMenus" ], "browser_action": { "default_title": "Open translator", "default_icon": "48x48.png", "default_popup": "popup.html" }, "background": { "page": "background.html" } } Now in order:
- manifest_version is the version of our manifest, now version 2 is relevant.
- name - extension name
- version - version of the extension, there should be only numbers, but in any format: 1.0 or 1.0.0.1 or 1.1.2, you can write as you like.
- icons - the list of icons of our extension
- permissions - permissions of our extension, the link gives access to a specific resource, contextMenus gives access to the context menu.
- browser_action: default_title - the text that will appear when you hover the mouse over the extension icon, default_icon is the default application icon, default_popup is the default popup window.
- background - here you can connect the background page, if it exists or background scripts.
With the manifesto figured out, now you can go to a more interesting lesson. Before we begin to create a View of our extension - we need to download additional files of all colors and colors. In general, this is optional and someone can write an extension on pure JS, without third-party styles, but I wanted to use Jquery and Bootstrap .
I decided especially not to bother with the look and quickly rolled up a more or less nice window decent looking translator.
popup.html
<!DOCTYPE html> <html> <head> <script src="jquery.js"></script> <script src="popup.js"></script> <script src="bootstrap.js"></script> <link rel="stylesheet" href="bootstrap.css"> <link rel="stylesheet" href="bootstrap-theme.css"> <link rel="stylesheet" href="popup.css"> </head> <body> <header> <img id="logo" src="mixx.png"> </header> <div id="wrapper"> <div class="li"> <input id="input" class="form-control"> </div> <div class="li" style="margin-bottom: 10px;"> <button id="btn_submit" type="submit" class="btn btn-default" style="margin-top: 10px;"></button> </div> </div> <footer id="options" role="button"> <label id="result"></label> </footer> </body> </html> I do not know how personally you, the reader, are in html, js and css, but at this level I do not set out to explain the principles of these languages to you, everything that I use and do not explain is rather primitive and easy to google.
Styles are not at all necessary, you can do without them, but with them everything looks a little friendlier and more beautiful.
Create a popup.css file and add some styles:
popup.css
body { min-width: 250px; margin: 0px; font-family: Segoe UI, Arial, sans-serif; font-size: 13px; background-color: #f8f6f2; } header { height: 45px; margin-bottom: 40px; border-bottom: 1px solid #e1ddd8; } #logo { display: block; position: relative; top: 15px; margin: 0px auto; } #wrapper { padding: 0px 20px; } footer { cursor: pointer; padding: 10px 35px; border-top: 1px solid #e1ddd8; } footer:hover { background: linear-gradient(to bottom, rgba(70, 50, 0, 0.1), rgba(70, 50, 0, 0.1)); } .li { list-style-type: none; border-top: 1px dashed #a5a4a1; } label { vertical-align: middle; } Now our extension should look something like this:

Now you can go to the very logic of the translator, create a file
popup.js
$(document).ready(function(){ $('#btn_submit').click(function(e){ /* , id = "btn_submit" */ translate($('#input').val()); }); }); function translate(input) { var url = "https://translate.yandex.net/api/v1.5/tr.json/translate"; /* , , 1.5 , */ var key = "trnsl.1.1.20170124T214153Z.11b2724899c0a9fc.6d5c7e3a02107ce1349d21bbc6dc9dd4a86dc62a"; /* , , <b> !</b> https://tech.yandex.ru/keys/get/?service=trnsl ( )*/ var parent = /[-]/i; var language = (parent.test(input))? 'ru-en':'en-ru'; $.getJSON(url, {lang: language, key: key, text: input}, function(res){ /* */ $('#result').text(""); for (var i in res.text) { $('#result').text($('#result').text() + res.text[i] + " "); } }); } Save and load our extension in chrome. Sometimes the button to update the extension does not help and then you need to delete the extension and reload it.
We check the work, we should get something like this:

It seems to have tried well, but something is missing. Add a reaction to the Enter key.
Add code to popup.js
$("#input").keyup(function(event){ if(event.keyCode == 13){ /* 13 - Enter $("#btn_submit").click(); } }); Check and see that you can now press enter, and not click on the button. But you need to add at least one more function that is present in most translators - this is copying the translated text to the clipboard.
Add code to popup.js
var options = document.getElementById("options"); if(options) { options.addEventListener("click", function() /* footer */ { var range = document.createRange(); */ Range. */ var value = document.querySelector("#result"); /* id = "result" */ range.selectNode(value); /* */ window.getSelection().addRange(range); try { var successful = document.execCommand('copy'); var msg = successful ? 'successful' : 'unsuccessful'; console.log('Copy email command was ' + msg); } catch(err) { console.log('Oops, unable to copy'); } window.getSelection().removeAllRanges(); }); Well, we did a good job on the view, now we have a good translator, moreover, written by us! But not everyone will be satisfied with such a result, for the same tireless adventure seekers who are trying to bring the instrument to perfection, but at least to make it as convenient as possible - we will not stop there!
Saga of background.js
The translator is, of course, good, but after all, taking, copying and pasting text is also tiring, so we need to make sure that our extension translates the text we select.
Background.html - background page and one of its features is to add an item to the context menu. In the background.html itself, we just connect the scripts, we need them.
background.html
<!DOCTYPE html> <html> <head> <meta charset="utf-8"> <script src="jquery.js"></script> <script src="background.js"></script> </head> But with the background.js we have more fun. Create a point of our application in the menu:
Add to background.js
chrome.contextMenus.create({ 'title': ' Translator', /* */ 'contexts':['selection'], /* */ 'onclick': function() {} /* , */ }); Now, when we reload the extension and select some text by right-clicking - we will see that a new item has appeared in the context menu:

Now you need to figure out how to translate this text. At first, I wanted our popup window to open when the text was selected and the translation was there, but I was faced with the fact that Google limited the possibility of opening the window only by clicking on the icon. Then I

But I could not find information on how to change the context menu in this way. I don’t want to open new tabs, so here we are a little shallow.
In background.js in place of the old empty function, insert this line:
Paste the code into background.js
function(info, tab) { translate(info.selectionText) } And add the translate function separately:
Paste the code into background.js
function translate(input) { var url = "https://translate.yandex.net/api/v1.5/tr.json/translate"; var key = "trnsl.1.1.20170124T214153Z.11b2724899c0a9fc.6d5c7e3a02107ce1349d21bbc6dc9dd4a86dc62a"; var parent = /[-]/i; var language = (parent.test(input))? 'ru-en':'en-ru'; $.getJSON(url, {lang: language, key: key, text: input}, function(res){ alert(res.text); }); } Let's check the work and see that when we select the text and click the translate button in the context menu, this window appears:

Well, that's all, friends! If someone tells you the best way to implement the translation using the context menu, I will be glad to hear.
For information on the implementation of such things, I express my gratitude to the articles on Habrahabr and the responses to StackOverflow.
Source: https://habr.com/ru/post/320776/
All Articles