Comparison of 7 photogrammetry systems. What is better to choose?
Greetings, Habr. This is my first attempt at translating an article. I hope it will be useful not only to the residents of Habr, but also to archaeologists, on whom the original article is oriented.
When I explain to people that photogrammetry is similar to the process of 3D scanning with photos, they always trust me, because it seems too fantastic to be true. Just imagine, take a few pictures of the object, send them to the algorithm and get a textured 3D model. Wow
')
After presenting the model, the second question asked is accuracy. What is the accuracy of 3D scanning by photo? Answer: submillimeter range . Again, I am surprised by the expression of distrust. Fortunately, our team wrote a scientific article about an experiment that showed an average deviation of 0.78 mm, that is, less than one millimeter compared to a scanned 3D model made with a laser scanner.
Just like in the laser scanner market, photogrammetry has many different test software options. They range from proprietary and proprietary solutions, to open and free. And precisely, among such programs and solutions, comes the third question, which is still unanswered, at least officially: which photogrammetry software is the best?
This question is difficult to answer, because the answer largely depends on the situation. But thinking about this, among the many approaches that I have taken over a long time, I decided to answer in such a way as to give a simple and lengthy answer.
Lord Sipan's Skull
In July 2016, I traveled to Lambayeque, Peru, where I met face to face with Lord Sipan’s skull. Analyzing it, I realized that it would be possible to restore his face using the forensic technique of face reconstruction. The skull, however, was broken and distorted by years of pressure, which he endured in his grave, found complete in 1987, one of the great archaeological expeditions led by Dr. Walter Alva.
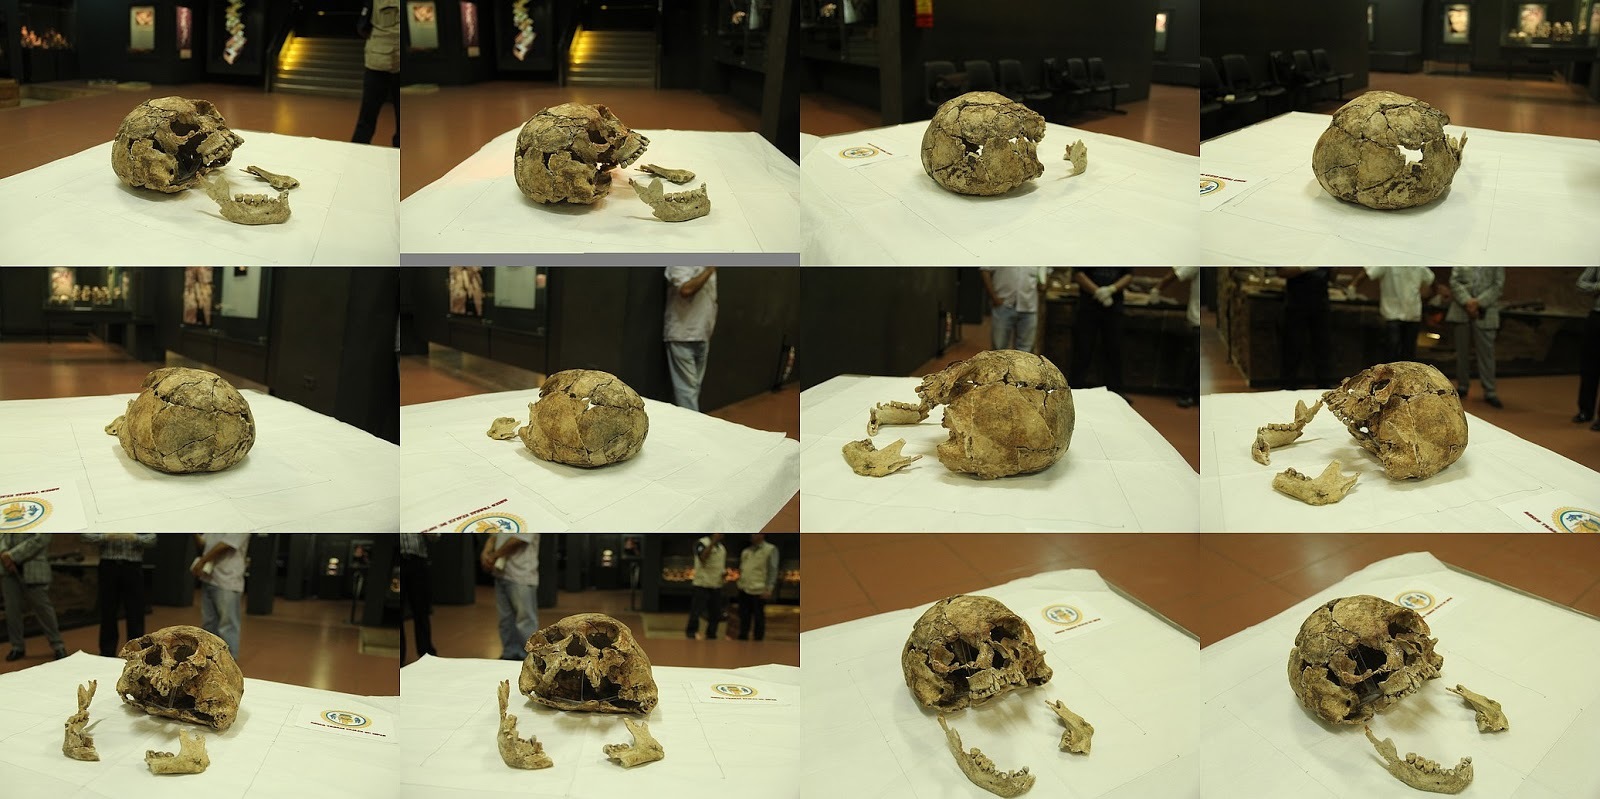
To restore the skull, I took 120 photos on the ASUS Zenphone 2 smartphone and with these photos, I resumed reconstruction work. Parallel to this process, professional photographer Raúl Martin from the marketing department of Inca University Garcilaso de la Vega (sponsor of my trip) took 96 photos on a Canon EOS 60D camera. Of these, I selected 46 images to continue the experiment.
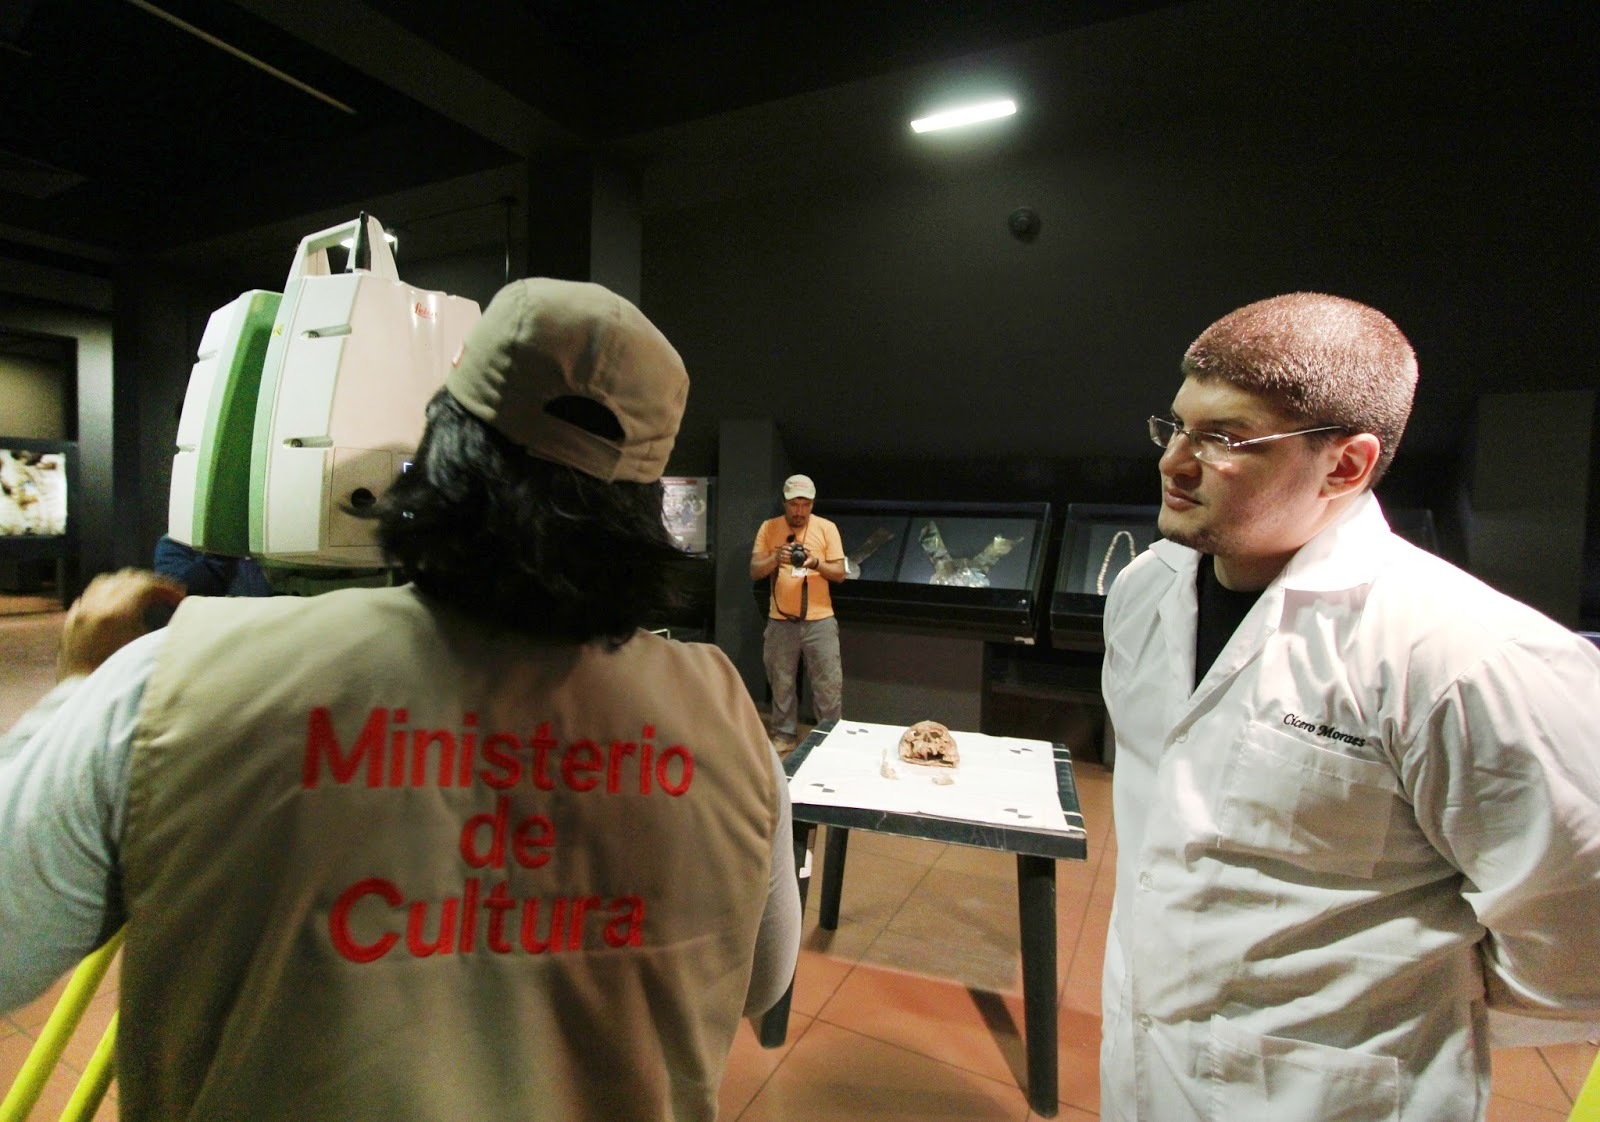
Specialist of the Ministry of Culture of Peru, begins the process of digitizing the skull (center)
A day after the photographic survey, the Peruvian Ministry of Culture sent specialists in the field of laser scanning to scan Lord Sipan's skull, using Leica ScanStation C10 equipment. The final point cloud was sent after 15 days, that is, when I received the data from the laser scanner, all the models obtained using photogrammetry were ready.
We had to wait all this time, since the model obtained with the help of equipment is the gold standard, that is, all the grids obtained using photogrammetry will be compared, one by one, with it.
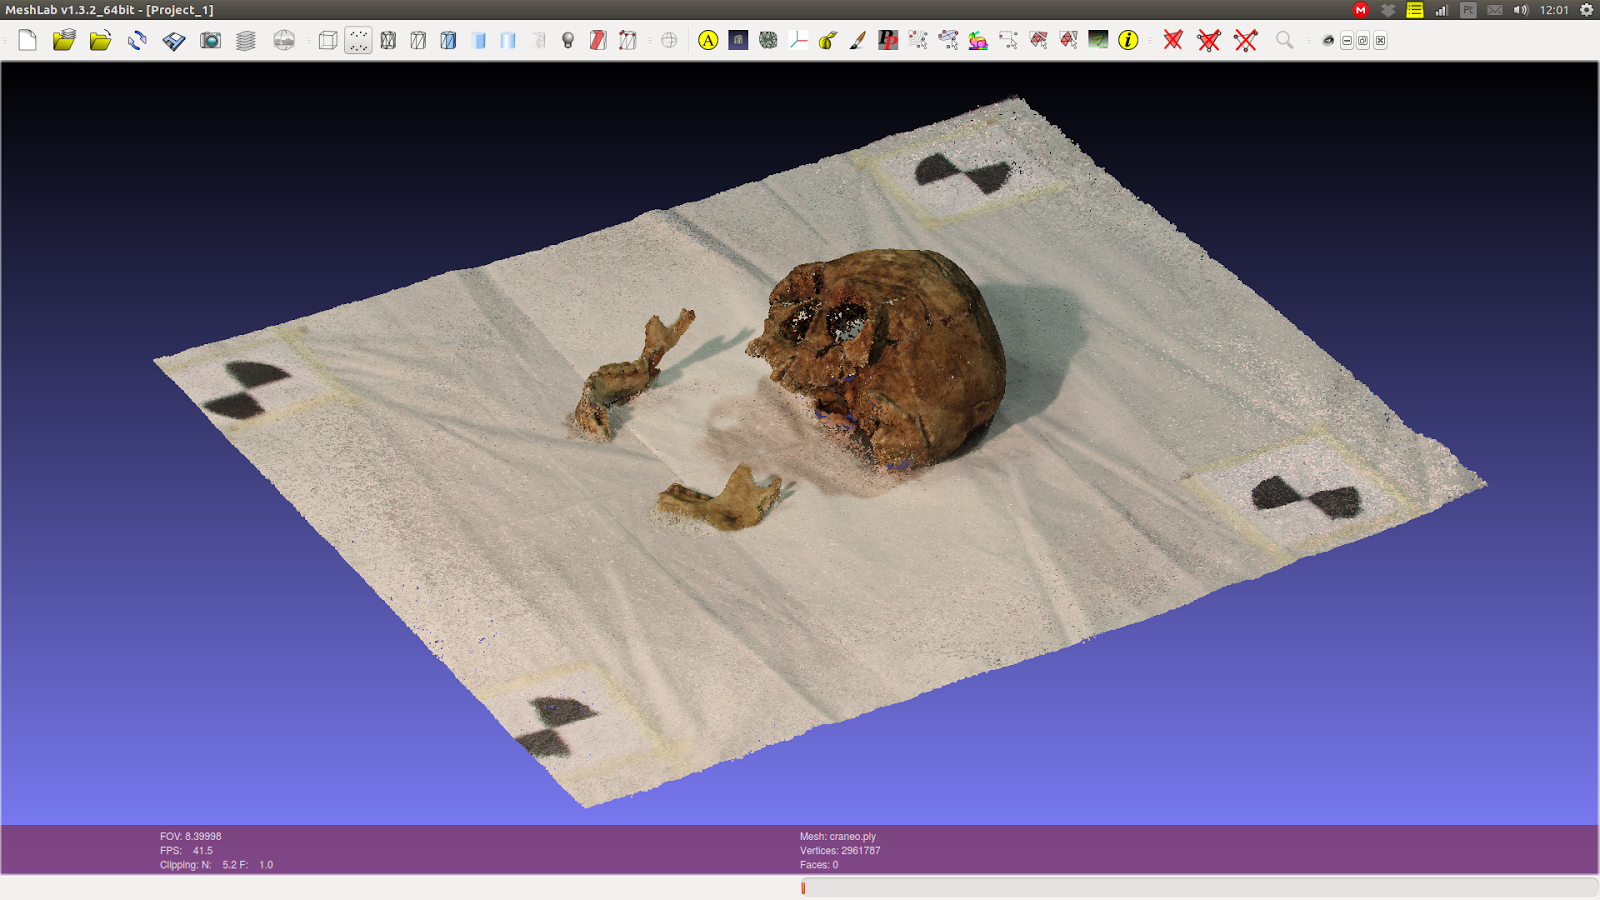
Full point cloud imported to MeshLab after conversion made to CloudCompare
The point cloud from the scan was in the .LAS and .E57 files ... and I had never heard of them. I had to do a lot of research to figure out how to open them on Linux using free software. It was decided to do this in CloudCompare, which offers the ability to import .E57 files. Then I exported the model as .ply to be able to open the MeshLah and reconstruct the 3D mesh using the Poisson algorithm.
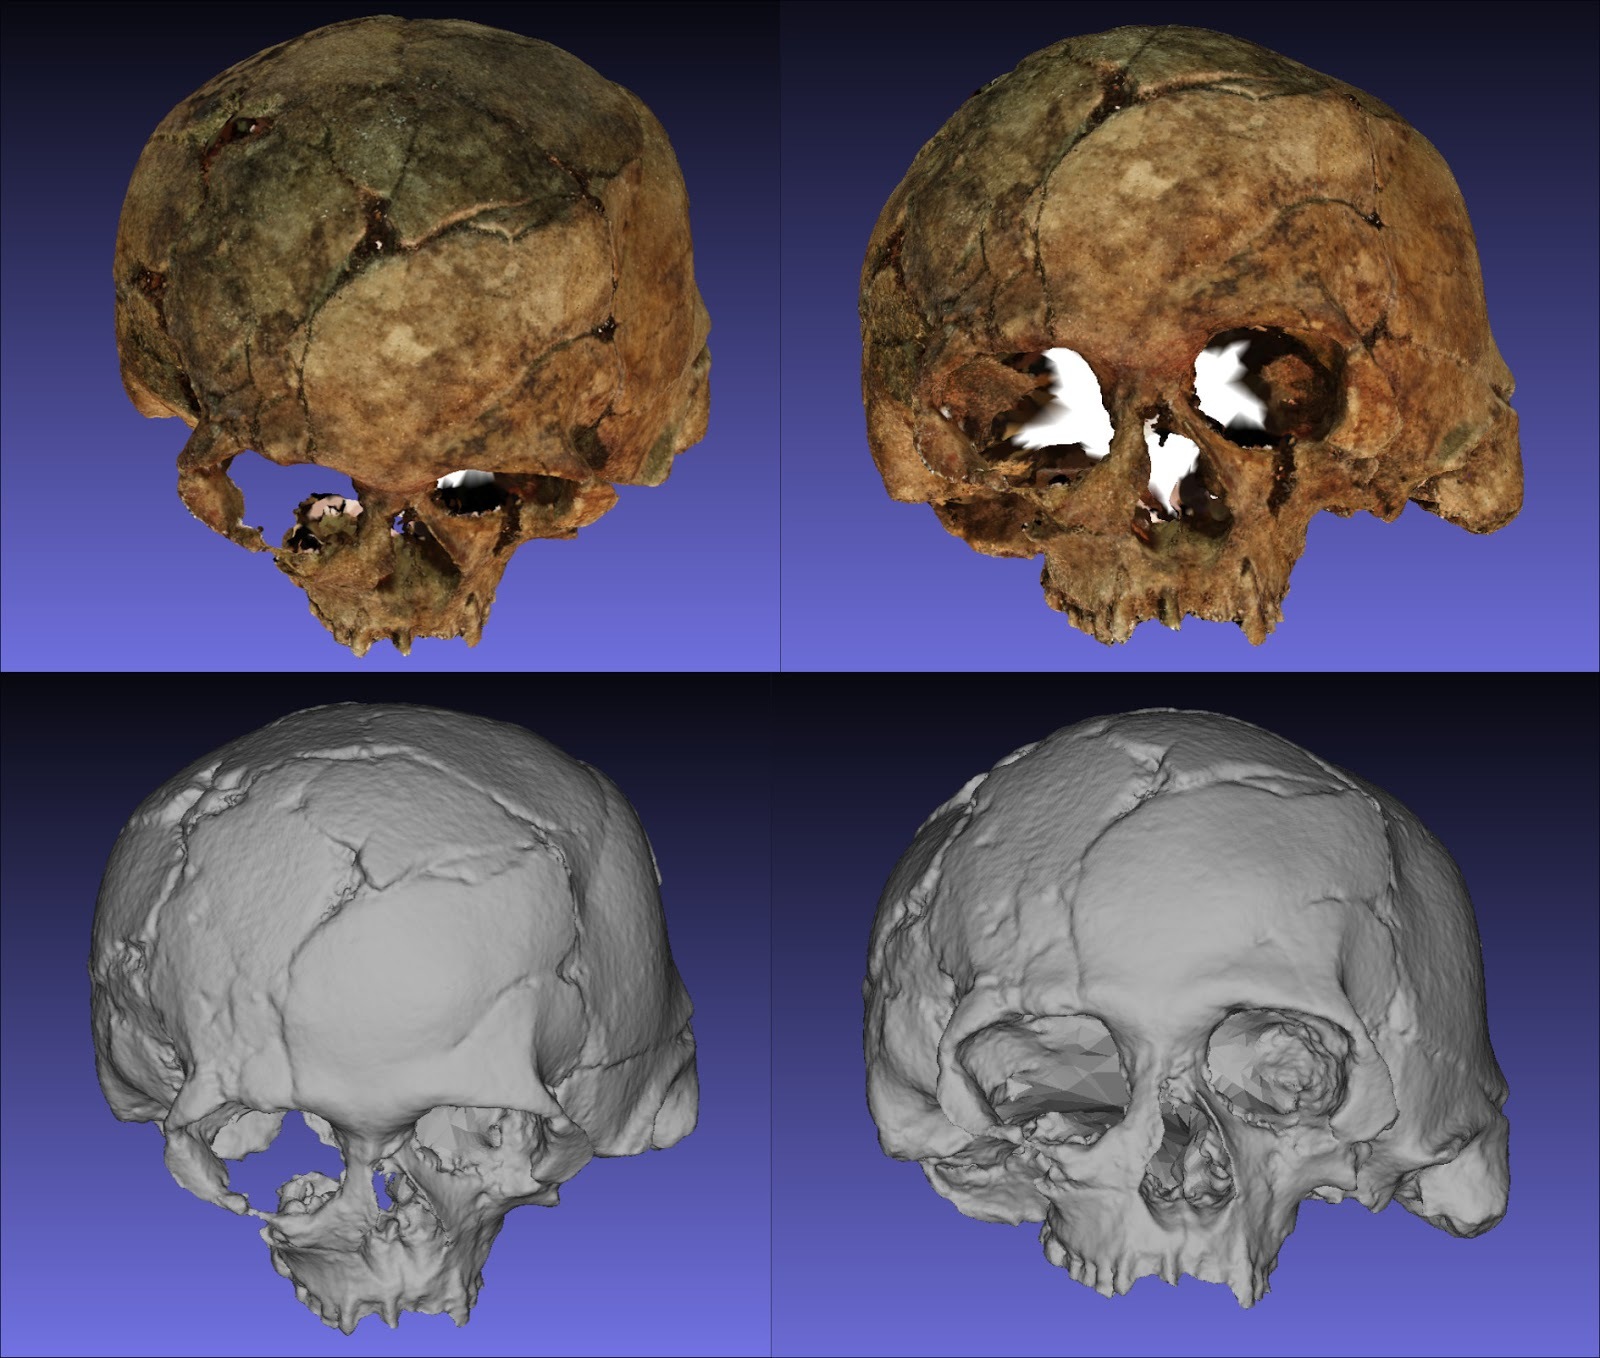
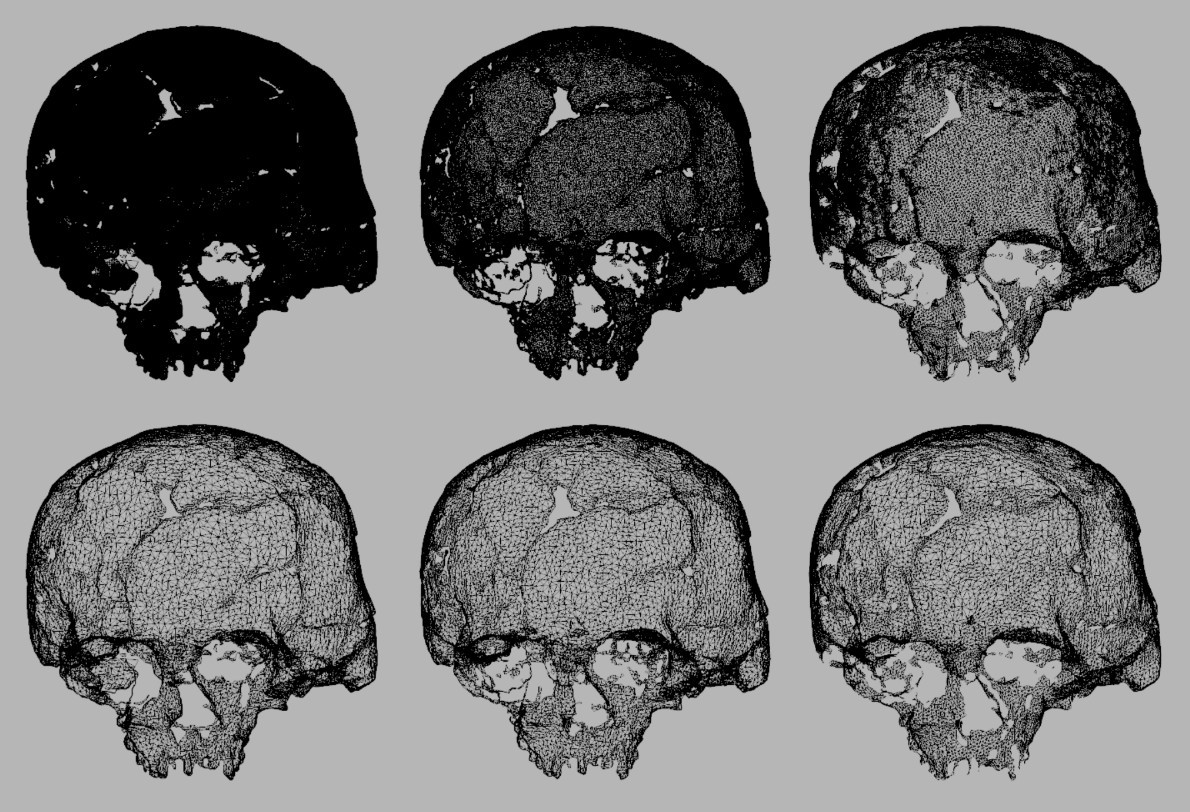
3D mesh reconstructed from point cloud. The color of the vertex (above) and the surface with only one color (below).
As noted above, the jaw and the surface of the table where the parts were placed were also scanned. The part associated with the skull was isolated and removed for the experiment to be performed. I will not deal with these details here, since the volume is different. I have already written other materials explaining how to remove irrelevant parts of a point / mesh cloud.
For scanning using photogrammetry, the following systems were selected:
1) OpenMVG (Open Multiple View Geometry library) + OpenMVS (Open Multi-View Stereo reconstruction library): A thin point cloud is calculated in OpenMVG and a dense point cloud in OpenMVS.
2) OpenMVG + PMVS (Patch-based Multi-view Stereo Software): A discharged point cloud is calculated in OpenMVG, and then a dense point cloud using PMVS.
3) MVE (Multi-View Environment): Complete photogrammetry system.
4) Agisoft Photoscan : Complete and closed photogrammetry system.
5) Autodesk Recap 360 : Complete online photogrammetry system.
6) Autodesk 123D Catch : A complete online photogrammetry system.
7) PPT-GUI (Python Photogrammetry Toolbox with a graphical user interface): A discharged cloud of points is generated by the Bundler , and later PMVS creates a dense cloud.

Above we have a table containing important aspects of each of the systems. In general, at least apparently, there is not a single system that stands out much more than others.

Generation of a discharged cloud + generation of a dense cloud + 3D mesh + textures, a little time to upload photos and 3D meshes (in cases with Recap 360 and 123D Catch).
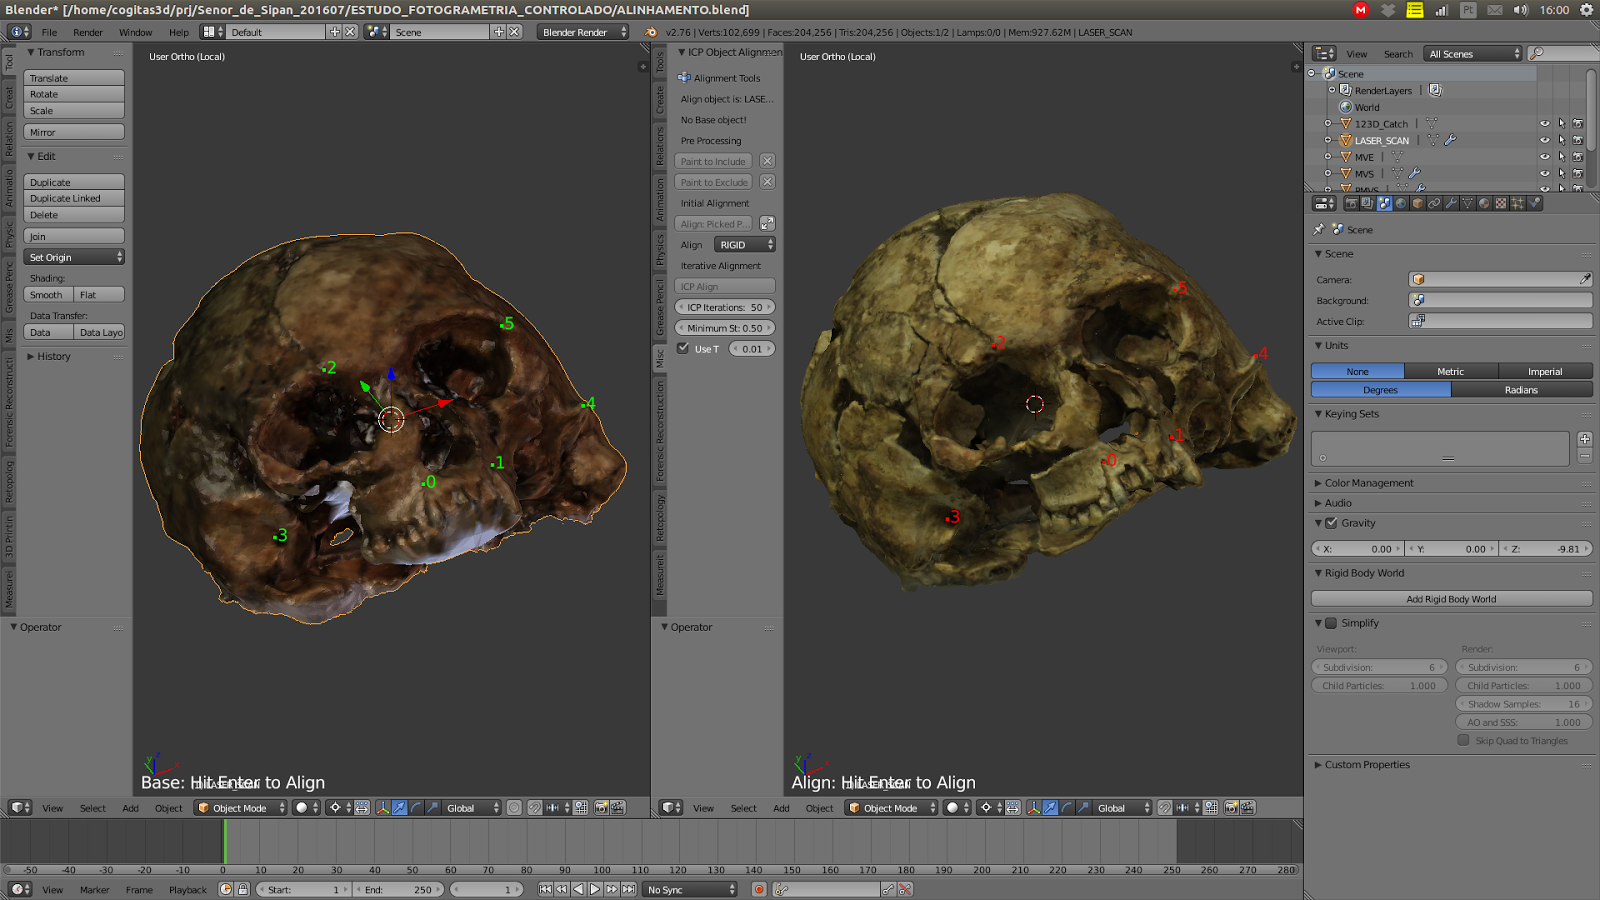
Alignment based on common points
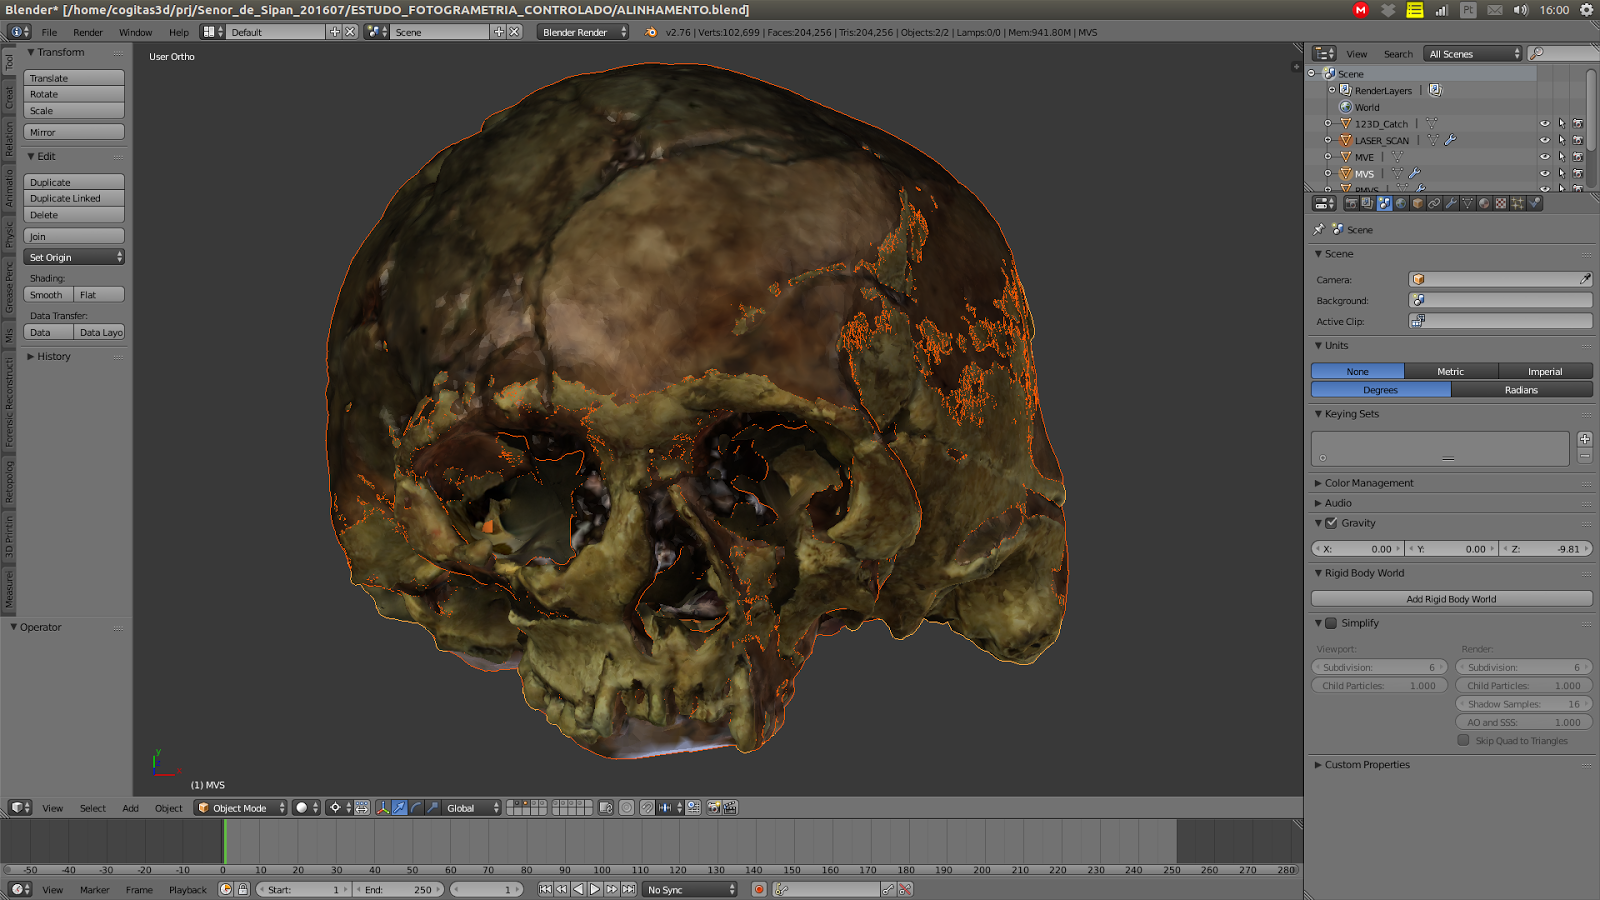
Aligned Skulls
All meshes were imported into Blender and combined with laser scanning.
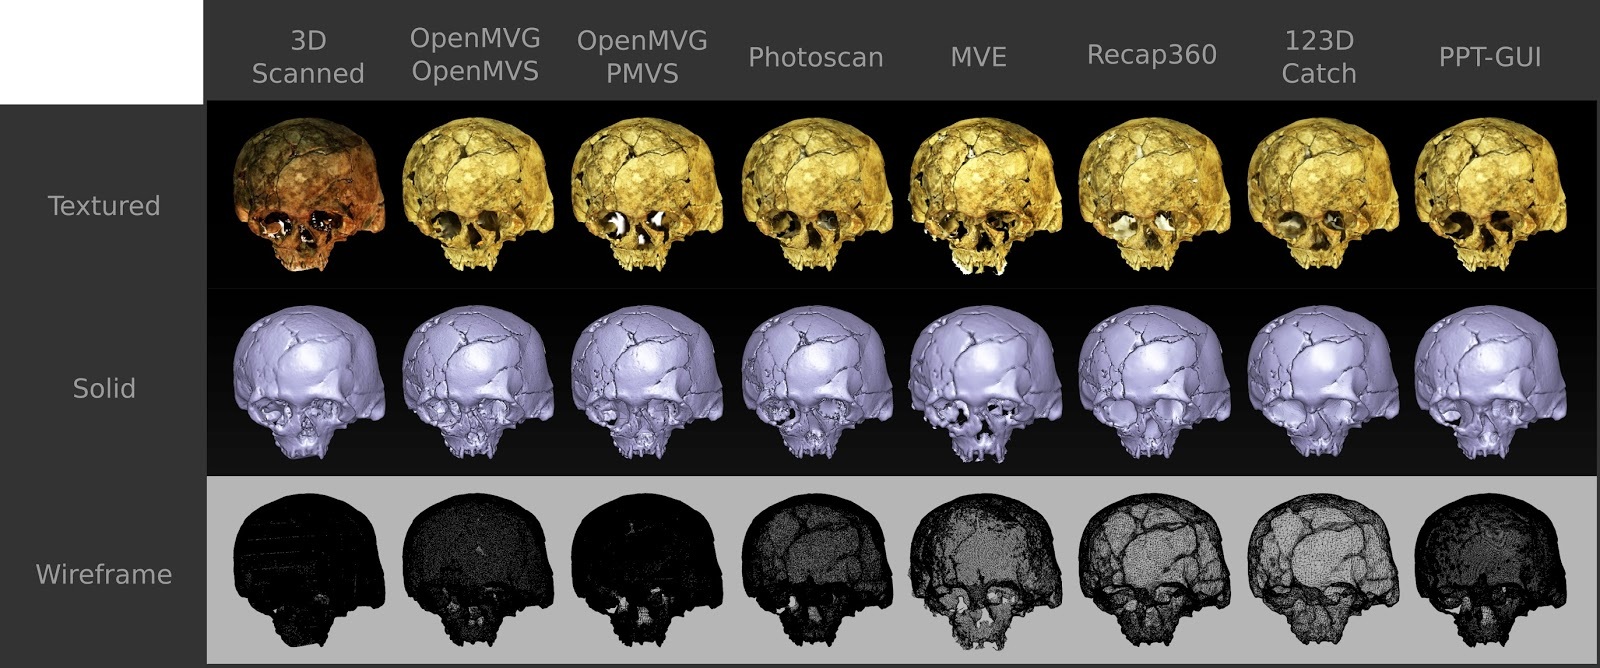
Above, we see that all the grids are nearby. We can see that some surfaces are so dense that we notice only the edges, as is the case with 3D scanning and OpenMVG + PMVS. Initially very important information ... the texture in the scanned meshes, as a rule, deceives us in relation to the quality of the scan, so in this experiment I decided to ignore the texturing results and focus on the 3D surface. Therefore, I exported all the original models to the .stl format, which, as you know, has no information about the texture.
Looking closely, we will see that the result is consistent with a less dense result of units in the grid. The ultimate goal of scanning, at least in my work, is to obtain a grid that is consistent with the original object. If this grid is simplified, because it is in harmony with the real volumetric aspect, it is even better, because when the 3D grid has fewer faces, it will be processed faster when released.

If we look at the file sizes (.stl exported without texture), which is a good comparison indicator, we see that the net mesh created in OpenMVG + OpenMVS is 38.4 MB in size and Recap 360 is only 5.1 MB!
After several years of working with photogrammetry, I realized that the best thing to do when we are faced with a very dense mesh is to simplify the mesh so that we can process it in real time. It’s hard to say whether this is true or not, as it is a patented and closed solution, but I believe that Recap 360 and 123D Catch generate complex grids, but at the end of the process they simplify it significantly, so they work on any hardware (PCs and smartphones ), preferably with WebGL support (interactive 3D in an Internet browser).
Soon we will return to the discussion of this situation associated with the simplification of the grids, and now let's compare them.
How 3D Grid Comparison Works
After all the skulls were cleaned and aligned with the gold standard (laser scanning), it's time to compare the grids in CloudCompare. But how does the 3D grid comparison technology work?
For illustration, I created some didactic elements. Let's go back to them.

This didactic element deals with two planes with surfaces of zero thickness (this is possible in 3D modeling), forming X.
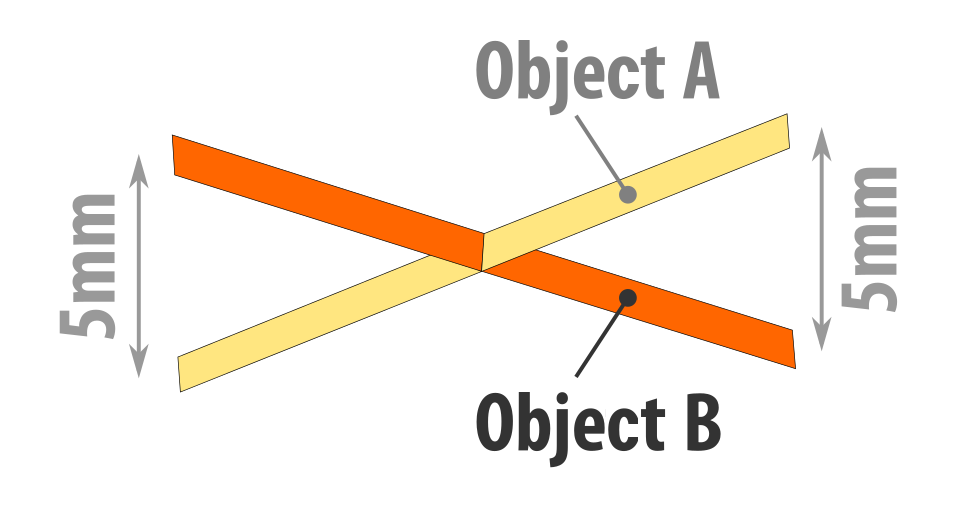
Then we have object A and object B. In the final part of both sides, the ends of the planes are separated by millimeters. Where there is an intersection, the distance is, of course, 0 mm.

When comparing two grids in CloudCompare, they turn out to be pigmented with a color spectrum that goes from blue to red. The picture above shows two already pigmented plans, but we must remember that they are two different elements and the comparison is made in two points, one in relation to the other.
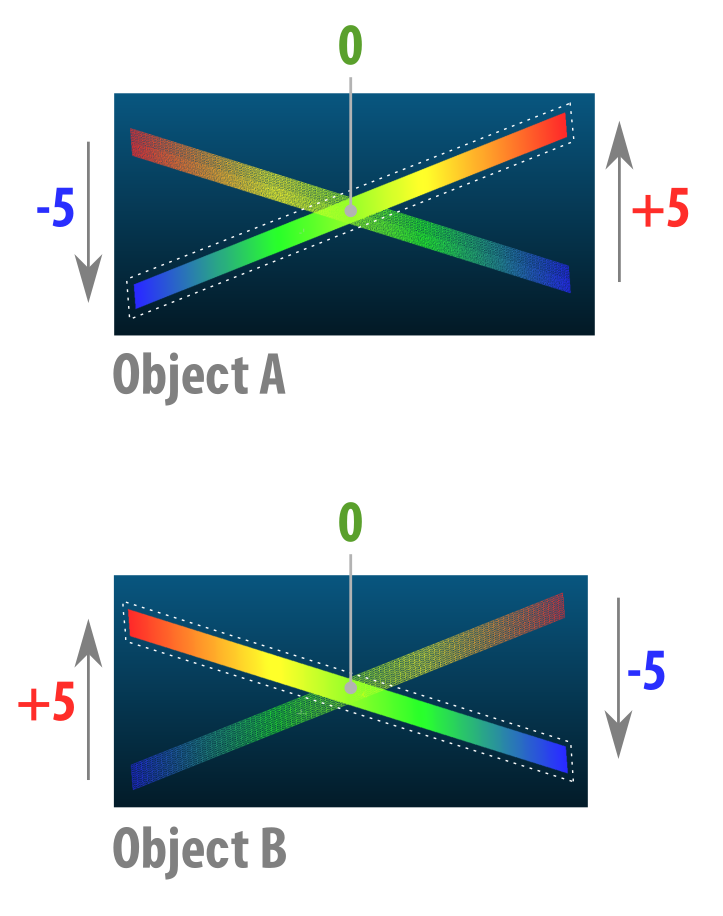
Now we have a clear idea of how this works. Basically, what happens is this: we set the distance limit, in this case 5 mm. The “out” grid tries to be pigmented red, and the one that “in” tends to be colored blue and what is at the intersection, that is, on the same line, is usually pigmented in green.
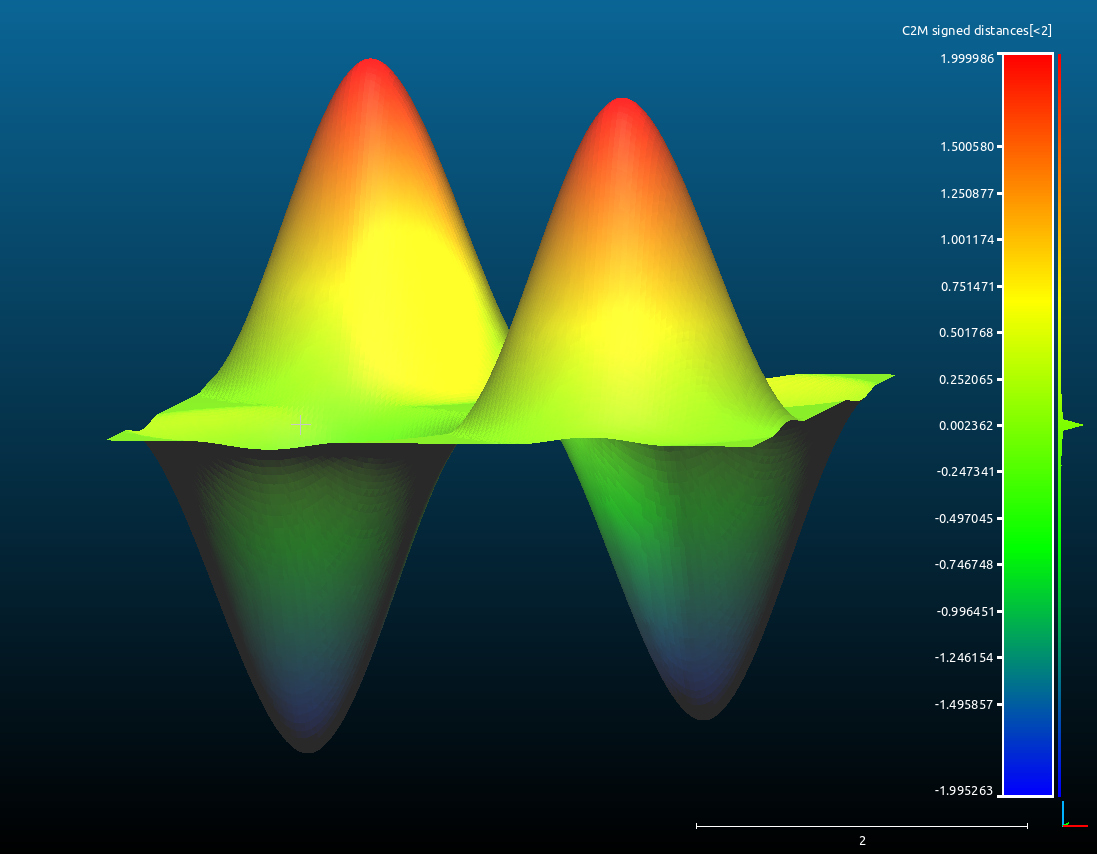
Now I will explain the approach used in this experiment. See above, we have an element with a central area that tends to zero, and the ends are set to +1 mm and -1 mm. This does not appear in the image, but the element that we use for comparison is a simple plane located in the center of the scene, right around the base of the 3D bell, or those that are “pointing up” when those that are “looking down”.
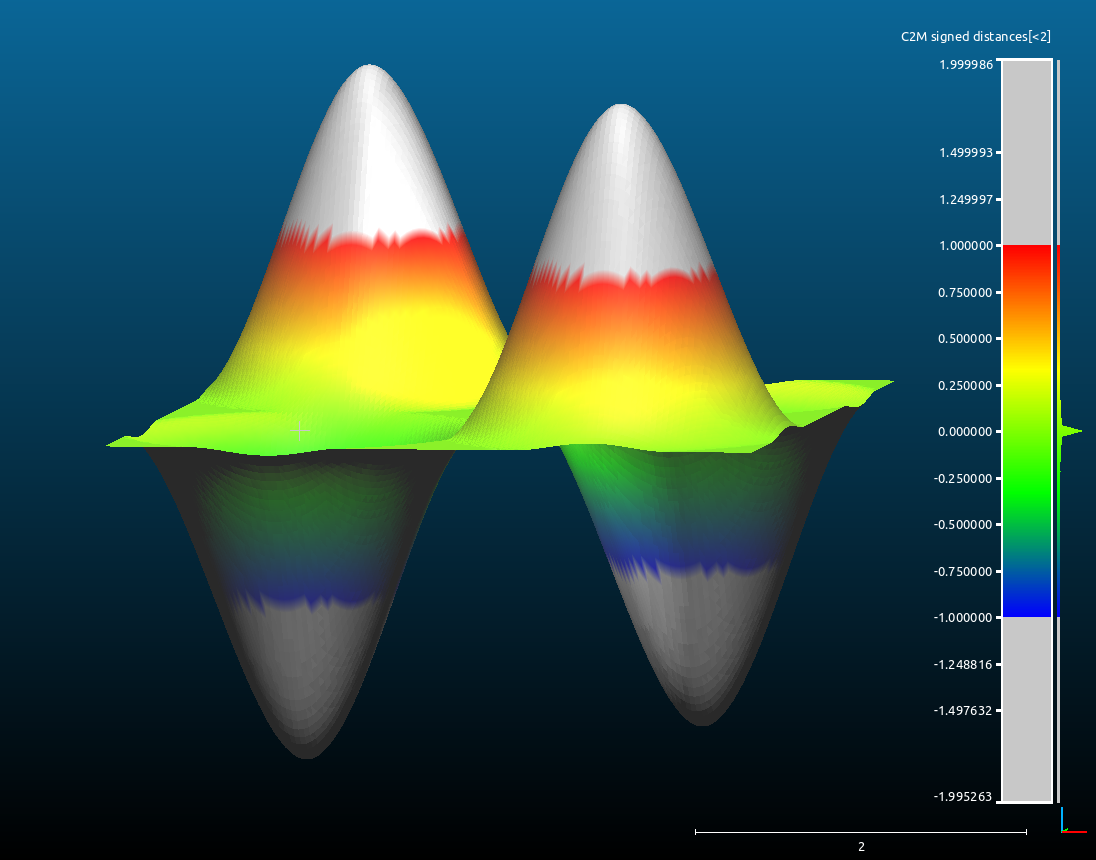
As I said earlier, we have set a comparison limit. It was initially set at + 2mm and -2mm. What if we change this limit to + 1mm and -1mm? See that this happened in the figure above, and the part that goes beyond the boundaries.
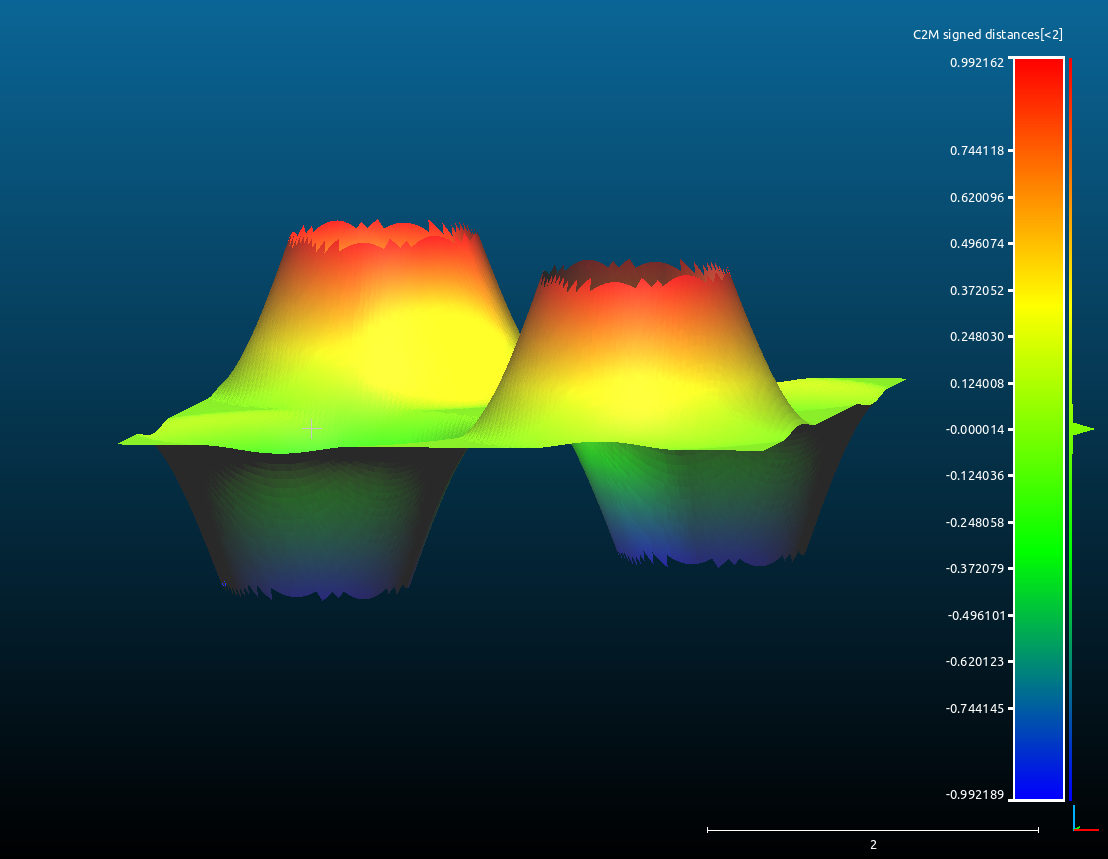
We can remove parts that go beyond rendering, so that they do not interfere with us.

Thus, as a result, in the grid there is only a percentage of the structure
For those who understand a little more 3D modeling, it is clear that the comparison is made on the vertices, not the faces. Because of this, we have a jagged edge.
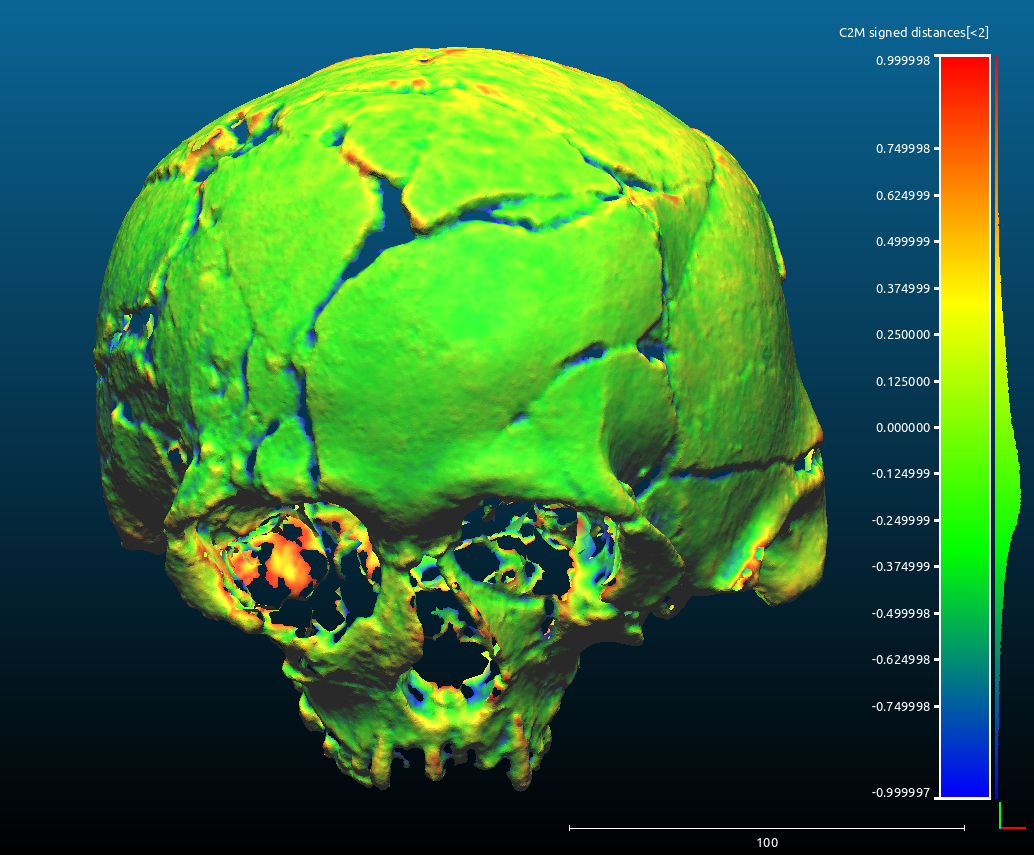
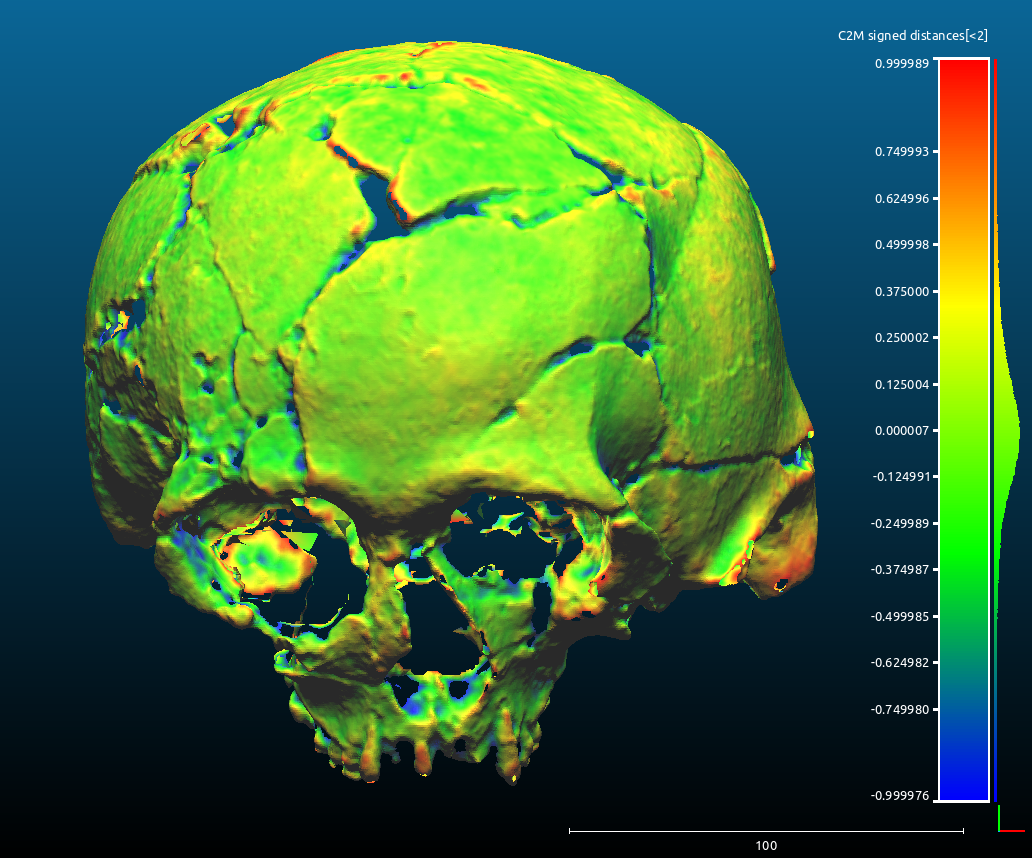
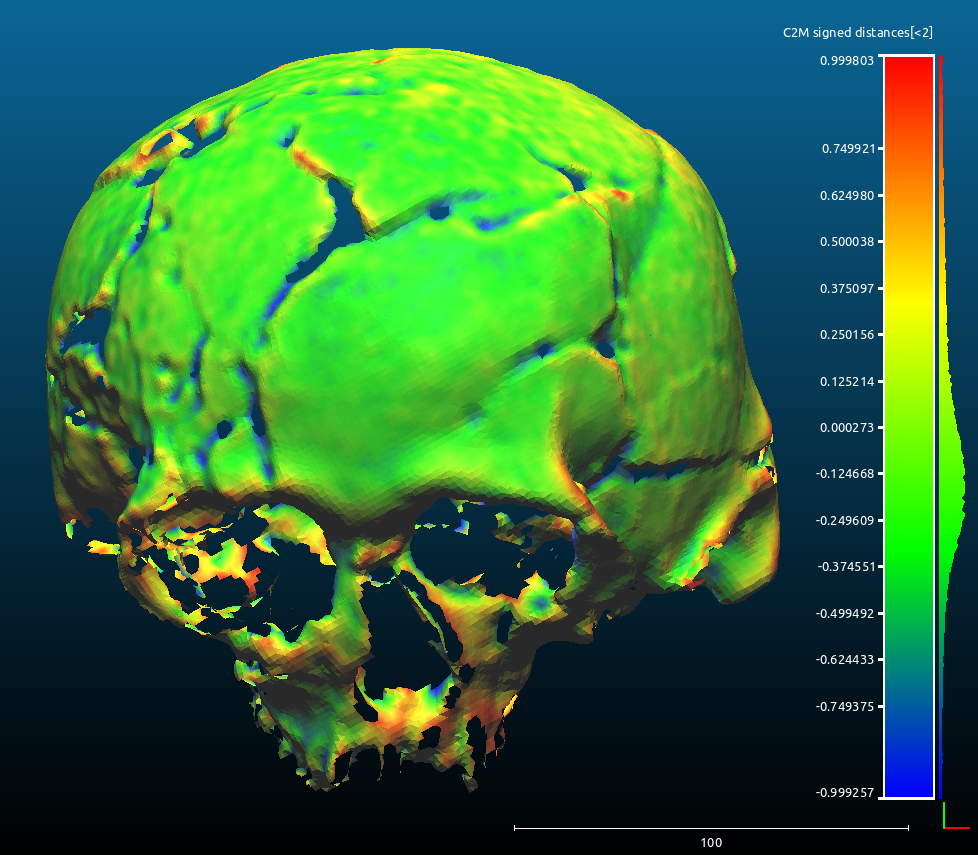
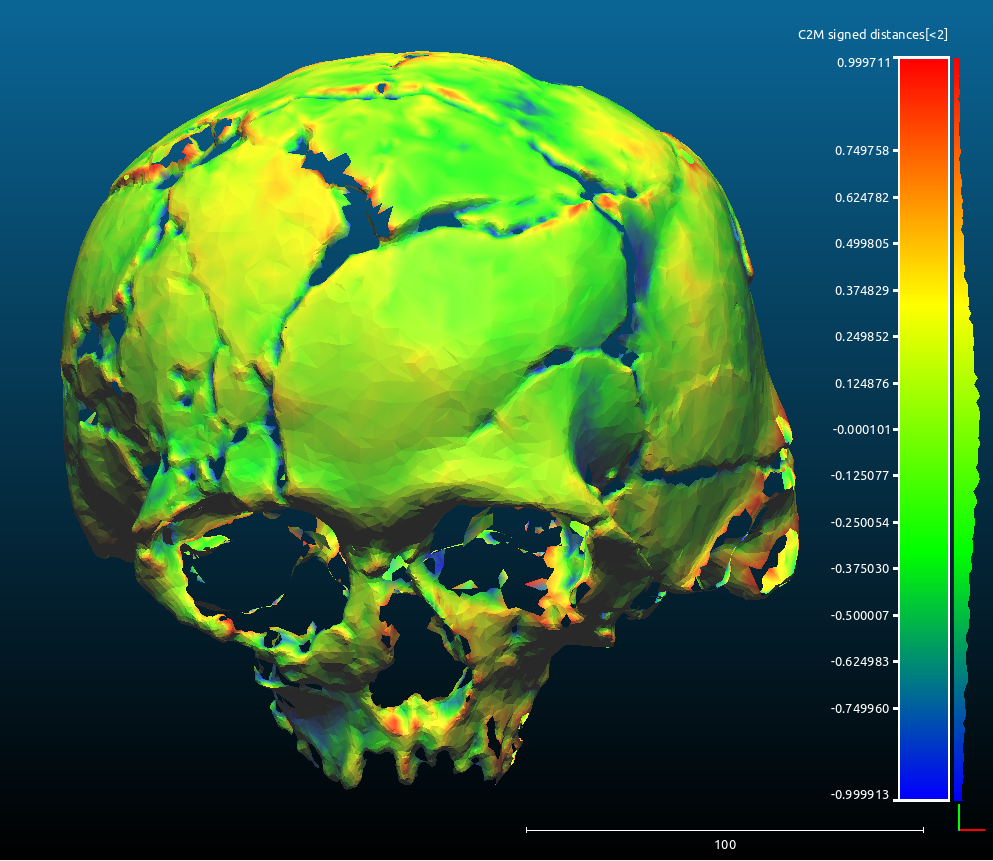
Skull comparison
Photogrammetry was compared with a laser scanner within +1 mm and -1 mm. Everything outside the spectrum has been erased.
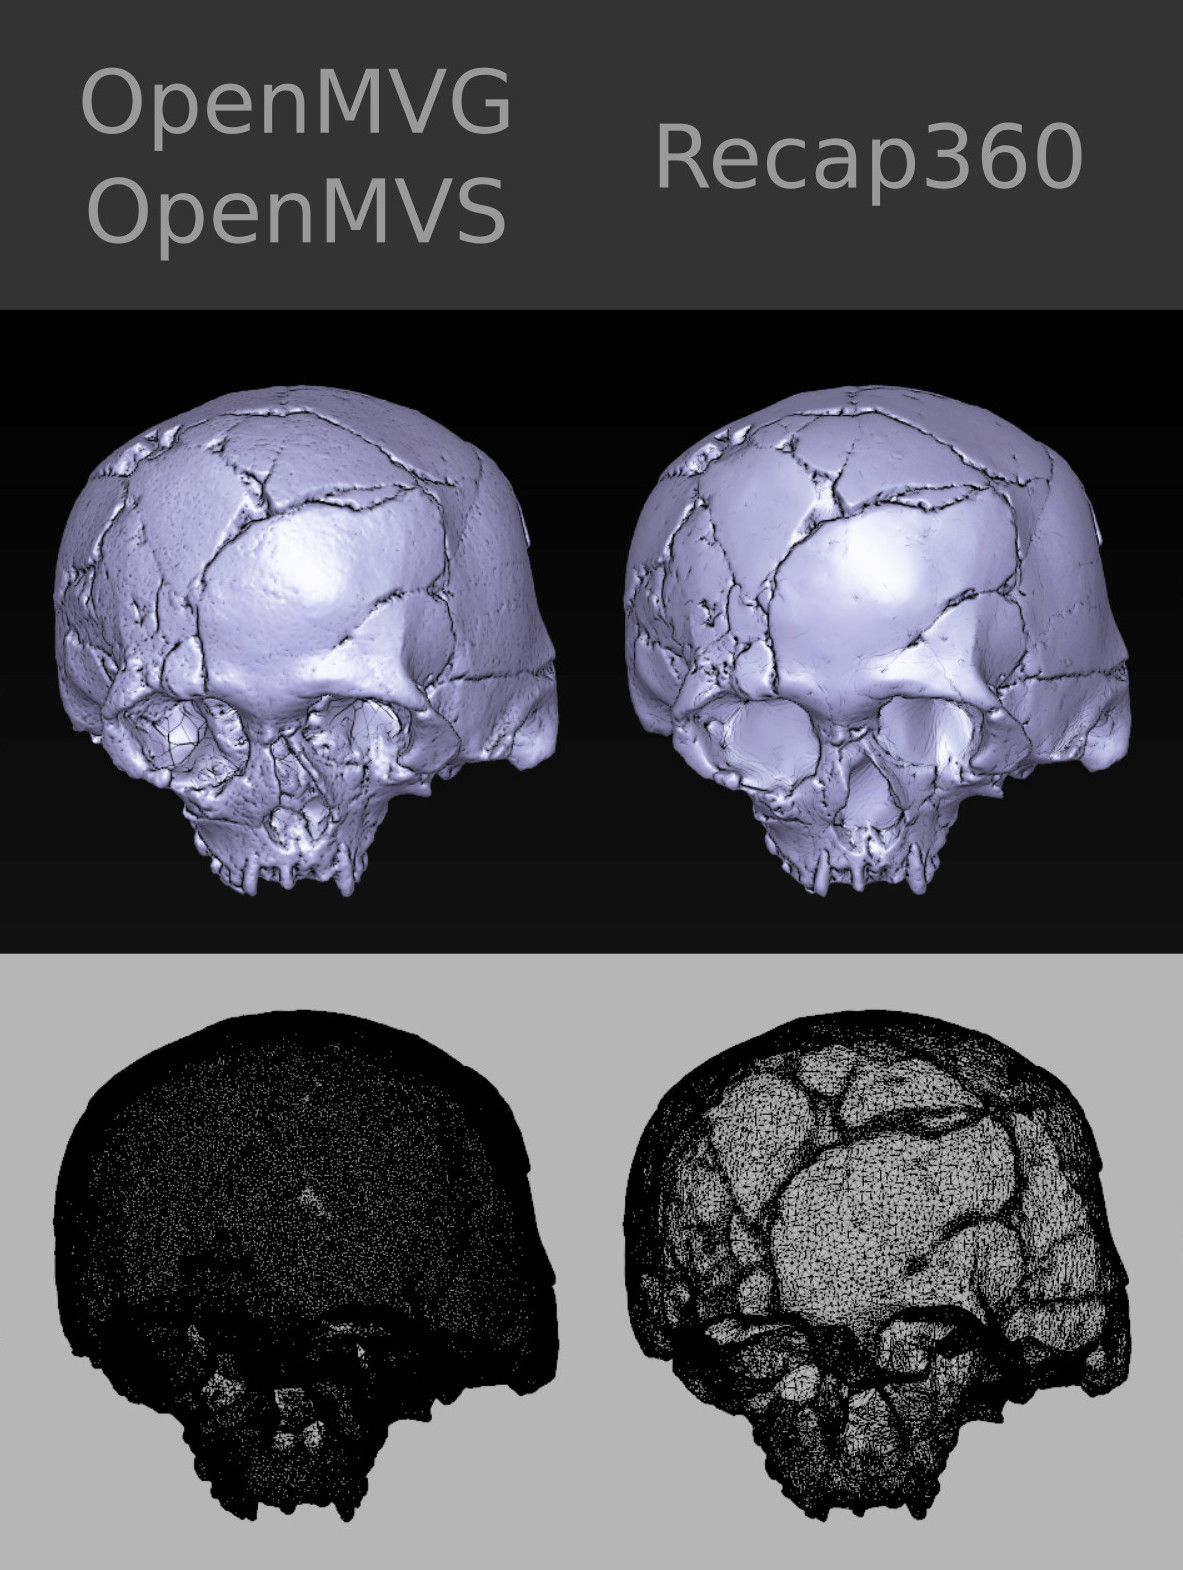
OpenMVG + OpenMVS
OpenMVG + PMVS
Photoscan

MVE
Recap 360

123D Catch
Ppt-gui

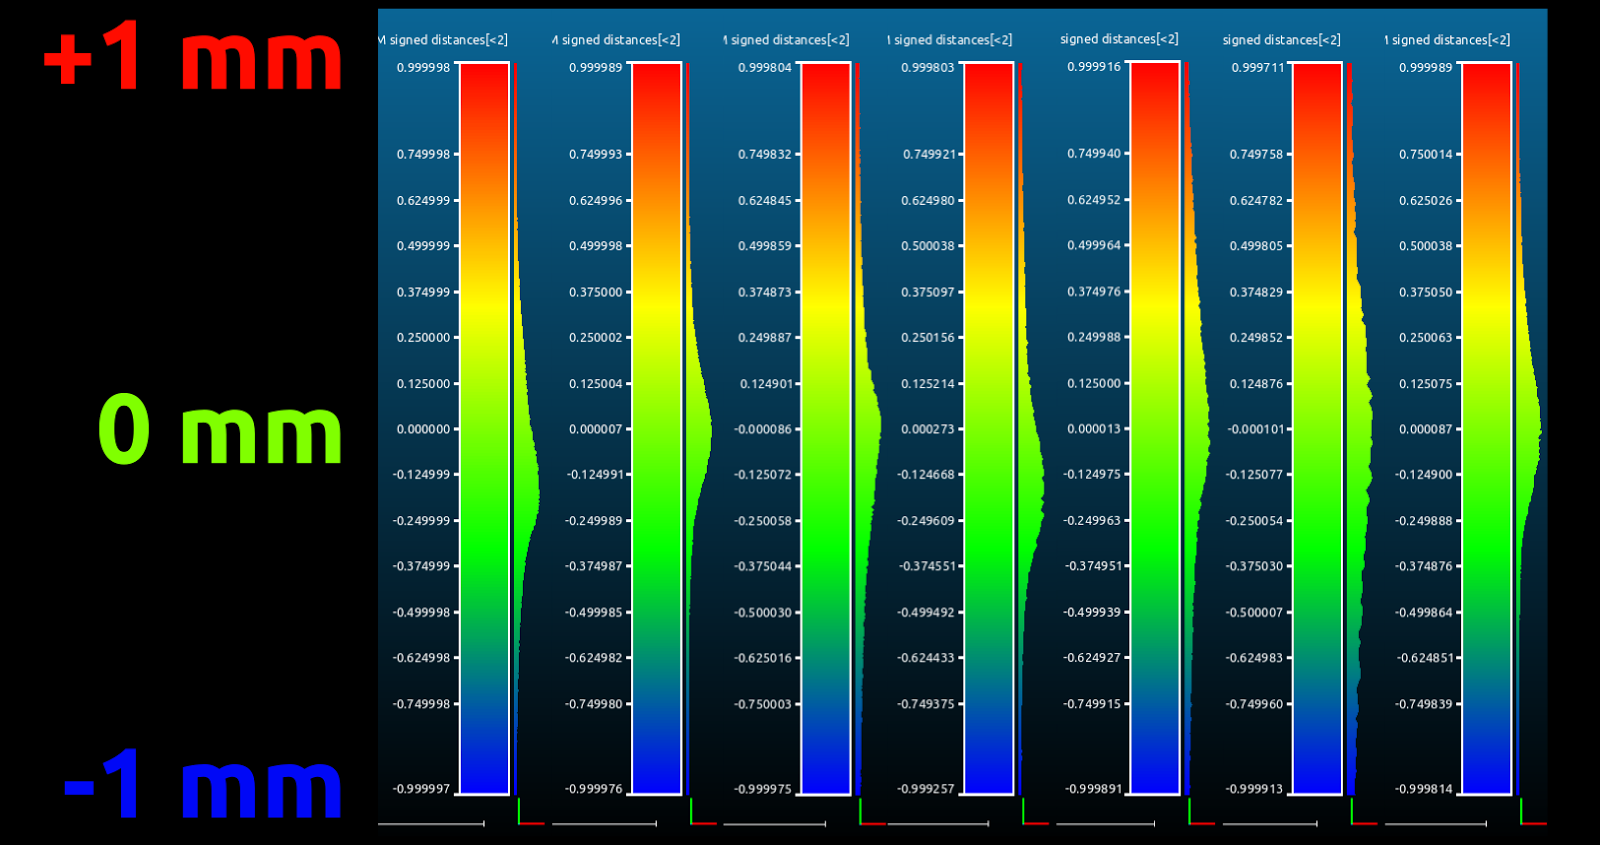
By putting everything in comparison, we see that there is a strong tendency to reduce the error to zero. All seven photogrammetry systems are effectively aligned with laser scanning!
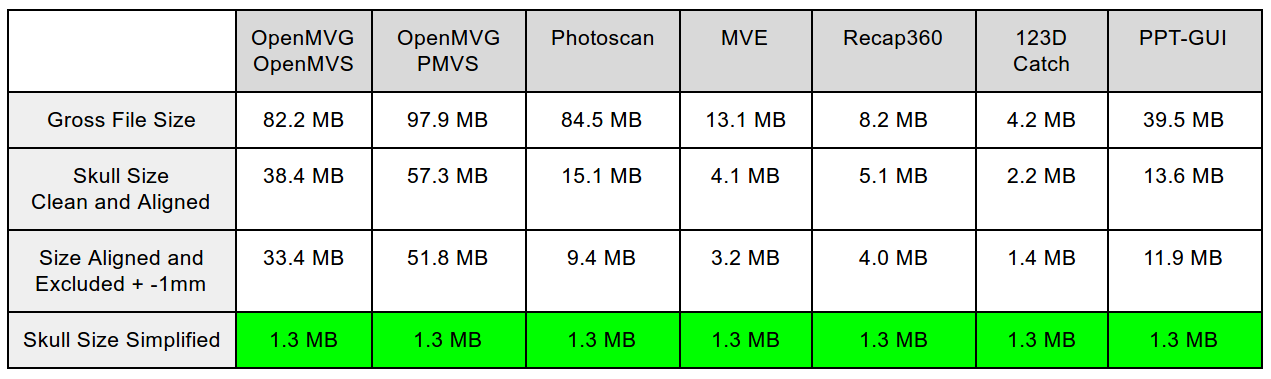
We now turn to the question of the size of files. One thing that always bothered me in comparison with photogrammetry results was the consideration of polygons generated by the grid reconstruction algorithm. As I said above, this does not make much sense, since in the case of the skull we can simplify the surface and nevertheless it retains the information necessary for work during the anthropological examination and forensic reconstruction of a person.
In light of this, I decided to align all the files, leaving them compatible in size and polygons. To do this, I took as a basis the smaller file size that 123D Catch generates and used the MeshLab Quadratic Edge Collapse Detection filter to 25,000. This made 7 STL files of 1.3 MB each.
With this alignment, we have a fair comparison between photogrammetry systems.
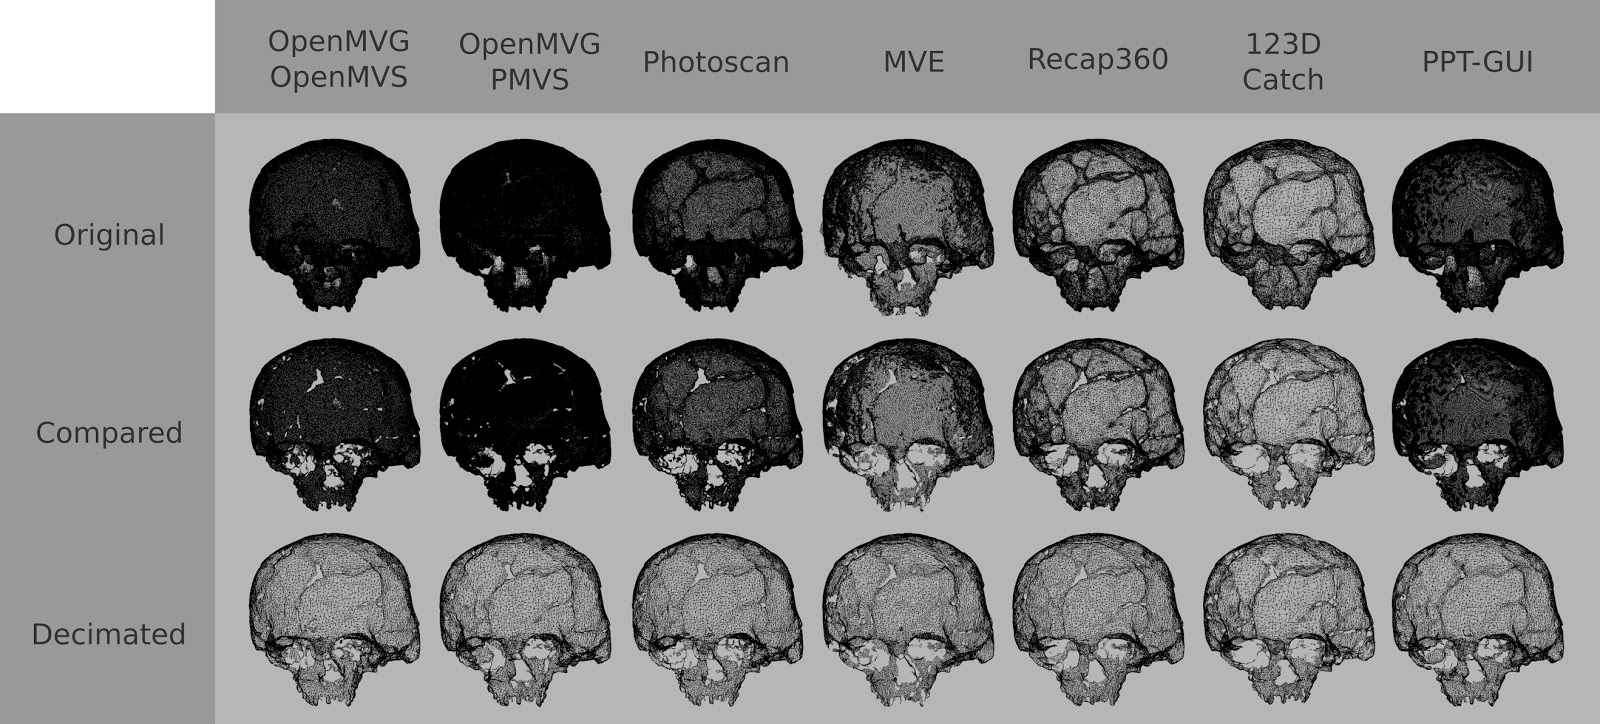
Above we can visualize the stages of work. In Original, the skulls are laid, aligned initially. Then in Compared, we only see areas of interest in the skull, and finally, in Decimated, we have skulls aligned in size. For an unsuspecting reader, this seems to be one image placed side by side.
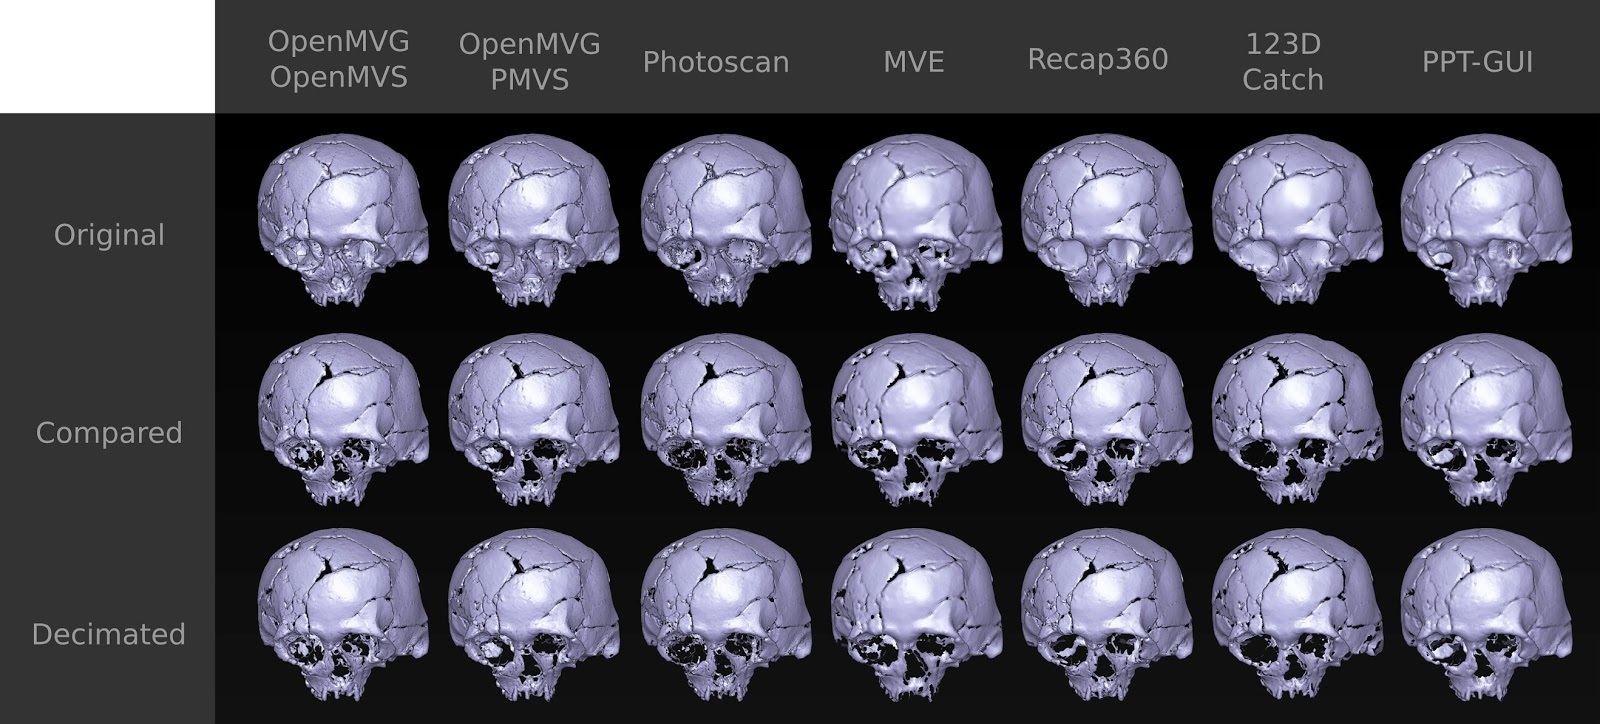
When we imagine the comparison in the "solid" model, we understand how all of them are compatible. Now let's get to the conclusions.
findings
The most obvious conclusion is that all programs, with the exception of MVE, showed smaller definitions in the grid, and all photogrammetry systems had very similar visual results.
Does this mean that MVE is inferior to others?
No, quite the opposite. MVE is a very reliable and practical system. In another embodiment, I will present its use in the case of the manufacture of a prosthesis with millimeter quality. In addition to this occasion, it was also used in other projects that make prosthetics, and this is an area that requires great precision, and it was successful. Case was even published on the official website of Darmstadt University , the institute that develops it.
Which photogrammetry system is the best?
It is very difficult to answer this question, because a lot depends on the user style.
Which system is best for beginners?
Undoubtedly, this is Autodesk Recap 360. This is an online platform that can be accessed from any operating system that has an Internet browser that supports WebGL. I have already tested directly on the smartphone, and it worked. In the courses that I conducted on photogrammetry, I used this solution more and more, because students tend to understand the process much faster than other options.
What is the best system for modeling and animation for professionals?
I would like to point at Agisoft PhotoScan. It has a graphical interface that allows, among other things, to create masks in the area of interest for photogrammetry, and also allows you to limit the area of calculation, which dramatically reduces the processing time on the machine. In addition, it exports in a wide variety of formats, offering the opportunity to show where the cameras were while photographing the scene.
Which system do you like the most?
Well, personally, I appreciate everything in certain situations. My favorite mix for today is OpenMVG + OpenMVS. Both are open and can be accessed using the command line, which allows me to control a number of properties, adjusting the scanning process if necessary, whether it be a reconstruction of a face, a skull or any other piece. Although I like this solution very much, it has some problems, such as not combining cameras with respect to models, when rare clouds of a scene are imported into Blender. To solve this problem, I use PPT-GUI, which generates a rarefied cloud from the Bundler and matches, that is, it aligns the cameras with the cloud more accurately. Another problem associated with OpenMVG + OpenMVS is that it ultimately does not create a full dense cloud, even if sparse data shows that all cameras are aligned. To solve this problem, I use PMVS, which, although it generates less dense grids than OpenMVS, it is very reliable and works in almost all cases. Another problem with open source options is the need to compile programs. Everything works very well on my computers, but when I have to transfer the solutions to students or those interested, it becomes a big headache. For the end user, it is important to have software in which images are loaded on one side, and on the other side a 3D model is obtained and this is offered by patented solutions. In addition, the licenses of the models obtained are more understandable in these applications, and I feel safer in the field of professional modeling than, for example, using the templates generated in PhotoScan. Technically, you pay for the license and can generate templates at will, using them in your work. So, this solution is similar to Autodesk solutions.
Source: https://habr.com/ru/post/320766/
All Articles