OSSI and Avaya Communication Manager
In this article I will try to tell you in detail about using the OSSI protocol to interact with the Avaya Communication Manager PBX. There is very little information on this topic in the public domain, and in the Russian segment everything is limited to a superficial article on Habré for 2013. It is necessary to eliminate this injustice.
The OSSI (Operations Support Systems Interface) protocol is used in Avaya products to interface various optional modules with the main PBX module, in this case Communication Manager. It can be accessed by simply selecting the correct terminal type while connecting to the server.
Two types of terminal deserve attention: ossi and ossimt . The first type is used to work directly with CM, receiving information and making changes to the configuration of the PBX. The second type is used to match the field identifier used in the first type with its actual purpose. This is necessary because In different versions of CM, different identifiers are used and in advance to find out what is impossible.
Standard output terminal ossi:
')

This type is characterized by the fact that the characters typed in the terminal are not displayed or deleted.
Standard output terminal ossimt:
Protocol interaction is performed by passing strings of a certain type. The type of the string is determined by the pointer being substituted at the beginning of the string. A list of these pointers:
Input and output of information in the terminal is in the following format:
Those. each line ends with a newline character (pressing Enter) and inside lines of type field and data, the elements are separated by a tab character (pressing Tab).
Let's take a closer look at the first 3 types of lines:
This line should contain the command to execute. In general, the commands are identical to the commands used in standard terminal administration. You can call the entire list of available commands by typing:
This line lists the field IDs for the entered command. The separation between the fields is a tab character. These identifiers are written in HEX-format and in order to understand which field corresponds to which, it is necessary to contact ossimt . There may be several lines of this type, depending on the amount of information transmitted by the command.
This line lists the data corresponding to the corresponding fields specified in the line of the previous type. Data is also separated by tabulation. Note that the number of lines of this type must be a multiple of the number of lines of type field.
Strings of type field and data are mainly used when displaying information after entering a command, but in addition they can be used when making changes to the system (eg change station XXXX ), or outputting a command that accepts additional parameters (eg display alarms ). It is enough only after the command line to add these lines, indicating in them the appropriate fields and data that you want to change.
For example, typing in the terminal:
We will change the display name to IC Wiener for extension 1000.
Strictly speaking, there are several ossi terminals. I know at least 3: ossi , ossi3 , ossis . There is no particular difference between them. Of the visible features, only that ossis does not return a string with the command itself when displaying the result of a command.
All described, of course, well. But how can this protocol be used for good? Well, for example, you can do some kind of monitoring. Consider for example the monitoring of media gateways.
This will help us to the usual command status media-gateways and Python.
Step 1: connect and get information.
Now we have information in the form of a line with which we can create anything.
Step 2: Parse the received information.
We need to divide the available information depending on the types of lines indicated above. Since the number of lines of one type can be several, we need to take into account their sequence.
As a result of these actions, we obtain the following variable parse:
Step 3: match the fields and data.
Finally, we need to map the field ID to a specific value from the data.
As a result, we obtain a dictionary in which the identifier of the field is in the key, and the value corresponds to the data corresponding to this field.
Final: PROFIT
So, we have a dictionary in which there is all the information on the status of media gateways. We can only find out what the identifier that means. This is done, as we remember, with the help of ossimt . For example, the fields major alarms , minor alarms , and warnings correspond to the identifiers 6c02ff00 , 6c03ff00 , 6c04ff00 . We look for them in our dictionary and we understand that we do not have a single serious error and “only” 40 warnings. You can live.
After a little work with the received data, you can get quite suitable monitoring of media gateways available directly from the terminal. For example, we can get the following picture:
And if not lucky, then this:
For convenience, I developed a small class for working with this protocol, you can see it here .
Theory
The OSSI (Operations Support Systems Interface) protocol is used in Avaya products to interface various optional modules with the main PBX module, in this case Communication Manager. It can be accessed by simply selecting the correct terminal type while connecting to the server.
Two types of terminal deserve attention: ossi and ossimt . The first type is used to work directly with CM, receiving information and making changes to the configuration of the PBX. The second type is used to match the field identifier used in the first type with its actual purpose. This is necessary because In different versions of CM, different identifiers are used and in advance to find out what is impossible.
Standard output terminal ossi:
')
This type is characterized by the fact that the characters typed in the terminal are not displayed or deleted.
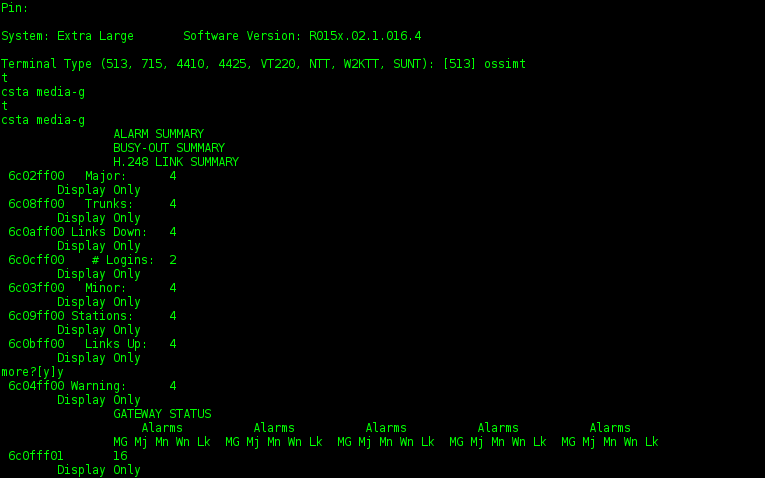
Standard output terminal ossimt:
Protocol interaction is performed by passing strings of a certain type. The type of the string is determined by the pointer being substituted at the beginning of the string. A list of these pointers:
- c (command) - pointer to the string containing the executable command;
- f (field) is a pointer to a string containing field identifiers;
- d (data) - pointer to the string containing the data, in accordance with the field;
- e (error) - pointer to the string containing the error message;
- t (terminate) - pointer to the end of input / output information
Input and output of information in the terminal is in the following format:
<>[RETURN]
f< 1>[TAB]< 2>[TAB]< 3>[RETURN]
d< 1>[TAB]< 2>[TAB]< 3>[RETURN]
t[RETURN]
Those. each line ends with a newline character (pressing Enter) and inside lines of type field and data, the elements are separated by a tab character (pressing Tab).
Let's take a closer look at the first 3 types of lines:
c (command)
This line should contain the command to execute. In general, the commands are identical to the commands used in standard terminal administration. You can call the entire list of available commands by typing:
chelp
t
f (field)
This line lists the field IDs for the entered command. The separation between the fields is a tab character. These identifiers are written in HEX-format and in order to understand which field corresponds to which, it is necessary to contact ossimt . There may be several lines of this type, depending on the amount of information transmitted by the command.
d (data)
This line lists the data corresponding to the corresponding fields specified in the line of the previous type. Data is also separated by tabulation. Note that the number of lines of this type must be a multiple of the number of lines of type field.
Strings of type field and data are mainly used when displaying information after entering a command, but in addition they can be used when making changes to the system (eg change station XXXX ), or outputting a command that accepts additional parameters (eg display alarms ). It is enough only after the command line to add these lines, indicating in them the appropriate fields and data that you want to change.
For example, typing in the terminal:
cha st 1000
f8003ff00
dI.C. Wiener
t
We will change the display name to IC Wiener for extension 1000.
Strictly speaking, there are several ossi terminals. I know at least 3: ossi , ossi3 , ossis . There is no particular difference between them. Of the visible features, only that ossis does not return a string with the command itself when displaying the result of a command.
Practice
All described, of course, well. But how can this protocol be used for good? Well, for example, you can do some kind of monitoring. Consider for example the monitoring of media gateways.
This will help us to the usual command status media-gateways and Python.
Step 1: connect and get information.
import telnetlib tn = telnetlib.Telnet('127.0.0.1', '5023') # 5023 tn.read_until('login'.encode()) # tn.write('username\n'.encode()) tn.read_until('Password'.encode()) # tn.write('password\n'.encode()) tn.read_until('Pin'.encode()) # - tn.write('pin\n'.encode()) tn.read_until('Terminal'.encode()) # tn.write('ossi\n'.encode()) tn.read_until('t\n'.encode()) # \ # , tn.write('csta media-g\n'.encode()) # command tn.write('t\n'.encode()) # terminate output = tn.read_until('t\n'.encode()) # , terminate. output = output.decode('utf-8') # Now we have information in the form of a line with which we can create anything.
output
'\ncsta media-g\nf6c02ff00\t6c08ff00\t6c0aff00\t6c0cff00\t6c03ff00\nf6c09ff00\t6c0bff00\t6c04ff00\t6c0fff01\t6c0fff02\nf6c0fff03\t6c0fff04\t6c0fff05\t6c0fff06\t6c0fff07\nf6c0fff08\t6c10ff09\t6c10ff0a\t6c10ff0b\t6c10ff0c\nf6c10ff0d\t6c10ff0e\t6c10ff0f\t6c10ff10\t6c11ff11\nf6c11ff12\t6c11ff13\t6c11ff14\t6c11ff15\t6c11ff16\nf6c11ff17\t6c11ff18\t6c12ff19\t6c12ff1a\t6c12ff1b\nf6c12ff1c\t6c12ff1d\t6c12ff1e\t6c12ff1f\t6c12ff20\nf6c13ff21\t6c13ff22\t6c13ff23\t6c13ff24\t6c13ff25\nf6c13ff26\t6c13ff27\t6c13ff28\nd0\t0\t0\t01\t0\nd0\t26\t40\t2 0| 0| 3|up\t5 0| 0| 2|up\nd8 0| 0| 3|up\t9 0| 0| 5|up\t10 0| 0| 3|up\t11 0| 0| 3|up\t12 0| 0| 1|up\nd13 0| 0| 0|up\t14 0| 0| 1|up\t15 0| 0| 0|up\t16 0| 0| 3|up\t180| 0| 0|up\nd19 0| 0| 0|up\t21 0| 0| 0|up\t22 0| 0| 0|up\t23 0| 0| 4|up\t24 0| 0| 1|up\nd25 0| 0| 1|up\t26 0| 0| 0|up\t27 0| 0| 0|up\t28 0| 0| 1|up\t29 0| 0| 1|up\nd30 0| 0| 1|up\t33 0| 0| 1|up\t34 0| 0| 5|up\t37 0| 0| 1|up\t\nd\t\t\t\t\nd\t\t\t\t\nd\t\t\nt\n' Step 2: Parse the received information.
We need to divide the available information depending on the types of lines indicated above. Since the number of lines of one type can be several, we need to take into account their sequence.
fields = {} # data = {} # lines = output.split('\n') # for line in lines: # if line.startswith('d'): # data data.update({ len(data): line[1:] # }) elif line.startswith('f'): # field fields.update({ len(fields): line[1:] }) elif line.startswith('t'): # terminate break else: # pass parse = { 'fields': fields, 'data': data, } As a result of these actions, we obtain the following variable parse:
parse
{ 'fields': { 0: '6c02ff00\t6c08ff00\t6c0aff00\t6c0cff00\t6c03ff00', 1: '6c09ff00\t6c0bff00\t6c04ff00\t6c0fff01\t6c0fff02', 2: '6c0fff03\t6c0fff04\t6c0fff05\t6c0fff06\t6c0fff07', 3: '6c0fff08\t6c10ff09\t6c10ff0a\t6c10ff0b\t6c10ff0c', 4: '6c10ff0d\t6c10ff0e\t6c10ff0f\t6c10ff10\t6c11ff11', 5: '6c11ff12\t6c11ff13\t6c11ff14\t6c11ff15\t6c11ff16', 6: '6c11ff17\t6c11ff18\t6c12ff19\t6c12ff1a\t6c12ff1b', 7: '6c12ff1c\t6c12ff1d\t6c12ff1e\t6c12ff1f\t6c12ff20', 8: '6c13ff21\t6c13ff22\t6c13ff23\t6c13ff24\t6c13ff25', 9: '6c13ff26\t6c13ff27\t6c13ff28' }, 'data': { 0: '0\t0\t0\t01\t0', 1: '0\t26\t40\t2 0| 0| 3|up\t5 0| 0| 2|up', 2: '8 0| 0| 3|up\t9 0|0| 5|up\t10 0| 0| 3|up\t11 0| 0| 3|up\t12 0| 0| 1|up', 3: '13 0| 0| 0|up\t14 0| 0| 1|up\t15 0| 0| 0|up\t16 0| 0| 3|up\t18 0| 0| 0|up', 4: '19 0| 0| 0|up\t21 0| 0| 0|up\t22 0| 0| 0|up\t23 0| 0| 4|up\t24 0| 0| 1|up', 5: '25 0| 0| 1|up\t26 0| 0| 0|up\t27 0| 0| 0|up\t28 0| 0| 1|up\t29 0| 0|1|up', 6: '30 0| 0| 1|up\t33 0| 0| 1|up\t34 0| 0| 5|up\t37 0| 0| 1|up\t', 7: '\t\t\t\t', 8: '\t\t\t\t', 9: '\t\t' } } Step 3: match the fields and data.
Finally, we need to map the field ID to a specific value from the data.
result = {} # for i in range(len(parse['fields'])): # fids = parse['fields'][i].split('\t') # data = parse['data'][i].split('\t') for i in range(len(fids)): result.update({ fids[i]: data[i] # }) As a result, we obtain a dictionary in which the identifier of the field is in the key, and the value corresponds to the data corresponding to this field.
result
{ '6c10ff0e': '21 0| 0| 0|up', '6c11ff16': '29 0| 0| 1|up', '6c13ff22': '', '6c0fff01': '2 0| 0| 3|up', '6c10ff0c': '18 0| 0| 0|up', '6c11ff15': '28 0| 0| 1|up', '6c10ff0d': '19 0| 0| 0|up', '6c12ff20': '', '6c10ff09': '14 0| 0| 1|up', '6c0fff03': '8 0| 0| 3|up', '6c10ff0f': '22 0| 0| 0|up', '6c11ff14': '27 0| 0| 0|up', '6c04ff00': '40', '6c13ff26': '', '6c10ff0b': '16 0| 0| 3|up', '6c10ff0a': '15 0| 0| 0|up', '6c0fff08': '13 0| 0| 0|up', '6c13ff25': '', '6c0cff00': '01', '6c12ff1f': '', '6c11ff18': '33 0| 0| 1|up', '6c13ff27': '', '6c11ff12': '25 0| 0| 1|up', '6c0fff06': '11 0| 0| 3|up', '6c0bff00': '26', '6c03ff00': '0', '6c11ff11': '24 0| 0| 1|up', '6c0aff00': '0', '6c10ff10': '23 0| 0| 4|up', '6c13ff28': '', '6c0fff07': '12 0| 0| 1|up', '6c12ff1b': '', '6c02ff00': '0', '6c0fff05': '10 0| 0| 3|up', '6c13ff23': '', '6c12ff1e': '', '6c08ff00': '0', '6c12ff1d': '', '6c12ff1a': '37 0| 0| 1|up', '6c11ff13': '26 0| 0| 0|up', '6c12ff1c': '', '6c13ff24': '', '6c13ff21': '', '6c0fff02': '5 0| 0| 2|up', '6c09ff00': '0', '6c12ff19': '34 0| 0| 5|up', '6c0fff04': '9 0| 0| 5|up', '6c11ff17': '30 0| 0| 1|up' } Final: PROFIT
So, we have a dictionary in which there is all the information on the status of media gateways. We can only find out what the identifier that means. This is done, as we remember, with the help of ossimt . For example, the fields major alarms , minor alarms , and warnings correspond to the identifiers 6c02ff00 , 6c03ff00 , 6c04ff00 . We look for them in our dictionary and we understand that we do not have a single serious error and “only” 40 warnings. You can live.
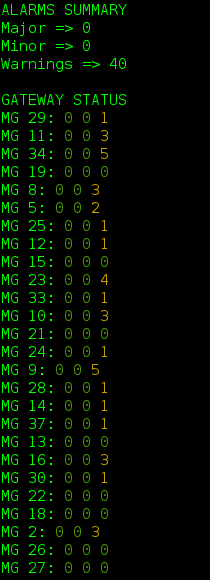
After a little work with the received data, you can get quite suitable monitoring of media gateways available directly from the terminal. For example, we can get the following picture:
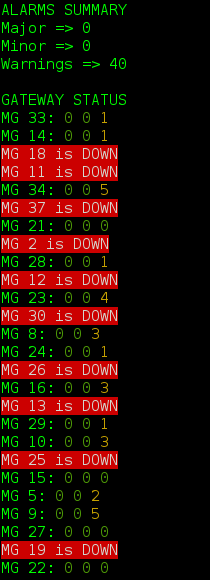
And if not lucky, then this:
For convenience, I developed a small class for working with this protocol, you can see it here .
Source: https://habr.com/ru/post/320596/
All Articles