How to establish a trust relationship between the computer and the main domain
Hello Dear Habrahabr readers! In the Internet, each of us can find a lot of separate articles about not going through computer authentication through a domain controller, more precisely, a computer connected to a domain loses connection with it.
So, we will start studying this problem.
Many IT engineers who work in large and small companies have computers with the Windows 7, 8.1 operating system, etc. and all these computers are connected to a domain network (DC).
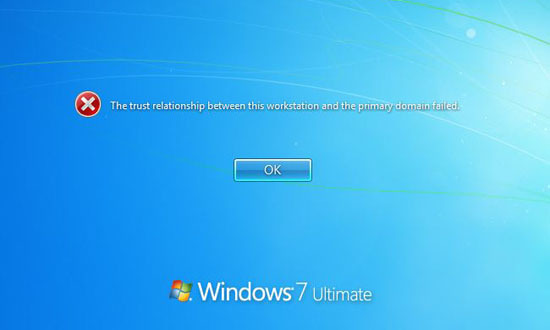
This problem occurs due to the fact that the Kerberos network protocol cannot synchronize and authenticate with the computer (which is connected to the domain). Then we can see such an error (see photo below).
')
After that, we search for a third-party program, download it, create a bootable USB flash drive and local admin, then log in through it and exit the domain, add the computer to the Workgroup and then connect this computer back to the domain.
Using Windows Batch scripting, I want to create a bat file and automate the process of creating and adding a local admin. The only thing we need is to run it after creating this file.
Open our text editor, enter the command shown below.
Let's go through all the teams on the points to eliminate unclear points.
• net user admin (instead of the word admin, you can add any name that suits you, the default is administrator, in my case it is admin).
Next we see the password that I put there Ww123456 (you can put any password that is remembered for you).
After we see / add / active: yes –add and activate: YES
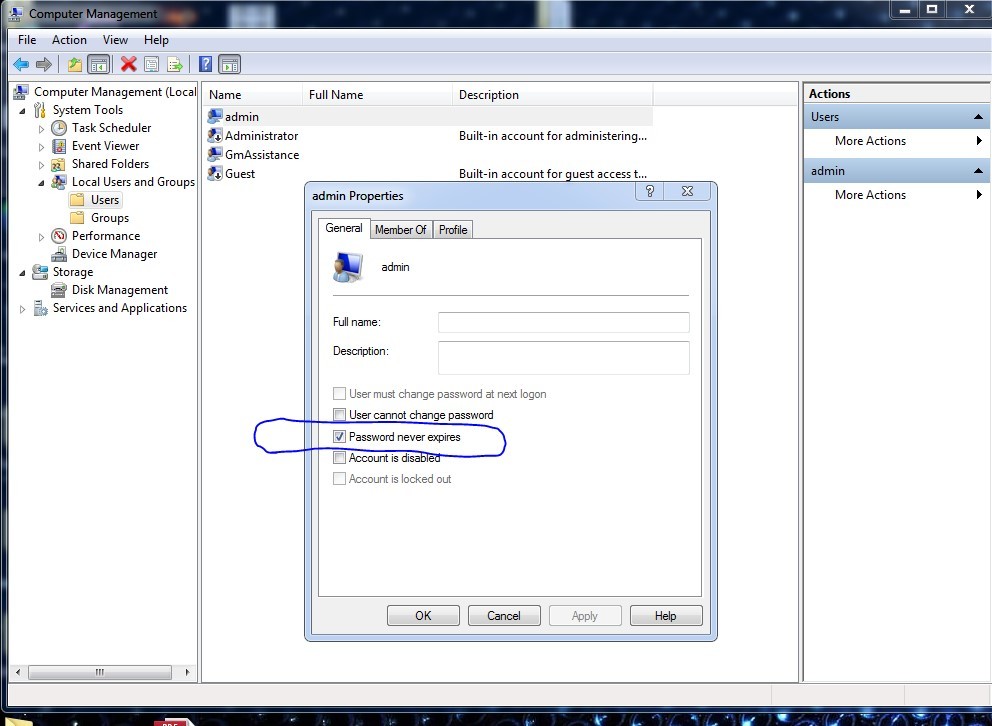
• WMIC USERACCOUNT WHERE "Name = 'admin'" SET PasswordExpires = FALSE - this command means that the admin that is added has a permanent password with no expiration date (see picture below).
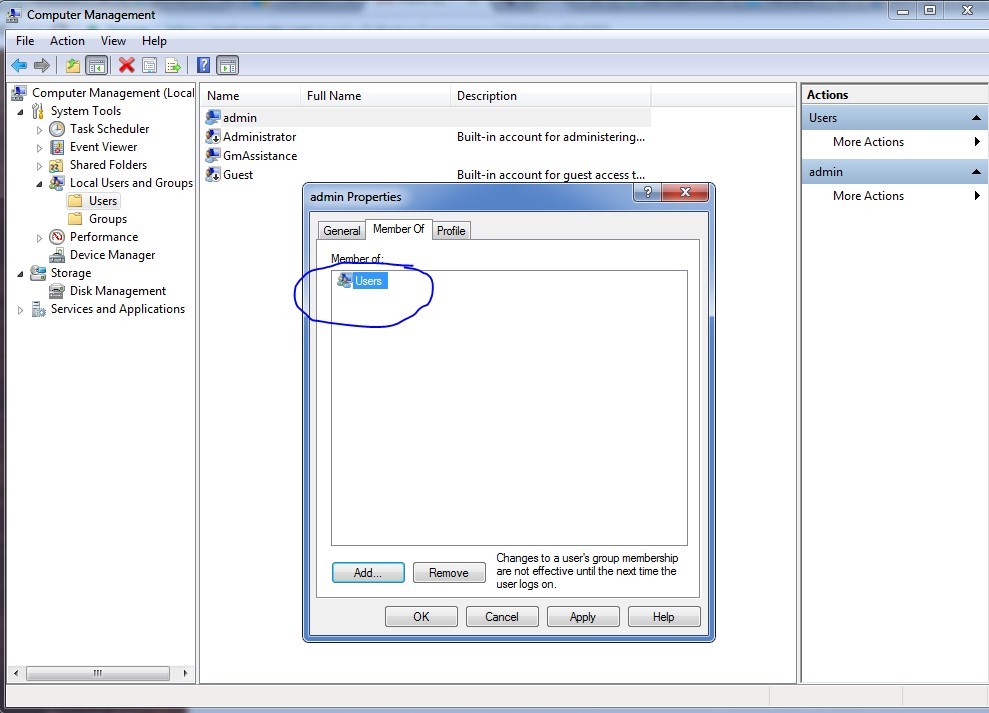
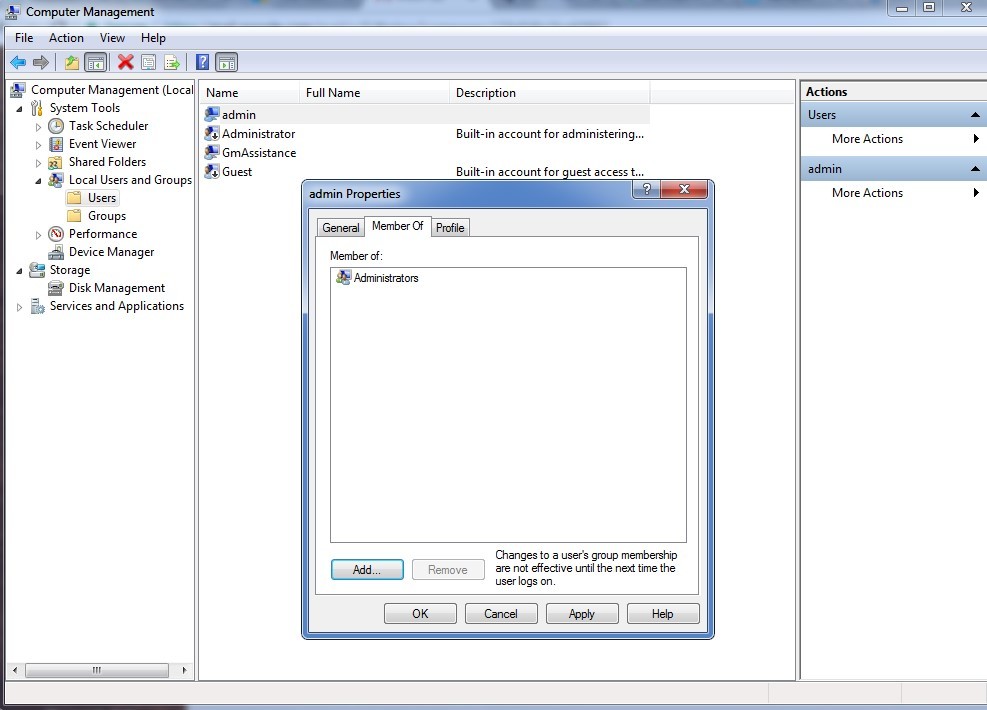
• The third and fourth paragraphs are interconnected by the fact that by default, when a local admin is created, the Member Of item is set to Users (see photo). We do not need it (Users), because we create a full-fledged administrator for our OS. Therefore, the fourth command, net localgroup Users admin / delete, deletes Users, and the previous command, net localgroup Administrators admin / add, adds an administrator (see photo).
• The last command, netsh advfirewall set allprofiles state off, disables the Windows firewall.
Sometimes, to install a program or give a command to the Windows-e, you need to disable the firewall (After running the script, you can enter the command-netsh advfirewall set allprofiles state on and re-enable it. I have off by default, because I'm using a third-party firewall. This is at the discretion of each person personally).
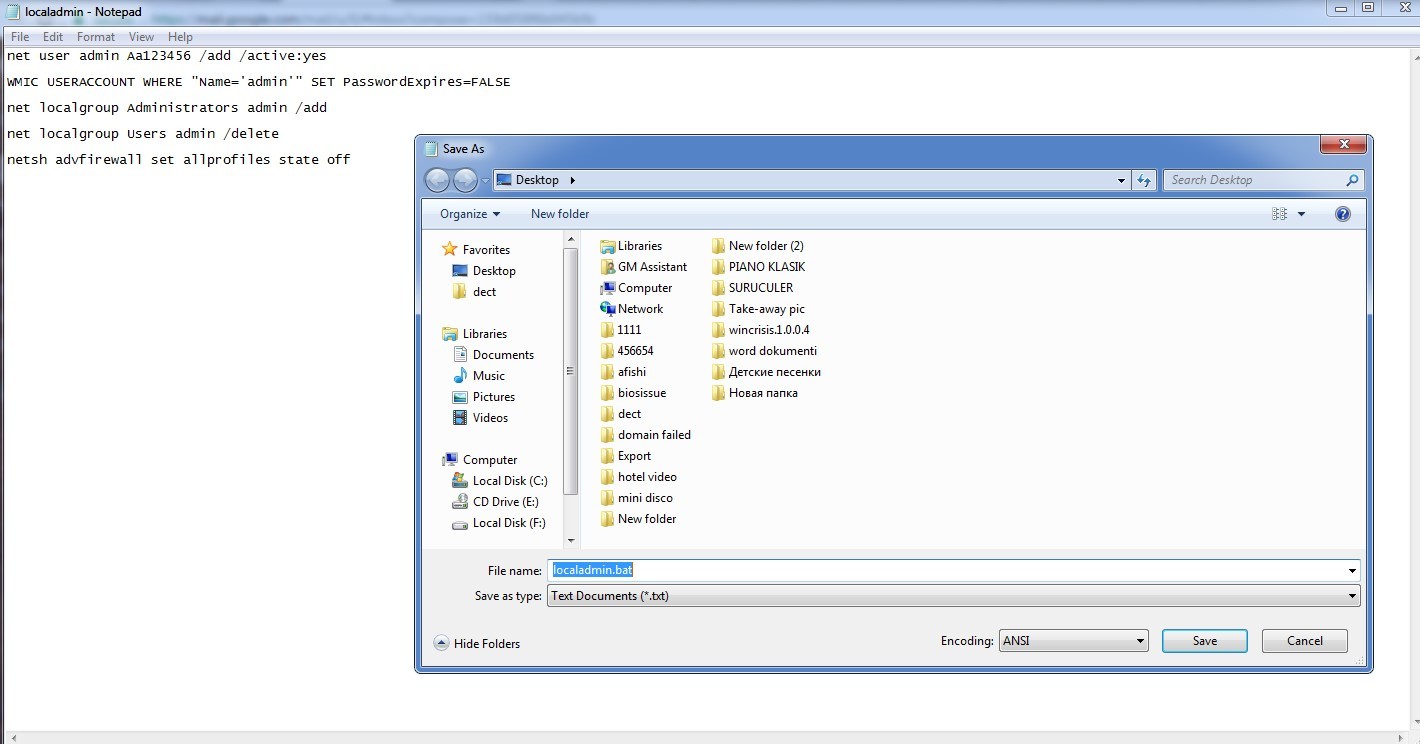
Next we go to our notebook, click File, save as ... (save as ...) enter the name of our script (in my case: localadmin). Then put a dot (.) And write the format of the bat script. Choose a place to save this entry and click save. Shown in more detail in the picture.
It turns out that such a script (see photo).

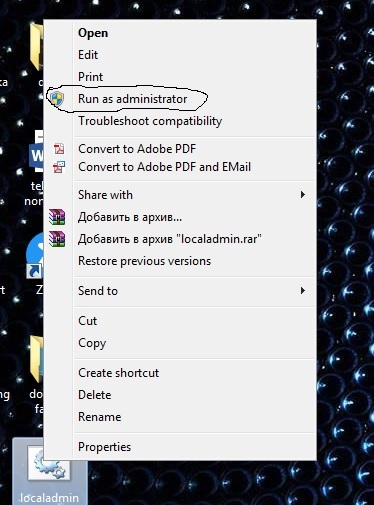
At startup, this script must be opened as an administrator:
• Press the right mouse button and Run as administrator (see photo).
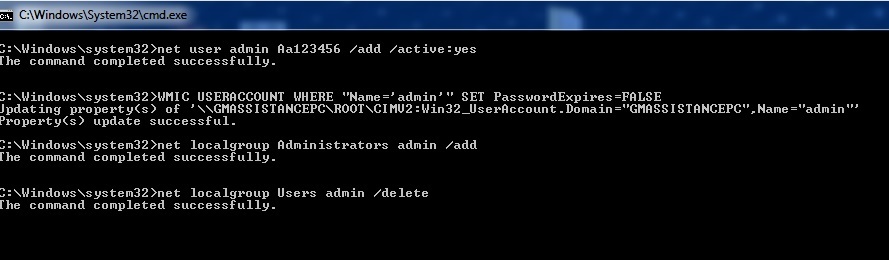
After launching the script, you should have this window (see photo).
If for any reason an error occurs, then in 90% of such cases this is due to the fact that your image from which you installed Windows is of an unlicensed nature, some kind of repack or the like. Download and use the licensed and proven software.
After successfully adding a local admin, you can run this script on all workstations in your office that have Windows installed.
If you ever get this error: The trust relationship you need only make the switch user and write the login where. \ Admin (remember! At the beginning, before the slash, the period is set!), Below enter the password you added to your script (in my case: Ww123456). After that you go to the working OS.
It remains to remove our computer from the domain and add it to the Workgroup. Instead of a Workgroup, we enter any letter (see photo).
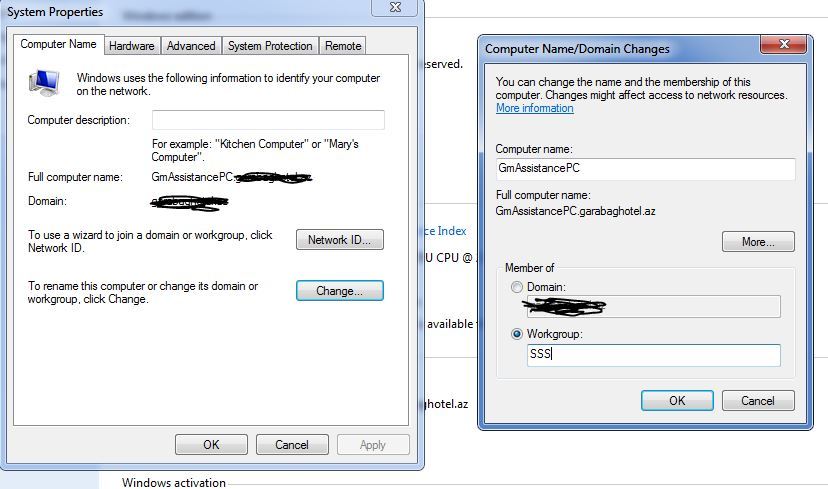
Next, enter the domain administrator password and the computer asks us to restart.
After the reboot, we go under our local admin again and then we add the computer to our domain. The system once again requires a reboot and Voila! Our User can again connect to the domain without any problems!
PS - This system also works for the server part of Windows, however, if you write such a script for servers after disabling the firewall, you will need to enable it again (before - netsh advfirewall set allprofiles state off, after netsh advfirewall set allprofiles state on).
Thank you for attention!
So, we will start studying this problem.
Many IT engineers who work in large and small companies have computers with the Windows 7, 8.1 operating system, etc. and all these computers are connected to a domain network (DC).
This problem occurs due to the fact that the Kerberos network protocol cannot synchronize and authenticate with the computer (which is connected to the domain). Then we can see such an error (see photo below).
')
After that, we search for a third-party program, download it, create a bootable USB flash drive and local admin, then log in through it and exit the domain, add the computer to the Workgroup and then connect this computer back to the domain.
Using Windows Batch scripting, I want to create a bat file and automate the process of creating and adding a local admin. The only thing we need is to run it after creating this file.
Open our text editor, enter the command shown below.
net user admin Ww123456 /add /active:yes WMIC USERACCOUNT WHERE "Name='admin'" SET PasswordExpires=FALSE net localgroup Administrators admin /add net localgroup Users admin /delete netsh advfirewall set allprofiles state off Let's go through all the teams on the points to eliminate unclear points.
• net user admin (instead of the word admin, you can add any name that suits you, the default is administrator, in my case it is admin).
Next we see the password that I put there Ww123456 (you can put any password that is remembered for you).
After we see / add / active: yes –add and activate: YES
• WMIC USERACCOUNT WHERE "Name = 'admin'" SET PasswordExpires = FALSE - this command means that the admin that is added has a permanent password with no expiration date (see picture below).
• The third and fourth paragraphs are interconnected by the fact that by default, when a local admin is created, the Member Of item is set to Users (see photo). We do not need it (Users), because we create a full-fledged administrator for our OS. Therefore, the fourth command, net localgroup Users admin / delete, deletes Users, and the previous command, net localgroup Administrators admin / add, adds an administrator (see photo).
• The last command, netsh advfirewall set allprofiles state off, disables the Windows firewall.
Sometimes, to install a program or give a command to the Windows-e, you need to disable the firewall (After running the script, you can enter the command-netsh advfirewall set allprofiles state on and re-enable it. I have off by default, because I'm using a third-party firewall. This is at the discretion of each person personally).
Next we go to our notebook, click File, save as ... (save as ...) enter the name of our script (in my case: localadmin). Then put a dot (.) And write the format of the bat script. Choose a place to save this entry and click save. Shown in more detail in the picture.
It turns out that such a script (see photo).
At startup, this script must be opened as an administrator:
• Press the right mouse button and Run as administrator (see photo).
After launching the script, you should have this window (see photo).
If for any reason an error occurs, then in 90% of such cases this is due to the fact that your image from which you installed Windows is of an unlicensed nature, some kind of repack or the like. Download and use the licensed and proven software.
After successfully adding a local admin, you can run this script on all workstations in your office that have Windows installed.
If you ever get this error: The trust relationship you need only make the switch user and write the login where. \ Admin (remember! At the beginning, before the slash, the period is set!), Below enter the password you added to your script (in my case: Ww123456). After that you go to the working OS.
It remains to remove our computer from the domain and add it to the Workgroup. Instead of a Workgroup, we enter any letter (see photo).
Next, enter the domain administrator password and the computer asks us to restart.
After the reboot, we go under our local admin again and then we add the computer to our domain. The system once again requires a reboot and Voila! Our User can again connect to the domain without any problems!
PS - This system also works for the server part of Windows, however, if you write such a script for servers after disabling the firewall, you will need to enable it again (before - netsh advfirewall set allprofiles state off, after netsh advfirewall set allprofiles state on).
Thank you for attention!
Source: https://habr.com/ru/post/320348/
All Articles