How to "make friends" Mitel SIP-DECT and Asterisk
This article will focus on installing the Mitel SIP-DECT system using the free IP-PBX Asterisk (v 11.2.1) as an office telephone exchange, although everything described below can equally apply to any IP PBX that supports standard SIP. We will not go into all the details of this solution, but will give a practical minimum how to configure the SIP-DECT system in the existing sip-infrastructure.
The advantages of the SIP-DECT technology from Mitel are that the DECT mobile communication subsystem is deployed on the basis of the existing SIP installation of any manufacturer - be it Mitel MX-One, Cisco Call Manger, IP-PBX Asterisk, and any other SIP-PBX that use to connect subscribers, as a protocol, open SIP.
In the infographic below, we see what the SIP-DECT solution consists of.
')
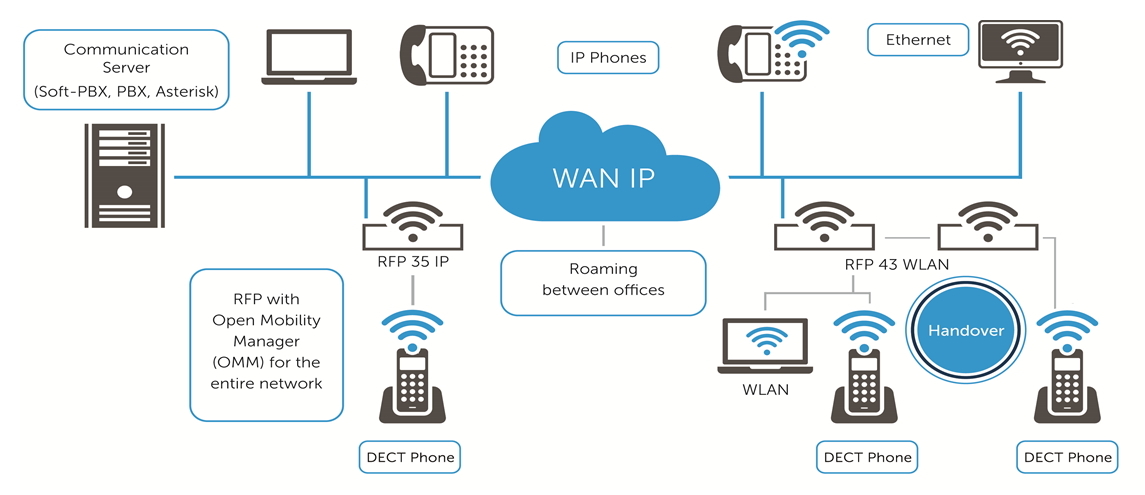
First of all it , of course, the SIP-DECT bases themselves, the so-called RFP (Radio Fixed Part), which can be installed both indoors and outdoors. In addition, the RFP 43IP model supports WLAN (802.11 a / b / g / n). All databases from the line have 8 conversational channels and several service channels for serving subscribers who have switched to this database during a handover.
From the point of view of mobility, in this configuration it is possible to use any DECT terminals of the GAP standard, and from the point of view of SIP-PBX, subscribers will be represented as ordinary SIP-subscribers. Thus, if everything is simplified, the SIP-DECT technology converts the voice flow in the DECT standard into IP packets of the SIP standard.
We have one SIP-DECT RFP 35IP base station, several Dect Mitel 612d terminals and, as mentioned above, IP-PBX Asterisk.
Scheme of communication, as follows.

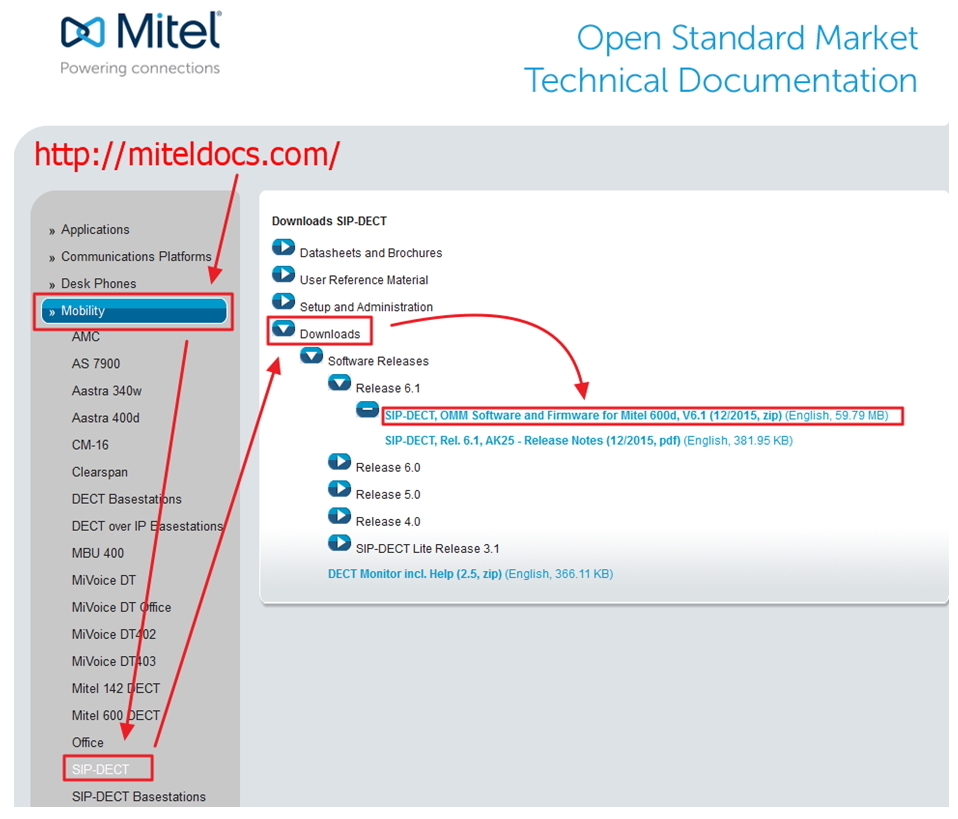
The first step is to set up the SIP-DECT system. Regardless of what type of base stations you use, the manufacturer always recommends that you first download the latest, current release of the OMM software from the vendor's website .
OMM (Open Mobility Manager) is a control system (software) of SIP-DECT. This software can be installed either on the base station itself (by default) or on a separate server running Linux or a virtual machine.
Here are the main documents to download:
After the zip-archive is unpacked, you will have several files at your disposal, the most important ones:
So, run the OM_Configuration.jar file, then click Scan.
The system offers us to get the current configuration of the system, after its detection, for which it is necessary to enter a login / password. By default, on the new RFP - login / password - omm / omm.
Important! In order for OM_Configuration to detect your RFP base, it must be included in the same subnet (located in the same broadcast domain) from the PC running the configurator.
Further, if the database is loaded, OM_Configuration works correctly and is detected, the MAC address of the RFP should be displayed on the screen. If this does not happen, then either the base station has not yet booted up, or it is faulty or is on a different subnet.
In this case, we see the MAC-address of the desired base station and network parameters.

We click on the desired database (in case there are more than one in the search list) to select it. Next, we configure the network parameters for the RFP, specifying the IP addresses for: the database itself, the network mask, the gateway, OMM, TFTP, etc.
It should be noted that if this database is configured as the main one, then the IP address and OMM IP address must match. If the base is “slave” in a cluster, then the address of the control base must be specified in the OMM IP address field. Do not forget to specify the DNS address, because Park-code will be received through the Mitel web-portal, directly from the interface of the base itself.
Another important feature is that you should have a TFTP server (TFTP server address) raised, which will contain the firmware files for updating the RFP software.
TFTP file name: iprfp3G.dnld (for RFP 35/36/37/43), iprfp2G.tftp (for RFP 32/34/42). After all the parameters are specified, click - Send config. Next, the database is rebooted and new software is loaded.

Now you can connect to the database via the web interface, using the IP address we specified above, and make sure which software version is installed.
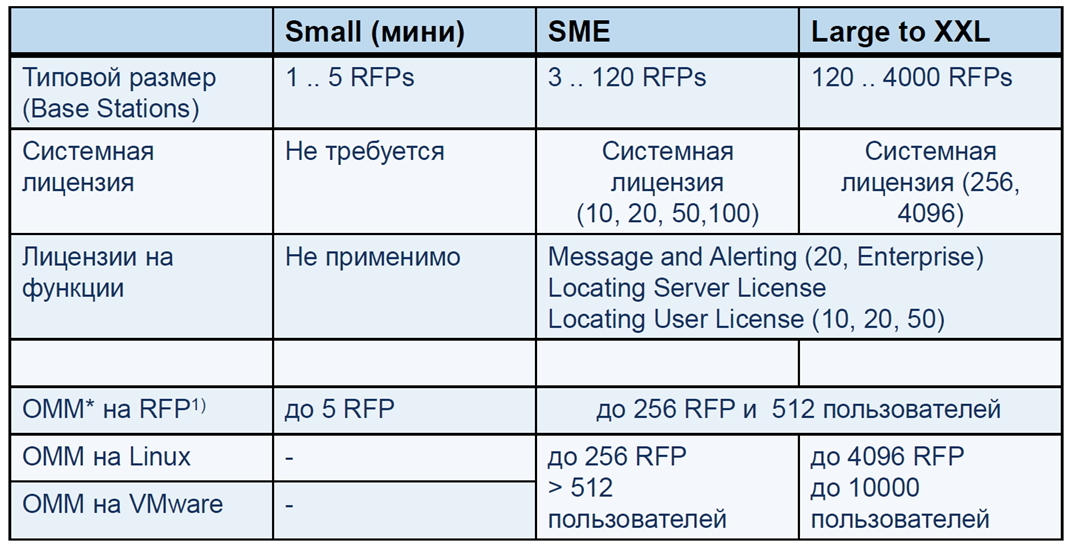
So, it is necessary to license the system: get the park code and download the license file (with more than 5 databases).
The licensing system for the SIP-DECT solution is shown below.
Go to the system settings section (System → System settings).
Specify the necessary system parameters:
Go to the SIP configuration (System → SIP). Here you need to specify the SIP server on which SIP-DECT subscribers will register. You can specify localhost - 127.0.0.1 (i.e., the base itself acts as a SIP server), which is enough to check the basic functionality of the system.

Let's move on to setting up a dect cluster (Base stations → New). Click New and add a new database.
In case everything is done correctly, you should see the following: Connected and Active will be active.

However, the following picture is often observed when there is no synchronization “over the air” between the bases. In this case, it is necessary to bring the bases closer to each other, so that they “see” between themselves, or, when this is not possible, spread the bases across different clusters. With this separation, the handover function disappears.

Now we will configure the DECT terminals in the section (System → DECT phones). Important! By default, the ability to register terminals in the system is disabled, it must be activated by clicking - Start in Subscription with configured IPEIs.
Now you can get new subscribers (mobile terminals) by clicking New. If the database itself is used as the SIP server, then the SIP authentication section can be left blank. When filling in, the entered data should correspond to the subscribers set up on the IP-PBX (user name and password).

And finally, for clarity, the screen settings from Asterisk.
The advantages of the SIP-DECT technology from Mitel are that the DECT mobile communication subsystem is deployed on the basis of the existing SIP installation of any manufacturer - be it Mitel MX-One, Cisco Call Manger, IP-PBX Asterisk, and any other SIP-PBX that use to connect subscribers, as a protocol, open SIP.
In the infographic below, we see what the SIP-DECT solution consists of.
')
First of all it , of course, the SIP-DECT bases themselves, the so-called RFP (Radio Fixed Part), which can be installed both indoors and outdoors. In addition, the RFP 43IP model supports WLAN (802.11 a / b / g / n). All databases from the line have 8 conversational channels and several service channels for serving subscribers who have switched to this database during a handover.
From the point of view of mobility, in this configuration it is possible to use any DECT terminals of the GAP standard, and from the point of view of SIP-PBX, subscribers will be represented as ordinary SIP-subscribers. Thus, if everything is simplified, the SIP-DECT technology converts the voice flow in the DECT standard into IP packets of the SIP standard.
SIP-DECT setup
We have one SIP-DECT RFP 35IP base station, several Dect Mitel 612d terminals and, as mentioned above, IP-PBX Asterisk.
Scheme of communication, as follows.
The first step is to set up the SIP-DECT system. Regardless of what type of base stations you use, the manufacturer always recommends that you first download the latest, current release of the OMM software from the vendor's website .
OMM (Open Mobility Manager) is a control system (software) of SIP-DECT. This software can be installed either on the base station itself (by default) or on a separate server running Linux or a virtual machine.
Here are the main documents to download:
- Release of the current version of SIP-DECT software - OMM Software and Firmware for Mitel 600d, V6.1 (12/2015, zip) (English, 59.79 MB)
- Instructions for configuration and configuration - SIP-DECT, Rel. 6.1, AK25 - Release Notes (12/2015, pdf) (English, 381.95 KB)
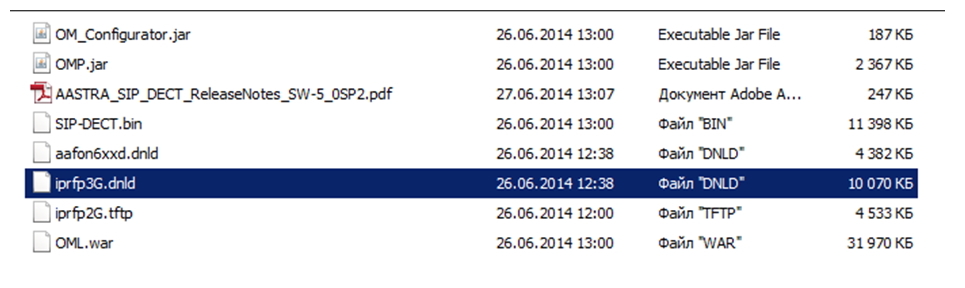
After the zip-archive is unpacked, you will have several files at your disposal, the most important ones:
- OM_Configuration.jar - Java application for initial setting up of base stations
- OMP.jar - Java application for configuring SIP-DECT systems (similar to the web-interface, but has more functionality)
- aafon6xxd.dnld - software file for downloading to Mitel 600d dect terminals
- iprfp3G.dnld - software file for downloading to RFP base stations (35/36/37/43)
- iprfp2G.tftp is a software file for downloading to previous generation RFP base stations (32/34/42).
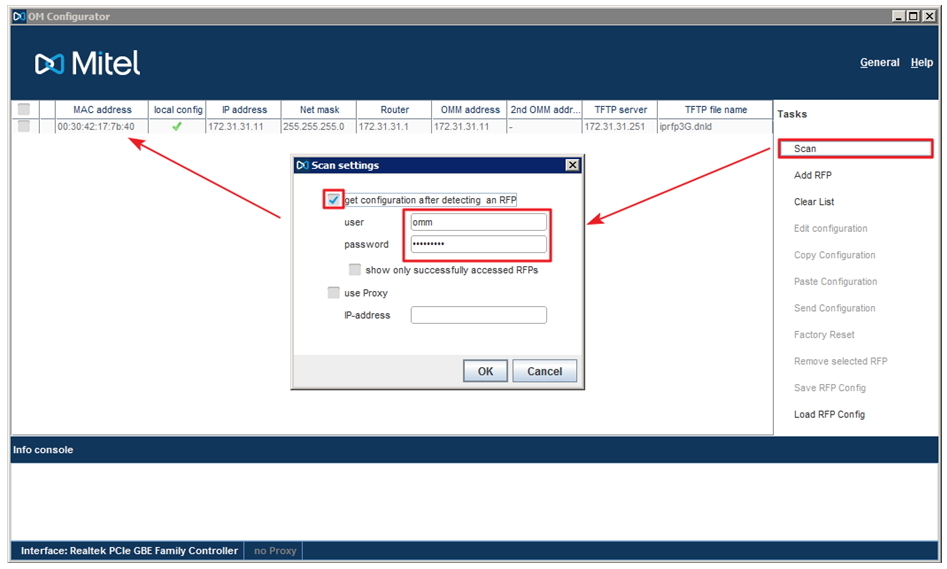
So, run the OM_Configuration.jar file, then click Scan.
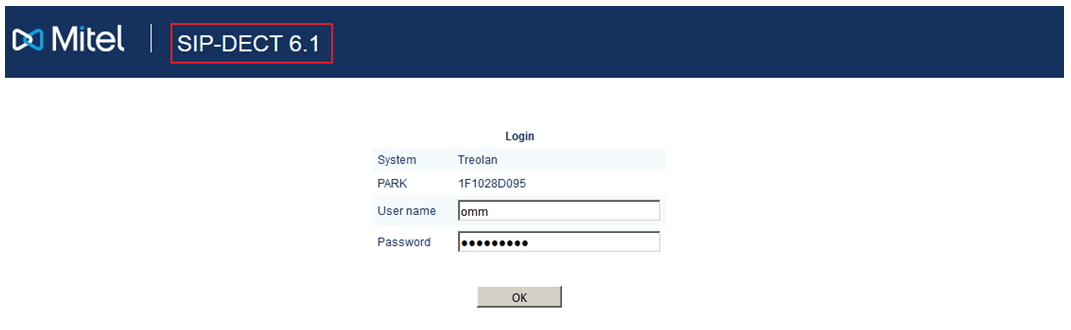
The system offers us to get the current configuration of the system, after its detection, for which it is necessary to enter a login / password. By default, on the new RFP - login / password - omm / omm.
Important! In order for OM_Configuration to detect your RFP base, it must be included in the same subnet (located in the same broadcast domain) from the PC running the configurator.
Further, if the database is loaded, OM_Configuration works correctly and is detected, the MAC address of the RFP should be displayed on the screen. If this does not happen, then either the base station has not yet booted up, or it is faulty or is on a different subnet.
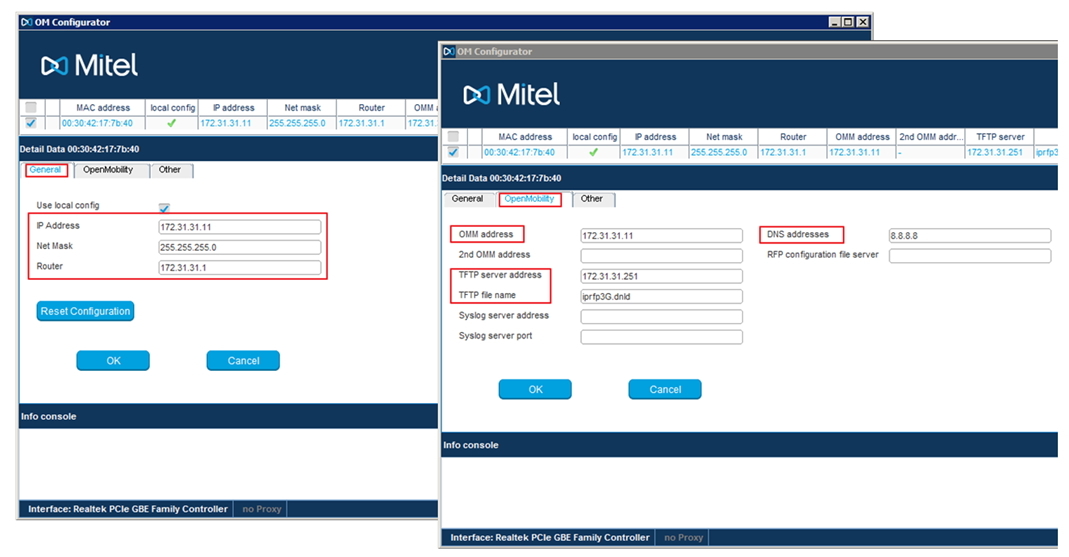
In this case, we see the MAC-address of the desired base station and network parameters.
We click on the desired database (in case there are more than one in the search list) to select it. Next, we configure the network parameters for the RFP, specifying the IP addresses for: the database itself, the network mask, the gateway, OMM, TFTP, etc.
It should be noted that if this database is configured as the main one, then the IP address and OMM IP address must match. If the base is “slave” in a cluster, then the address of the control base must be specified in the OMM IP address field. Do not forget to specify the DNS address, because Park-code will be received through the Mitel web-portal, directly from the interface of the base itself.
Another important feature is that you should have a TFTP server (TFTP server address) raised, which will contain the firmware files for updating the RFP software.
TFTP file name: iprfp3G.dnld (for RFP 35/36/37/43), iprfp2G.tftp (for RFP 32/34/42). After all the parameters are specified, click - Send config. Next, the database is rebooted and new software is loaded.
Web interface
Now you can connect to the database via the web interface, using the IP address we specified above, and make sure which software version is installed.
So, it is necessary to license the system: get the park code and download the license file (with more than 5 databases).
The licensing system for the SIP-DECT solution is shown below.
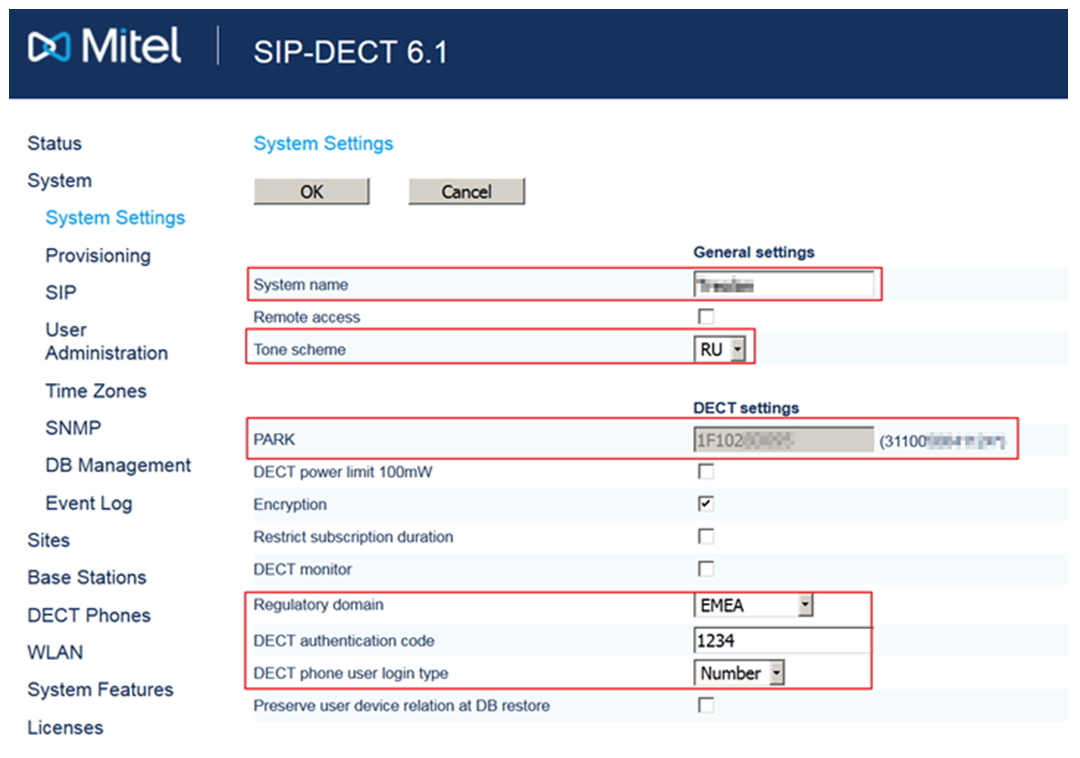
Go to the system settings section (System → System settings).
Specify the necessary system parameters:
- System name
- Tone scheme - RU
- PARK code
- Regulatory domain - EMEA
- DECT authentication code - 1234 (for terminal authorization)
- Portable part user login type - Number
- Regulatory domain (WLAN) - RU (for systems with Wi-Fi)
- Time zone
Go to the SIP configuration (System → SIP). Here you need to specify the SIP server on which SIP-DECT subscribers will register. You can specify localhost - 127.0.0.1 (i.e., the base itself acts as a SIP server), which is enough to check the basic functionality of the system.
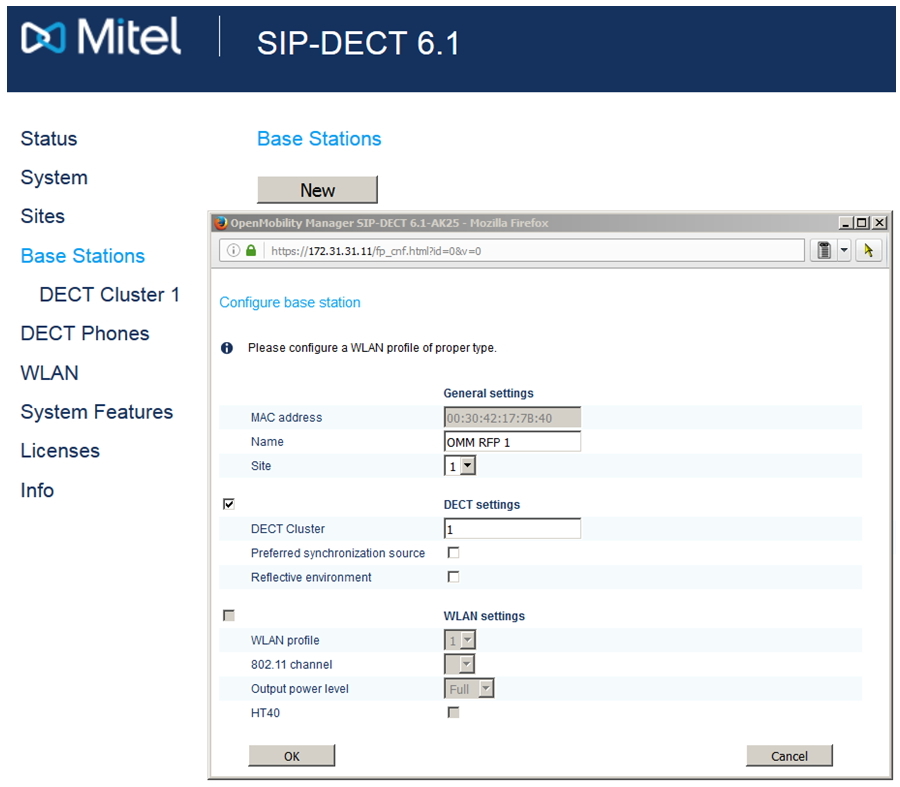
Let's move on to setting up a dect cluster (Base stations → New). Click New and add a new database.
In case everything is done correctly, you should see the following: Connected and Active will be active.
However, the following picture is often observed when there is no synchronization “over the air” between the bases. In this case, it is necessary to bring the bases closer to each other, so that they “see” between themselves, or, when this is not possible, spread the bases across different clusters. With this separation, the handover function disappears.
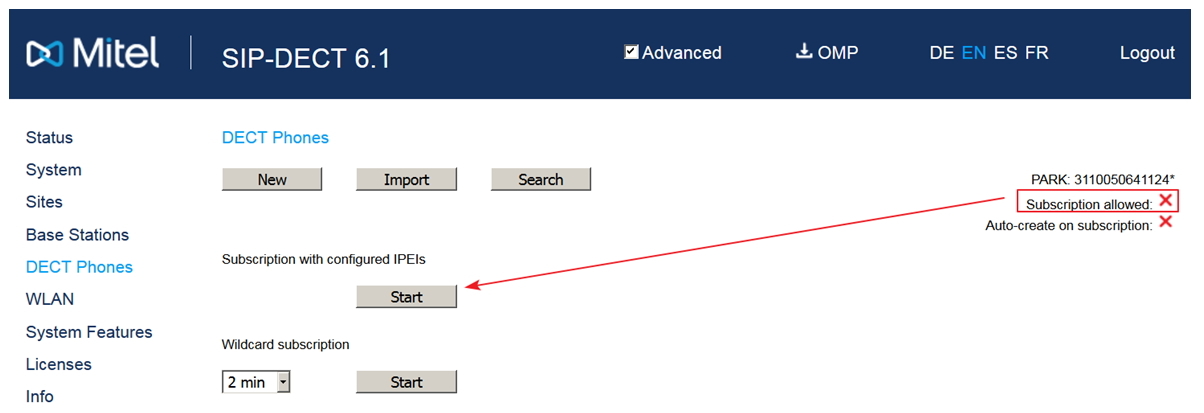
Now we will configure the DECT terminals in the section (System → DECT phones). Important! By default, the ability to register terminals in the system is disabled, it must be activated by clicking - Start in Subscription with configured IPEIs.
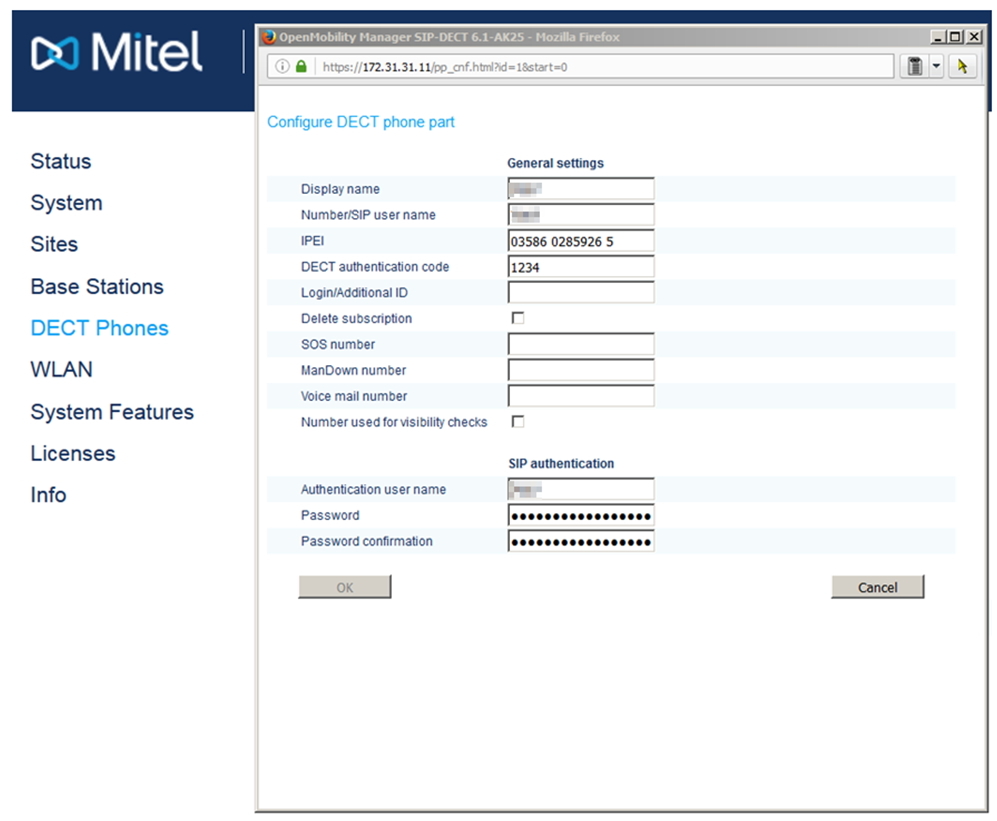
Now you can get new subscribers (mobile terminals) by clicking New. If the database itself is used as the SIP server, then the SIP authentication section can be left blank. When filling in, the entered data should correspond to the subscribers set up on the IP-PBX (user name and password).
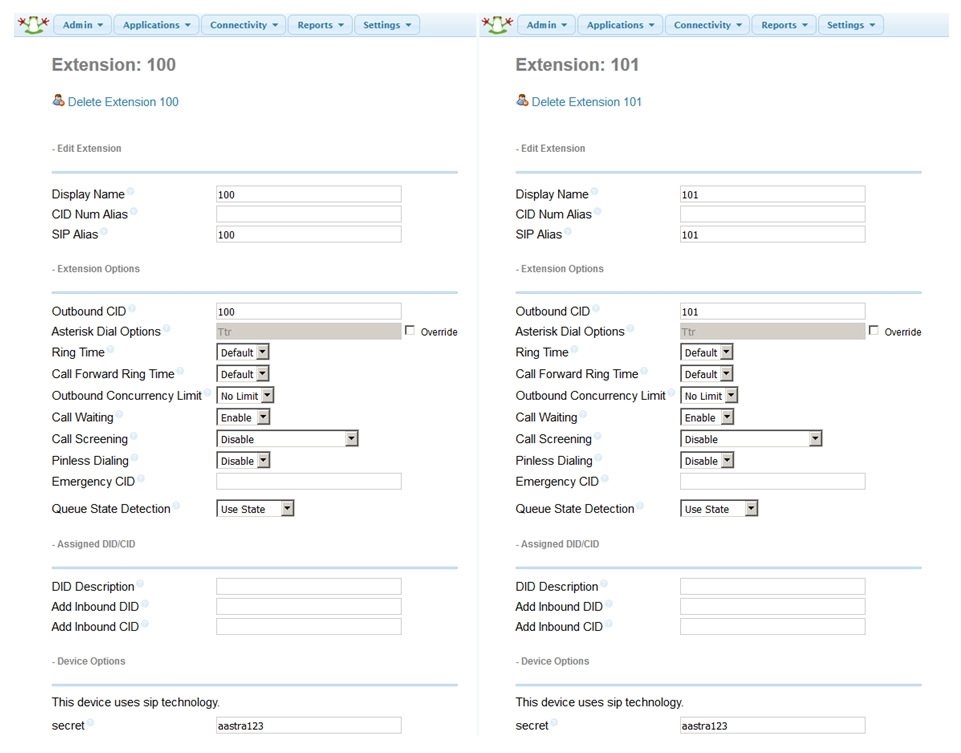
And finally, for clarity, the screen settings from Asterisk.
Source: https://habr.com/ru/post/320330/
All Articles