IAP in Unity3D
Once upon a time, during the days of Unity 4, the addition of in-game purchases caused some difficulties. You could go in two ways: use any plugin from the existing ones or implement your wrapper over the native functions for each platform. In the first case, there were several solutions: Soomla, OpenIAB, Prime, and many, many others. Some of them were paid and were quite expensive: the price of Prime was about $ 70. Some were free and refused to work in iOS: OpenIAB.
And in the version of Unity3D 5.3 appeared in-app support for purchases as they say out of the box. This simple tool makes it easy to embed in-app purchases for the most popular app stores.
Now supported:
To begin, in the Services tab, click on the In-App Purchasing field and enable this feature. The analytics service is also automatically turned on, in which you can later see the Revenue, Average Revenue Per Paying User (ARPPU), Average Revenue Per Daily Active User (ARPDAU).
')
Next, you need to click on the Import button and then, all the necessary assets will be imported into the project.
Now you need to add code to work with IAP. This C # script contains the following functions:
To make it clearer how to use the script, I will give an example. There are two purchases: one NonConsumable - disabling advertising, the second Consumable - gives the player 80 coins. Two platforms are used: Google Play, AppStore. For each purchase, you must declare three constants that contain the identifiers of purchases UnityIAP, Google Play and AppStore.
After that, these constants must be passed to the initialization function:
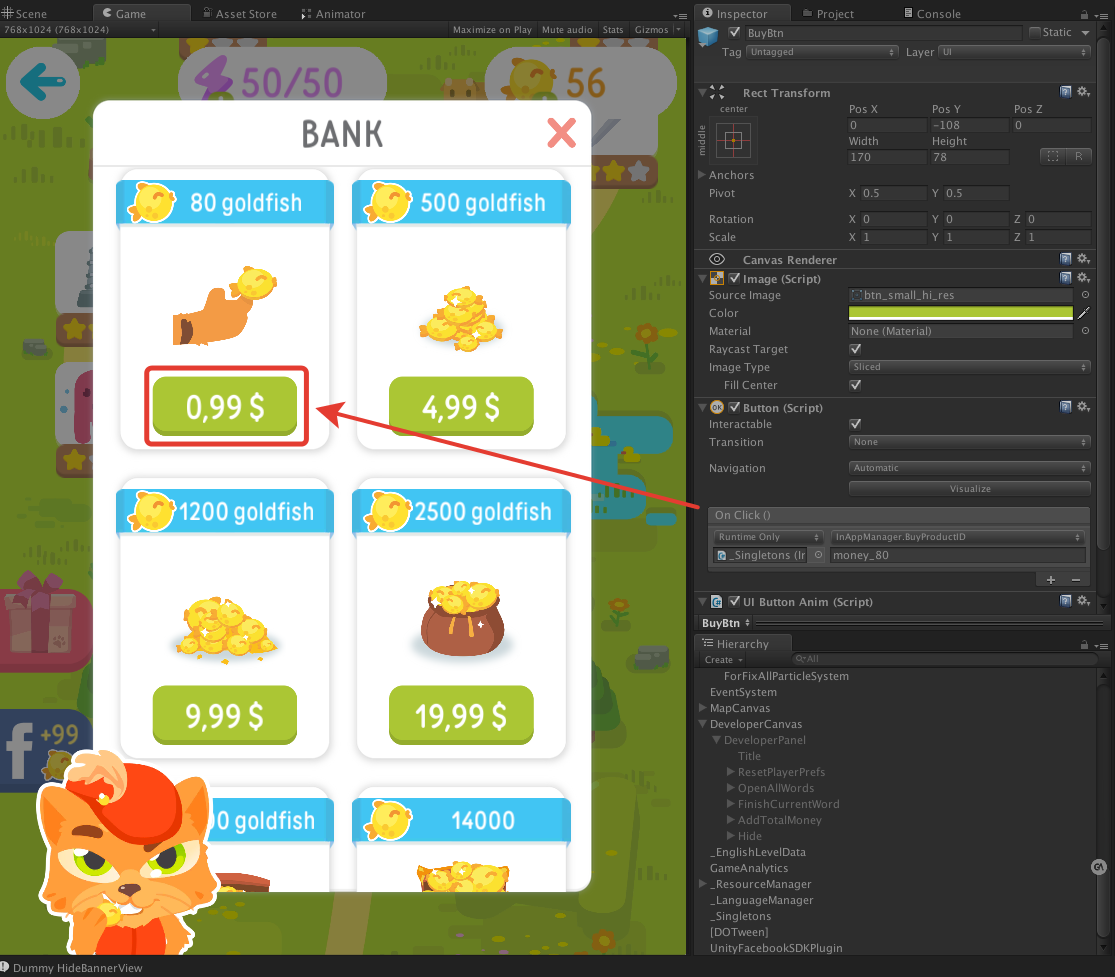
Now on the purchase button of the item, you need to hang the BuyProductID function with passing it the identifier of the item being sold as a parameter.
And in the PurchaseProcessingResult function, add actions for each of the purchases.
That's all. It remains only to remember to create purchases with the same identifiers in the AppStore and Google Play.
Unity3D 5.3
And in the version of Unity3D 5.3 appeared in-app support for purchases as they say out of the box. This simple tool makes it easy to embed in-app purchases for the most popular app stores.
Now supported:
- Amazon apps
- Google play
- iOS App Store
- Mac App Store
- Samsung GALAXY Apps
- Tizen store
- Windows Store.
Project Integration
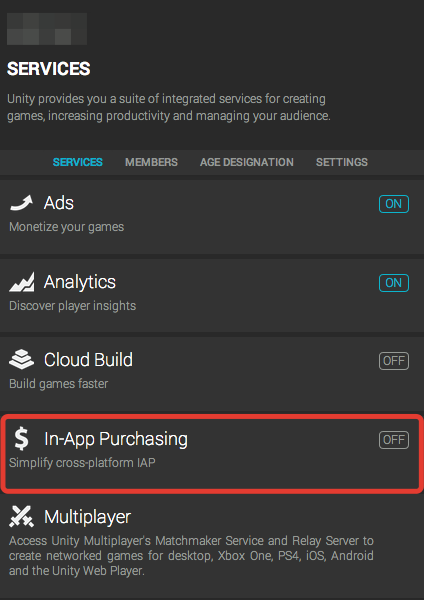
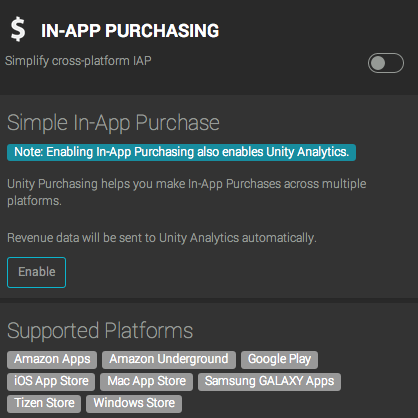
To begin, in the Services tab, click on the In-App Purchasing field and enable this feature. The analytics service is also automatically turned on, in which you can later see the Revenue, Average Revenue Per Paying User (ARPPU), Average Revenue Per Daily Active User (ARPDAU).
')
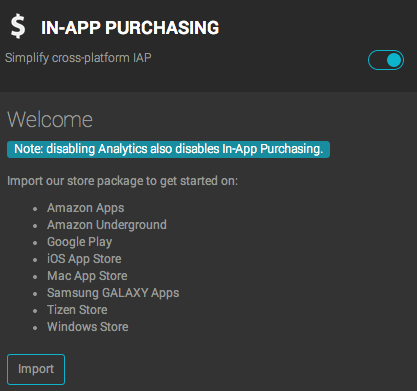
Next, you need to click on the Import button and then, all the necessary assets will be imported into the project.
In-app manager
Now you need to add code to work with IAP. This C # script contains the following functions:
- InitializePurchasing: initializes the IAP, adds items that are available for sale and allows you to handle the necessary events
- BuyProductID: a function that allows you to buy the necessary item using its identifier
- BuyConsumable, BuyNonConsumable, BuySubscription: features that allow you to purchase various types of purchases. Many stores support 3 types of purchases:
- Consumable - type of purchase, which data can be spent by the player in the game (for example: coins, energy replenishment);
- NonConsumable - type of purchase, the data of which remain with the player forever (for example: a unique sword, disabling advertising)
- Subscription - subscription;
- RestorePurchases: - a function that allows you to implement a mechanism to restore purchases. Required in iOS. If the game has a NonConsumable purchase, then there should be a button that performs its recovery.
- OnInitialize: called when the application can connect to the Unity IAP.
- OnInitializeFailed: called when the application failed to connect to the Unity IAP. An error message is written to the console.
- ProcessPurchase: called when the purchase is successful
- OnPurchaseFailed: the function is called when the purchase fails and an error message is written to the console.
Use in the game
To make it clearer how to use the script, I will give an example. There are two purchases: one NonConsumable - disabling advertising, the second Consumable - gives the player 80 coins. Two platforms are used: Google Play, AppStore. For each purchase, you must declare three constants that contain the identifiers of purchases UnityIAP, Google Play and AppStore.
public const string pMoney80 = "money_80"; public const string pNoAds = "no_ads"; public const string pMoney80AppStore = "app_money_80"; public const string pNoAdsAppStore = "app_no_ads"; public const string pMoney80GooglePlay = "gp_money_80"; public const string pNoAdsGooglePlay = "gp_no_ads"; After that, these constants must be passed to the initialization function:
builder.AddProduct(pMoney80, ProductType.Consumable, new IDs() { { pMoney80AppStore, AppleAppStore.Name }, { pMoney80GooglePlay, GooglePlay.Name } }); builder.AddProduct(pNoAds, ProductType.NonConsumable, new IDs() { { pNoAdsAppStore, AppleAppStore.Name }, { pNoAdsGooglePlay, GooglePlay.Name } }); Now on the purchase button of the item, you need to hang the BuyProductID function with passing it the identifier of the item being sold as a parameter.
And in the PurchaseProcessingResult function, add actions for each of the purchases.
if (String.Equals(args.purchasedProduct.definition.id, pMoney80, StringComparison.Ordinal)) { //Action for money ResourceManager.Instance.Money += 80; } else if (String.Equals(args.purchasedProduct.definition.id, pNoAds, StringComparison.Ordinal)) { //Action for no ads ResourceManager.Instance.NoAds = true; } That's all. It remains only to remember to create purchases with the same identifiers in the AppStore and Google Play.
Source: https://habr.com/ru/post/320224/
All Articles